Skip to content

Category: The Art of Vibe Coding

12 min read The Art of Vibe Coding, Claude

How I Built a Claude Skill That Makes Claude Code Never Forget What It Learns

Let’s say you’re debugging.

Again.

That same gnarly issue that made you question your entire career choice last Tuesday. And the Tuesday before that. Your brain does that thing where it whispers: “Wait… didn’t I fix this already?”

You definitely fixed this already.

The solution exists somewhere—buried in a three-week-old Slack thread, or maybe that commit message you wrote at 2 AM when you were feeling particularly verbose. (Spoiler: You weren’t. The message says “fixed bug.”)

Here’s the thing: We’re hemorrhaging wisdom every single day.

Not because we’re not learning. We learn constantly. We discover edge cases, make architectural decisions, stumble upon performance tricks that would make your CS professor weep with joy.

But then? We move on. Next feature. Next sprint. Next fire.

And all that hard-won knowledge?

Poof.

Gone like your willpower at 3 PM when someone mentions there’s leftover birthday cake in the break room.

.

.

.

The Problem: Claude Code Has The Memory of a Goldfish

Picture this: You’re vibe coding with Claude Code. (Yes, that’s a technical term now. Roll with it.)

Together, you and Claude are making dozens of micro-decisions every session:

  • “Oh right, this package completely changed its API in v2”
  • “We need to store files in org-scoped directories for multi-tenancy”
  • “This approach is 10x faster than the obvious solution”
  • “Never—and I mean NEVER—use pattern X here because of edge case Y”

These aren’t just code comments, friend. This is architectural wisdom. The kind that separates the “I can center a div” developers from the “I’ve seen things you wouldn’t believe” architects.

But here’s what happens next. (You already know where this is going, don’t you?)

  1. Claude Code discovers something important
  2. You fix the issue together
  3. You high-five virtually and move on
  4. Next week, Claude Code makes the exact. Same. Mistake.
  5. You debug the exact. Same. Issue.
  6. Rinse, repeat, cry a little

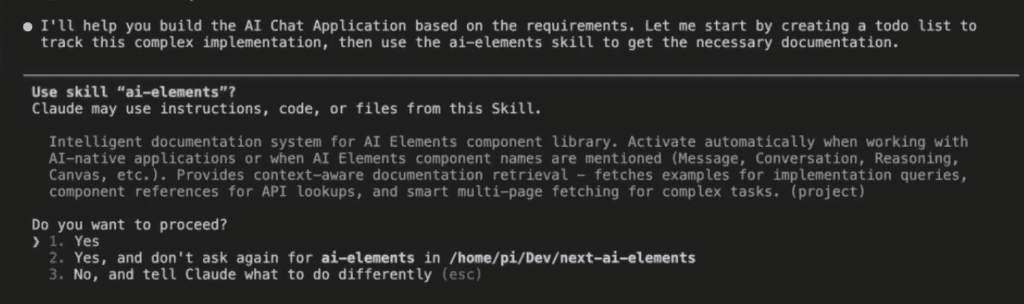
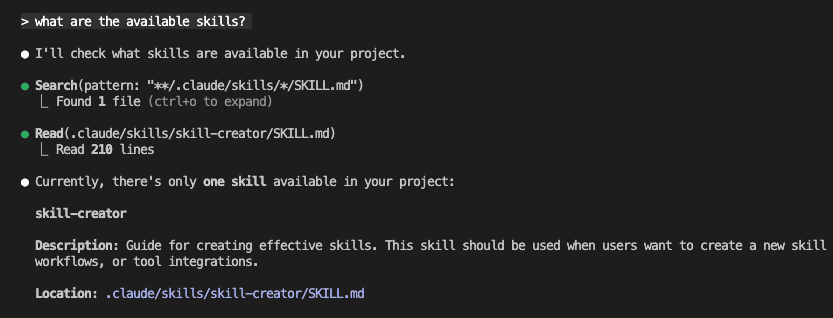
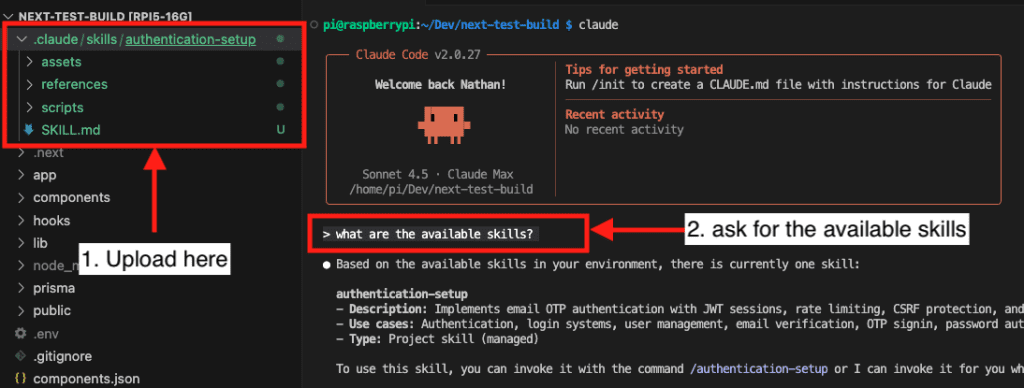
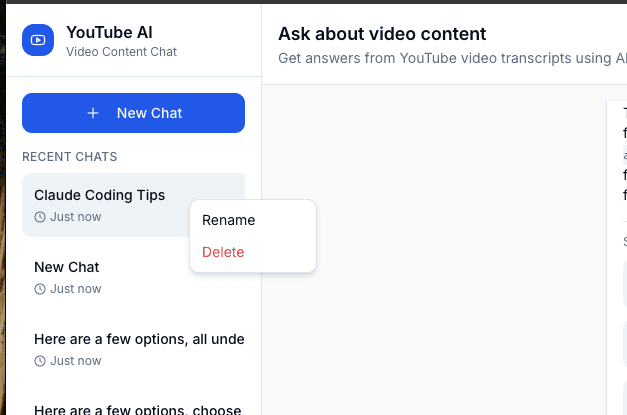
Sure, we’ve got CLAUDE.md for project rules.

But let me ask you something: When was the last time you updated that file after a coding session?

Cricket sounds.

Exactly.

Nobody has time to document discoveries when you’re in the zone. Nobody.

So I built a Claude Skill that remembers everything for us.

(Stay with me. This gets good.)

.

.

.

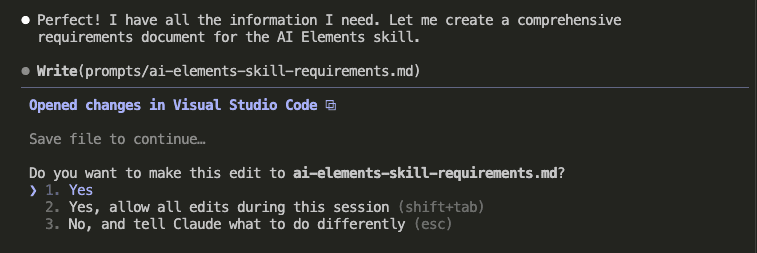
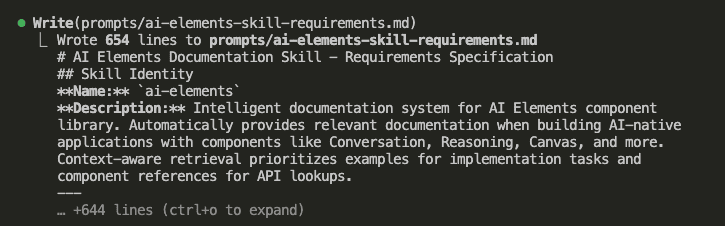
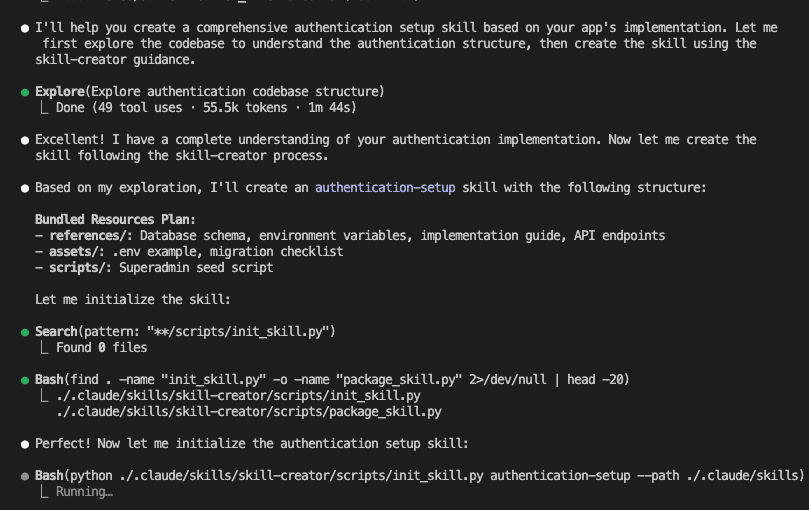
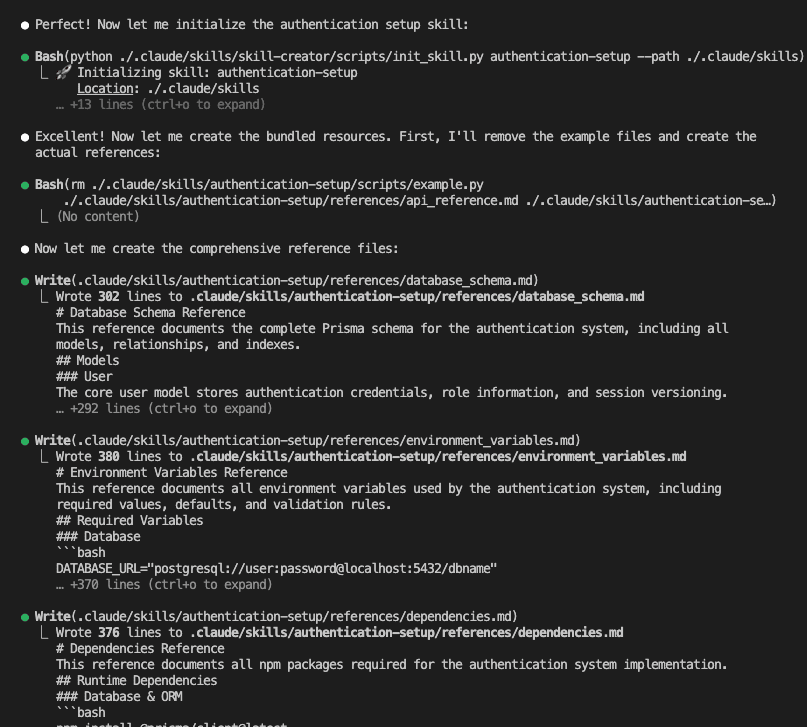
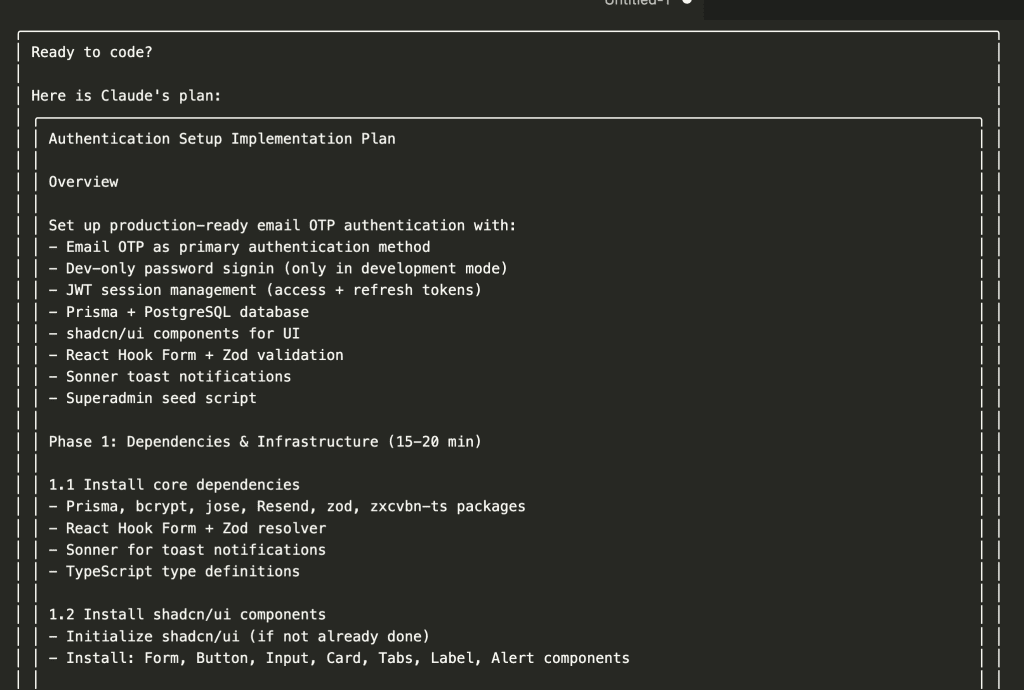
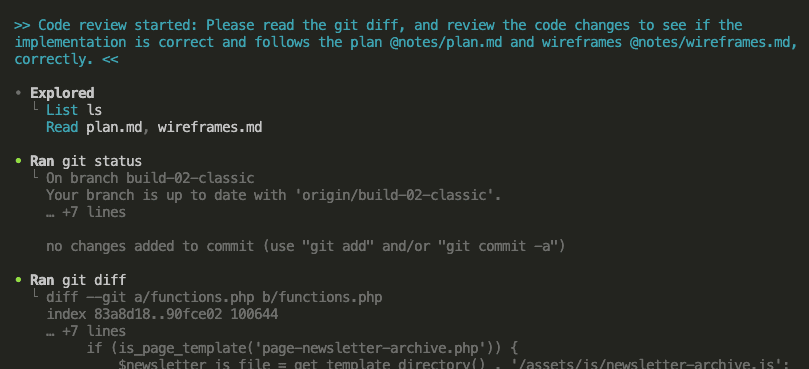
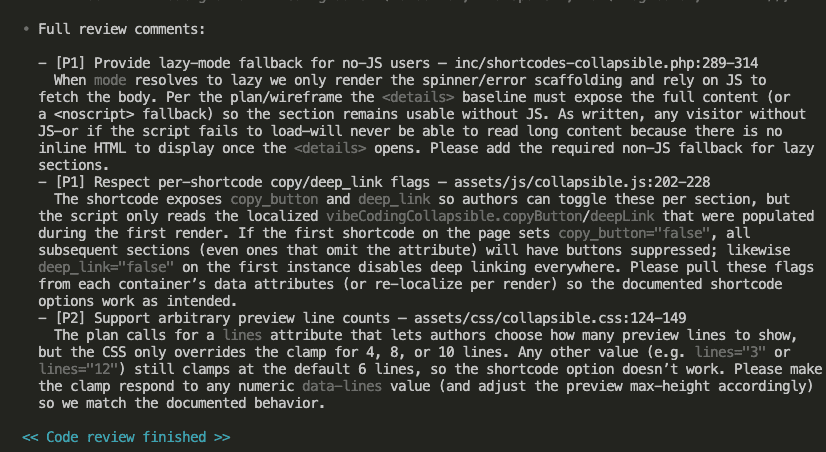
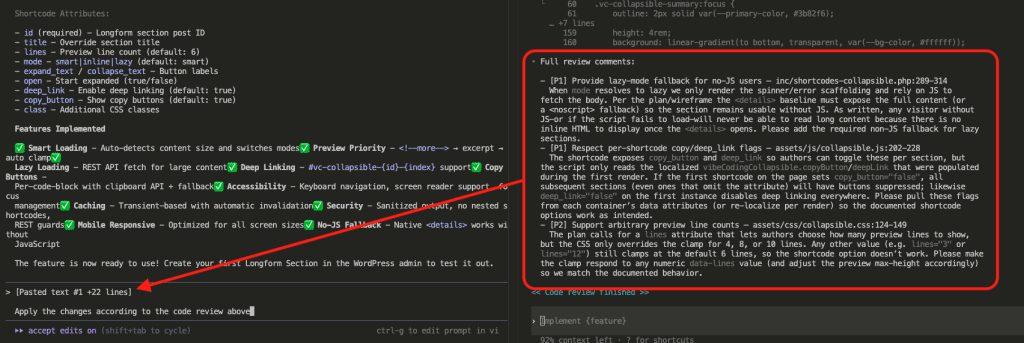
The Complete Workflow: Capture, Review, Integrate

GitHub Repo: https://github.com/nathanonn/claude-skill-build-insights-logger

The Build Insights Logger skill creates what I like to call a “knowledge management system.” (Fancy, right? It’s actually pretty simple.)

  • Step 1: Automatic Capture – Logs insights while you’re coding
  • Step 2: Smart Review – Shows you insights organized by category
  • Step 3: Selective Integration – Adds the good stuff to CLAUDE.md
  • Step 4: Compound Learning – Every future session gets smarter

Let me show you how this saved my bacon. (Actually, it was more like saving me from a dependency nightmare, but “saved my bacon” sounds more dramatic.)

.

.

.

Step 1: Automatic Knowledge Capture (While You Code!)

Here’s what the Build Insights Logger does brilliantly: it automatically logs meaningful insights as Claude Code works.

No manual documentation.
No “I’ll add this to the docs later.” (You won’t.)
No lost learnings.

Just automatic capture of:

  • Non-trivial edge cases you stumble upon
  • Design decisions and their rationale (the WHY behind the WHAT)
  • Performance optimizations that made you go “whoa”
  • Security implications that could bite you later
  • Architecture patterns you actually adopt
  • API gotchas and their fixes
  • Implementation trade-offs

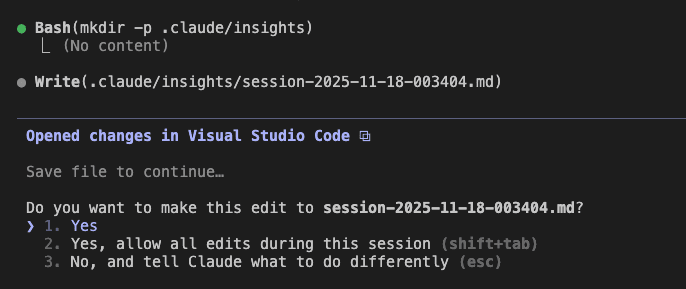
Everything gets logged to .claude/insights/ during your session. Ready for review when YOU’RE ready.

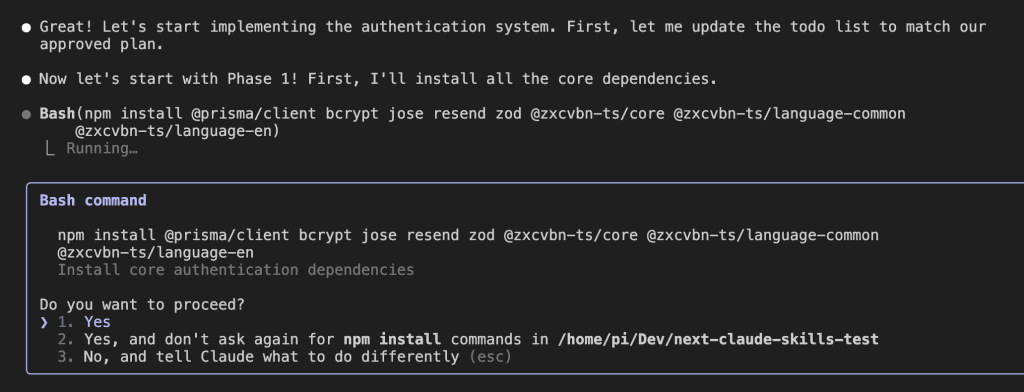
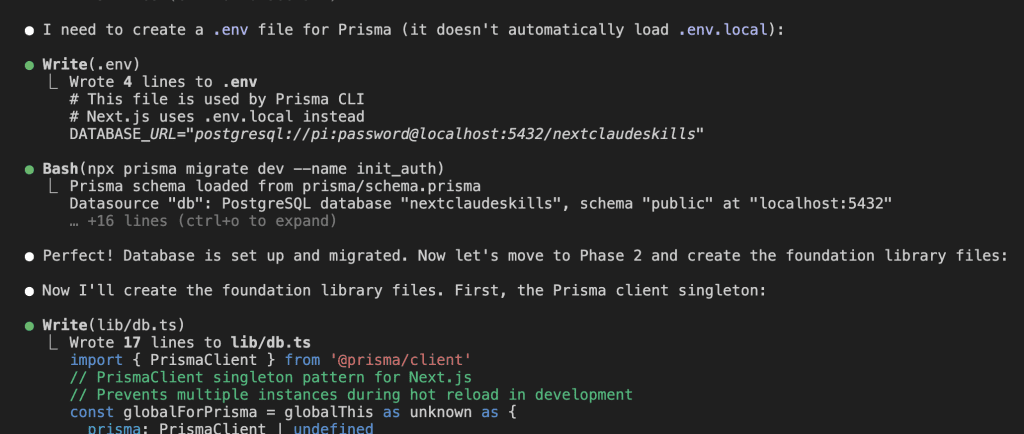
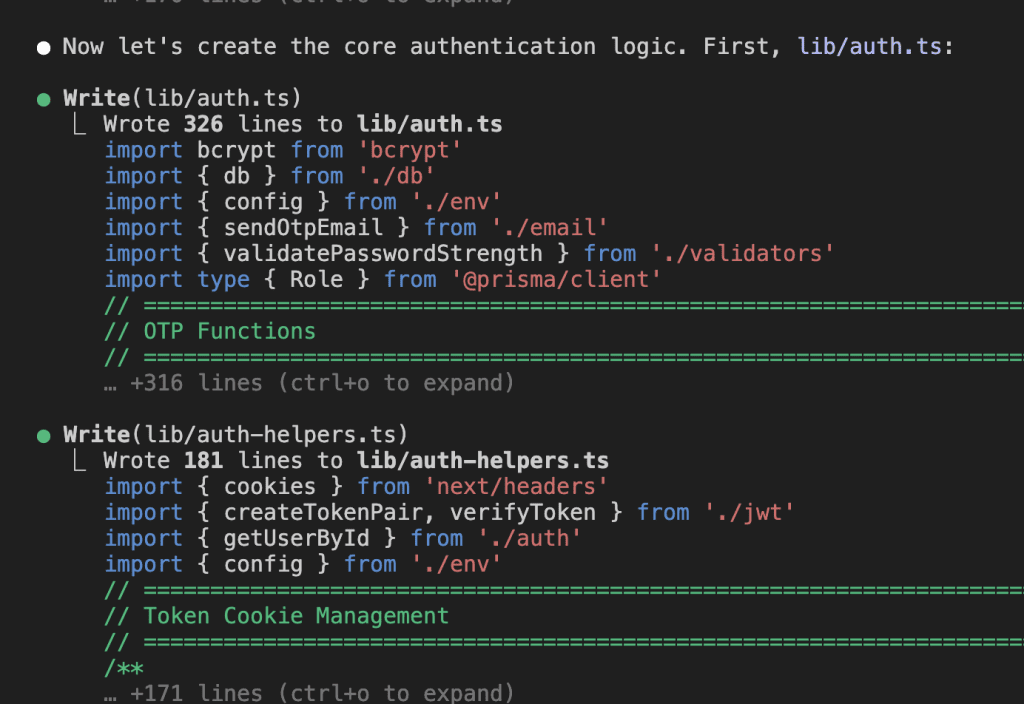
Real-World Example: Building a Document Management System

On Monday, I was building a document management system. The complex kind—file uploads, multi-tenant storage, previews, the whole enchilada.

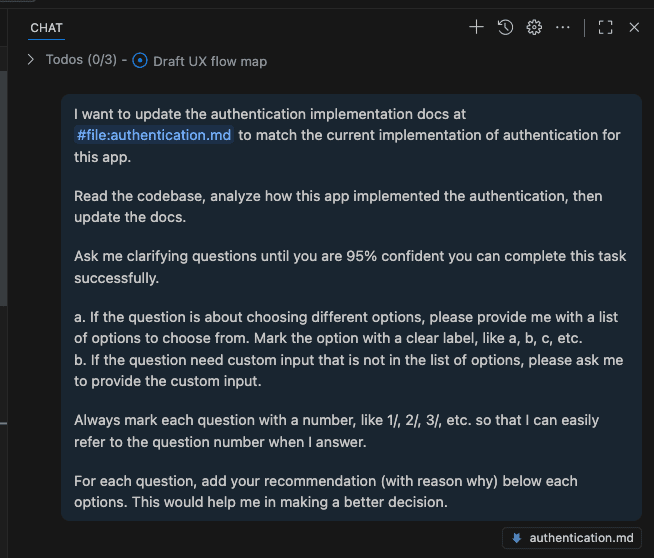
I started with my standard instruction to Claude Code

01-include-instructions-to-use-build-insights-logger-skill

Notice the magic phrase: “Please use the build-insights-logger skill.”

That’s it. That’s all it takes.

Claude Code immediately gets it:

cc-ask-to-use-skills

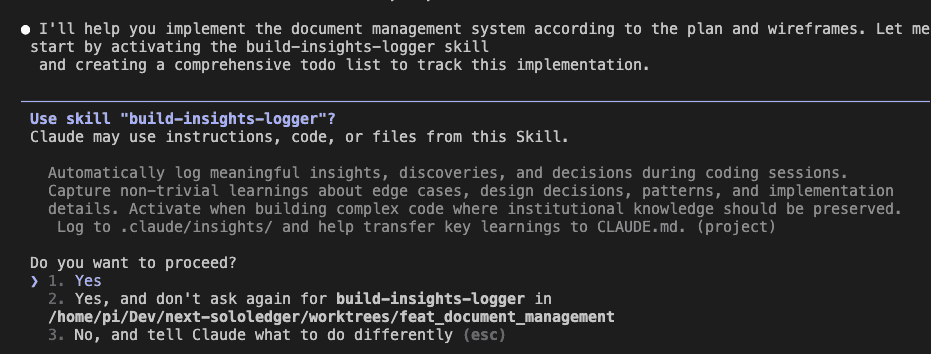
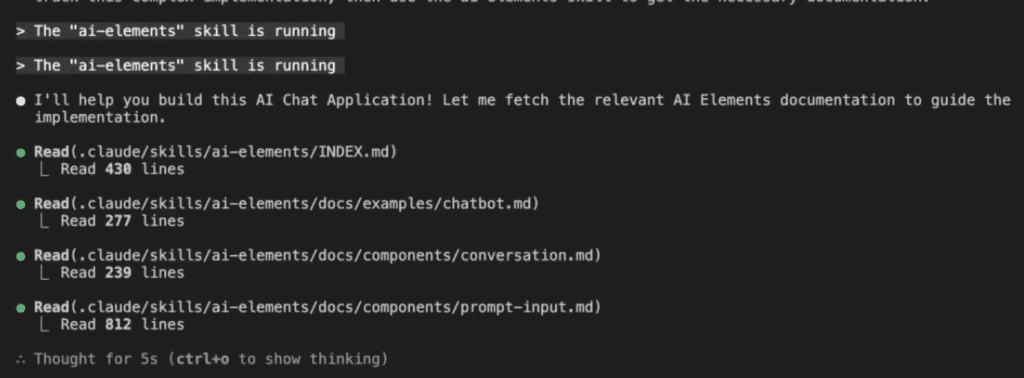
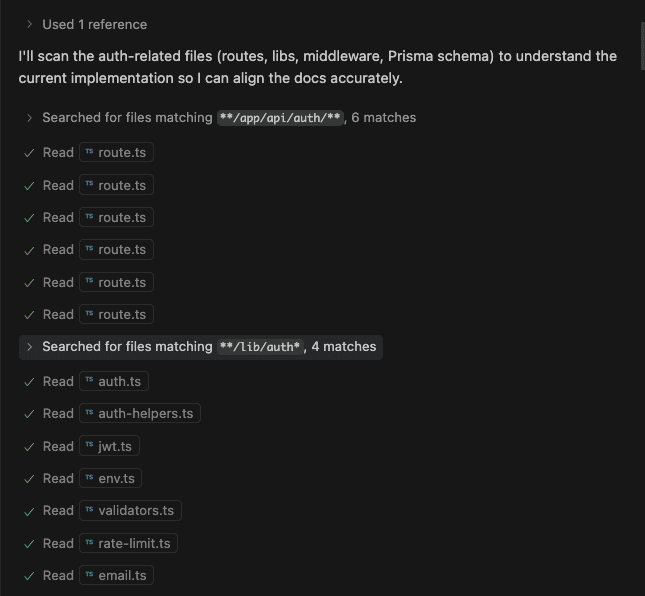
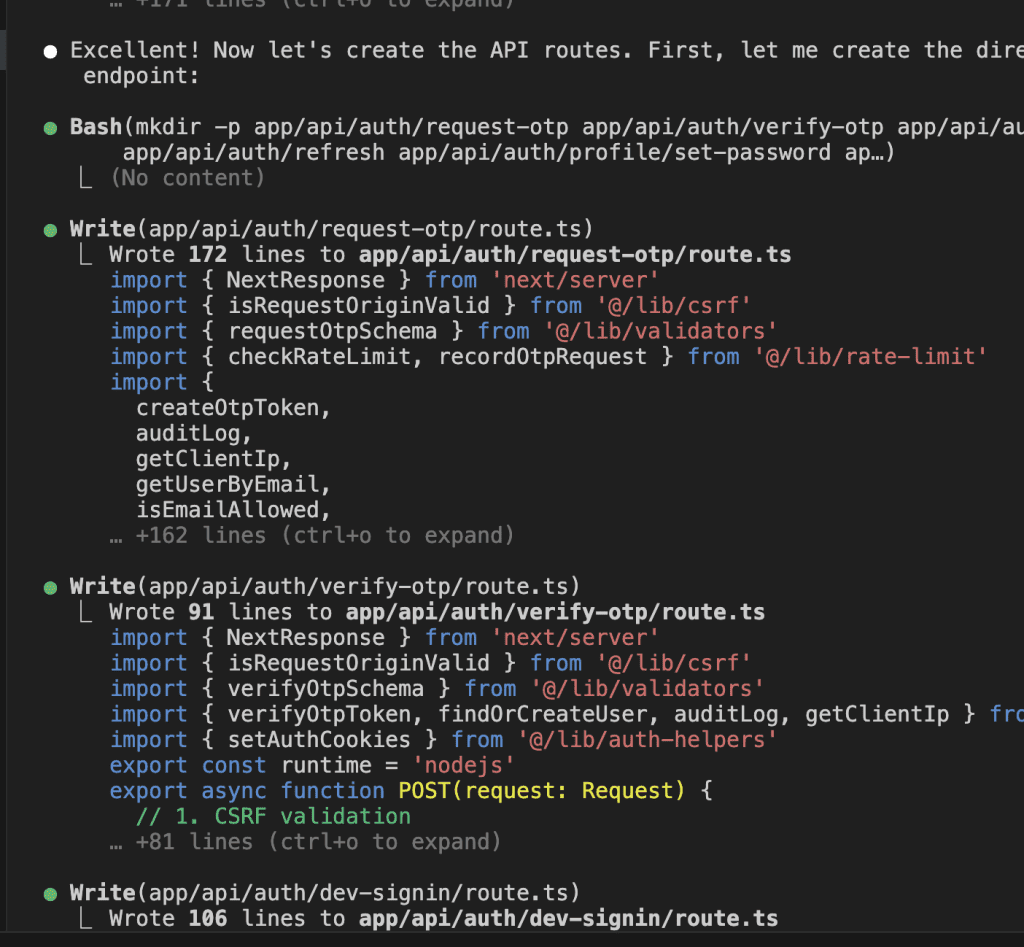
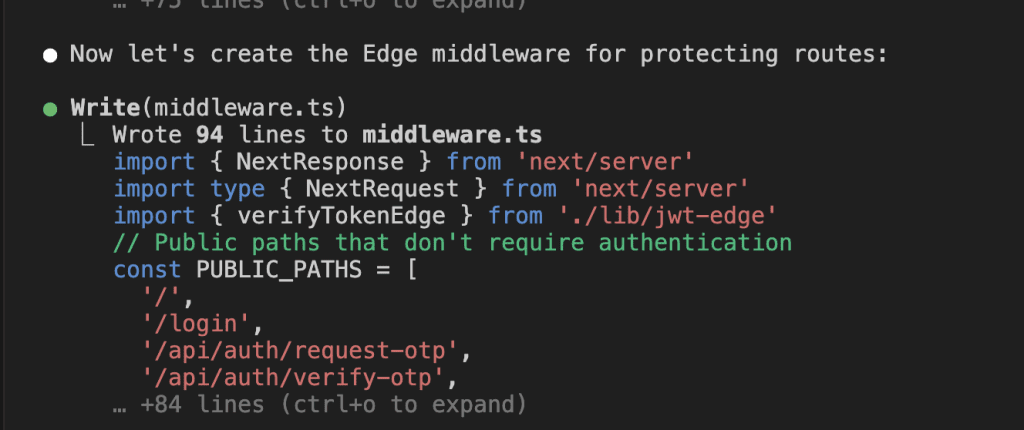
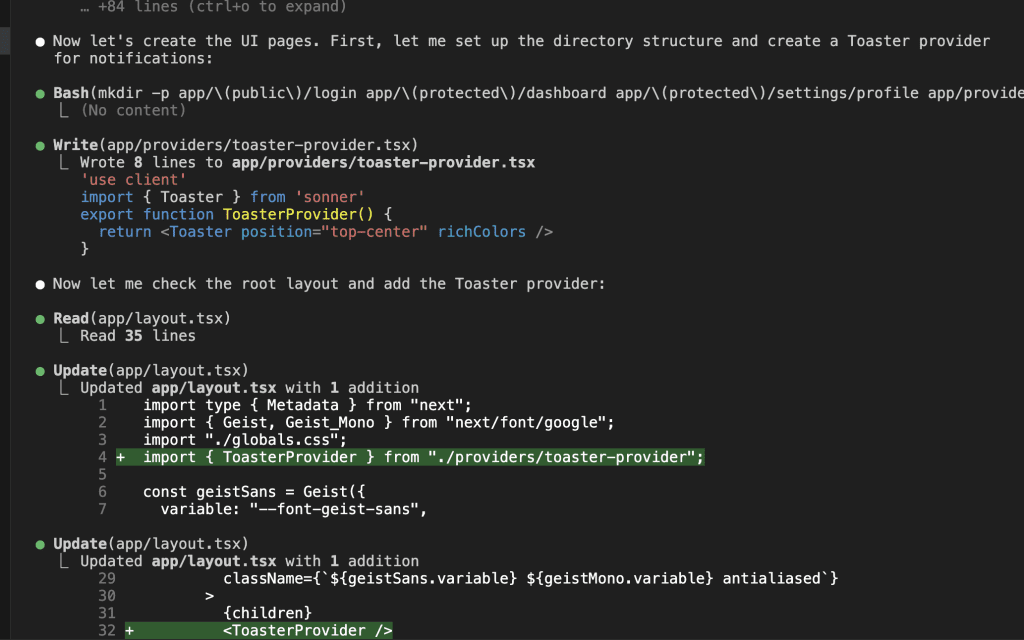
With the skill activated, Claude Code starts building. But—and here’s where it gets interesting—it’s not just coding. It’s documenting its discoveries:

skill-activated-cc-start-building

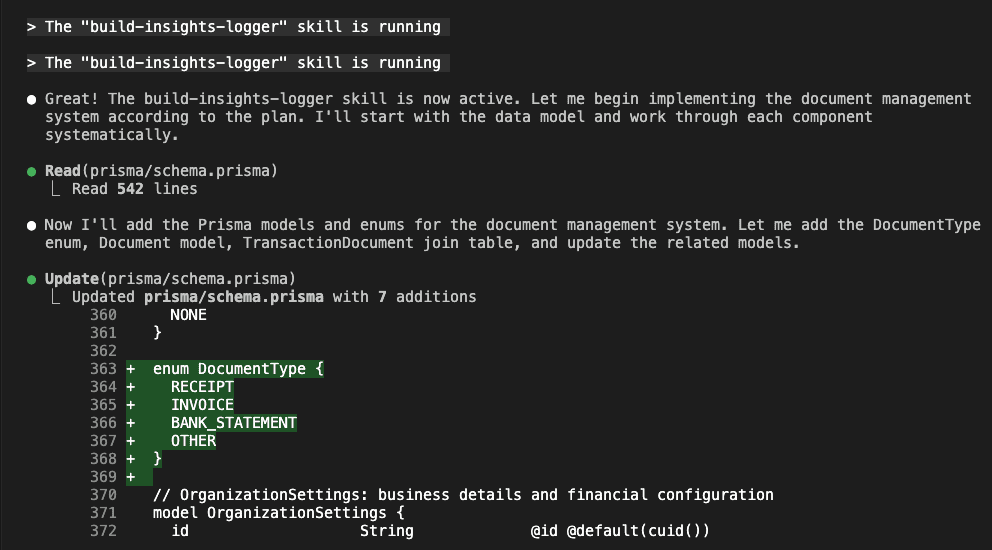
As Claude works through the implementation, it automatically creates an insights log:

cc-log-insights-as-it-build

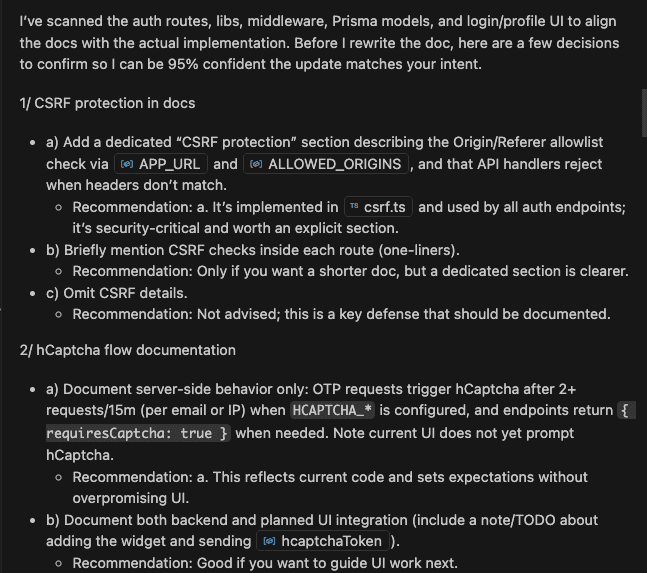
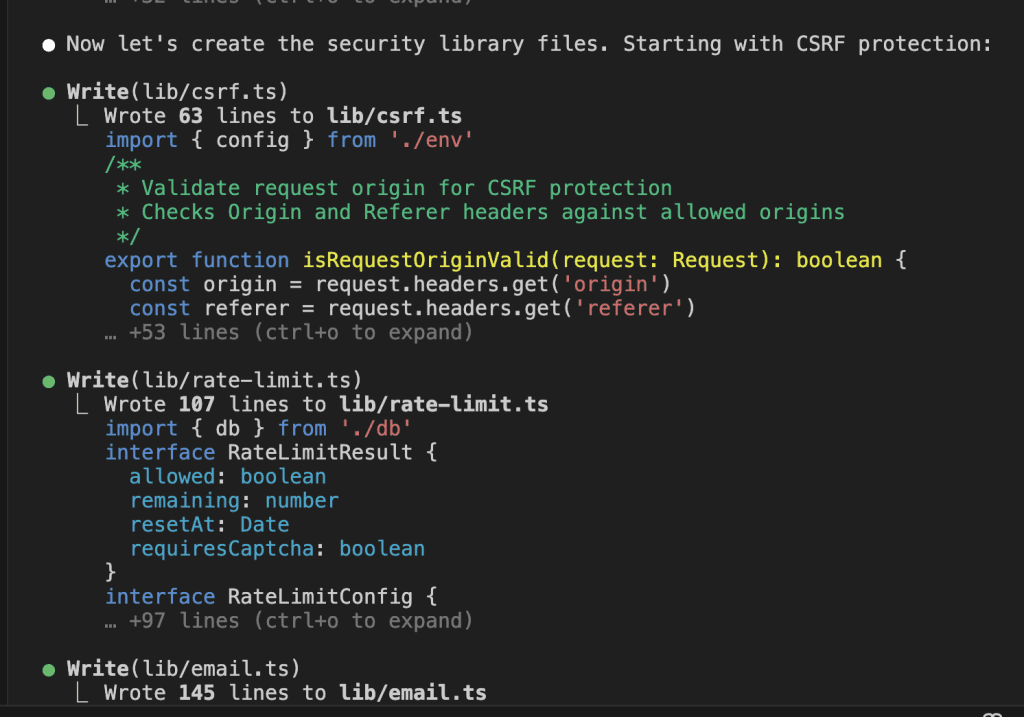
What Gets Captured: Real Architectural Decisions

These insights aren’t fluff. They’re the real deal—architectural decisions that matter:

example-of-insights-logged

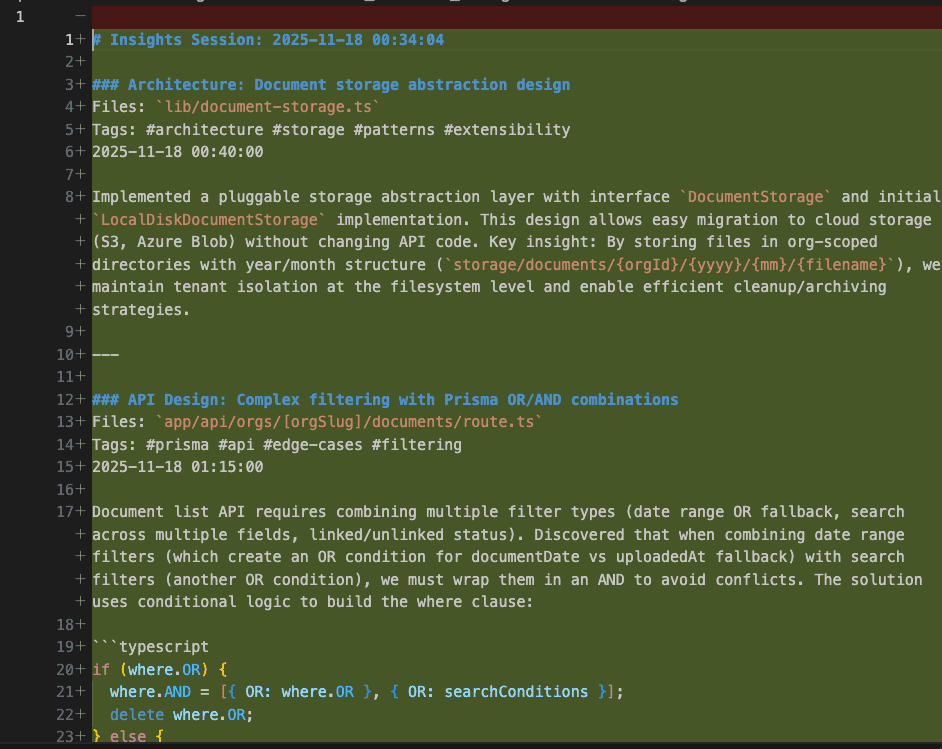
Look at that first insight—a pluggable storage abstraction. Claude Code discovered you needed to support multiple storage backends (local disk, S3, Azure Blob) and documented the pattern.

Key insight captured: “By storing files in org-scoped directories with year/month structure (storage/documents/{orgId}/{yyyy}/{mm}/{filename}), we maintain tenant isolation at the filesystem level and enable efficient cleanup/archiving strategies.”

That’s not a code comment, friend.

That’s institutional knowledge.

As development continues, more insights accumulate:

example-of-insights-logging-01
example-of-insights-logging-02

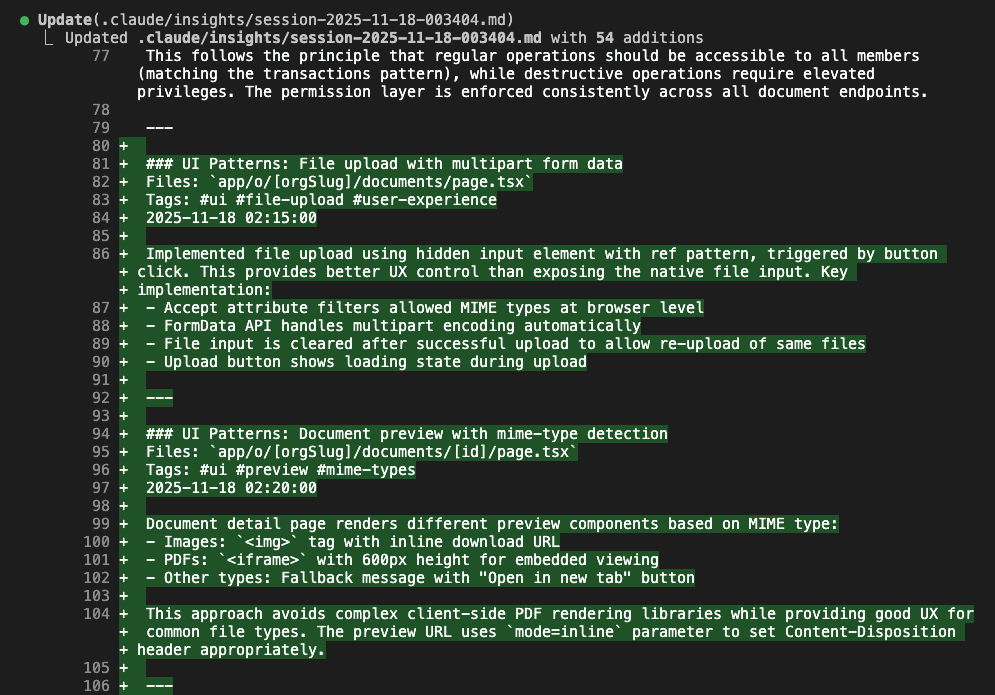
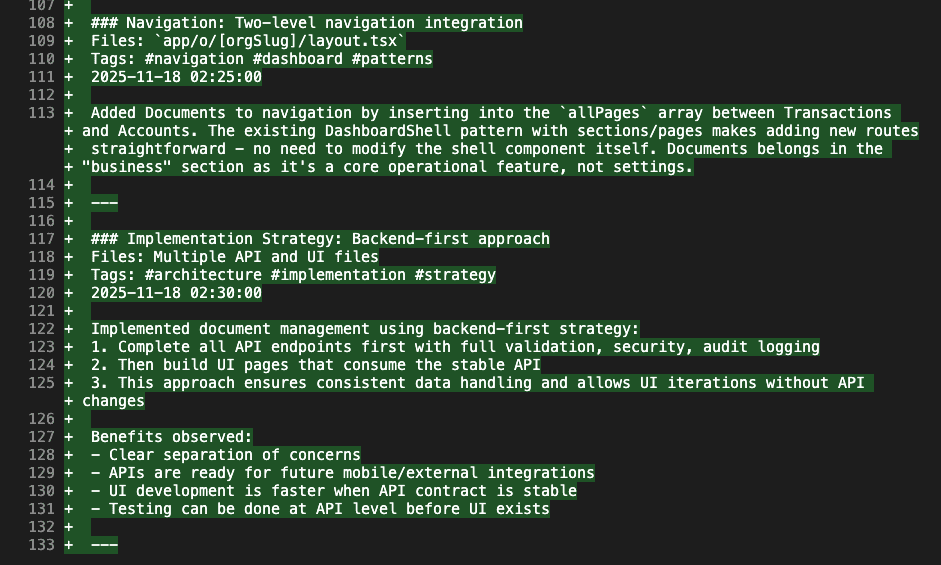
Notice the categories:

  • Architecture: System design decisions
  • UI Patterns: Implementation approaches that actually work
  • Navigation: Integration strategies
  • Implementation Strategy: Why we’re building it this way

Each insight includes:

  • The files involved
  • Relevant tags (for finding it later)
  • Clear explanation of the decision
  • Why it matters (the part everyone forgets to document)

The Moment That Made Me a Believer: The cuid2 Bug

Here’s where the skill earned its keep.

After implementing the core functionality, I hit an error:

I-discover-error-in-the-implementation

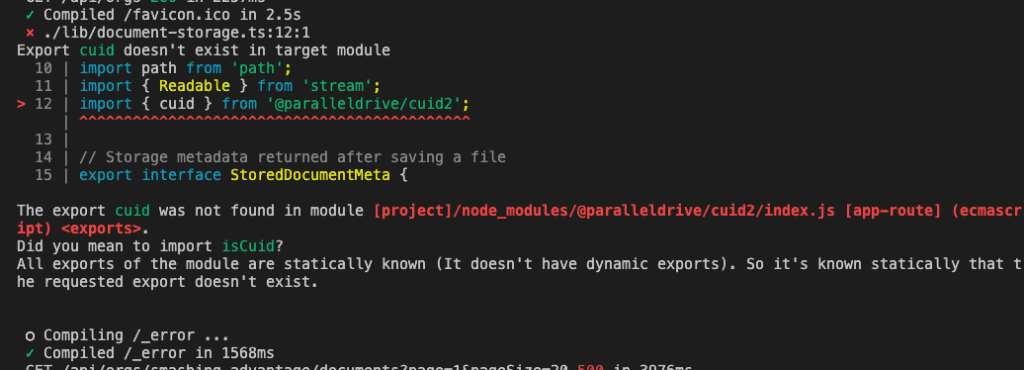
The build was failing. The error message? Cryptic as a fortune cookie: “Export cuid doesn’t exist in target module.”

Now, normally this triggers The Debugging Dance. You know the one—check imports, read docs, sacrifice a rubber duck to the Stack Overflow gods.

But watch what happened when I asked Claude Code to fix it and log the insight:

i-ask-cc-to-fix-it-and-log-insights

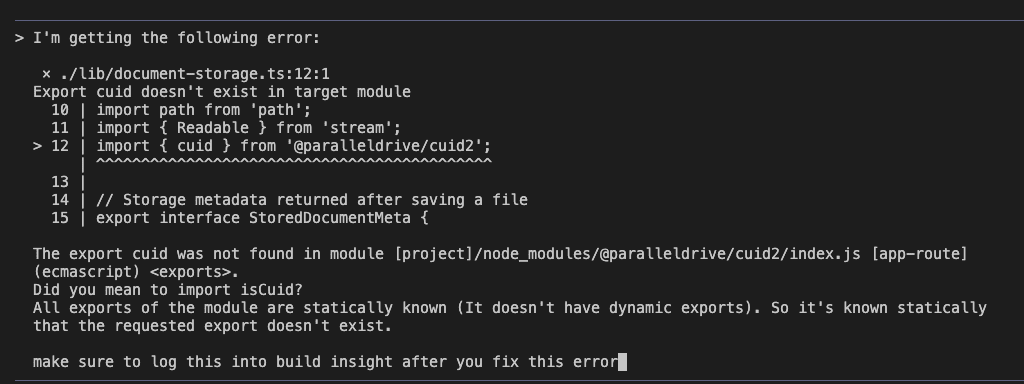
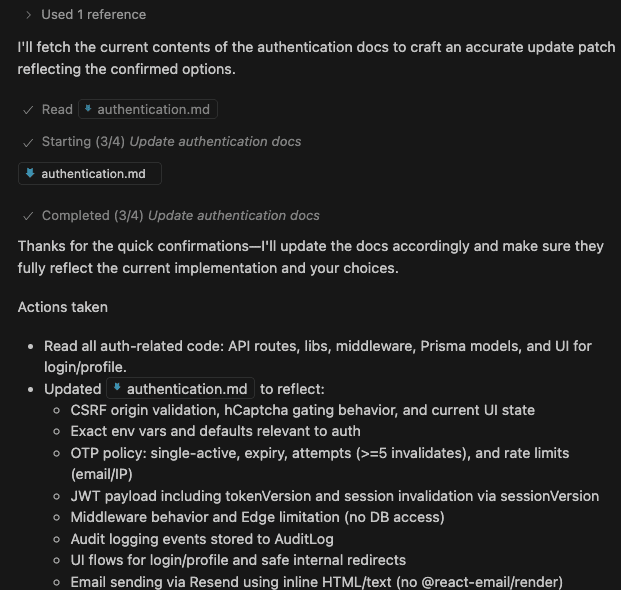
Claude Code didn’t just fix the bug.

It:

  1. Researched the root cause
  2. Created a comprehensive fix plan
  3. Documented the gotcha for future reference
cc-plan-including-logging-the-issue-to-avoid-future-bugs

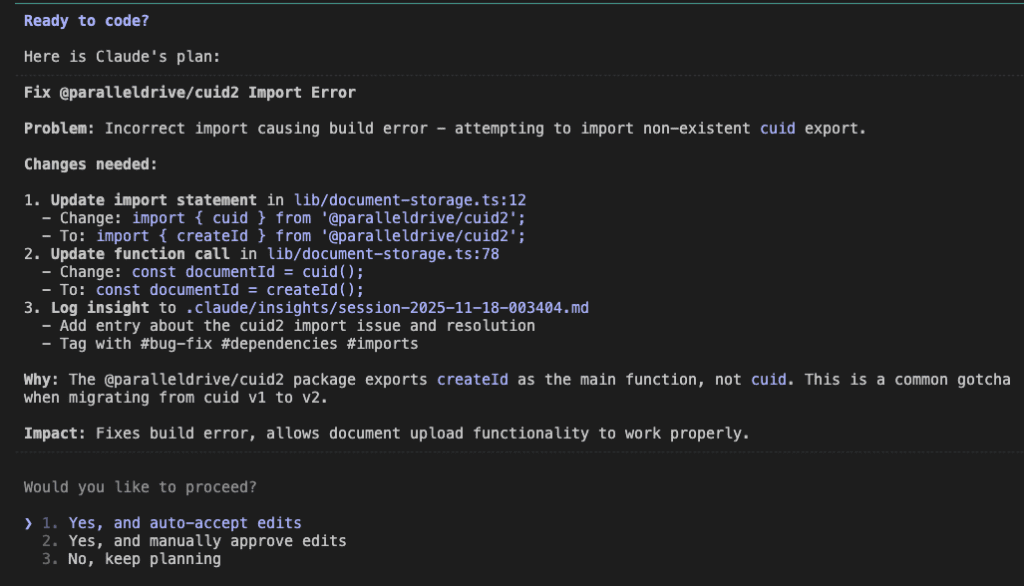
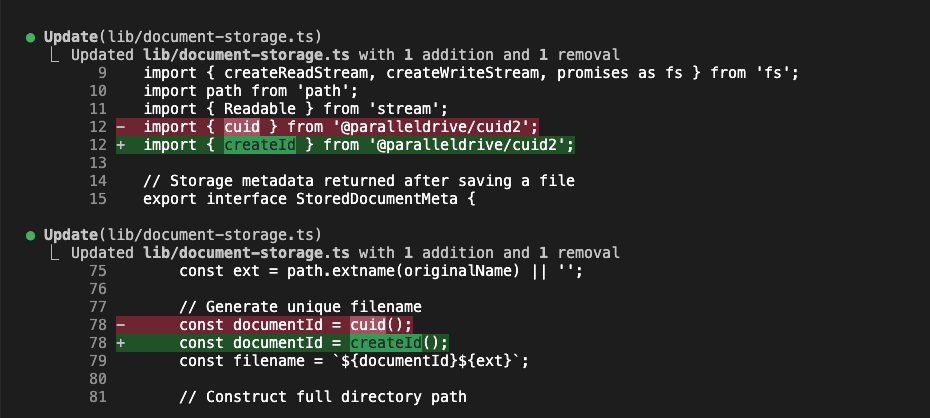
The fix was simple—the package had changed its API between v1 and v2:

cc-implment-fixes

But here’s the crucial part—this knowledge was captured permanently:

example-of-insights-updated

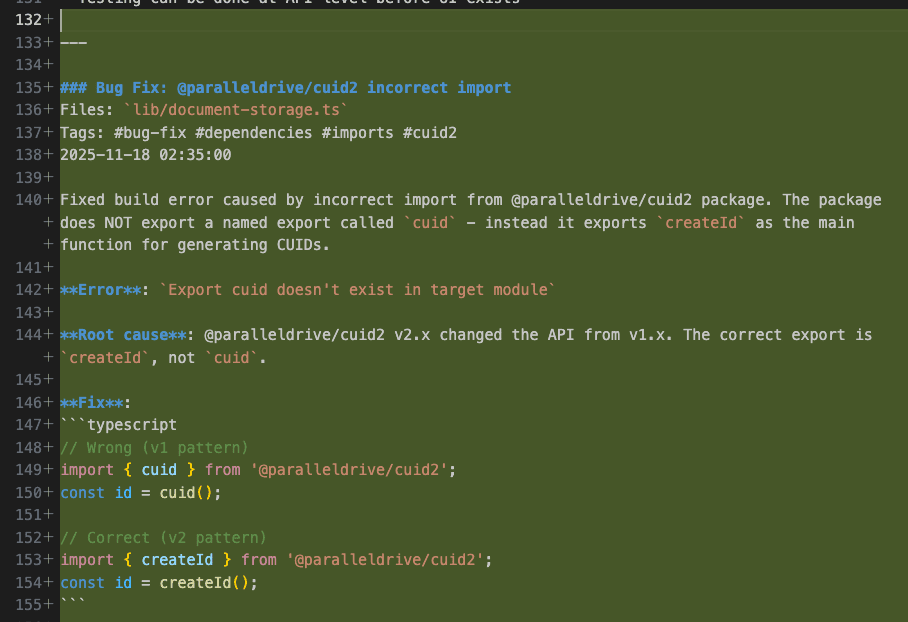
Look at that bug fix documentation:

  • Clear problem statement
  • Root cause analysis
  • Wrong pattern marked (with a big ❌)
  • Correct pattern provided (with a reassuring ✅)
  • Package version context

This bug will never bite us again.

Never.

(Well, unless we forget to use the skill. But we won’t. Right?)

.

.

.

Step 2: Transforming Raw Insights Into Permanent Knowledge

So you’ve been capturing insights automatically. Your .claude/insights/ folder is filling up with valuable learnings like a wisdom piñata.

But insights in session files are like vegetables in your crisper drawer—valuable, but not helping anyone if they’re just sitting there.

Time for the review workflow. This is where the magic happens.

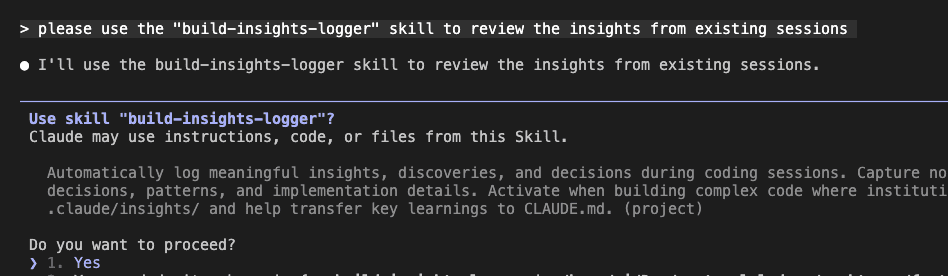
Triggering the Review: On YOUR Schedule

The Build Insights Logger respects your flow. It never interrupts with “Hey! Want to review your insights? How about now? Now? What about now?”

Never.

You review when YOU want. After the feature ships. After the bug is squashed. After your coffee. (Definitely after coffee.)

Here’s how simple it is:

use-skill-to-review-insights

One command: “Please use the build-insights-logger skill to review the insights from existing sessions.”

Claude Code immediately understands:

cc-trigger-build-insights-logger-skill

Watch what happens next. Claude doesn’t just dump a wall of text like your cousin’s Facebook posts. It systematically explores your insights directory:

cc-first-review-existing-sessions

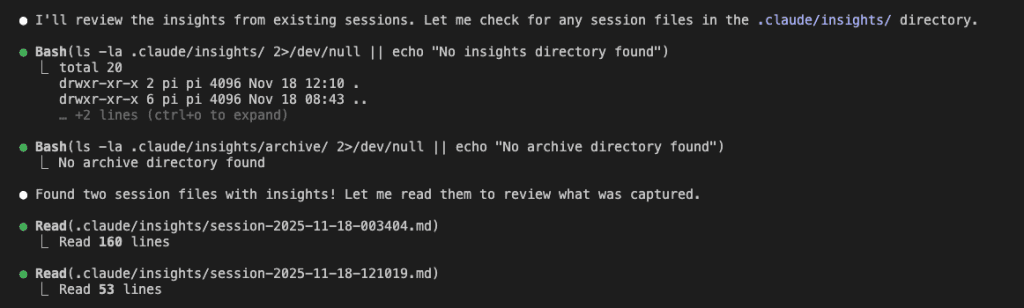
Two session files found. 160 lines of insights total.

Raw knowledge waiting to be refined. Like coffee beans waiting to become that sweet, sweet nectar of productivity.

The Presentation: Organized, Categorized, Actually Useful

This is where the skill really shines.

Instead of showing you raw session logs (boring), Claude Code presents your insights like a senior architect presenting findings to the team:

cc-return-key-insights-ask-user-to-choose-01

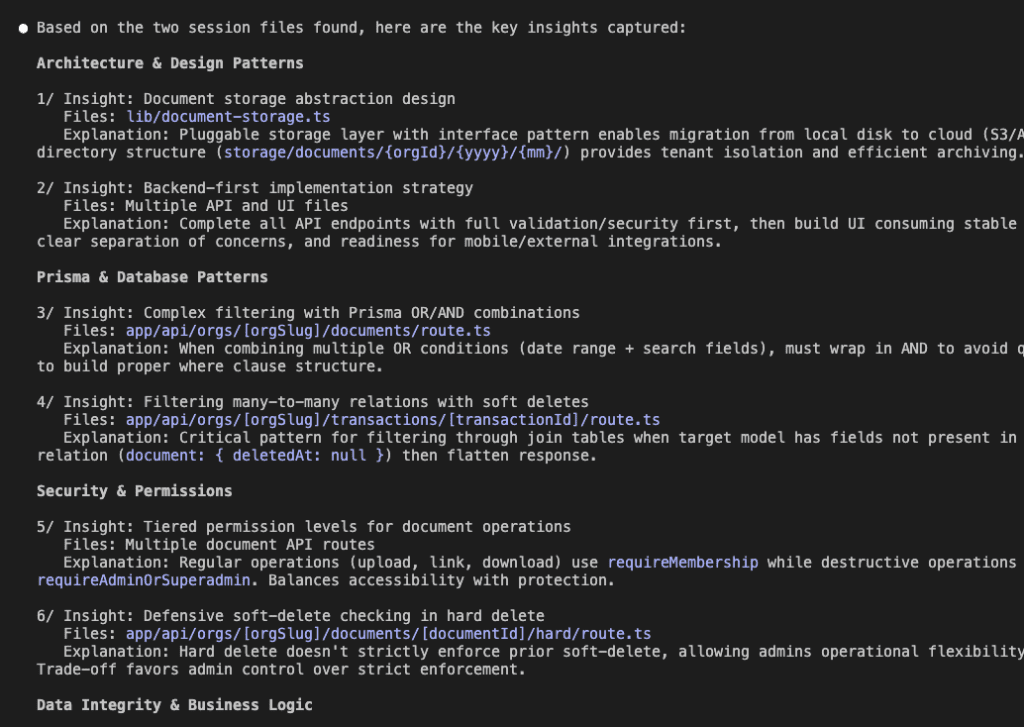
Look at that organization!

Architecture & Design Patterns

  • Document storage abstraction with migration paths
  • Backend-first implementation strategy

Prisma & Database Patterns

  • Complex filtering with OR/AND combinations
  • Many-to-many relations with soft deletes

Each insight is:

  • Numbered for easy selection (1/, 2/, 3/…)
  • Categorized for context (because context is everything)
  • Summarized with key details
  • Explained with why it matters

The presentation continues:

cc-return-key-insights-ask-user-to-choose-02

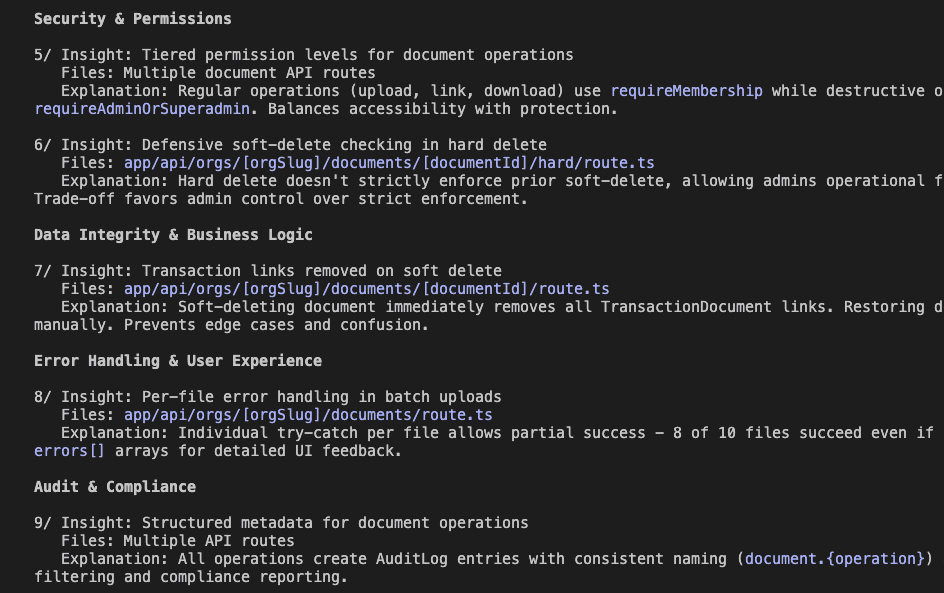
Security & Permissions

  • Tiered permission levels for different operations
  • Defensive soft-delete checking

Data Integrity & Business Logic

  • Transaction links removed on soft delete
  • Per-file error handling in batch operations

And more:

cc-return-key-insights-ask-user-to-choose-03

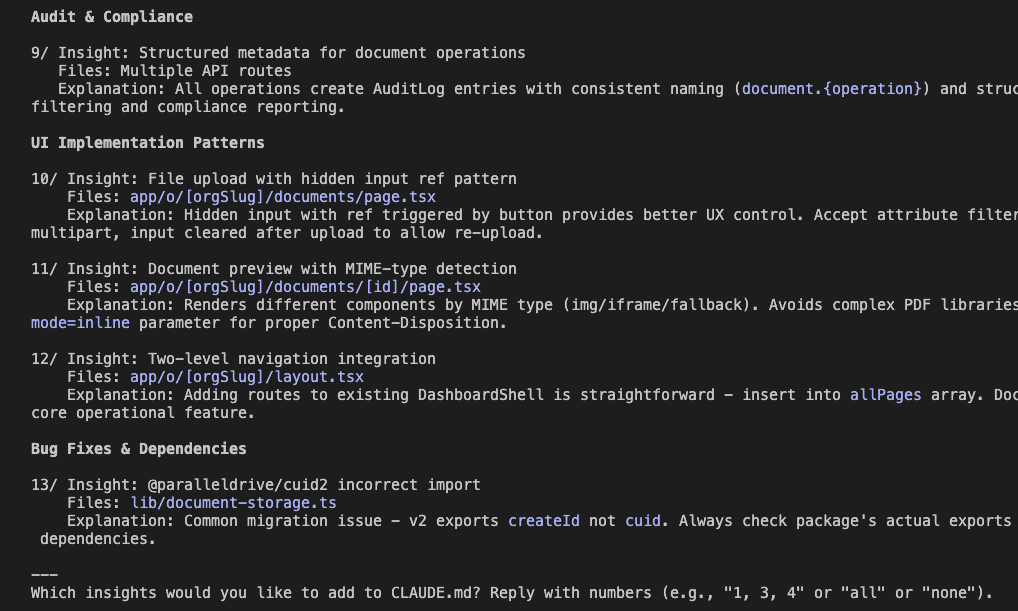
UI Implementation Patterns

  • File upload with hidden input ref pattern
  • Document preview with MIME-type detection
  • Two-level navigation integration

Bug Fixes & Dependencies

  • That @paralleldrive/cuid2 import issue (remember that little rascal?)

13 insights total. Each one a potential bug prevented, a pattern established, a decision documented.

It’s like having a time machine that lets you send wisdom to your future self.

.

.

.

Step 3: Curating Your Knowledge Base (Be Picky!)

Claude asks: “Which insights would you like to add to CLAUDE.md?”

This is where you become the curator of your own knowledge museum. (Fancy!)

i-choose-which-insights-to-keep

My selections:

  • 2 – Backend-first implementation strategy (methodology worth preserving)
  • 3 & 4 – Prisma patterns (made generic for any schema)
  • 5 – Tiered permissions (security pattern)
  • 13 – The cuid2 import bug (never. again.)

Notice what I did with insight 3? “Make this rule generic so that it can be applicable for any Prisma schema.”

The skill doesn’t just copy-paste like a lazy intern. It adapts insights to be broadly useful.

I didn’t select everything. Some insights were too specific. Others were already covered.

Quality beats quantity.

Every. Single. Time.

The Integration: Surgical Precision (No Mess)

Watch what happens when Claude Code integrates my selected insights:

cc-update-claude-md-file-based-on-my-selections-01

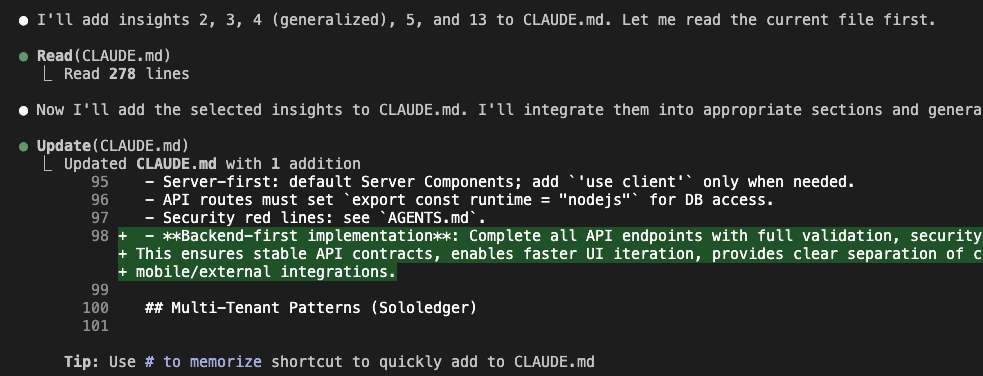
Claude reads my existing CLAUDE.md (278 lines) and begins surgical integration.

It doesn’t just slap new stuff at the end like a P.S. on a love letter. It finds the RIGHT sections:

cc-update-claude-md-file-based-on-my-selections-02

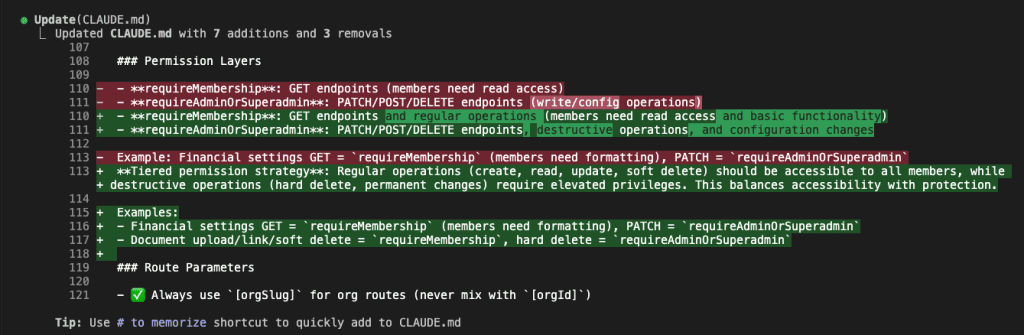
The Permission Layers section gets enhanced with the tiered strategy:

  • GET endpoints for regular members
  • PATCH/POST/DELETE for destructive operations require admin
  • Clear examples with specific routes
cc-update-claude-md-file-based-on-my-selections-03

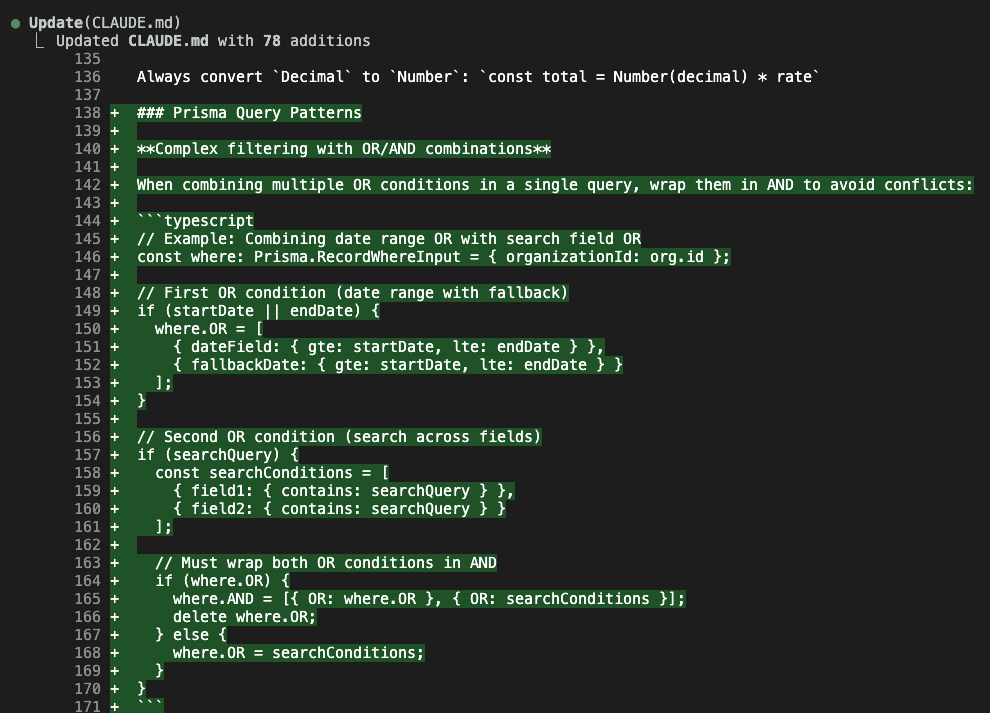
A new Prisma Query Patterns section appears with that complex OR/AND filtering pattern:

// When combining multiple OR conditions in a single query, wrap them in AND:
if (where.OR) {
  where.AND = [{ OR: where.OR }, { OR: searchConditions }];
  delete where.OR;
}

This pattern will save you hours of debugging Prisma query conflicts.

Hours.

11-cc-update-claude-md-file-based-on-my-selections-04

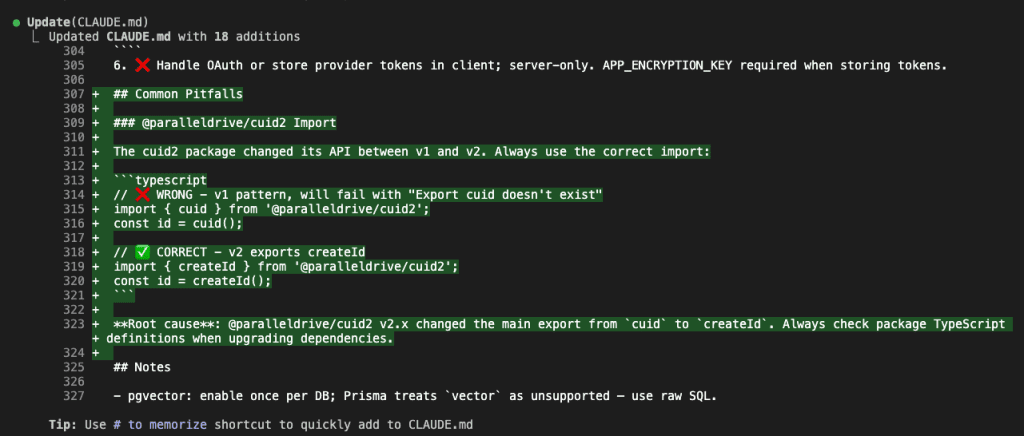
The Common Pitfalls section gets the cuid2 import pattern:

// ❌ WRONG - v1 pattern, will fail with "Export cuid doesn't exist"
import { cuid } from '@paralleldrive/cuid2';

// ✅ CORRECT - v2 exports createId
import { createId } from '@paralleldrive/cuid2';

Complete with root cause explanation. This bug will never happen again in any project.

(I’m not crying. You’re crying.)

The Confirmation: Knowledge Preserved

cc-done-updating-claude-md-file

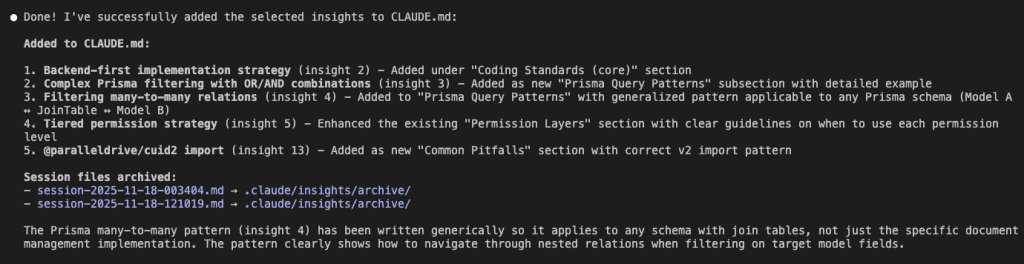
The summary tells the complete story:

Added to CLAUDE.md:

  1. Backend-first implementation strategy → Coding Standards section
  2. Complex Prisma filtering → New Prisma Query Patterns section
  3. Filtering many-to-many relations → Same section, generalized
  4. Tiered permission strategy → Enhanced Permission Layers section
  5. @paralleldrive/cuid2 import → Common Pitfalls section

Session files archived:

  • session-2025-11-18-003404.md.claude/insights/archive/
  • session-2025-11-18-121019.md.claude/insights/archive/

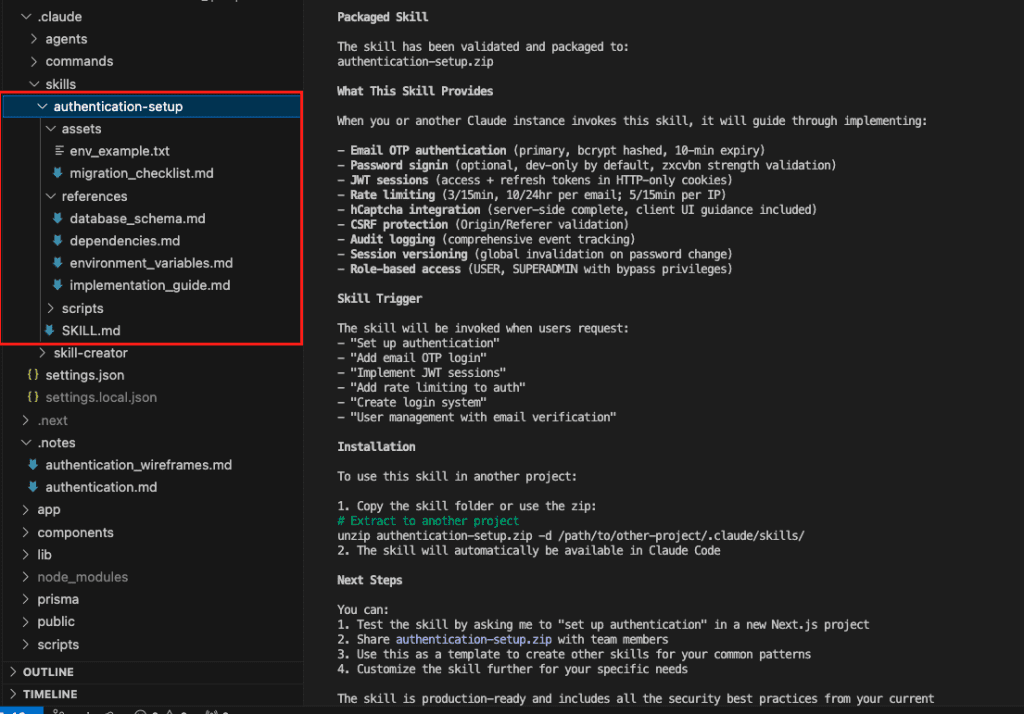
The insights aren’t lost. They’re archived. But the valuable patterns? They’re now in CLAUDE.md where they’ll guide every future coding session.

It’s like upgrading from sticky notes to a proper filing system. (But one that actually works.)

.

.

.

The Selection Philosophy: What Makes the Cut?

Not every insight belongs in CLAUDE.md.

Here’s my selection criteria. (Yes, I have criteria. I’m fancy like that.)

Always Include:

  • Universal patterns that apply across features
  • Security decisions that affect the whole app
  • Performance optimizations that should be standard
  • Bug fixes for external dependencies
  • Architectural principles that guide development

Usually Skip:

  • Feature-specific implementation details
  • One-off workarounds
  • Obvious patterns Claude already knows
  • Project-specific business logic
  • Temporary fixes waiting for upstream patches

Transform When Adding:

  • Make patterns generic (not tied to specific models)
  • Extract the principle, not just the implementation
  • Add context about when to apply (and when NOT to)
  • Include examples that clarify usage

The goal isn’t to document everything. The goal is to capture patterns that make your next project better.

Less encyclopedia, more greatest hits album.

.

.

.

The Compound Effect:

Here’s what happens over time. (Spoiler: It’s beautiful.)

  • Week 1: You capture 10 insights about authentication patterns
  • Week 2: You capture 8 insights about performance optimizations
  • Week 3: You capture 12 insights about error handling
  • Month 2: You have 100+ insights spanning every aspect of your codebase

Now imagine Claude Code with access to all of that institutional knowledge.

It’s not just avoiding bugs. It’s:

  • Consistent architectural decisions
  • Proven patterns applied automatically
  • Edge cases handled proactively
  • Performance optimizations baked in
  • Security considerations from day one

Your codebase doesn’t just grow. It evolves.

(Like Pokémon, but for code.)

Picture this:

Before this review:

  • 2 session files with 13 insights
  • Knowledge trapped in temporary logs
  • Claude Code blissfully unaware

After 2 minutes of review:

  • 5 critical patterns added to permanent knowledge
  • CLAUDE.md enhanced with battle-tested wisdom
  • Every future session benefits

Now multiply this across every coding session:

  • Week 1: 5 insights added → Next development avoids 5 issues
  • Week 2: 8 more insights → Next development avoids 13 issues
  • Month 2: 50+ insights → Your codebase is basically bulletproof

Each review session doesn’t just improve documentation. It improves every future line of code Claude writes.

It’s compound interest for your codebase.

.

.

.

Your Complete Workflow: From Chaos to Compound Knowledge

Here’s your complete workflow. (Print this out. Stick it on your monitor. Tattoo it on your forearm. Whatever works.)

During Development (Automatic):

  1. Activate build-insights-logger at session start
  2. Code normally—insights log automatically
  3. Discoveries, decisions, and fixes are captured
  4. Session file grows with valuable learnings

After Development (5 minutes):

  1. Request review: “Review insights from existing sessions”
  2. Read through categorized insights
  3. Select the valuable patterns (usually 30-50%)
  4. Let Claude integrate into CLAUDE.md
  5. Session files archive automatically

Next Development (Automatic Benefits):

  1. Claude reads enhanced CLAUDE.md
  2. Applies all captured patterns
  3. Avoids all documented pitfalls
  4. Implements proven architectures
  5. Your code is better without trying

It’s not just documentation.

It’s evolutionary development.

Each development builds on the learnings of the last. Like standing on the shoulders of giants, except the giant is your past self. (Your past self is very tall in this metaphor. Roll with it.)

.

.

.

Your Action Items (Yes, You. Right Now.)

  1. Implement the Build Insights Logger skill in your current project
  2. Activate it at the start of your next coding session
  3. Code normally—let insights capture automatically
  4. Review weekly—spend 5 minutes curating insights
  5. Watch your CLAUDE.md grow from basic rules to battle-tested wisdom
  6. Measure the difference—track how many repeated bugs you avoid

What insights are waiting in your .claude/insights/ folder right now?

Go review them.

Your future self will thank you. (Your future self might even buy you coffee. Your future self is thoughtful like that.)


Resources:

11 min read The Art of Vibe Coding, Claude

Claude Skills Part 3: How to Make Claude Code Master Any Library in 15 Minutes (Even If It Launched Yesterday)

Let’s say you’re sitting there at 2 AM.

You’ve just discovered this game-changing AI Elements library—launched recently, perfect for what you need. Your brain is doing that excited thing where it’s already building the feature before your fingers touch the keyboard.

You fire up Claude Code.

Type with the confidence of someone who’s done this a thousand times: “Build me an AI chat interface using AI Elements.”

Claude starts coding.

It looks… plausible.

Convincing, even.

Then you spot it: import { AIChat } from '@ai-sdk/elements'

That import doesn’t exist. The component is called Conversation. Claude is hallucinating an API that sounds right but isn’t.

It’s writing fiction dressed up as code.

You correct it.

Claude apologizes—sweet, polite, completely unhelpful.

Tries again.

Different hallucination.

Round and round you go.

Like trying to teach someone to cook while they’re blindfolded and you’re speaking different languages.

The documentation is literally right there on your screen. But Claude can’t see it.

Well.

That used to be true.

.

.

.

Here’s the Thing About AI and Documentation

Every week—every blessed week—new libraries launch.

The ones you already use? They’re dropping breaking changes like confetti at a wedding nobody wanted to attend.

Meanwhile, your AI coding agent is stuck in the past.

Claude Opus 4.1 doesn’t know about the library that launched last month. It definitely doesn’t know about the v2.0 that dropped while you were eating lunch yesterday.

(Is it weird that we expect AI to be omniscient? Like it should somehow absorb knowledge through the ethernet? Stay with me.)

You’ve probably tried the usual suspects:

  • The copy-paste marathon—where you dump documentation into the prompt until your context window explodes like an overfilled water balloon.
  • The MCP server hunt—searching for something that usually doesn’t exist. (Spoiler: it doesn’t.)
  • The Context7 lottery—sometimes brilliant, sometimes returns docs from the Mesozoic era.
  • The manual correction dance—where you become a human API reference for three hours. (Fun!)

Each approach fails spectacularly in its own special way.

  • Copy-pasting burns through 80% of your context before you write a single line of actual code. Good luck debugging when you’ve already consumed 100k tokens on documentation alone.
  • MCP servers are amazing. When they exist. Which is approximately never for the library you need right now.
  • Context7 is like a box of chocolates—you never know if you’re getting current docs or something from 2022. You’ll find out the hard way.
  • Manual correction? Sure, if your idea of a good time is playing “human API dictionary” until your eyes bleed.

There had to be a better way.

(There is.)

.

.

.

Enter Claude Skills: Your Documentation Superpower

Imagine this: You could teach Claude ANY library’s documentation.

Permanently.

Not the copy-paste-and-pray method. Not the please-let-there-be-an-MCP-server wishful thinking.

Actual knowledge.

The kind Claude can reference intelligently, pulling only the relevant bits for each task.

Like having a senior developer who’s memorized every documentation page but only shares what you need to know right now.

Here’s what becomes possible:

Claude Skills package documentation in a way that makes Claude understand not just WHAT the API is, but HOW to use it correctly. The difference between knowing the words to a song and understanding why it makes people cry.

Once you create a skill, it works forever.

Every project.

Every session.

Perfect implementation every time.

(Is it magic? Kind of. But the boring, repeatable kind.)

Let me show you exactly how I turned brand-new AI Elements documentation into a Claude Skill. Then used it to build a complete AI chat application.

Without a single hallucination.

Ferpetesake, it actually worked.

.

.

.

Step 1: Gather Your Documentation (2 Minutes, If You’re Slow)

I started at ai-sdk.dev/elements.

Downloaded everything—component references, examples, tutorials, the works.

Dropped them in my project like this:

Location of AI Elements documentation in project structure

Here’s the thing: Grab everything. Even that weird edge-case page you think you’ll never need. That’s the page that’ll save your bacon at 3 AM when nothing else makes sense.

(Trust me on this one.)

.

.

.

Step 2: Brainstorm Like You Mean It (5 Minutes)

Most people would jump straight into creating the skill here.

Don’t.

(Seriously. Stop. Put down the keyboard.)

First, you need to define exactly how you want Claude to use this documentation. Think of it like training a brilliant but literal-minded assistant—you need to be specific about expectations.

Here’s my exact prompt:

Initial prompt asking Claude to brainstorm requirements

Prompt:

I want to create a skill that reads the docs in this folder @docs/ai-sdk-ai-elements-doc/.

The idea: whenever we work with AI elements or build an AI native app, we'll refer to the relevant docs first before building the app.

The docs are in markdown format and contain detailed information about the AI elements SDK including usage examples, and best practices.

Ask me clarifying questions until you are 95% confident you can complete this task successfully.

a. If the question is about choosing different options, please provide me with a list of options to choose from. Mark the option with a clear label, like a, b, c, etc.
b. If the question need custom input that is not in the list of options, please ask me to provide the custom input.

Always mark each question with a number, like 1/, 2/, 3/, etc. so that I can easily refer to the question number when I answer.

For each question, add your recommendation (with reason why) below the options. This would help me in making a better decision.

Watch what happens next.

Claude Code analyzing and asking clarifying questions

Claude doesn’t just accept the task like an overeager intern. It asks targeted questions:

How should the skill activate?

  • Automatic (when AI Elements terms pop up)
  • Manual only (when you explicitly call it)
  • Hybrid (best of both worlds)

Where should documentation live?

  • Local markdown files
  • WebFetch from the mothership
  • Both (local with web backup)
Me answering with "1/a, 2/a, 3/c"

I answer with quick picks. No dissertations needed.

Claude then creates a complete requirements document.

The comprehensive requirements compilation 1
The comprehensive requirements compilation 2
The comprehensive requirements compilation 3

We’re talking 654 lines of specifications. It includes:

  • Activation triggers (automatic when components are mentioned—like a helpful friend who knows when to chime in)
  • 4 intelligent routing modes
  • Smart multi-page fetching rules
  • Response format templates
  • Query interpretation patterns

This isn’t busy work.

This is Claude learning HOW you want it to think about this documentation.

Time invested: 5 minutes of Q&A.

(Worth every second.)

.

.

.

Step 3: Transform Requirements Into Reality (3 Minutes)

Now for the satisfying part.

Asking Claude to create the skill

I tell Claude: “Let’s use the ‘skill-creator’ skill to create the skill”

(Yes, we’re using a skill to create a skill. It’s skills all the way down. Stay with me.)

Claude creating the skill

Watch as Claude:

  1. Packages all 39 markdown files (31 components plus the kitchen sink)
  2. Creates intelligent routing rules
  3. Builds activation triggers
  4. Generates a searchable index

The result?

Your documentation is now a reusable Claude Skill.

Forever.

(Take a moment. This is big.)

.

.

.

Step 4: Watch the Magic Happen (10 Minutes of Pure Joy)

Time to see if this actually works.

I tell Claude: “Read the @.notes/requirements.md, and use the ‘ai-elements’ skill to build the AI Chat Application.”

Claude recognizes the skill immediately:

Now here’s where it gets interesting.

Claude reading documentation 1

Instead of guessing the API—or worse, making stuff up—Claude reads the actual docs:

  • INDEX.md for component reference
  • examples/chatbot.md for patterns
  • components/conversation.md for core components
  • components/prompt-input.md for input handling

Notice something?

Claude read 8 files out of 39. Not the entire documentation set. Just what it needed.

Surgical precision.

(This is the opposite of the copy-paste-everything approach. And it’s beautiful.)

Now Claude builds with the confidence of someone who actually knows what they’re doing:

Claude building with confidence 1

Every import correct. Every API call accurate. Zero hallucinations.

Want proof this actually works? Here’s what I built:

The entire AI chat application builds perfectly:

  • Database schema with Prisma
  • API routes for chat sessions
  • Real-time streaming with AI Elements
  • Proper component composition
  • Error handling
  • State management

No back-and-forth. No corrections. No “actually, that’s not how it works.”

It. Just. Works.

(I may have done a small victory dance. Don’t judge.)

.

.

.

Why This Isn’t Just Another MCP Alternative

“But wait,” you’re thinking. “Isn’t this what MCP servers do?”

Kind of. But also not at all.

MCP servers:

  • Require the library author to build one (good luck with that)
  • Need constant maintenance (who has time?)
  • Often lag behind latest versions (naturally)
  • You have zero control (hope you like their choices)

Claude Skills:

  • You create them yourself (15 minutes, tops)
  • Work with ANY documentation (even that obscure library from 2019)
  • Update when YOU want (not when someone else gets around to it)
  • Full control over what’s included (your docs, your rules)

But here’s the feature that makes me want to write poetry:

Claude Skills read intelligently.

When working with AI Elements, Claude didn’t inhale all 39 documentation files like some kind of context-window glutton. It read the 8 relevant ones. No waste. No bloat. Just what it needed.

Try that with copy-paste.

(Spoiler: you can’t.)

.

.

.

The Compound Effect (Or: Why This Changes Everything)

Think about your current stack for a hot second:

  • React components library
  • Your database ORM
  • Payment provider SDK
  • Authentication library
  • UI component system
  • Analytics platform
  • Email service
  • File storage API
  • That weird library Bob insisted on using

Each one could be a Claude Skill.

Do the math with me:

1 library skill = 2 hours saved per project 10 library skills = 20 hours saved Your entire stack as skills = Never manually correct AI again

But wait. (There’s more.)

  • Version updates? Update the skill once. Every project gets the new version. Like magic, but boring and reliable.
  • Team knowledge? Share the skill. Everyone codes like they wrote the docs. Instant expertise, just add water.
  • New libraries? 15 minutes to perfect implementation. Even if it launched during your lunch break.

.

.

.

Your Library Skills Arsenal: A Field Guide

The Golden Rules

Rule 1: Include Everything, Let Claude Filter

Don’t try to curate “only the important docs.” You’re not the documentation police.

Claude Skills are intelligent. They’ll find what’s relevant. Your job is comprehensive coverage. Be the completionist.

Rule 2: Update Regularly (Set a Calendar Reminder)

Monthly skill updates. Put it in your calendar. Title it “Feed the Skills.” Your future self will send you thank-you notes.

Rule 3: Create Composite Skills

Building with Next.js + Prisma + tRPC? Create a “nextjs-stack” skill with all three. One activation, complete stack knowledge.

(Why make three trips when one will do?)

Rule 4: Test in Isolation

Before using a library skill in production:

  • Create a simple test project
  • Ask Claude to build a basic example
  • Verify the generated code matches current docs

Trust, but verify.

Rule 5: Share Your Skills

That React Native Navigation skill you perfected? Your team needs it. That Stripe integration skill? The community wants it.

Build once. Help everyone.

(Be the hero.)

.

.

.

Your Action Plan (Do This Today)

Step 1: Identify Your Most Frustrating Library

Which one causes the most AI hallucinations?

  • That new API you’re wrestling?
  • The library with the major update?
  • The complex SDK with 100+ endpoints?

Pick your nemesis.

Step 2: Gather Documentation (2 minutes)

Download or clone the docs. Create a folder. Done.

(Easier than making coffee.)

Step 3: Brainstorm Requirements (5 minutes)

Use my prompt. Answer the questions. Let Claude build comprehensive requirements.

No shortcuts here. Do the work.

Step 4: Create The Skill (3 minutes)

Run skill-creator. Package the documentation.

Watch as months of frustration evaporate.

Step 5: Test Immediately

Build something simple. Verify accuracy. Refine if needed.

(But honestly? It usually works perfectly the first time.)

Step 6: Use It Everywhere

Every project. Every feature. Perfect implementation.

No exceptions.

.

.

.

The Future You’re Building (Whether You Know It Or Not)

Picture this: You open Claude Code six months from now.

Your skills library includes:

  • Every major framework (even the ones that don’t exist yet)
  • Your company’s internal SDKs (the undocumented ones)
  • That obscure library only you use (we all have one)
  • The cutting-edge tool that launched this morning

You type: “Build me a real-time collaborative editor with our standard stack”

Claude activates:

  • nextjs-15-skill
  • collaboration-sdk-skill
  • your-ui-components-skill
  • websocket-patterns-skill

Perfect implementation. First try. Every single time.

No more “Claude doesn’t know this library.”

No more debugging hallucinated APIs.

No more being a human API reference.

Just your documentation, permanently accessible, intelligently used.

(Is this what peace feels like?)

.

.

.

Here’s What I Know to Be True

Every library you use regularly should be a Claude Skill.

Not because it’s trendy. Not because it’s the cool new thing. Not even because I said so.

Because spending 15 minutes creating a skill saves you hours of correction. Forever.

Because your team deserves consistent implementation without the learning curve.

Because you have better things to do than correct AI hallucinations all day.

(Like, literally anything else.)

Claude Skills aren’t just about saving time. They’re about eliminating an entire category of AI coding friction. The kind that makes you want to throw your laptop out the window.

So here’s my challenge:

Take that new library. The one with no MCP server. The one Claude keeps getting wrong. The one that’s been making you question your career choices.

Spend 15 minutes. Create the skill. Watch it work perfectly.

Then ask yourself:

Why would you ever go back to the old way?

Stop correcting hallucinations.

Start building with confidence.

Right now.

(Seriously. What are you waiting for?)


Resources:

16 min read ChatGPT, The Art of Vibe Coding, WordPress Automation

How AI Agents Completely Eliminated My WordPress Click-and-Repeat Hell (And Your Clients Will Never Know)

Quick note: If you’re expecting Claude Skills Part 3 this week – it’s coming next week! I’m presenting this WordPress automation topic at WordCamp Taiwan 2025, so I’m switching up the schedule. Part 3 of the Claude Skills series (the one you’ve been waiting for drops next week. Trust me, it’ll be worth the wait.


It’s Friday night, 11:40 p.m.

You’re staring at wp-admin on client site number nine.

Updates → Clear cache → Regenerate CSS → Woo settings check → Lighthouse quick run → Screenshot the results.

You could do it with your eyes closed.

And that’s the problem.

You’re not developing anymore.

You’re a highly-paid mouse with a checklist.

More than 80% of your workload every week is just doing the same 20-30 clicks over and over and over.

What if I told you an AI agent could do all these clicks for you?

Not through APIs.
Not through custom code.

Through the exact same wp-admin interface you’re clicking right now.

.

.

.

The WordPress Pain Nobody Talks About

Here’s what your week actually looks like:

  • Monday morning: Update plugins on 5 client sites (45 minutes of clicking)
  • Tuesday: VAT tax increased – update rates on 12 WooCommerce stores (2 hours)
  • Wednesday: Deploy the same security settings to 8 new sites (90 minutes)
  • Thursday: Set up another identical WooCommerce store (3 hours)
  • Friday: Check all sites for updates, run reports (2 hours)

Sound familiar?

You didn’t become a WordPress developer to be a professional button-clicker.

Yet here you are, executing the same sequences like a well-trained automaton.

The worst part?

You know there’s an API for most of this.

But setting up proper API automation for 20 different client sites?

That’s a week-long project.

By the time you finish, you could have just… clicked the buttons.

Until browser-using AI agents changed everything.

.

.

.

July 2025: The ChatGPT Agent Launch That Changed Everything

I remember exactly where I was when OpenAI announced ChatGPT Agent.

Mid-morning.

Coffee getting cold while I watched the demo.

ChatGPT was… using a browser. Clicking buttons. Filling forms. Reading screens. Making decisions.

That’s when it hit me like a lightning bolt.

WordPress is entirely browser-based.

Every setting. Every configuration. Every update. It’s all just… clicking buttons in wp-admin.

If ChatGPT could use a browser, it could manage WordPress sites.

The possibilities exploded in my mind:

  • Bulk updates across client sites
  • WooCommerce store setups from scratch
  • Tax rate changes across multiple installations
  • Security configurations replicated perfectly
  • Plugin compatibility testing on staging sites

Everything I’d been doing manually could be delegated to an AI that never gets tired, never makes typos, and never accidentally clicks the wrong button at 11:40 p.m.

And ChatGPT wasn’t alone.

There are a few more browser-using AI agents in the market like Perplexity Comet and Claude for Chrome.

The game had changed.

WordPress automation that was impossible six months ago was suddenly trivial.

I immediately started experimenting.

And what I discovered changed my entire business.

.

.

.

How Browser-Using AI Agents Actually Work

A browser-using AI agent is exactly what it sounds like – an AI that can use a browser like a human.

It can:

  • Open websites and navigate pages
  • Read what’s on the screen
  • Click buttons and links
  • Fill out forms
  • Take screenshots
  • Document what it did

But here’s the killer feature for WordPress:

It uses the same wp-admin interface you already know.

No API setup. No authentication headaches. No custom code.

Picture this scenario:

The government just announced a tax rate change from 5% to 7%.

You have 20 WooCommerce client sites.

Each site requires:

  1. Log in to wp-admin
  2. Navigate to WooCommerce → Settings
  3. Click Tax tab
  4. Click Standard Rates
  5. Find the rate field
  6. Change 5% to 7%
  7. Click Save

That’s 7 clicks per site. 20 sites = 140 clicks.

Two hours of your life.

Gone.

Doing the exact same sequence over and over.

Now watch what happens with an AI agent:

You tell it once: “Update the tax rate from 5% to 7% on these 20 sites.”

It does exactly what you would do – logs in, navigates to WooCommerce → Tax → Standard Rates, changes the value, saves.

Across all 20 sites…. while you make coffee.

.

.

.

The WooCommerce Setup That Convinced Me This Was Real

Let me show you what made me a believer.

Setting up a WooCommerce store from scratch involves:

  • Store configuration (15-20 fields)
  • Tax setup (10+ settings)
  • Shipping zones (5-10 configurations per zone)
  • Payment gateways (multiple API keys and settings)
  • Product creation (categories, attributes, variations)

Manually?

That’s 100+ clicks and at least 5 hours of mind-numbing work.

Watch what happened when I gave an AI agent a simple checklist:

The result?

A fully configured WooCommerce store.

Every setting perfect. Every product created. Ready for orders.

100+ clicks. Zero human involvement after providing the checklist.

Want techniques like these weekly?

Join The Art of Vibe Coding—short, practical emails on shipping with AI (without the chaos).

No spam. Unsubscribe anytime. Seriously.

.

.

.

The Secret: It’s All About The Checklist

Here’s what nobody tells you about AI automation:

Your AI agent is only as good as your checklist.

But here’s the beautiful part – you already have these checklists.

  • They’re in your SOPs.
  • Your client documentation.
  • Your head (you’ve done this 100 times).

The even better news?

AI can help you create perfect checklists in two revolutionary ways.

.

.

.

Method #1: Let AI Interview You (The Clarifying Questions Technique)

This changed my entire workflow.

Instead of writing a 200-line checklist from scratch, I give the AI a rough idea and let it interview me.

Here’s exactly how it works:

Step 1: Give AI Your Rough Concept

The full “Let AI Interview You” prompt:

I want to create a demo site for a WooCommerce website. The data for this site needs to be Malaysia-centric, as I am based there.

To achieve this, we will need to set up several key elements: the business address, tax, shipping options, and approximately five products. We'll focus on selling physical products, specifically t-shirts.

For tax, we need to use the local Malaysian SST. Regarding shipping, we will configure it for the US, UK, Singapore, and Malaysia.

For payments, I initially considered a gateway that offers a sandbox environment. However, for now, let's proceed with Stripe as the payment gateway.

So, to summarize, we'll have the address, tax, shipping settings, payment gateway, and physical products (t-shirts) configured for the countries mentioned.

My request from you is a comprehensive list of all necessary items and data points I can use to populate the WooCommerce website, including specific details for the address, tax, shipping, and any other relevant information you deem necessary.

Ask me clarifying questions until you are 95% confident you can complete this task successfully.

a. If the question is about choosing different options, please provide me with a list of options to choose from. Mark the option with a clear label, like a, b, c, etc.
b. If the question need custom input that is not in the list of options, please ask me to provide the custom input.

Always mark each question with a number, like 1/, 2/, 3/, etc. so that I can easily refer to the question number when I answer.

For each question, add your recommendation (with reason why) below the options. This would help me in making a better decision.

Step 2: AI Asks Clarifying Questions

Look at what the AI does. It doesn’t just ask “what do you want?” It provides specific options:

1/ Brand for the demo store
a) BajuLab (fictional)
- Recommendation: Great for demos; avoids mixing with your real brand.
b) Smashing Advantage Apparel (uses your existing brand umbrella)
- Recommendation: Useful if you'll demo to your clients as "your studio's" store.
c) Custom brand (tell me the exact name)

Every question has:

  • Clear options (a, b, c)
  • Recommendations with reasoning
  • Custom input if needed

The AI continues with granular questions about:

  • Tax configuration (SST vs GST)
  • Shipping zones and methods
  • Payment gateway preferences
  • Product catalog structure

Step 3: Answer With Simple Choices

My responses? Dead simple:

No lengthy explanations, or complex configurations. Just pick from the menu.

Step 4: AI Generates Perfect Checklist

The AI transforms my simple answers into a comprehensive, copy-paste kit:

Shows the final comprehensive checklist

But, it’s not done yet.

Next, we will ask the AI to convert it into a detailed checklist (with click-path + values):

From vague idea to perfect checklist in 10 minutes.

.

.

.

Method #2: Turn Your Screen Recording Into a Checklist

Already know how to do the task?

This method is even faster.

Step 1: Record Yourself Doing It Once

Open your screen recorder. Do the task once. Don’t explain anything – just do it normally.

Step 2: Upload to AI

Drop your video into Google AI Studio. No editing needed.

The “Turn Your Screen Recording Into a Checklist” prompt:

I've uploaded a video demonstrating the WordPress plugin update process. The video covers:

1. Creating a backup using a backup plugin to protect against issues
2. Navigating to the plugins page and identifying plugins that need updates
3. Updating plugins one-by-one and verifying the site after each update
4. Restoring from backup if problems occur

**Your Task:**
Analyze the video thoroughly and create a **comprehensive, step-by-step checklist** for updating WordPress plugins. This checklist must be:

- **Generic and reusable** - Don't reference specific plugin names; use placeholders like "[Plugin Name]" or "[Backup Plugin]"
- **Detailed with exact click-paths** - Format: `Dashboard > Section > Subsection > Button/Field`
- **Include specific values** - Note any settings, options, or fields that need to be filled/selected
- **Action-oriented** - Each step should start with a clear action verb (Click, Navigate, Select, Enter, Verify, etc.)
- **Include verification steps** - After each critical action, specify what to check/verify
- **Organized by phases** - Group steps into: Preparation/Backup, Pre-Update Checks, Update Process, Post-Update Verification, and Troubleshooting/Restore

**Format the checklist as:**
- [ ] **Step description** → `Click path` → Value/Action → ✓ Verification checkpoint

This checklist should enable anyone to replicate the process consistently across different WordPress sites and various plugins.

Step 3: AI Documents Every Click

The AI watches your video and creates step-by-step documentation:

Your muscle memory becomes reusable documentation.

Every click.
Every navigation.
Every setting.

Captured and structured automatically.

.

.

.

From “Update and Pray” to “Update and Relax”

WordPress updates.

We all know the feeling.

That red notification bubble haunting your admin bar: “12 updates available.”

Your stomach drops.

Because you know what’s coming.

The Official Best Practice:

  1. Make a full backup
  2. Update on staging first
  3. Test all functionality
  4. Check for conflicts
  5. Document changes
  6. Then update production

The Reality at 11:40 p.m.: “Select all → Update → Pray”

We’ve all been there.

Rolling the dice.

Hoping this isn’t the update that breaks everything.

Remember the last time an update went wrong?

  • The payment gateway that stopped working (discovered by an angry customer)
  • The contact form that suddenly disappeared
  • The shipping calculator that decided everything costs $0
  • The homepage that went completely blank
  • That “minor” security update that broke your custom CSS

The recovery process is its own special hell:

  • Frantically googling error messages
  • SSH-ing into the server at midnight
  • Trying to remember which backup actually works
  • Explaining to the client why their site was down for 3 hours
  • Promising yourself you’ll “do it properly next time”

But next time comes, and you’re exhausted, and there are 12 sites to update, and…

“Select all → Update → Pray”

What if I told you an AI agent could handle all of this automatically?

Not just the updates.

The entire process:

The Challenge: Update multiple WordPress plugins across a client site
The Twist: If anything breaks, automatically rollback

Watch what happened:

The AI agent:

  • Created a backup first (verified it was complete)
  • Updated plugins systematically (one at a time)
  • Checked the site after each update (front-end and critical functions)
  • When it detected a broken plugin, deactivate it.
  • Documented exactly which plugin caused the issue
  • Sent a report with screenshots and recommendations

Total human involvement: Zero.

No stress.
No late-night panic.
No angry client calls.

Just a calm notification: “Updates completed. One compatibility issue detected and resolved. Full report attached.”

.

.

.

“But Isn’t It Risky?” Let’s Talk Security

I know what you’re thinking.

“Giving an AI access to my WordPress sites? That sounds like a security nightmare.”

Valid concern. Let’s address it head-on.

Here’s the reality:

Your WordPress sites are already at risk every day from:

  • Plugin vulnerabilities (remember that massive security hole last month?)
  • Weak passwords (“password123” is still in your client’s database)
  • Human error (ever updated the wrong site at 11:40 p.m.?)
  • Outdated themes causing conflicts
  • That intern who has admin access for some reason

You already know how to handle these risks: backups, staging, testing, proper procedures.

With AI agents, we apply the exact same precautions.

.

.

.

The Three Commandments of AI Agent Security

Rule #1: Never Give AI Your Actual Credentials

Never. Ever. EVER.

Instead:

  • Use one-time passwordless login links
  • Log in first, then hand control to AI
  • Store API keys in wp-config.php, not in checklists
  • Use placeholders in checklists, update manually after

Rule #2: AI Works on Staging, Not Production

Your workflow becomes:

  1. AI agent does its work on staging
  2. You review the results (30 seconds)
  3. If good → merge to production (one click)
  4. If broken → no harm done

Almost every decent host offers staging now. No excuses.

Rule #3: Always Make Backups First

This should already be your religion. But with AI agents, it’s scripture:

  • Backup before any major changes
  • Verify the backup actually works
  • Know your restoration process cold

These aren’t new risks. They’re the same risks you already manage.

The AI agent is just another tool. Like giving your assistant access to update plugins. Except this assistant never gets tired, never makes typos, and documents everything.

.

.

.

The Hidden Benefits Nobody Talks About

Once I started using AI agents for WordPress tasks, unexpected benefits emerged:

Benefit #1: Perfect Documentation

Every task the AI performs is documented. Every click. Every change. Every result.

Client asks “what changed on my site last month?”

Here’s the exact log of every update, every setting change, every modification. With timestamps.

Benefit #2: Consistency Across All Sites

That security configuration you perfected? It’s now identical across all 20 client sites.

No more “I think I configured this one differently” or “Did I remember to add that firewall rule?”

Benefit #3: Testing Becomes Trivial

Want to test how a plugin update affects 5 different theme configurations?

  • Spin up 5 staging sites.
  • Give the AI agent the same checklist for each.
  • Watch it test all 5 simultaneously while you grab coffee.

Benefit #4: You Can Take a Real Vacation

Picture this: You’re on a beach in Bali. Feet in the sand. Favorite beverage in hand (mine’s a cold coconut water, but you do you).

Your phone buzzes. It’s your AI agent:

“Weekly maintenance complete. 47 plugins updated across 12 sites. Two compatibility issues detected and resolved. All sites passing health checks. Full report ready for client review.”

You take another sip. Maybe check the report. Maybe don’t.

Site maintenance doesn’t stop because you’re sipping margaritas on a beach. Your AI agents run on the cloud, execute your checklists, handle the issues.

You only intervene if something actually needs your expertise. Which, let’s be honest, is rare when it comes to routine updates.

.

.

.

Your WordPress Workflow, Transformed

Let’s get specific about what this means for your daily workflow:

Before AI Agents (Your Current Week)

  • Monday: 3 hours of plugin updates across client sites
  • Tuesday: 2 hours setting up a new WooCommerce store
  • Wednesday: 1 hour updating tax rates and shipping zones
  • Thursday: 2 hours running security audits and fixing issues
  • Friday: 2 hours generating reports and maintenance

Total: 10 hours of clicking

After AI Agents (Your New Week)

  • Monday morning: 15 minutes reviewing AI agent reports from weekend maintenance
  • Monday afternoon: Actually building that custom feature your client wants
  • Tuesday – Thursday: Real development work
  • Friday: Planning next week while AI agents run all maintenance

Total: 15 minutes of oversight

That’s not a 50% improvement. That’s not even a 90% improvement.

That’s 40 hours per month of your life back.

.

.

.

How to Start Tomorrow Morning

Here’s exactly how to implement this:

Step 1: Pick Your Most Painful Task

What did you do this week that made you want to quit WordPress?

  • Setting up another identical WooCommerce store?
  • Updating plugins across 10 sites?
  • Migrating settings between staging and production?

Pick ONE task. The one that hurts the most.

Step 2: Create Your First Checklist

Use Method #1 (AI interview) or Method #2 (screen recording).

Don’t overthink it.

Your first checklist won’t be perfect. That’s fine.

Step 3: Test on a Staging Site

Never test on production first. Clone one of your sites to staging.

Give the AI agent your checklist. Watch it work.

Step 4: Refine and Scale

Your first run will reveal issues:

  • Missing steps in the checklist
  • Unclear instructions
  • Edge cases you forgot

Fix them. Run again. Once it’s perfect, you have a reusable automation forever.

Step 5: Expand Systematically

One task automated successfully? Move to the next:

  1. Week 1: Plugin updates
  2. Week 2: WooCommerce setups
  3. Week 3: Security configurations
  4. Month 2: Everything routine is automated

.

.

.

The Real Question: What Will You Do With Your Time?

Remember that Friday night at 11:40 p.m.? Clicking through client site number nine?

That version of you doesn’t have to exist anymore.

You didn’t become a WordPress developer to click buttons. You got into this to build things. To solve problems. To create.

When 80% of your routine work is handled by AI agents, what will you do?

Maybe you’ll:

  • Take on more clients (without burning out)
  • Build that SaaS you keep dreaming about
  • Actually enjoy your weekends
  • Learn that new framework you’ve been putting off
  • Spend time with your family instead of wp-admin

Or maybe you’ll just sleep better knowing that while you rest, your AI agents are handling the midnight maintenance, the weekend updates, the mind-numbing configurations.

All the work. None of the clicking.

.

.

.

Your Challenge This Week

I’m not asking you to automate everything. I’m not even asking you to trust AI with production sites yet.

I’m asking you to do ONE thing:

Pick one repetitive task you did this week.

Just one.

Create a checklist for it. Hand it to an AI agent. Watch what happens.

Because once you see it work – once you watch an AI agent perfectly execute 100 clicks in 6 minutes – you’ll realize something profound:

You’ve been doing WordPress on hard mode this entire time.

The age of manual WordPress management is over.

The age of AI agents is here.

What will you automate first?

Stop clicking.

Start delegating.

Your future self – the one actually building cool stuff instead of clicking buttons – will thank you.


9 min read The Art of Vibe Coding, Claude, Codex, GPT-5, Vibe Coding

Claude Skills Part 2: How to Turn Your Battle-Tested Code Into a Reusable Superpower

You’ve built the perfect authentication system.

It took months. Every edge case handled. Every security hole plugged. Production-tested across three different apps.

And now you’re starting project number four.

Time to rebuild it. Again. From scratch.

Because that’s how AI works, right? It gives you a solution, not your solution.

Wrong.

Last week, I showed you how Claude Skills changed everything – letting you replicate YOUR exact patterns across every project.

Today, I’m going to show you exactly how to create your own Claude Skills.

By the end of this article, you’ll know how to turn any feature into a reusable skill that Claude Code can deploy perfectly every time.

.

.

.

The Secret: It’s Not About Code, It’s About Documentation

Here’s what most developers get wrong about Claude Skills.

They think it’s about copying code files. Dumping your lib/auth folder into a skill and calling it done.

That’s not how it works.

Claude Skills aren’t code repositories.

They’re implementation guides that teach Claude your specific patterns, your architecture decisions, your way of solving problems.

And the key to creating a powerful skill?

Comprehensive documentation that captures not just WHAT your code does, but HOW and WHY it works.

Let me show you exactly how I turned my authentication system into the Claude Skill I demonstrated in Part 1.

.

.

.

Step 1: Let GPT-5 Document Your Implementation (10 Minutes)

This is counterintuitive, but stay with me.

I don’t use Claude to document my Claude Skills. I use GPT-5.

Why? Because GPT-5 is meticulous. It’s the senior architect who notices every pattern, every decision, every subtle implementation detail.

Here’s my exact process:

Initial prompt to GPT-5 asking it to analyze the authentication codebase

I give GPT-5 this prompt:

I want to update the authentication implementation docs at 
#file:authentication.md to match the current implementation of authentication for 
this app.

Read the codebase, analyze how this app implemented the authentication, then 
update the docs.

Ask me clarifying questions until you are 95% confident you can complete this task 
successfully.

a. If the question is about choosing different options, please provide me with a list 
of options to choose from. Mark the option with a clear label, like a, b, c, etc.
b. If the question need custom input that is not in the list of options, please ask me 
to provide the custom input.

Always mark each question with a number, like 1/, 2/, 3/, etc. so that I can easily 
refer to the question number when I answer.

For each question, add your recommendation (with reason why) below each 
options. This would help me in making a better decision.

Notice the key elements:

  • 95% confidence threshold (forces thoroughness)
  • Structured question format (speeds up the process)
  • Recommendations included (leverages GPT-5’s analysis)
GPT-5 analyzing the codebase, showing it reading files and understanding patterns

Watch as GPT-5 systematically explores:

  • Authentication routes (/app/api/auth/**)
  • Library files (auth.ts, jwt.ts, rate-limit.ts)
  • Middleware implementation
  • Database schema
  • Environment variables

GPT-5 asks targeted questions:

GPT-5 asking clarifying questions about CSRF protection, hCaptcha, and other implementation details

I answer with just the option letters.

Me answering with simple "1/a, 2/a, 3/a" format

No lengthy explanations needed. GPT-5 already understands my intent.

The result?

GPT-5 compiling the comprehensive authentication documentation

A complete authentication implementation guide covering:

  • System architecture
  • Security measures (CSRF, rate limiting, audit logging)
  • Database schema with relationships
  • API endpoints with exact paths
  • JWT token strategy with sessionVersion
  • Environment variables with defaults
  • Migration checklist for new projects

302 lines of detailed documentation. Every decision documented. Every pattern explained.

Time spent: 10 minutes.

Now, you might notice something different in my screenshots – I’m using GPT-5 in GitHub Copilot instead of my usual Codex.

The reason?

I’d hit my Codex weekly limits when writing this. (Yes, even I burn through those limits when I’m deep in development mode.)

But here’s what I discovered: GPT-5 in GitHub Copilot is an excellent substitute for Codex. In terms of performance – especially when it comes to analyzing codebases – I honestly can’t tell the difference.

Same meticulous analysis.
Same comprehensive documentation.
Same quality output.

.

.

.

Step 2: Create ASCII Wireframes for the UX Flow (5 Minutes)

Here’s where most skill creators stop. They have the backend documentation.

But Claude Skills need to understand the FULL implementation – including the UI.

This is where ASCII Wireframes become your secret weapon.

I ask GPT-5:

Asking GPT-5 to create ASCII wireframes

Why ASCII instead of HTML mockups?

HTML mockup for login page: ~500 lines, ~15,000 tokens ASCII wireframe for login page: ~50 lines, ~1,500 tokens

Same information. 90% less tokens.

GPT-5 creating comprehensive ASCII wireframes document

GPT-5 creates wireframes for every screen:

Every interaction mapped. Every flow documented. Claude will know EXACTLY what UI to build.

Total documentation time: 15 minutes.

.

.

.

Step 3: Transform Documentation Into a Claude Skill (5 Minutes)

Now we have comprehensive documentation and wireframes. Time to turn them into a Claude Skill.

First, you need the skill-creator skill itself. Get it from Anthropic’s skills repository.

Project structure showing skill-creator in .claude/skills folder and documentation in notes folder

My project structure:

.claude/
  skills/
    skill-creator/     # The skill that creates skills
notes/
  authentication.md            # Our documentation
  authentication_wireframes.md # Our wireframes

Start a new Claude Code session and ask:

Asking Claude "what are the available skills?"

Claude shows the available skills:

Now the magic moment:

Asking Claude to create authentication skill
Please use the skill-creator skill to create a new skill with the skill-creator that shows 
how to set up authentication exactly like this app does. Please refer to the documentation 
@.notes/authentication.md and wireframes @.notes/authentication_wireframes.md.

Watch as Claude:

  1. Reads the skill-creator instructions
  2. Explores your authentication codebase
  3. Analyzes your documentation
  4. Studies the wireframes
Claude exploring the codebase to understand the authentication implementation

It’s not just copying files.

It’s understanding your implementation and transforming it into teachable instructions.

Claude creating the authentication-setup skill structure

Claude creates a complete skill structure:

authentication-setup/
  ├── SKILL.md                    # Main skill instructions
  ├── scripts/                    # Initialization scripts
  ├── references/                 # Your documentation
  │   ├── database_schema.md      # Prisma schema reference
  │   ├── environment_variables.md # Required env vars
  │   ├── dependencies.md         # NPM packages needed
  │   └── implementation_guide.md # Step-by-step guide
  └── assets/                     # Templates and examples
      └── migration_checklist.md  # Deployment checklist

Key insight: The skill doesn’t contain your actual code files. It contains instructions for recreating your patterns.

Claude packages everything into authentication-setup.zip:

Claude showing the packaged skill is ready

Time to create skill: 5 minutes.

.

.

.

Step 4: Deploy Your Skill to Another Project (2 Minutes)

This is where the payoff happens.

Uploading the skill to a new Next.js project's .claude/skills folder

Take your authentication-setup.zip and extract it to any project:

new-project/
  .claude/
    skills/
      authentication-setup/  # Your skill goes here

Start Claude Code in the new project. Type:

In new project, typing "/authentication-setup" to trigger the skill

Claude immediately recognizes the skill:

Claude recognizing and loading the authentication-setup skill
Claude implementing the complete authentication system

Claude doesn’t just copy files. It:

  • Analyzes your current project structure
  • Adapts to your existing patterns
  • Integrates with your current code
  • Maintains your architectural decisions

Your exact authentication system. In a completely new project. In under 10 minutes.

.

.

.

The Power of Compound Knowledge

Think about what just happened.

You took months of refinement, every bug fix, every security improvement, every UX enhancement…

And packaged it into 20 minutes of documentation work.

Now that skill can be deployed to:

  • Every new project you start
  • Every team member’s workspace
  • Every client implementation
  • Every prototype that needs auth

The math is staggering:

1 skill × 10 projects = 10 hours saved 10 skills × 10 projects = 100 hours saved Your entire toolkit as skills = Career-changing productivity

But here’s what nobody talks about…

.

.

.

Why GPT-5 + Claude Skills Is The Ultimate Combo

Using GPT-5 to document for Claude Skills isn’t random. It’s strategic.

GPT-5’s superpower: Meticulous analysis and comprehensive documentation
Claude’s superpower: Following detailed instructions perfectly

When you combine them:

  1. GPT-5 extracts every pattern and decision from your code
  2. Claude Skills preserves that knowledge permanently
  3. Claude Code implements it flawlessly every time

It’s like having a senior architect (GPT-5) document your best practices, then having infinite junior developers (Claude Code instances) who can implement those practices perfectly.

No knowledge loss.
No pattern drift.
No “I think I did it differently last time.”

.

.

.

Common Mistakes to Avoid

Mistake #1: Skipping the Documentation Phase

“I’ll just copy my code files into the skill.”

Wrong.

Skills need context, not just code.

Without documentation, Claude won’t understand your architectural decisions.

Mistake #2: Forgetting the UI Wireframes

Backend-only skills create Frankenstein features.

Same logic, completely different UI.

Always include wireframes.

Mistake #3: Not Testing in a Clean Project

Always test your skill in a fresh project.

That’s where you’ll discover missing dependencies or assumptions.

.

.

.

Your Skills Library Starts Today

Here’s your action plan:

1. Identify Your Most Reused Feature

What do you build in every project?

  • Authentication system?
  • Admin dashboard?
  • Payment integration?
  • File upload handling?

2. Document It With GPT-5 (15 minutes)

Use my exact prompt. Let GPT-5 extract every pattern.

3. Create ASCII Wireframes (5 minutes)

Map the UI flow. Every screen. Every interaction.

4. Generate The Skill (5 minutes)

Use skill-creator. Let Claude package your knowledge.

5. Test In a New Project

Deploy it. Use it. Refine it.

6. Repeat For Your Next Feature

Build your library one skill at a time.

.

.

.

The Compound Effect Nobody Sees Coming

Every skill you create makes the next project easier.

But here’s what really happens:

Month 1: You create 3 skills (auth, payments, dashboard) Month 2: You create 5 more (file upload, search, notifications…) Month 3: You realize you can build entire apps in hours

By month 6?

You’re not coding anymore. You’re orchestrating.

  • “Use authentication-setup skill.”
  • “Use payment-processing skill.”
  • “Use admin-dashboard skill.”

Complete applications assembled from your battle-tested components.

Each implementation identical to your best work.

No quality degradation.
No pattern drift.
No forgotten edge cases.

This isn’t the future of development. It’s available right now.

.

.

.

Part 3 Preview: Teaching Claude Any Library

Next week, I’ll show you something even more powerful.

How to create Claude Skills that teach Claude to perfectly integrate ANY library or SDK into your apps.

Imagine:

  • “Use the stripe-integration skill” → Your exact Stripe patterns
  • “Use the websocket-setup skill” → Your real-time architecture
  • “Use the testing-harness skill” → Your testing methodology

Not generic implementations. YOUR implementations.

But for now…

Open that project with your best authentication system.

Document it with GPT-5.

Turn it into a skill.

Watch as 10 minutes of work today saves you 10 hours next month.

What feature will you turn into a Claude Skill first?

Stop rebuilding.

Start packaging.

Now.


P.S. – Since creating my authentication-setup skill two weeks ago, I’ve deployed it to 6 different projects. Total time saved: 14 hours. Total consistency: 100%. Every deployment identical to my best implementation. That’s the power of turning your code into Claude Skills.

P.P.S. – The skill-creator skill itself is open source. You can find it at github.com/anthropics/skills. But the real magic? It’s in the skills YOU create from YOUR battle-tested code.

8 min read Claude, Codex, The Art of Vibe Coding, Vibe Coding

Claude Skills: Your “I Know Kung Fu” Moment Has Arrived (Part 1 of 3)

You’re building your fifth Next.js app this month.

Time for authentication. Again.

You fire up Claude Code. “Build me email OTP authentication with JWT, password management, rate limiting, CSRF protection…”

Claude starts coding.

It looks good.

But wait – the JWT implementation is different from your last project. The rate limiting uses a different pattern.

The password hashing… is this bcrypt or argon2 this time?

Every. Single. App.

A different variation of the same feature.

Not because you want variety.

But because that’s how AI works – it gives you a solution, not your solution.

Until now.

.

.

.

The Problem That’s Been Staring Us in the Face

We’ve all been here.

You’ve built authentication for your SaaS app.

It’s perfect.
Production-tested.
Battle-hardened.

Next project comes along.

Same authentication needs.

But when you ask Claude Code to build it:

  • Different JWT strategy (why are we using RS256 now?)
  • Different database schema (wait, where’s the sessionVersion field?)
  • Different security patterns (no rate limiting on the OTP endpoint?)
  • Different file structure (why is auth logic scattered across 15 files?)

Sure, it works.

But it’s not your authentication system. The one you’ve refined over months. The one with all the edge cases handled.

It’s like having a master chef forget their signature recipe every time they walk into a new kitchen.

The real tragedy?

You have the perfect implementation.

It’s sitting right there in your last project. But there’s been no way to teach Claude Code your patterns, your architecture, your way of doing things.

Until Claude Skills changed everything.

.

.

.

Enter Claude Skills: The “I Know Kung Fu” Moment

Remember that scene in The Matrix?

Neo downloads kung fu directly into his brain. Instant mastery. No training montage required.

That’s Claude Skills.

But instead of martial arts, you’re uploading your battle-tested code patterns directly into Claude’s knowledge base.

Here’s what just became possible:

Before Claude Skills:

  • “Build authentication” → Random implementation each time
  • Hours of tweaking to match your standards
  • Inconsistent patterns across projects
  • The eternal “wait, how did I do this last time?” dance

After Claude Skills:

  • “Use the authentication-setup skill” → Your exact implementation
  • Same patterns, same structure, same security measures
  • 10 minutes from zero to production-ready auth
  • Perfect consistency across every project

This isn’t just about saving time. It’s about something much bigger.

.

.

.

The Authentication Skill That Changes Everything

Let me show you exactly what I mean.

I built a Next.js boilerplate with a complete authentication system:

  • Email OTP with 6-digit codes via Resend
  • JWT sessions (access + refresh tokens)
  • Password management with bcrypt
  • CSRF protection on all mutations
  • Rate limiting per email/IP
  • Audit logging for security events
  • Whitelist-only email access
  • PostgreSQL + Prisma ORM

This wasn’t a weekend hack.

This was weeks of refinement. Every edge case handled. Every security hole plugged.

Then I turned it into a Claude Skill.

Now watch what happens.

Claude listing available skills when asked

I simply ask: “What are the available skills?”

Claude shows me my arsenal:

  • authentication-setup – Complete auth system with everything I mentioned
  • multi-tenant-setup – Organizations, memberships, invitations
  • dashboard-shell-setup – Production-ready dashboard with resizable sidebar
  • ai-sdk-v5 – AI integrations for OpenAI, Anthropic, Gemini

Each skill is a complete feature set, ready to deploy.

.

.

.

The 10-Minute Authentication Implementation

Here’s where it gets interesting.

I tell Claude: “Please use the authentication-setup skill to setup the email OTP authentication for this app.”

I provide my PostgreSQL connection string and mention I need dev-only password login for testing.

Claude recognizes the skill and asks permission.

This is important – you maintain control over what gets implemented.

Claude asking permission to use the skill

Watch as Claude:

  1. Examines your current project structure
  2. Reads the skill instructions
  3. Checks for existing code to avoid conflicts
Claude initializing the skill and exploring the codebase

This isn’t blind copy-paste. It’s intelligent integration.

Here’s the genius part.

Claude asks configuration questions:

  • Want to use shadcn/ui components or plain HTML?
  • Have a Resend API key ready?
  • Which additional features to include?

These aren’t random questions.

They’re part of the skill definition, ensuring the implementation matches YOUR specific needs for THIS project.

I select my preferences.

User answering the configuration questions

Notice how Claude provides options but also accepts custom inputs. The skill is flexible, not rigid.

Then Claude presents the complete implementation plan:

The plan includes:

  • Phase 1: Dependencies & Infrastructure
  • Phase 2: Core Library Files
  • Phase 3: API Routes
  • Phase 4: Middleware & Route Protection
  • Phase 5: UI Implementation
  • Phase 6: Database & Scripts
  • Phase 7: Configuration & Documentation

Every. Single. Detail. Planned. Before writing any code.

.

.

.

Watching the Magic Happen

With the plan approved, Claude goes to work.

Installing dependencies and setting up Prisma

First, dependencies. Notice it installs exactly what my authentication system needs:

  • @prisma/client for database
  • bcrypt for password hashing
  • jose for JWT operations
  • resend for emails
  • zod for validation
  • @zxcvbn-ts for password strength

Not a generic “auth package” in sight. These are my chosen tools.

Creating the database schema and migrations

The Prisma schema matches my pattern exactly:

  • User model with sessionVersion for instant session invalidation
  • OtpToken model with attempt tracking
  • AuditLog for security events

This isn’t Claude’s guess at a schema.

This is MY schema.

Building the authentication library files

Watch as it creates:

  • lib/auth.ts – Core authentication logic
  • lib/csrf.ts – CSRF protection
  • lib/rate-limit.ts – Rate limiting with database tracking
  • lib/jwt.ts and lib/jwt-edge.ts – Separate JWT handlers for Node and Edge runtime
Creating API routes with proper structure

326 lines in lib/auth.ts alone. Every function, every pattern, exactly as I designed it.

The API routes follow my exact pattern:

app/api/auth/
├── request-otp/route.ts
├── verify-otp/route.ts
├── dev-signin/route.ts
├── signout/route.ts
├── refresh/route.ts
└── profile/
    ├── set-password/route.ts
    └── change-password/route.ts

Not scattered.

Not random.

My structure.

Implementing middleware and protected routes

Edge middleware that:

  • Verifies JWT without database calls (performance!)
  • Protects /dashboard/* and /settings/*
  • Redirects with ?next= parameter for smooth auth flow

The login page with:

  • Tabbed interface (OTP + Dev Password)
  • React Hook Form + Zod validation
  • Sonner toast notifications
  • Proper loading states
More UI implementation details

Protected layouts, profile pages, dashboard – all following the same patterns.

Claude completing the implementation

Done.

In under 10 minutes of actual implementation time.

The complete getting started guide

Claude even provides a getting started guide:

  1. Create superadmin: SEED_EMAIL=you@example.com npm run seed:superadmin
  2. Start dev server: npm run dev
  3. Visit http://localhost:3000
  4. Sign in with your email

Everything documented. Everything working.

.

.

.

The Proof: Side-by-Side Comparison

But does it actually match the original?

Login page comparison - original boilerplate (top) vs Claude Skills implementation (bottom)
Login page comparison – original boilerplate (top) vs Claude Skills implementation (bottom)]

Look at those login pages.

The structure, the tabs, the form layout – virtually identical.

Some minor styling differences, but the core implementation?

Exact match.

Profile page comparison - original (left) vs Claude Skills implementation (right)
Profile page comparison – original (left) vs Claude Skills implementation (right)

The profile pages tell the same story. Same sections, same password management, same session handling.

Here’s the kicker: The Claude Skills version actually improved on my original in some places. Cleaner code organization. Better error messages. More consistent styling.

The student became the master.

Then taught the next student to be even better.

Want techniques like these weekly?

Join The Art of Vibe Coding—short, practical emails on shipping with AI (without the chaos).

No spam. Unsubscribe anytime. Seriously.

.

.

.

Why This Changes Everything

This isn’t just about authentication.

Think bigger.

Every feature you’ve perfected can become a skill:

  • Your payment integration with Stripe
  • Your real-time notification system
  • Your file upload handling
  • Your admin dashboard layout
  • Your API error handling patterns
  • Your testing setup

Build once. Refine until perfect. Convert to skill. Deploy everywhere.

The compound effect:

1 perfected feature × 10 projects = 10 hours saved 10 perfected features × 10 projects = 100 hours saved 100 perfected features × Your entire career = …you do the math

But it’s not just time saved.

It’s consistency gained. It’s quality guaranteed. It’s your personal coding style, preserved and replicated perfectly.

.

.

.

The Hidden Benefits Nobody Talks About

Benefit #1: Your Code Patterns Become Your Coding Standard

No more “wait, which project had the good auth implementation?”

Your Claude Skills ARE your coding standard.

Benefit #2: Onboarding Becomes Trivial

New developer joins your team? “Here are our Claude Skills. Use them.”

Instant consistency.

Benefit #3: You Stop Reinventing Wheels

That perfect rate limiting implementation from 6 months ago?

It’s in your skill.

Ready to deploy.

Benefit #4: Your Skills Get Better Over Time

Find a bug in your auth flow? Fix it in the skill.

Every future project gets the improvement.

Benefit #5: You Can Share (Or Sell) Your Expertise

Those Claude Skills you’ve perfected?

They’re valuable. Share with your team. Open source them. Monetize them.

.

.

.

Your “I Know Kung Fu” Moment Awaits

Here’s what you need to understand:

Claude Skills aren’t just another AI feature. They’re the bridge between “AI that codes” and “AI that codes the way YOU code.”

It’s the difference between:

  • A junior developer googling solutions
  • A senior developer implementing YOUR solutions

Every pattern you’ve perfected.
Every architecture you’ve refined.
Every security measure you’ve battle-tested.

All of it can become a Claude Skill.

All of it can be replicated perfectly across every project you ever build.

The question isn’t whether you should start using Claude Skills.

The question is: which of your battle-tested features will you turn into a skill first?

In Part 2, I’ll show you exactly how to convert your existing codebase into a Claude Skill.

The process is simpler than you think, and the payoff is massive.

But for now, open that project with the perfect authentication system.

The one you’ve been copying manually to every new project.

It’s time to teach Claude YOUR kung fu.


P.S. – That authentication skill I demonstrated? It’s now deployed in 5 different production apps. Same code. Same patterns. Same security. Total implementation time across all 5 apps: under an hour. The old way would have taken days, and each would have been slightly different. That’s the power of Claude Skills.

P.P.S. – Part 2 drops next week: “How to Convert Your Battle-Tested Code Into Claude Skills.” I’ll walk you through turning your existing codebase into reusable skills, with specific examples and templates you can use immediately.

7 min read The Art of Vibe Coding, Claude, Codex, GPT-5, Vibe Coding

Codex plans with ASCII Wireframes → Claude Code builds → Codex reviews

I used to dive straight into The Codex-Claude Code Workflow and watch it build features.

Sometimes it worked brilliantly.

Other times?

The implementation worked but looked nothing like what I imagined.

The problem wasn’t Claude Code.

It was me.

I was expecting it to read my mind about UI layout and catch its own bugs.

Then I added two things to my workflow:

ASCII wireframes and systematic code review.

Now?

97% of my features work perfectly on the first shot.

No back-and-forth debugging. No “that’s not quite right” moments. Just clean, working code that matches my vision.

Let me show you exactly how this works.

.

.

.

The Old Way Was Good. The New Way Is Magic.

Here’s what I used to do:

  1. GPT-5 plans the feature
  2. Claude Code implements it
  3. Hope for the best

It worked.

Kind of.

But UI was always a gamble, and bugs only showed up during testing.

Here’s what I do now:

  1. GPT-5 asks questions until it’s 95% confident
  2. GPT-5 creates ASCII wireframes (visual blueprint, minimal tokens)
  3. Claude Code implements (following both plan AND wireframes)
  4. GPT-5 reviews the git diff (catches bugs before I even test)
  5. Claude Code applies fixes (surgical corrections)

The difference?

Night and day.

.

.

.

Real Example: Building WordPress Collapsible Sections

My WordPress newsletter was getting unwieldy. Long code snippets and prompts made posts hard to read.

Readers had to scroll forever to get through everything.

I needed collapsible sections.

Click to expand when you want details, stay collapsed when you don’t.

Here’s how the new workflow handled it.

Step 1: Setting Up for Success

I hit GPT-5 with my requirements.

But here’s the critical part – I told it explicitly: “DON’T WRITE OR EDIT ANY FILES.”

Initial prompt to GPT-5 requesting planning for collapsible sections feature

Prompt:

__YOUR_INSTRUCTIONS_HERE__

Read the codebase, and help me come up with a plan to implement everything above.

Make sure to include a short description for this plan in paragrah format at the beginning of the plan.

IMPORTANT: DON'T WRITE OR EDIT ANY FILES.

Use web search if you need to find solutions to problems you encounter, or look for the latest documentation.

Ask me clarifying questions until you are 95% confident you can complete this task successfully.

a. If the question is about choosing different options, please provide me with a list of options to choose from. Mark the option with a clear label, like a, b, c, etc.
b. If the question need custom input that is not in the list of options, please ask me to provide the custom input.

Always mark each question with a number, like 1/, 2/, 3/, etc. so that I can easily refer to the question number when I answer.

For each question, add your recommendation (with reason why) below each options. This would help me in making a better decision.

And I added this game-changer: “Ask me clarifying questions until you are 95% confident you can complete this task successfully.”

Plus numbered questions with lettered options.

No typing paragraphs. Just “1/a, 2/c, 3/b”.

Done.

Step 2: GPT-5 Goes Detective Mode

GPT-5 immediately dove into my codebase:

GPT-5 starting to explore the codebase structure

Then came the questions.

Not random questions.

Strategic ones:

GPT-5 listing detailed questions about implementation choices

Look at those options:

  • Where should content live? (Theme files, CPT, or plugin)
  • How should expand/collapse work? (Native HTML, JS toggle, or hybrid)
  • Content delivery? (Inline, lazy-load, or auto-switch)

Every question had options. With recommendations. With reasons.

This is what thinking looks like.

Step 3: Quick Answers, Deep Impact

I fired back my choices:

My responses to GPT-5's questions

Fast. Decisive. No essays needed.

But GPT-5 wasn’t done:

GPT-5 asking additional clarifying questions

More edge cases.

More decisions.

Every answer shaped the final implementation.

Step 4: The Plan Emerges

After gathering everything, GPT-5 delivered:

GPT-5's finalized implementation plan with all details

This wasn’t a vague outline.

It was a blueprint:

  • Exact file structure
  • CPT registration details
  • Shortcode parameters
  • REST endpoint specs
  • Caching strategy
  • Security measures

Everything. Decided. Documented.

The ASCII Wireframe Revolution

Here’s where things get interesting.

I asked GPT-5: “Based on this plan, give me the UX flow map and screen-by-screen content using ASCII wireframe.”

Asking GPT-5 to create ASCII wireframes

Prompt:

Based on this plan, give me the ux flow map and screen-by-screen content using the ASCII wireframe. Put it at @notes/wireframes.md.

What came next blew my mind:

GPT-5 creating the ASCII wireframes

The Power of ASCII Wireframes

Example ASCII wireframe showing the admin interface layout

Look at this beauty:

ASCII wireframe showing the content editing interface

This isn’t just a sketch.

It’s a contract.

Claude Code sees this and knows EXACTLY what to build.

No interpretation. No guesswork. Just pure clarity.

Why ASCII beats everything else:

  • 10x fewer tokens than HTML
  • Zero ambiguity
  • Instant understanding
  • Easy to modify
  • Works in any terminal

Step 5: Claude Code Takes the Wheel

Armed with the plan AND wireframes, I unleashed Claude Code (Sonnet 4.5):

Providing the plan and wireframes to Claude Code

Watch what happened:

Claude Code starting implementation based on plan and wireframes

Claude didn’t hesitate. Didn’t guess. It knew exactly what to build because the wireframes showed it.

Claude Code completing the implementation

Implementation complete. First try.

Step 6: The code review That Catches Everything

This is where most devs stop.

Not me.

I fired up Codex CLI’s code review feature:

Custom code review prompt to GPT-5

Prompt:

Please read the git diff, and review the code changes to see if the implementation is correct and follows the plan @notes/plan.md and wireframes @notes/wireframes.md, correctly.

GPT-5 went full detective:

GPT-5 starting the code review process
GPT-5's completed code review with findings

Found issues? You bet:

  • P1: Missing lazy-mode fallback for non-JS users
  • P1: Copy button behavior was wrong
  • P2: Preview line count didn’t match CSS
  • Security improvements needed

These weren’t “nice to have” fixes. These were bugs waiting to happen.

Step 7: Surgical Fixes

I handed GPT-5’s review to Claude Code:

Claude applied every fix.

No arguments. No confusion. Just clean corrections.

The End Result: From Concept to Production

Here’s what we built. In one shot. With this workflow.

The WordPress Admin Experience

WordPress admin showing the new Longform Sections custom post type in the menu

Clean integration into WordPress admin. “Longform Sections” sits right where it should, right below Pages.

The Longform Section edit screen with copy shortcode functionality

Look at that meta box on the right. Copy shortcode with one click. Multiple usage examples. All the parameters documented right there.

Every attribute explained:

  • id – Post ID (required)
  • title – Custom title or defaults to post title
  • lines – Preview line count (default 6)
  • mode – smart|inline|lazy
  • expand_text / collapse_text – Customizable labels
  • deep_link – Enable direct linking to sections
  • copy_button – Show copy button for code

No documentation needed. It’s self-explanatory.

The Frontend Magic

The collapsible section showing a bash script in collapsed state

This is what readers see. Clean. Collapsed. A bash script preview with “Show more” button ready.

The “Next Worktrees Manager” section shows just enough code to give context. The fade-out effect tells readers there’s more. One click to reveal everything.

Clean.

Collapsed.

A bash script preview with “Show more” button ready.

Click “Show more” and boom – the full script appears.

The expanded state showing the full bash script content

.

.

.

Why This Workflow Changes Everything

97% Success Rate Isn’t Luck

It’s the result of:

  • Clear communication through wireframes
  • Systematic planning with questions
  • Meticulous review before testing
  • Surgical corrections based on feedback

You don’t get 97% success by luck.

You get it by design.

That’s how “good enough” becomes “ships perfectly.”

.

.

.

Your Turn to Level Up

Stop settling for “close enough” implementations.

Stop debugging for hours.

Stop the back-and-forth madness.

Here’s your action plan:

  1. Tonight: Save the workflow prompts
  2. Tomorrow: Try it on one small feature
  3. This week: Build something complex
  4. Next month: Wonder how you ever worked differently

.

.

.

The Bottom Line

I built a production-ready WordPress feature in less than 20 minutes.

Not a prototype. Not “mostly working.” Production-ready.

97% of my features now ship on the first try.

The 3% that don’t? External dependencies. Environment issues. Things no AI can predict.

This workflow transform you from someone who “uses AI to code” to someone who orchestrates AI to build exactly what I envision.

ASCII wireframes + systematic planning + code review = development superpowers.

What will you build when implementation matches imagination perfectly?


P.S. – This workflow needs GPT-5 (via Codex CLI) for planning/review and Claude Code (Sonnet 4.5) for implementation. Together, they’re unstoppable. Apart, they’re just good. Choose wisely.

5 min read Claude, Codex, The Art of Vibe Coding, Vibe Coding

How I Vibe Code With 3 AI Agents Using Git Worktrees (Without Breaking Anything)

You know that feeling when you’re vibe coding with Claude Code and it suggests a “minor database refactor” – then suddenly your entire local database is corrupted?

Or when you want to test Claude Code’s approach versus Codex’s approach, but switching branches means losing all your test data?

I was so tired of this dance.

So I built a solution.

Next.js Worktrees Manager – a bash script that creates completely isolated development environments with their own PostgreSQL databases.

Let me show you exactly how I vibe code with multiple AI agents simultaneously.

.

.

.

The Problem Nobody Talks About

Here’s what happens every single day when you’re vibe coding:

You’re in the zone with an AI coding agent.

Claude Code, Codex, Cursor, Windsurf – doesn’t matter which.

The agent suggests changes.
You accept them.
Then you realize it modified your database schema.

Now what?

git reset --hard?

Sure, that fixes the code. But your database?

Those migrations already ran.
That test data is gone.
Your local environment is now broken.

The worst part?

You want to compare different AI agents’ implementations.

But without git worktrees, that means:

  • Constantly switching branches
  • Re-running migrations
  • Losing test data
  • Fighting port conflicts
  • Wasting hours on environment management instead of coding

Regular git workflows weren’t built for this level of experimentation.

.

.

.

The Solution: Git Worktrees + True Isolation

Next.js Worktrees Manager does one thing brilliantly:

It extends git worktrees with database isolation.

Each worktree gets:

  • Its own working directory (via git worktrees)
  • Its own PostgreSQL database (cloned from your main)
  • Its own port assignment (run multiple dev servers simultaneously)
  • Its own .env configuration

Git worktrees handle the code isolation. My script handles everything else.

.

.

.

Installation (30 Seconds)

git clone https://github.com/nathanonn/next-worktrees-manager.git
cd next-worktrees-manager
chmod +x worktrees.sh

Done.

.

.

.

Let Me Show You The Magic

Say you want three different AI agents to implement authentication.

Here’s the entire process:

./worktrees.sh setup 
  --branches claude-auth,Codex-auth,gemini-auth 
  --db-url postgresql://localhost:5432/myapp

Watch what happens:

  1. Creates three worktrees in worktrees/ directory
  2. Clones your database three times
  3. Updates each .env with the correct database URL
  4. Assigns ports 3001, 3002, and 3003

Time elapsed: Less than 60 seconds.

Now run all three simultaneously:

cd worktrees/claude-auth && PORT=3001 npm run dev
cd worktrees/Codex-auth && PORT=3002 npm run dev
cd worktrees/gemini-auth && PORT=3003 npm run dev

Open your browser:

  • http://localhost:3001 – Claude’s implementation
  • http://localhost:3002 – Codex‘s implementation
  • http://localhost:3003 – Gemini’s implementation

Test them side-by-side.

Break things.

Each environment is completely isolated.

.

.

.

The Cleanup Is Even Better

Every setup creates a group ID like wt-20251008-191431.

When you’re done experimenting:

./worktrees.sh clean --group wt-20251008-191431

[Screenshot 3 placeholder: Cleaning up worktrees and databases with a single command]

One command. All worktrees deleted. All databases dropped. Your main branch untouched.

It’s like those experiments never happened.

.

.

.

Use Cases That Actually Matter

Testing AI Agent Outputs

Stop wondering which AI agent produces better code. Test them simultaneously:

./worktrees.sh setup 
  --branches gpt5-approach,claude-opus-approach,gemini-3-approach 
  --db-url postgresql://localhost/myapp

Run all three.

See which implementation is cleaner.

Make an informed decision.

Feature Variations

Building multiple payment providers?

Keep them isolated:

./worktrees.sh setup 
  --branches stripe-checkout,paypal-checkout,crypto-checkout 
  --db-url postgresql://localhost/ecommerce

No more commenting out code.

No more environment variable juggling.

Production Debugging

Need to reproduce a production bug safely?

./worktrees.sh setup 
  --branches prod-bug-fix 
  --db-url postgresql://localhost/production_copy 
  --setup-cmd "npm run seed:production"

Break things freely.

Your main environment stays clean.

Team Development

Multiple developers. Same codebase. Zero conflicts:

./worktrees.sh setup 
  --branches alice/feature,bob/feature,charlie/fix 
  --db-url postgresql://localhost/team_db

Everyone gets their own database.

No more “waiting for migrations.”

.

.

.

The Features That Matter

Custom Ports

./worktrees.sh setup 
  --branches v1,v2,v3 
  --db-url postgresql://localhost/db 
  --start-ports 3000,4000,5000

Auto-Prisma

If you use Prisma, it runs prisma generate automatically:

./worktrees.sh setup 
  --branches test 
  --db-url postgresql://localhost/db 
  --auto-prisma on  # Default

Custom Setup

Need to install packages or seed data?

./worktrees.sh setup 
  --branches experiment 
  --db-url postgresql://localhost/db 
  --setup-cmd "npm install && npm run seed"

Force Recreate

Testing the same branch repeatedly?

./worktrees.sh setup 
  --branches test 
  --db-url postgresql://localhost/db 
  --force

.

.

.

Safety Built In

The script protects you from yourself:

  • Local databases only – Can’t accidentally touch remote databases
  • Clean git check – Won’t create worktrees with uncommitted changes
  • Connection handling – Safely terminates active connections
  • Dry run mode – Preview with --dry-run
  • Confirmation required – Bulk cleanup needs --yes

.

.

.

Performance Reality Check

Max 10 branches per setup.

Why?
PostgreSQL connection limits.
But honestly, if you need more than 10 parallel experiments, you have bigger problems.

Database cloning is instant.

PostgreSQL’s CREATE DATABASE ... TEMPLATE uses copy-on-write.

Even gigabyte databases clone in seconds.

.

.

.

Your New Daily Commands

# Create experiment
./worktrees.sh setup --branches feat/test --db-url postgresql://localhost/db

# Check status
./worktrees.sh status --group wt-20251008-191431

# Get start commands
./worktrees.sh start --group wt-20251008-191431  

# Clean up
./worktrees.sh clean --group wt-20251008-191431

# Nuclear option
./worktrees.sh clean --all --yes

.

.

.

Who Actually Needs This

You need this if you:

  • Work with AI coding agents daily
  • Test multiple implementations regularly
  • Value experimental freedom
  • Hate database conflicts
  • Want true environment isolation

You don’t need this if you:

  • Never experiment
  • Work on simple CRUD apps
  • Don’t use PostgreSQL
  • Enjoy manual environment management

.

.

.

The Bottom Line

Stop tiptoeing around your development database.

Stop losing hours to environment setup.

Stop choosing between experimentation and stability.

This script gives you true isolation in under a minute. Break things. Test wildly. Your main branch stays untouched.

Get the script: github.com/nathanonn/next-worktrees-manager

Your future self – vibe coding with three AI agents simultaneously using git worktrees – will thank you.


P.S. – I’ve used this script to test different AI agent implementations. Not once has my main database been corrupted. That peace of mind alone makes vibe coding actually enjoyable again.

5 min read The Art of Vibe Coding, Claude, Codex

Claude Opus 4.1 vs GPT-5 vs GPT-5 Codex: The Bash Bug That Revealed Their Differences

A real-world debugging session that shows how Claude Opus 4.1, GPT-5, and GPT-5 Codex handle the same problem differently – with surprising results.

Sometimes the most frustrating bugs have the simplest solutions.

And sometimes, the AI model you trust most isn’t the right one for the job.

Let me tell you about the time I spent hours (yes, hours) watching Claude Opus 4.1 chase its tail trying to fix a bash script, only to have GPT-5 Codex solve it in minutes.

.

.

.

The Setup: A/B Testing with Git worktrees

I needed a script to automate A/B testing environments using Git worktrees.

The concept was straightforward: create separate workspaces for comparing different AI agents’ outputs side by side, each with its own database instance.

Using my standard workflow, I had GPT-5 plan the architecture and Claude Sonnet 4 implement it.

The script (ab-worktrees.sh) was created successfully.

… or so I thought.

.

.

.

The Problem: Silent Failure

When I ran the script, nothing happened. No error. No output. Just… nothing.

Time to debug.

.

.

.

Round 1: Claude Opus 4.1 – The Endless Loop

I turned to Claude Opus 4.1, my go-to for complex debugging.

It immediately started adding debug statements, analyzing the script structure, and running tests.

It found issues and made fixes!

It added more debug output!

More debugging attempts by Claude

After multiple iterations, Claude confidently declared:

Claude claiming "The script is working but the output isn't showing due to how the shell environment handles output"

But when I tested it…

The script still returning nothing

Still nothing.

Claude kept insisting it was fixed, identifying “echo -e incompatibility” and “working tree check failures” – but the fundamental issue remained.

.

.

.

Claude Opus 4.1 vs GPT-5 vs GPT-5 Codex: Testing Them All

Frustrated, I switched to GPT-5-high in Codex CLI.

GPT-5-high couldn’t crack it either.

But then I tried one more variant: GPT-5-codex-high.

.

.

.

The Breakthrough: A Devastatingly Simple Fix

GPT-5 Codex found the issue immediately:

GPT-5 Codex's fix overview showing the actual problem

The problem? Bash conditional syntax.

The Bug

# Original (broken) pattern
[[ -z "$A_START" ]] && A_START="$BASE_BRANCH"

The Fix

# Fixed pattern
if [[ -z "$A_START" ]]; then
    A_START="$BASE_BRANCH"
fi

That’s it.

That’s the entire fix.

.

.

.

Why This Simple Bug Was So Hard to Find

GPT-5 Codex explained it perfectly:

The && shortcut pattern fails silently in certain contexts:

  • When set -e is enabled (which my script had)
  • In functions or subshells
  • When the first condition returns non-zero

The shortcut syntax relies on specific Bash behavior that breaks under these conditions. The explicit if statement always works.

.

.

.

The Working Script

After applying the fix:

The actual setup completing successfully

Success!

The script now:

  • Creates two Git worktrees (worktrees/a and worktrees/b)
  • Clones the database for each environment
  • Sets up separate ports (3001 and 3002)
  • Provides clear instructions for running both variants
The created worktree structure in the file system
The PostgreSQL databases created for A/B testing

.

.

.

The Lessons

1. Different Models, Different Strengths

Claude Opus 4.1 is brilliant at many things, but it got stuck in a loop adding complex debugging rather than reconsidering the fundamental syntax.

GPT-5 Codex, specialized for code, immediately spotted the syntax pattern issue.

2. Simple Bugs Can Be the Hardest

The simpler the bug, the easier it is to overlook.

We expect complex problems to have complex solutions, but sometimes it’s just a matter of using if instead of &&.

3. Shell Scripting Is Deceptively Complex

What looks like identical syntax can behave completely differently depending on shell options, context, and environment.

The “clever” shortcut often isn’t worth the fragility.

4. Know When to Switch Tools

After watching Claude go in circles for hours, switching to a different model wasn’t giving up – it was being strategic.

Different AI models truly have different strengths.

.

.

.

The Irony

The most sophisticated AI model I had access to couldn’t fix a bug that boiled down to “use an if statement instead of &&”.

Meanwhile, a more specialized model solved it immediately.

Sometimes the best debugger isn’t the most powerful AI – it’s the one that’s been trained specifically for the task at hand.

.

.

.

Important Disclaimer

This is just one data point, not a comprehensive benchmark.

This single debugging session shouldn’t be used to conclude that GPT-5 Codex is definitively superior to Claude Opus 4.1, or that any model is inherently better than another.

Each AI model has its strengths and weaknesses, and they excel in different contexts.

What this experience taught me is that when you’re stuck on a problem with one model, switching to another might provide the fresh perspective needed for a breakthrough.

It’s not about finding the “best” model – it’s about using the right tool for the specific job at hand.

Claude Opus 4.1 remains exceptional at complex reasoning, creative problem-solving, and many coding tasks. GPT-5 and GPT-5 Codex have their own unique strengths.

The key is knowing when to leverage each one.

.

.

.

What’s Next: The A/B Testing Script

Speaking of using the right tool for the job – next week, I’ll be sharing the complete worktrees.sh script that started this whole adventure.

This bash script lets you test different AI models’ outputs side by side using Git worktrees, making it easy to compare implementations from Claude Opus 4.1 vs GPT-5 vs GPT-5 Codex (or any other models) in real-time.

You’ll learn how to:

  • Set up isolated testing environments for each model’s output
  • Compare implementations without contaminating your main branch
  • Run parallel tests with separate databases
  • Make data-driven decisions about which model’s solution to use

Subscribe to stay tuned for next week’s deep dive into automated A/B testing for AI-generated code!

Want techniques like these weekly?

Join The Art of Vibe Coding—short, practical emails on shipping with AI (without the chaos).

No spam. Unsubscribe anytime. Seriously.


Have you experienced similar situations where switching AI models made all the difference? Where a “simple” fix eluded even the most advanced tools? I’d love to hear your debugging war stories in the comments.

8 min read The Art of Vibe Coding, Codex, Vibe Coding

The Latest Codex CLI Commands That Will Save Your Sanity (And Your Rate Limits)

You fire up Codex CLI for a quick task.

Five minutes later, you’re rate-limited.

“When can I code again?” you wonder, staring at the unhelpful error message.

Or maybe you’re trying to get structured JSON from exec, but it returns a wall of text instead.

Or you want Code Review feedback, but you’re not sure how to get the most out of /review.

Sound familiar?

Codex CLI v0.41 just shipped with fixes for all of these headaches.

But here’s the thing – most developers don’t even know these features exist.

Let me show you the three commands that will transform how you use Codex CLI, plus the exact fixes for the issues that drive us all crazy.

.

.

.

But First: Are You Even On v0.41?

Most people aren’t.

They’re running older versions and wondering why things don’t work right.

Check your version right now:

codex --version
codex-cli 0.41.0

Not on 0.41? Here’s the fastest way to update:

If you use npm:

npm install -g @openai/codex@latest

If you use Homebrew:

brew update && brew upgrade codex

30 seconds. That’s all it takes.

Now let’s dive into the commands that actually matter.

The /status Command: Finally See Your Usage BEFORE You Hit The Wall

Here’s what drives me crazy.

You’re coding. Everything’s flowing. Then BAM – rate limit exceeded.

No warning. No heads up. Just sudden death to your productivity.

The worst part? You had no idea you were even close to the limit.

Before v0.41, you were flying blind. Now, /status shows you exactly how much runway you have left.

.

.

.

The Game-Changing Update Nobody’s Talking About

v0.41 added usage tracking to /status.

Look at this beauty:

codex /status

See those percentages?

  • 10% used on your 5-hour limit
  • 15% used on your weekly limit
  • Exact reset times for both

Now you can actually plan.

Big task coming up? Check your usage first. Running low? Save it for after the reset.

No more surprises.

.

.

.

The Blank Usage Bug (And The 2-Second Fix)

But wait. You run /status and the usage section is… empty?

This happens to everyone. Here’s the stupidly simple fix:

# Send a throwaway message first
codex
> hi
> /status

Why does this work?

Usage data loads after your first message. It’s a known bug. Now you know the workaround.

.

.

.

How to Never Get Surprised Again

Make checking /status a habit:

# Add to your shell profile
alias cs="codex /status"  # Quick check

# Before starting big tasks
cs  # Am I good to go?

When you see you’re at 80% on your 5-hour limit, you know it’s time to wrap up or switch to lighter tasks.

When you see you’re at 90% on your weekly limit on a Wednesday, you know to save heavy lifting for next week’s reset.

The power isn’t just seeing the limits. It’s planning around them.

.

.

.

Want techniques like these weekly?

Join The Art of Vibe Coding—short, practical emails on shipping with AI (without the chaos).

No spam. Unsubscribe anytime. Seriously.

The /review Command: Your AI Code Reviewer That Actually Works

You just finished a feature.

Before committing, you want a second pair of eyes on it.

But your teammate is busy. Or it’s 2 AM. Or you just want a sanity check before the PR.

Enter /review – the command that turns Codex into your always-available Code Reviewer.

.

.

.

### The Interactive Menu (The Feature Most People Miss)

Here’s what blew my mind when I discovered it.

Just type `/review` with no arguments:

“`bash

codex /review

“`

And you get this beautiful interactive menu:

Screenshot showing /review interactive menu with 4 options: "1. Review uncommitted changes", "2. Review a commit" (highlighted), "3. Review against a base branch", "4. Custom review instructions"

Pick option 2, and watch this magic:

Screenshot showing commit selection screen with a searchable list of recent commits like "added ab-testing guide", "feat: Update API activity monitor", "Refactor database schema"

You can:

Search commits by typing – Just start typing to filter

Navigate with arrow keys – Up/down through your commit history

Hit Enter to review – Instant analysis begins

Screenshot showing code review in progress for commit 97fd1d4, with Codex finding issues like "Fix clean command option docs - The guide advertises ./ab-worktrees.sh clean --src-db-url but only recognizes --dry-run"

Why this changes everything:

No memorizing commit hashes. No complex git commands. Just browse, select, review.

It’s like having a git GUI built into your terminal.

.

.

.

Three Ways to Review (From Basic to Brilliant)

1. Review Your Staged Changes

The basics. Stage what you want reviewed:

git add -p  # Stage specific chunks
codex /review

2. Review a Specific Commit

Made a commit but having second thoughts?

# Review the last commit
codex /review commit HEAD

# Review any commit
codex /review commit abc123def

3. The Power Move: Custom Instructions

This is where /review becomes magical:

# Security-focused review
codex /review diff --base main 
  --instructions "Check for SQL injection, XSS, and auth bypasses"

# Performance review
codex /review diff --base main 
  --instructions "Find N+1 queries and unnecessary database calls"

# API contract review
codex /review diff --base main 
  --instructions "Verify backward compatibility and semantic versioning"

.

.

.

GitHub PR Reviews (The Feature Nobody Uses)

Did you know Codex can review PRs directly on GitHub?

Just comment on any PR:

@codex review for memory leaks

Setup required: Enable Code Review for your repo first. Takes 2 minutes.

.

.

.

The Selective Staging Trick

Here’s a pro move most developers miss:

Don’t review everything. Review what matters.

# Stage only the business logic
git add -p src/core/

# Skip the test files and configs
# Now review JUST the important stuff
codex /review

Why this matters:

  • Focused reviews catch more issues
  • Less noise, better signal
  • Faster reviews, clearer feedback

Stage surgically. Review intelligently.

.

.

.

The exec Command: Finally, JSON That Doesn’t Suck

You need Codex to analyze something and return JSON.

So you run:

codex exec "analyze the codebase and return findings as JSON"

What you get back?

A wall of text with some JSON-ish stuff buried in the middle. Good luck parsing that in your CI pipeline.

v0.41 fixed this nightmare.

.

.

.

The Schema Revolution

Here’s the game-changer: --output-schema

You tell Codex EXACTLY what JSON structure you want. It delivers exactly that.

Watch this magic:

# 1. Create your schema (analysis-schema.json)
{
  "type": "object",
  "properties": {
    "summary": { "type": "string" },
    "issues": {
      "type": "array",
      "items": {
        "type": "object",
        "properties": {
          "severity": {
            "type": "string",
            "enum": ["low", "medium", "high", "critical"]
          },
          "file": { "type": "string" },
          "description": { "type": "string" }
        }
      }
    }
  },
  "required": ["summary", "issues"]
}

# 2. Run with schema enforcement
codex exec --output-schema analysis-schema.json 
  "Find security issues in the codebase"

# 3. Get PERFECT JSON every time

The result?

Parseable. Predictable. Production-ready JSON.

Every. Single. Time.

.

.

.

See What Codex Is Thinking

Ever wonder what Codex is planning before it executes?

The new --include-plan-tool flag shows you:

codex exec --include-plan-tool 
  "Refactor the auth module for better testing"

Why this matters:

  • Debug long-running commands
  • Understand Codex’s approach
  • Catch issues before execution
  • Learn from its planning process

.

.

.

The Model Bug You Need to Know

Warning: There’s a fresh bug where --output-schema gets ignored with gpt-5-codex.

The workaround? Use gpt-5 instead:

# Doesn't respect schema (bug)
codex config set model gpt-5-codex
codex exec --output-schema schema.json "task"  # Returns unstructured text

# Works perfectly
codex config set model gpt-5
codex exec --output-schema schema.json "task"  # Returns proper JSON

The team knows. Fix coming soon. For now, use gpt-5 when you need schemas.

.

.

.

The Hidden Gem: No More Ripgrep Errors

Remember those annoying postinstall errors?

Error: ripgrep binary not found
Please install ripgrep manually

v0.41 bundles ripgrep. No more install failures in CI. It just works.

Small fix. Huge relief.

.

.

.

Your Cheat Sheet (Copy This)

# Version check
codex --version                              # Are you on 0.41?

# Status & rate limits
codex /status                                # See limits & reset times

# Review commands
codex /review                                # Review staged changes
codex /review commit HEAD                    # Review last commit
codex /review diff --base main 
  --instructions "focus on X"                # Custom focused review

# Exec with structure
codex exec --output-schema schema.json "task"     # Get JSON back
codex exec --include-plan-tool "task"             # See the planning

.

.

.

Your Action Items

  1. Update to v0.41 right now (seriously, it takes 30 seconds)
  2. Add rate limit checks to your shell profile: alias cs="codex /status" # Quick status check
  3. Create JSON schemas for your common exec tasks
  4. Set up /review in your git hooks: # In .git/hooks/pre-commit codex /review || exit 1
  5. Switch models if you hit bugs (gpt-5 vs gpt-5-codex)

.

.

.

The Bottom Line

Codex CLI v0.41 isn’t just an incremental update.

It’s the difference between guessing and knowing.

Between random failures and predictable workflows.

Between text soup and structured data.

These three commands – /status, /review, and exec – aren’t just features. They’re workflow transformers that turn Codex from a cool tool into an essential part of your development process.

The tools are ready. The bugs have workarounds. The productivity gains are real.

What will you build now that your tools actually work?


P.S. – I discovered the usage tracking feature after hitting rate limits three times in one day. Now I check /status before starting any big task. Haven’t been surprised by a rate limit since.

P.P.S. – Yes, the model-specific bugs are annoying. But switching models takes 2 seconds, and the productivity gains are worth the minor inconvenience. The team ships fixes fast – check the GitHub issues for updates.

6 min read Claude, Codex, The Art of Vibe Coding, Vibe Coding

The Codex-Claude Code Workflow: How I Plan With GPT-5 and Execute With Claude Code

I used to dive straight into Claude Code’s Plan Mode and ask it to build features.

Sometimes it worked brilliantly – Claude would research, plan, and implement perfectly. Other times, despite Plan Mode’s capabilities, it built something that technically worked but wasn’t quite what I had in mind.

The problem?

Even with Plan Mode, I wasn’t always giving Claude Code enough context about my specific requirements.

I was expecting it to infer implementation details, UI decisions, and edge cases from a brief description.

Then I discovered a game-changing workflow: Use Codex to plan meticulously, then Claude Code to execute flawlessly.

Let me show you exactly how this works with a real example – adding a context menu to rename and delete chat sessions in my YouTube AI app.

.

.

.

The Magic Is In The Questions

Here’s the breakthrough:

Instead of jumping straight into implementation, I start by having Codex ask me clarifying questions until it’s 95% confident it can create a perfect plan.

This brilliant approach comes from Sabrina Ramonov’s YouTube video “3 ChatGPT Prompts That Feel Like Millionaire Cheat Codes”.

I’ve refined her prompt to work perfectly with Codex for feature planning.

.

.

.

Step 1: Start With Questions, Not Code

I begin with this carefully crafted prompt to Codex:

In the Chat sidebar, I want to add context menu for user to rename the session as well as deleting the session.

Help me come up with a plan to implement this. DON'T WRITE OR EDIT ANY FILES.

Ask me clarifying questions until you are 95% confident you can complete this task successfully.

a. If the question is about choosing different options, please provide me with a list of options to choose from. Mark the option with a clear label, like a, b, c, etc.
b. If the question need custom input that is not in the list of options, please ask me to provide the custom input.

The key elements here:

  • DON’T WRITE OR EDIT ANY FILES – This keeps Codex focused on planning
  • 95% confidence threshold – Forces thorough understanding before proceeding
  • Structured options – Makes decision-making faster and reveals possibilities I hadn’t considered
Original state of the chat sidebar without context menu
Initial prompt to Codex asking for the plan

.

.

.

Step 2: The Clarifying Questions Phase

This is where the magic happens. Codex doesn’t just ask random questions – it systematically explores every aspect of the feature:

Codex presenting its first round of clarifying questions with options

Notice how Codex provides options for each decision:

  • Rename UI: Dialog with text input, inline edit, or popover
  • Delete confirmation: AlertDialog, no confirmation, or typing “DELETE”
  • Mobile behavior: Different menu types or desktop-only
  • Post-action behavior: Keep selection, reset, or select next

I can quickly pick options without having to type lengthy explanations:

My responses to Codex's questions using the option labels

But Codex doesn’t stop there. It asks follow-up questions to refine the details:

Codex asking additional clarifying questions

Questions about:

  • Handling duplicate titles
  • Whitespace validation
  • Button visibility
  • Delete confirmation text
  • Test IDs for E2E testing

I continue answering:

My responses to the additional questions

.

.

.

Want techniques like these weekly?

Join The Art of Vibe Coding—short, practical emails on shipping with AI (without the chaos).

No spam. Unsubscribe anytime. Seriously.

Step 3: The Comprehensive Plan

After gathering all requirements, Codex produces a detailed implementation plan:

Codex's final comprehensive plan with all implementation details - Parts 1 of 4
Codex's final comprehensive plan with all implementation details - Parts 2 of 4
Codex's final comprehensive plan with all implementation details - Parts 3 of 4
Codex's final comprehensive plan with all implementation details - Parts 4 of 4

The plan is incredibly thorough, covering:

Backend Architecture:

  • PATCH and DELETE routes with exact endpoints (/api/chat/sessions/:sessionId)
  • Specific HTTP status codes (200, 204, 401, 404)
  • Storage interface methods with complete signatures
  • MemStorage and PostgreSQLStorage implementation details
  • Ownership verification and cascade deletion logic

Client-Side Implementation:

  • useChat hook extensions with renameSessionMutation and deleteSessionMutation
  • Cache invalidation strategies
  • Toast feedback for success/error states
  • Context state management

UI Components:

  • ContextMenu wrapper with ContextMenuTrigger
  • Always-visible “…” actions button with DropdownMenu
  • Dialog components with specific state management
  • Input validation rules (trim, non-empty, allow duplicates)
  • Loading states that disable actions during pending operations

UX Specifications:

  • Left-click for selection, right-click for actions
  • Mobile-first “…” button approach
  • Preserved updatedAt timestamps during rename
  • Session order stability
  • Sidebar sheet behavior (no auto-close on dialog open)

Testing Infrastructure:

  • Comprehensive test IDs for E2E testing
  • API contract examples with request/response formats
  • Testing checklist with specific scenarios

This isn’t just a vague outline – it’s a blueprint that any developer could follow.

.

.

.

Step 4: From Plan to Implementation

Now comes the handoff. I copy Codex’s plan and paste it directly into Claude Code:

Copying the plan from Codex and pasting into Claude Code

Claude Code immediately understands the comprehensive plan:

Claude Code acknowledging and analyzing the plan

Watch as Claude Code systematically implements each part of the plan:

Claude Code examining the existing codebase structure
Claude Code making the necessary changes to implement the features

The implementation is surgical and precise – Claude Code knows exactly what to build because the plan is so detailed:

Claude Code's completion message showing successful implementation
The working context menu with rename and delete options

.

.

.

Step 5: The Review Loop

But we’re not done yet. This is where the workflow truly shines.

I take the git diff from Claude Code’s implementation and ask Codex to review it:

Please read the git diff, analyze the implementation and check if everything is implemented as per advised.

DON'T WRITE OR EDIT ANY FILES.
Asking Codex to review the implementation

Codex meticulously reviews every change:

Codex's detailed review findings

In this case, Codex found two deviations from the agreed plan:

  1. Timestamp updates during rename (should be preserved)
  2. Button visibility on desktop (had unnecessary opacity classes)

.

.

.

Want techniques like these weekly?

Join The Art of Vibe Coding—short, practical emails on shipping with AI (without the chaos).

No spam. Unsubscribe anytime. Seriously.

Step 6: Refinement Based on Feedback

I copy Codex’s feedback back to Claude Code:

Providing Codex's feedback to Claude Code

Claude Code immediately understands and implements the corrections:

Claude Code implementing the fixes
Claude Code confirming all fixes are complete

The final result?

A perfectly implemented feature that matches the original specifications exactly:

Final working implementation with all refinements

.

.

.

Why This Workflow Is Revolutionary

1. Thinking Before Coding

By forcing myself to answer Codex’s questions, I’m thinking through edge cases and implementation details BEFORE any code is written.

This prevents the “oh wait, what about…” moments during development.

2. Leveraging Strengths

  • Codex excels at: Analysis, planning, asking the right questions, and meticulous review
  • Claude Code excels at: Understanding context, implementing complex features, and following detailed plans

3. Faster Development

Counter-intuitively, spending 10 minutes on planning saves hours of refactoring.

The implementation is right the first time.

4. Better Code Quality

The review loop catches issues that might slip through.

Having Codex review Claude Code’s work is like having a senior developer review every PR.

5. Learning Through Questions

Codex’s questions often reveal considerations I hadn’t thought of.

“Should duplicate titles be allowed?”
“What happens to the selection after delete?”

These questions make me a better developer.

.

.

.

The Prompt That Makes It Work

The secret sauce is in the prompt structure. By combining:

  • Clear feature description
  • Explicit “don’t code” instruction
  • 95% confidence threshold (credit to Sabrina Ramonov)
  • Structured option format

We transform Codex from a code generator into a thoughtful architect who ensures every detail is considered before implementation begins.

.

.

.

Your Next Feature

Try this workflow on your next feature:

  1. Start with Codex – Use the clarifying questions prompt
  2. Answer thoughtfully – Pick from options or provide custom input
  3. Get the plan – Let Codex create a comprehensive blueprint
  4. Implement with Claude Code – Copy the plan and watch it build
  5. Review with Codex – Check the implementation against the plan
  6. Refine with Claude Code – Apply any feedback from the review

This isn’t just about building features faster. It’s about building them right the first time.

While the context menu might seem like a simple example, this same workflow scales beautifully to complex features. Whether you’re building authentication systems, real-time collaboration, or intricate data visualizations – the pattern of meticulous planning with Codex followed by precise execution with Claude Code ensures success every time.

What feature will you plan with Codex and build with Claude Code?


P.S. – The combination of Codex’s analytical planning and Claude Code‘s implementation prowess has transformed how I develop. No more half-baked features or forgotten edge cases. Just clean, well-planned, thoroughly reviewed code.