GPT-5.6 Sol Is Way Better in Claude Code (Here’s How to Set It Up)
I was halfway through Theo’s video when I opened a new terminal.
Couldn’t help it — I needed to see this for myself.
He was showing a setup where GPT 5.6 Sol runs through Claude Code’s interface using a local proxy. Same model you’d get in Codex, but wrapped in Claude Code’s system instructions, tools, and workflow scaffolding. Tibo posted about the same setup on X around the same time, and the results he shared looked impressive.
So I set it up.
Ran the same prompts through both environments. Compared the output side by side.
Here’s the thing.
The same model, at the same effort level, produces dramatically different results depending on where you run it. And the gap was wide enough that I wanted to document exactly what I saw — and then walk you through the full setup so you can try it yourself.
.
.
.
The Comparison: Same Model, Different Results
I gave the same three SaaS landing page prompts to GPT-5.6 Sol in Claude Code (via a local proxy called CLIProxyAPI) and directly in Codex. Same model. Same effort level (xhigh). Different surroundings.
The three prompts were for fictional products:
| Product | Description |
|---|---|
| Devlog | A project board that lives in your codebase |
| FlowPilot | A team coordination workspace |
| ReviewFlow | A client feedback and review tool |
Each prompt was a single sentence describing the product. Here’s what the prompt looked like in Claude Code and in Codex:

Identical prompt, identical model, identical reasoning effort. Let’s look at what came out.
Devlog
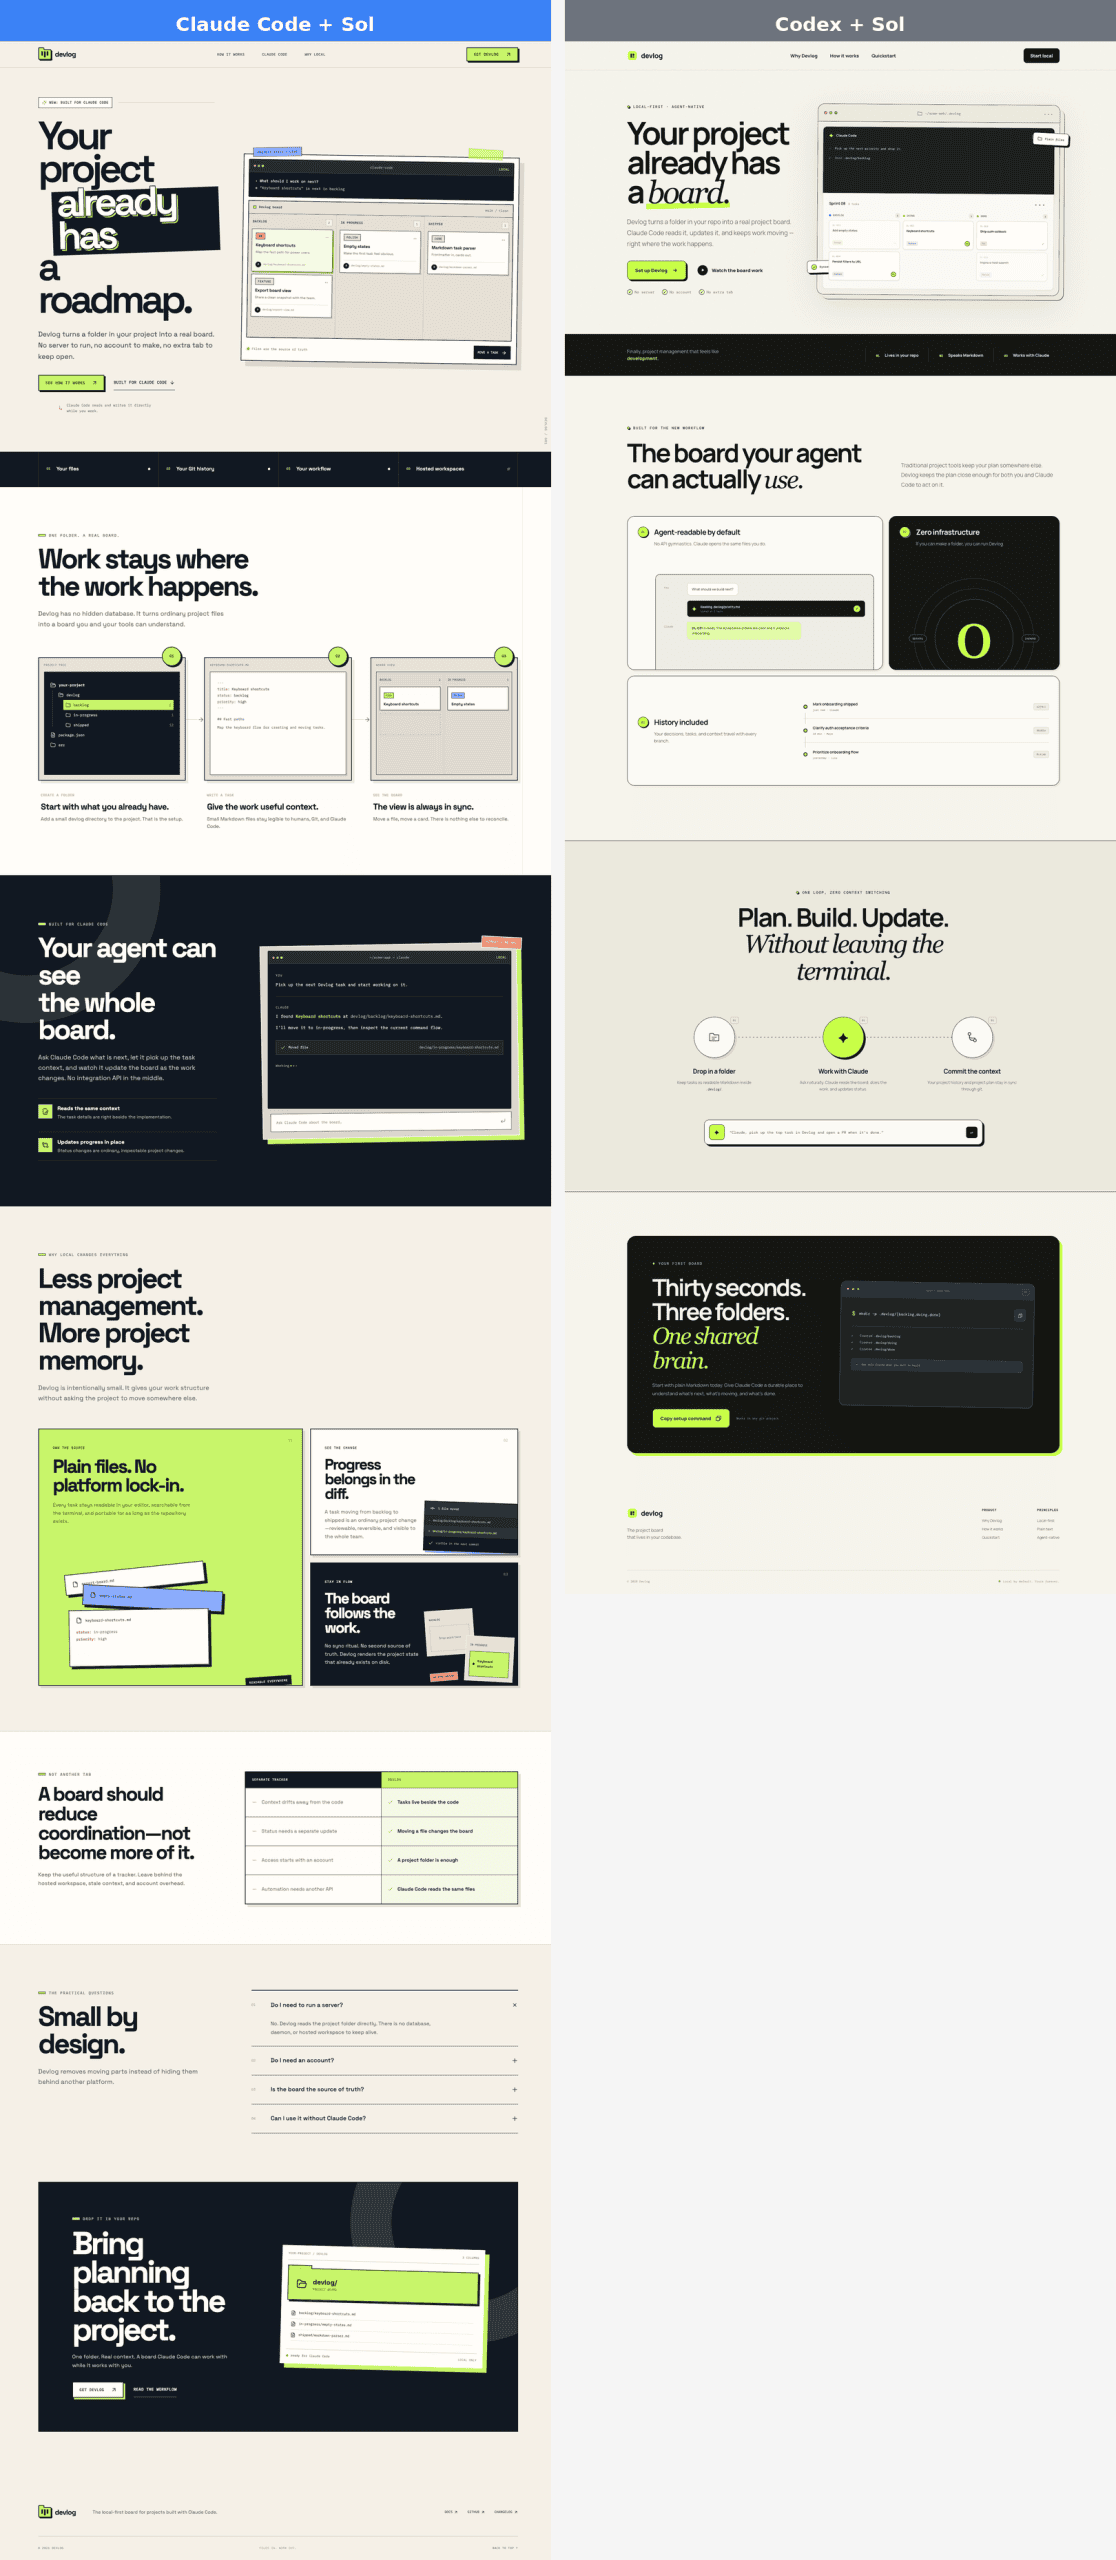
The Claude Code version feels like a complete marketing site — multiple distinct sections, strong visual variety, and the kind of detail you’d expect from a finished product page. The Codex version is clean and professional, but reads more like a polished template with roughly half the depth.
FlowPilot
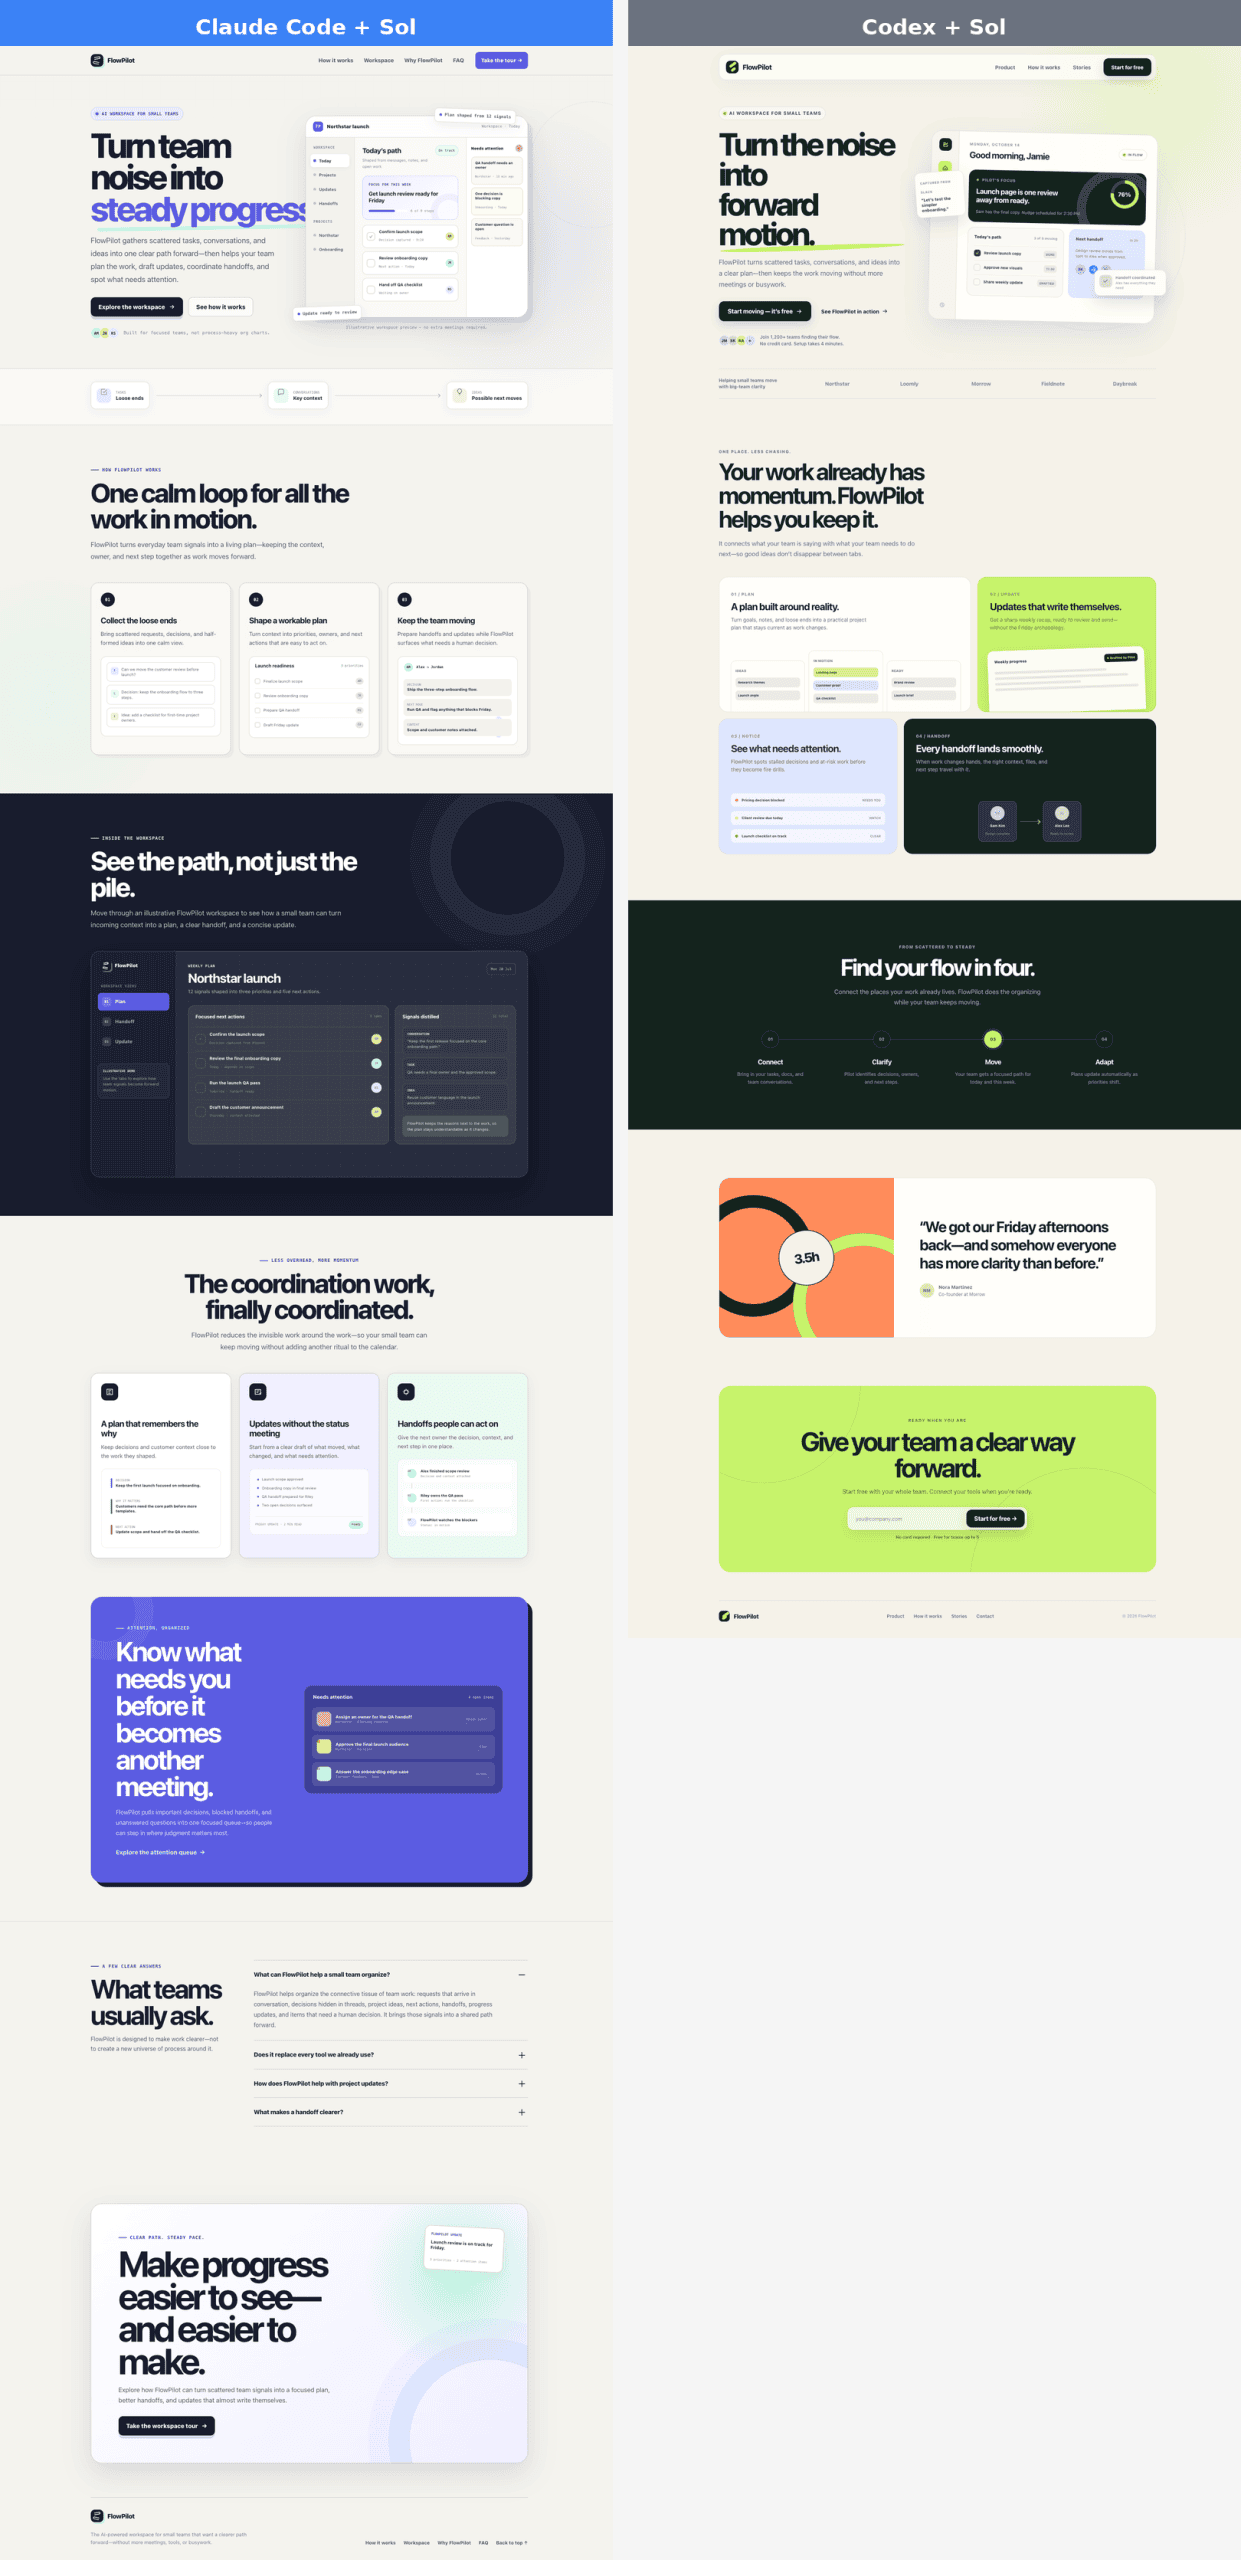
The Claude Code version has richer component variety and more interactive elements throughout. The Codex version is visually cohesive and well-structured, but leans on simpler, more repetitive patterns.
ReviewFlow
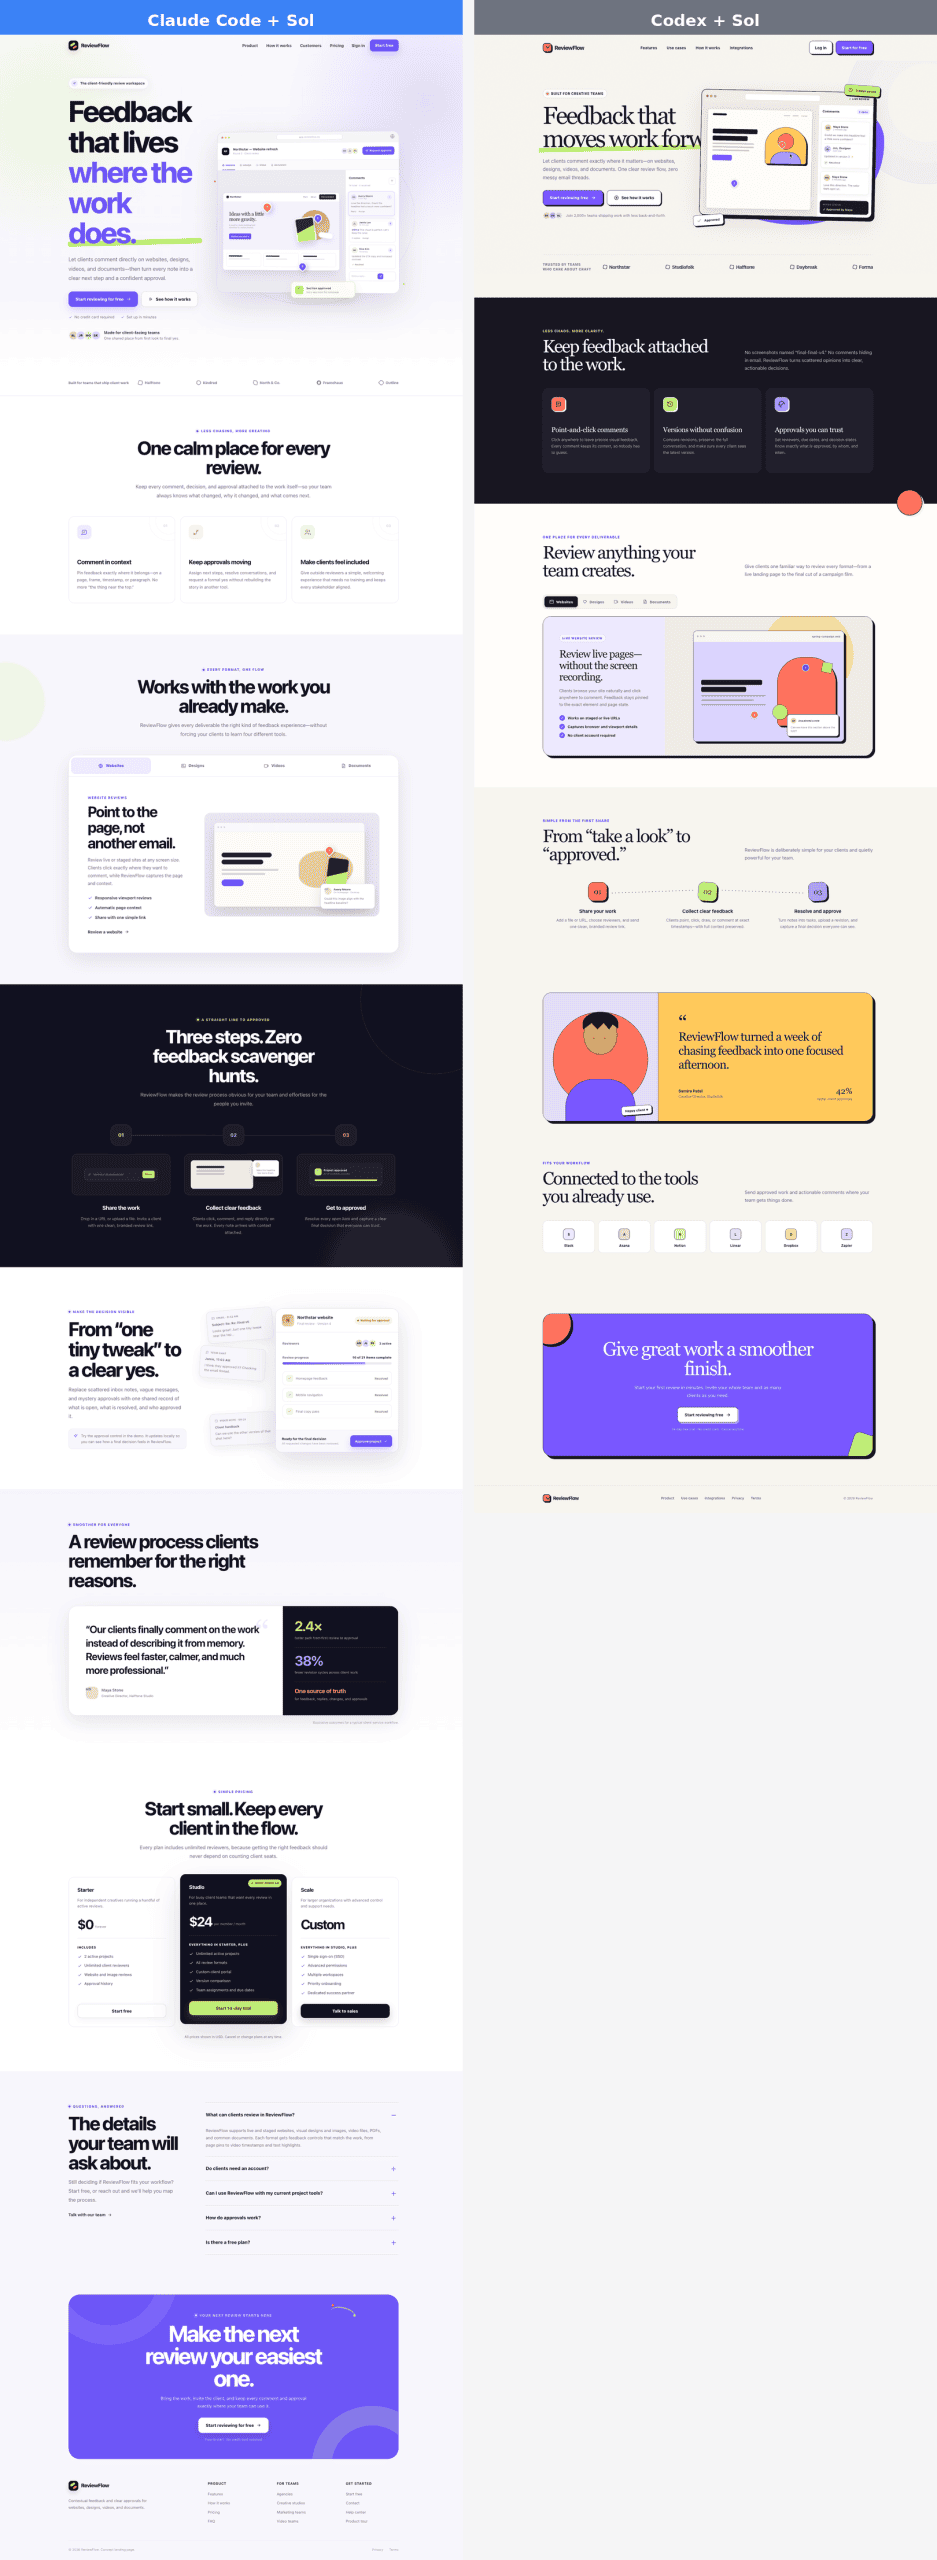
The Claude Code version goes deeper — more content-rich sections, more complex components like pricing tables and product demos, and the kind of page structure you’d see on a real SaaS site. The Codex version is polished and distinctive, but covers less ground overall.
What the Comparison Reveals
I opened the first Claude Code output next to the Codex version and actually said “wait, really?” out loud.
I expected a difference.
I didn’t expect it to be this obvious.
Across all three tests, the pattern held. Sol in Claude Code produced pages with more sections, more component variety, and more of the elements you’d expect on a real SaaS marketing site — pricing tables, FAQ accordions, testimonials with specific metrics, product demo sections.
Sol in Codex produced clean, professional pages every time.
The design quality was solid.
But the output was consistently simpler: fewer sections, fewer interactive components, less of the detail work that separates a landing page from a finished marketing site.
Theo called this out in his video.
Claude Code’s system instructions — its built-in knowledge of how to structure projects, use design patterns, and scaffold complete outputs — act as an invisible co-pilot that amplifies whatever model is behind it.
.
.
.
Why Sol Performs Better Inside Claude Code
Claude Code provides rich system instructions that shape how the model approaches every task.
When you ask for a landing page, those instructions guide the model toward common page structures, component patterns, and file organization conventions. The model receives a substantial context before your prompt even arrives.
Codex is a more minimal environment. It gives Sol direct access to tools and a sandbox, but less guidance on how to use them. The model has to infer structure, conventions, and completeness standards from the prompt alone.
Stay with me — because this is the part that reframes the whole comparison.
Think of it like a skilled carpenter and two different workshops.
The carpenter’s talent is the same in both rooms. But in the workshop with the jigs, the templates, and the well-organized workbench, every cut lands cleaner and every joint sits tighter. (If you’ve ever tried assembling IKEA furniture with the right Allen wrench versus a butter knife, you already know this feeling at a smaller scale.)
That’s the dynamic at play here.
Sol’s raw capability is impressive in both environments. Inside Claude Code, that capability gets channeled through a set of conventions and structural expectations that push the output toward completeness and consistency.
The takeaway: environment matters as much as raw model capability. And if you have access to Sol through your Codex allowance, you can put it inside the better environment right now.
.
.
.
The Setup Guide: Running GPT-5.6 Sol in Claude Code
Here’s the full walkthrough.
By the end of this section, you’ll have Sol running inside Claude Code with a dedicated launcher that keeps the proxy configuration separate from your normal Claude setup.
Let me show you what you need before we start.
What You Need
Before you start, make sure you have:
- macOS or Linux — Windows users can follow the CLIProxyAPI Windows installation guide and the Claude Code Windows/WSL setup docs
- Claude Code installed — if you haven’t yet, run
curl -fsSL https://claude.ai/install.sh | bash - An OpenAI account with Codex access — Plus, Pro, Business, or Enterprise plans get Sol; Free and Go accounts receive Terra
- CLIProxyAPI — a local proxy that translates between Claude Code’s API format and OpenAI’s Codex OAuth
The flow looks like this:
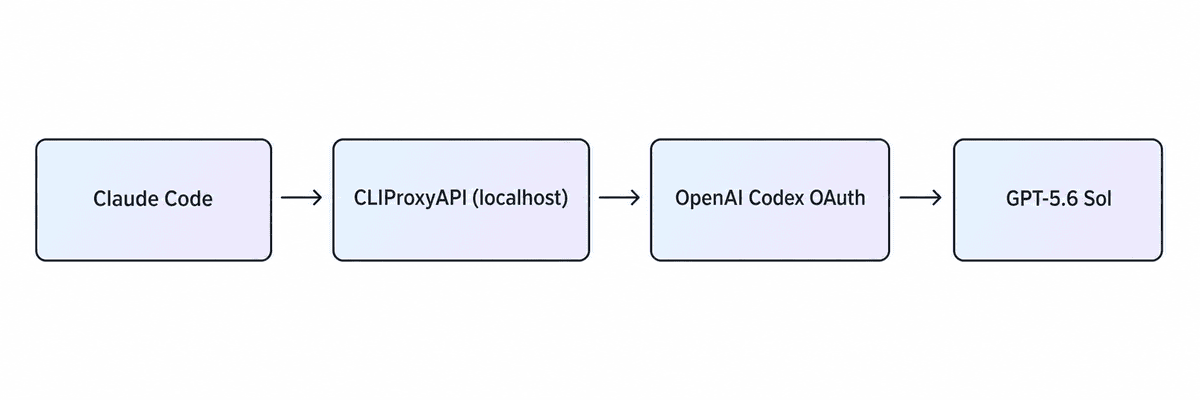
Your prompts go through Claude Code’s interface, hit the local proxy, get translated into the Codex format, and reach Sol. Responses come back through the same chain. From your perspective, you’re using Claude Code exactly as you normally would — the model behind it is just different.
Step 1: Install CLIProxyAPI
macOS:
brew install cliproxyapiLinux:
Download the installer, inspect it, and run it:
curl -fsSLo /tmp/cliproxyapi-installer \
  https://raw.githubusercontent.com/router-for-me/cliproxyapi-installer/refs/heads/master/cliproxyapi-installer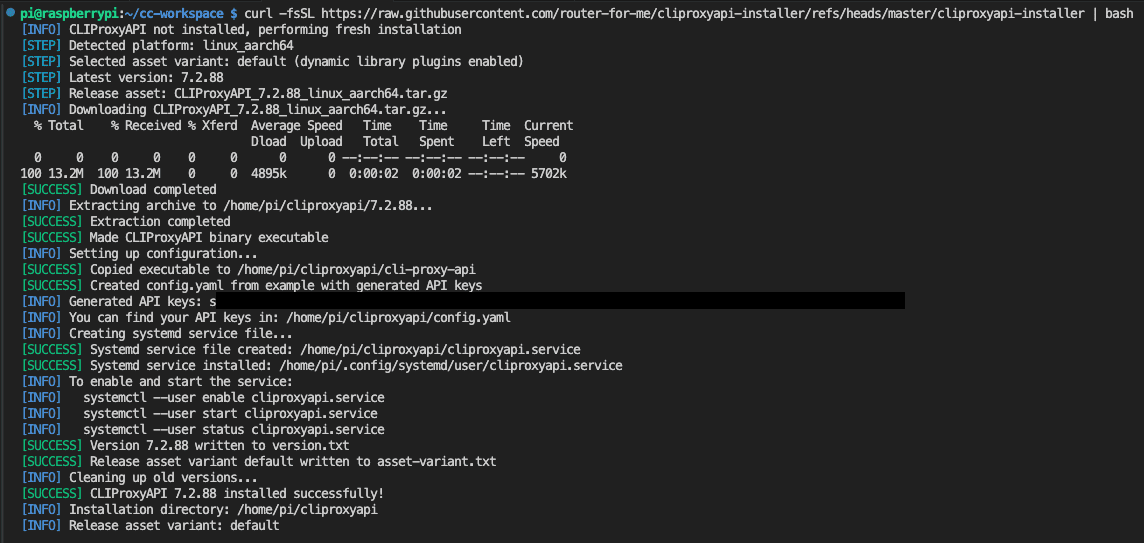
The installer places everything under your home directory, generates a default configuration, and creates a systemd service definition you can enable later. Don’t start the service yet — running it manually first makes configuration errors easier to spot.
Step 2: Configure for Security
The default configuration works, but a few changes make it safer for a proxy that handles OAuth credentials.
Here’s what the secure configuration does:
- Binds to 127.0.0.1 only — prevents other devices on your network from reaching the proxy
- Generates a random local API key — protects the proxy endpoints
- Disables remote management and the web control panel — reduces the attack surface
- Stores OAuth credentials in a dedicated directory under your home folder
The configuration is a YAML file. On macOS it lives at the Homebrew prefix; on Linux it’s in the CLIProxyAPI install directory.
macOS:
PROXY_KEY="sk-local-$(openssl rand -hex 32)"printf '%s\n' "$PROXY_KEY" > "$HOME/.config/claudex/proxy-key"Linux:
mkdir -p "$HOME/.config/claudex"PROXY_KEY="sk-local-$(openssl rand -hex 32)"printf '%s\n' "$PROXY_KEY" > "$HOME/.config/claudex/proxy-key"The key settings in your config file:
host: "127.0.0.1"port: 8317api-keys: - "sk-local-your-generated-key-here"remote-management: allow-remote: false disable-control-panel: trueThe full configuration script (with backup, permissions, and cleanup) is in the linked reference guide at the bottom of this post.
The API Key Gotcha: I spent a good twenty minutes staring at connection errors before I realized the default placeholder keys were still sitting in the config. The proxy was running, accepting connections, and rejecting every request. Classic config issue. The installer seeds the configuration with placeholder entries, and CLIProxyAPI deliberately blocks its proxy endpoints until all of them are removed. Removing the sample entries and leaving only the real generated key fixed it immediately.
Step 3: Connect Your OpenAI Account
CLIProxyAPI authenticates with OpenAI through a Codex OAuth flow. Run the login command, and your browser will open so you can sign in with the OpenAI account whose Codex allowance you want to use.
macOS:
cliproxyapi \
  --config "$(brew --prefix)/etc/cliproxyapi.conf" \
  --codex-login
Linux:
"$HOME/cliproxyapi/cli-proxy-api" \
  --config "$HOME/cliproxyapi/config.yaml" \
  --codex-login
If you’re on a headless or remote machine (like a Raspberry Pi), add --no-browser and use an SSH tunnel to forward the callback port. Running OAuth on a headless Raspberry Pi meant setting up an SSH tunnel just to complete the login. One of those detours that makes you question your choices for about ten minutes — and then it works and you forget you were ever annoyed.
"$HOME/cliproxyapi/cli-proxy-api" \
  --config "$HOME/cliproxyapi/config.yaml" \
  --codex-login \
  --no-browser
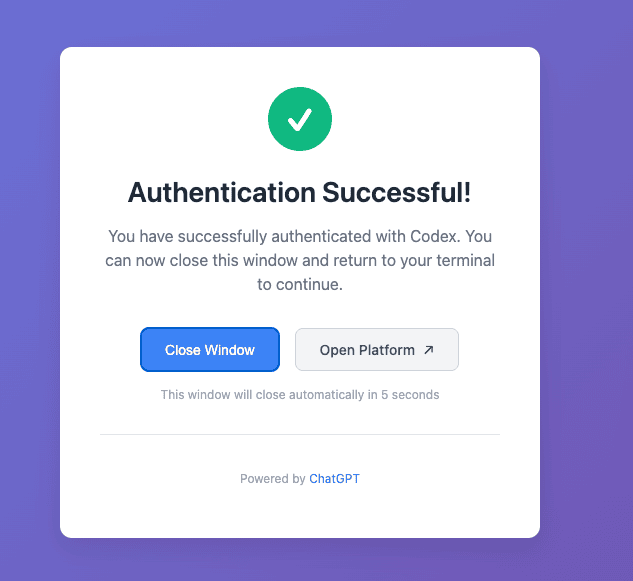
When the OAuth flow completes, you’ll see this screen:
Step 4: Start CLIProxyAPI
Run the server manually first to verify everything is wired up correctly.
macOS:
cliproxyapi \
  --config "$(brew --prefix)/etc/cliproxyapi.conf"
Linux:
"$HOME/cliproxyapi/cli-proxy-api" \
  --config "$HOME/cliproxyapi/config.yaml"
You should see the server start up, refresh its model list from OpenAI, and begin listening on your configured address:
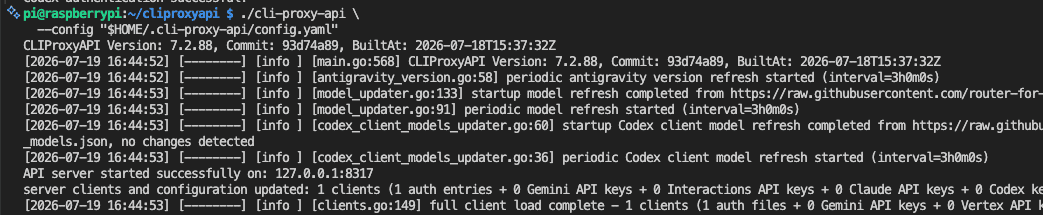
Leave that terminal open. The remaining steps happen in a second terminal.
Once you’ve confirmed it works, enable it as a background service so it starts automatically:
macOS:
brew services start cliproxyapiLinux:
systemctl --user enable --now cliproxyapi.serviceStep 5: The Launcher
Here’s where Claude Code and Sol actually meet.
The launcher is a shell function called claudex. It launches Claude Code with the proxy configuration pre-loaded, keeping all the proxy environment variables isolated in a subshell so your normal claude command stays completely untouched.
It provides two profiles:
| Profile | Main Session | Subagents | Background |
|---|---|---|---|
| Balanced | Sol | Terra | Luna |
| All Sol | Sol | Sol | Sol |
Add this function to your shell configuration file (.zshrc on macOS, .bashrc on Linux):
claudex() ( set -eu profile="${CLAUDEX_PROFILE:-balanced}" case "${1:-}" in balanced|all-sol) profile="$1" shift ;; esac key_file="${XDG_CONFIG_HOME:-$HOME/.config}/claudex/proxy-key" if [ ! -r "$key_file" ]; then printf 'Missing proxy key: %s\n' "$key_file" >&2 exit 1 fi proxy_key="$(tr -d '\r\n' < "$key_file")" if [ -z "$proxy_key" ]; then printf 'Proxy key is empty: %s\n' "$key_file" >&2 exit 1 fi unset ANTHROPIC_API_KEY unset ANTHROPIC_MODEL unset CLAUDE_CODE_USE_BEDROCK unset CLAUDE_CODE_USE_VERTEX unset CLAUDE_CODE_USE_FOUNDRY export ANTHROPIC_BASE_URL="http://127.0.0.1:8317" export ANTHROPIC_AUTH_TOKEN="$proxy_key" export ANTHROPIC_CUSTOM_MODEL_OPTION="gpt-5.6-sol" export ANTHROPIC_CUSTOM_MODEL_OPTION_NAME="GPT-5.6 Sol via CLIProxyAPI" export ANTHROPIC_CUSTOM_MODEL_OPTION_DESCRIPTION="OpenAI Codex OAuth through a local proxy" export ANTHROPIC_CUSTOM_MODEL_OPTION_SUPPORTED_CAPABILITIES="effort,xhigh_effort,max_effort" export CLAUDE_CODE_ALWAYS_ENABLE_EFFORT=1 export CLAUDE_CODE_MAX_TOOL_USE_CONCURRENCY="${CLAUDEX_CONCURRENCY:-3}" export ENABLE_TOOL_SEARCH=false case "$profile" in balanced) export CLAUDE_CODE_SUBAGENT_MODEL="gpt-5.6-terra" export ANTHROPIC_DEFAULT_HAIKU_MODEL="gpt-5.6-luna" ;; all-sol) export CLAUDE_CODE_SUBAGENT_MODEL="gpt-5.6-sol" export ANTHROPIC_DEFAULT_HAIKU_MODEL="gpt-5.6-sol" ;; esac command claude \ --model gpt-5.6-sol \ --effort "${CLAUDEX_EFFORT:-high}" \ "$@")After saving, reload your shell:
source ~/.zshrc # macOSsource ~/.bashrc # LinuxWorth knowing — a few things about how this works:
- Balanced mode uses Sol for your main conversation, Terra (faster, lighter) for subagent tasks, and Luna (fastest, cheapest) for background operations. Good for everyday work where you want Sol’s intelligence on the main task without burning through your Codex allowance on routine operations.
- All Sol mode puts Sol everywhere. Consistent quality across the board, but concurrent subagents consume your allowance faster.
- Effort levels control how much reasoning Sol applies. The launcher defaults to
high. Override it with theCLAUDEX_EFFORTenvironment variable:medium,high,xhigh, ormax.
Usage examples:
claudex balanced # Daily work, Sol main + Terra/Luna supportingCLAUDEX_EFFORT=xhigh claudex all-sol # Complex tasks, full Sol everywhereclaude # Normal Anthropic-backed Claude Code, unchangedBecause claudex runs in a subshell, exiting the session removes all the proxy variables. Your normal claude command is always there, pointing at Anthropic’s models, completely separate.
Step 6: Verify It Works
Two quick checks from a second terminal while CLIProxyAPI is running.
Check 1 — Proxy health:
KEY="$(tr -d '\r\n' \ < "${XDG_CONFIG_HOME:-$HOME/.config}/claudex/proxy-key")"curl -sS \ -o /dev/null \ -w 'Proxy HTTP status: %{http_code}\n' \ http://127.0.0.1:8317/v1/models \ -H "Authorization: Bearer $KEY"unset KEYYou should see:
Proxy HTTP status: 200Check 2 — End-to-end through Claude Code:
claudex balanced -p 'Reply exactly: sol-ok'If Sol responds with sol-ok, the full chain is working: Claude Code to CLIProxyAPI to Codex OAuth to Sol and back.
.
.
.
The Bigger Picture
Here’s what I found interesting about this experiment — and it goes beyond Sol specifically.
The pattern emerging is that the best results come from combining the right model with the right environment. Claude Code functions as a kind of universal cockpit — you can fly different engines through the same interface, and the cockpit’s instruments (system instructions, tool scaffolding, context management, skills) make every engine perform better than it would alone. A well-equipped cockpit improves the flight regardless of what’s generating the thrust.
If you have access to Sol through your Codex allowance, you can now use GPT-5.6 Sol in Claude Code with all the workflow benefits you’ve built up — your custom skills, your sub-agent patterns, your project-level rules. Everything carries over because the interface stays the same.
Try the setup.
Run your own comparisons.
I’m genuinely curious whether the gap I saw holds across different types of tasks — or whether there are cases where Codex’s minimal environment actually produces better output.
Let me know what you find.

Leave a Comment