How to Install Any Skill in ChatGPT Work (Web version) With One Prompt
OpenAI launched ChatGPT Work in early July 2026 with two versions: a desktop app reworked from the old Codex application, and a web version that runs entirely in the browser.
Both let AI work with your files, plugins, and approved tools to complete real tasks. You give it a goal, it retrieves what it needs, builds finished deliverables, and runs multi-step workflows. This is OpenAI’s take on what Anthropic built with Claude Cowork — a workspace where AI goes beyond answering questions and actually finishes work for you.
Most of the early coverage focused on the desktop app, which makes sense — it has local execution and deeper integration with your file system.
The web version runs lighter — no local install, no background processes — and that’s exactly why I wanted my tools there too.
In How to Turn AI-Generated HTML Into WordPress Blocks (Without Breaking Them), I built a skill that validates AI-generated block markup before it reaches the WordPress editor. It catches structural problems — broken nesting, hallucinated block types, invalid attributes — before they become broken blocks the editor can’t render. Useful enough that I wanted it everywhere I work, including ChatGPT Work’s web version.
On the desktop app, the install path is clear. You can upload a zip file through the interface, or run a CLI command that pulls the skill from a public repository:
npx skills add nathanonn/agent-skills --skill validate-block-markupTwo documented options. The CLI command is especially convenient — point it at a repo, name the skill, and it pulls everything down in seconds.
The catch: those options live on the desktop. Skills you install on the desktop app stay on the desktop app. Switch to the web version, and they won’t be there — the two environments don’t share a skill directory.
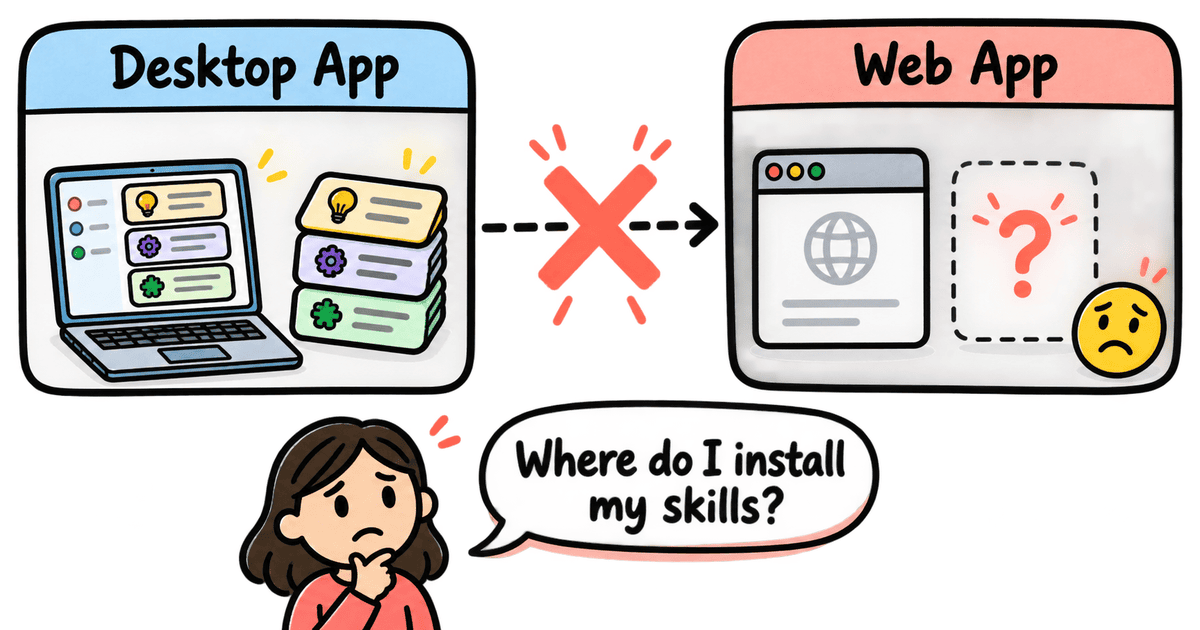
So when I wanted to install skills in ChatGPT Work’s web version, I opened it expecting a visible install option. Clicked around, searched menus, nothing. It took several minutes of poking through Settings before I found it buried four levels deep.
The feature exists. Reaching it takes four clicks through nested settings, and once you’re there, you still need to download files, zip them, and upload the zip manually.
There’s a shortcut that skips all of it — one prompt, one GitHub URL.
.
.
.
Where ChatGPT Work hides the skill installer
The manual installation path starts in Settings.
Open the Settings panel and click the Plugins tab. At the bottom of the plugin list, there’s a “Browse plugins” link — easy to miss if you’re scrolling past your existing plugins without looking for it.
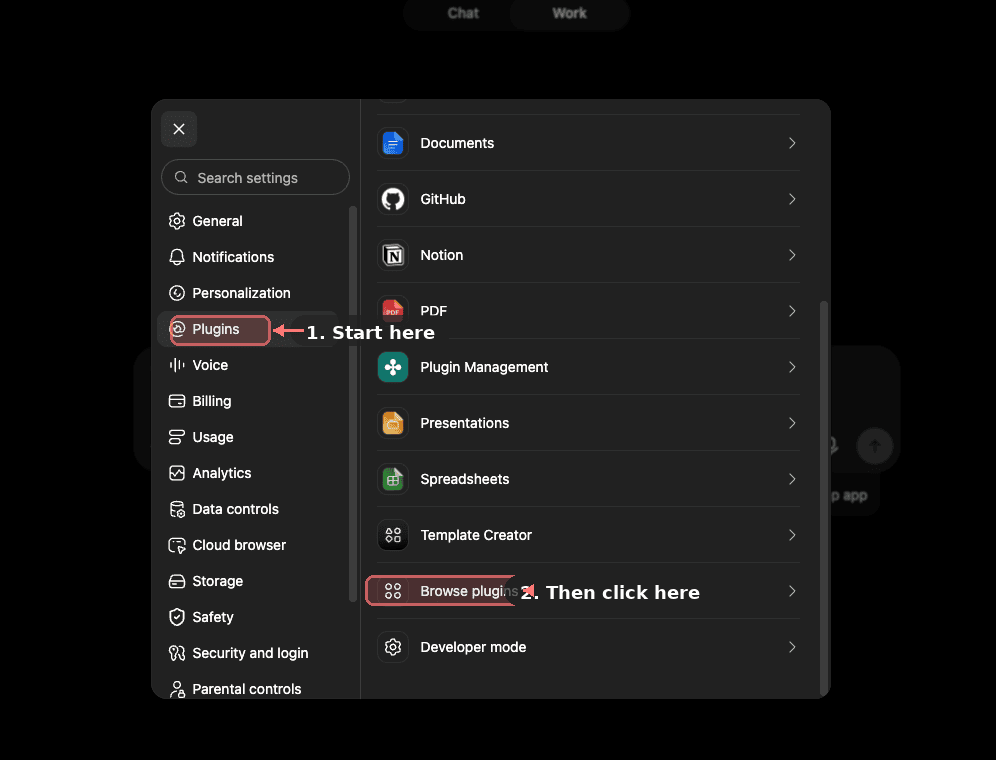
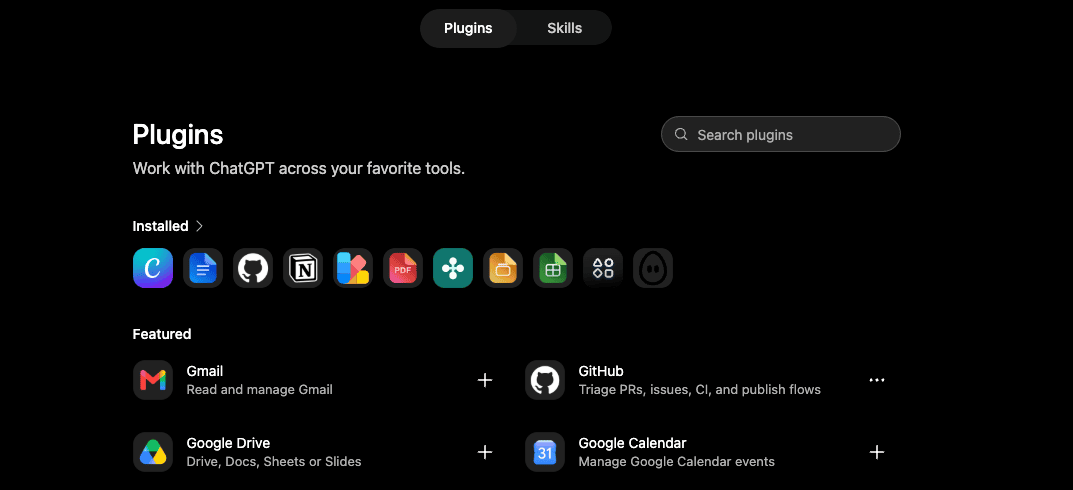
Clicking that link takes you to a separate Plugins page. Installed plugins appear on the left, featured ones on the right. Two tabs sit at the top: Plugins and Skills.
Click the Skills tab and you’ll see a small “+” button in the corner with three choices:
- Create with Chat: describe what you want and let ChatGPT write the skill for you
- Create with Editor: write the skill code directly in a built-in editor
- Upload from your computer: select a zip file or skill file from your machine
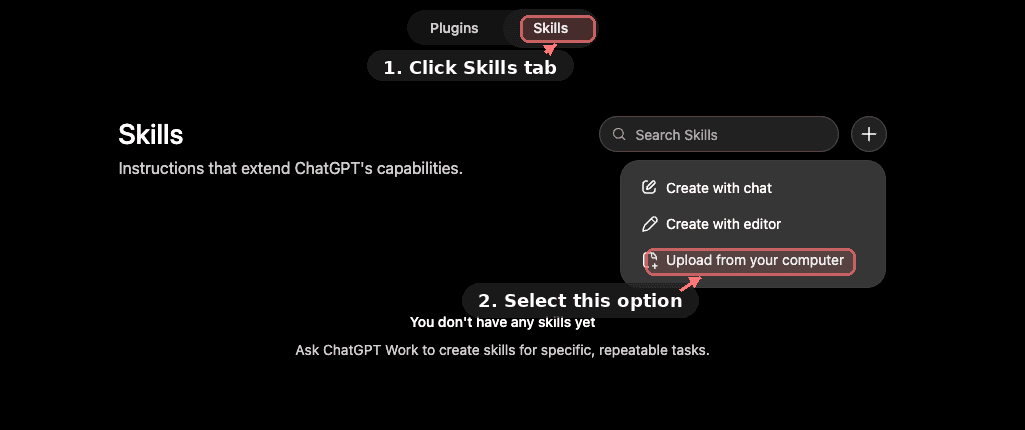
The third option is the one you need for installing an existing skill.
Click “Upload from your computer” and you get a file-upload dialog where you can drag and drop a zip or browse your machine for one.
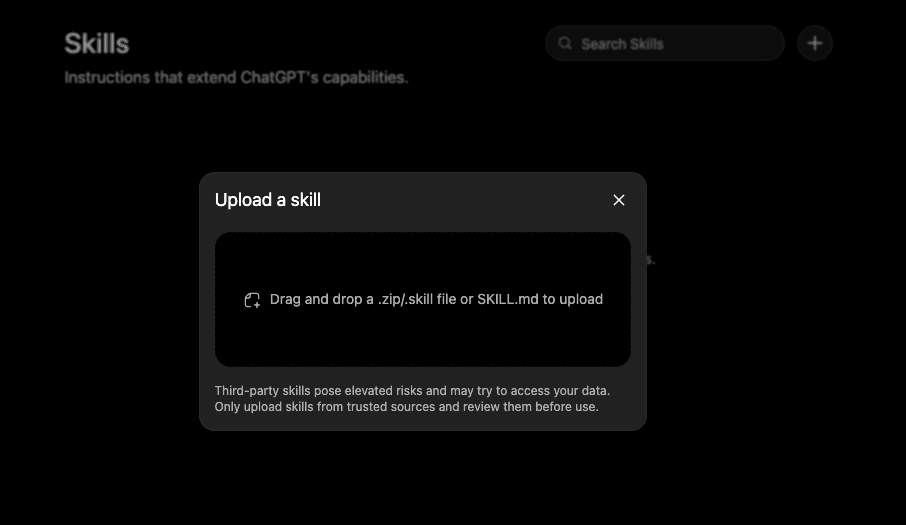
So the full path runs four clicks deep: Settings, Plugins tab, Browse plugins, Skills tab. And before you can upload anything, you still need to download the skill files from wherever they live, bundle them into a zip, then upload that zip through the dialog. On the desktop, at least you can skip the UI entirely and use the CLI. The web version has no CLI equivalent — the settings menu is the only way in.
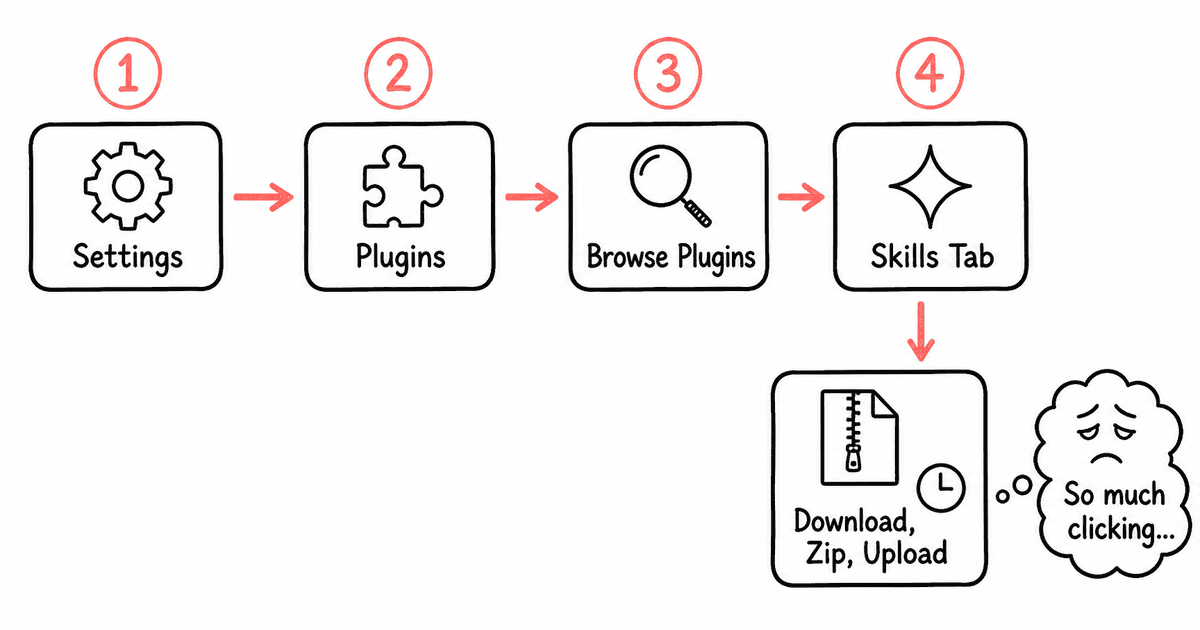
Think about what that means in practice.
You find a skill on GitHub that does something you need. To use it in the web version, you leave ChatGPT Work, go to GitHub, download the skill files to your machine, open a file manager, zip the folder, come back to ChatGPT Work, navigate four settings screens deep, and upload the zip. For a platform built around AI doing work for you, the process of adding a new capability has all the automation of a paper form and a stamp.
For one skill, this is tolerable. For anyone who regularly grabs skills from public repositories, the friction adds up fast.
After finding the upload path and realizing I still needed to zip files manually, I nearly closed the tab and went back to the desktop app. On a whim, I tried just asking ChatGPT to do it.
If only there were a way to do this in one step.
.
.
.
The one-prompt method
There is.
Instead of navigating settings menus and uploading zip files, you can install skills in ChatGPT Work directly from a GitHub URL.
One prompt, and ChatGPT handles the downloading, validation, and installation on its own.
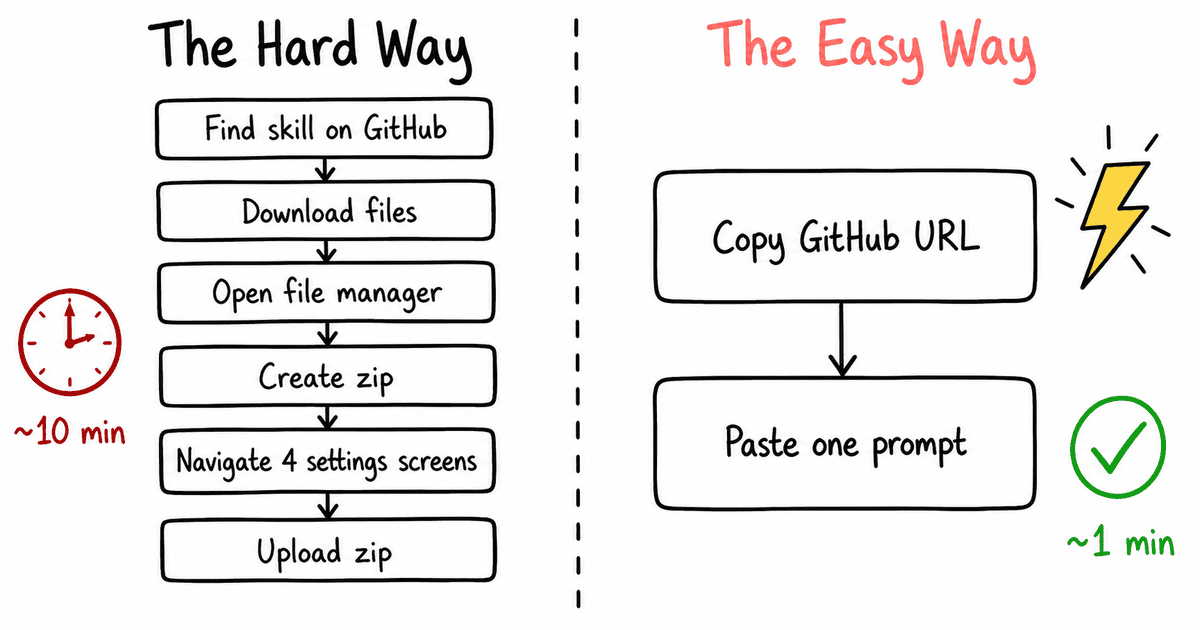
Let me walk through each step.
Step 1: Find the skill on GitHub.
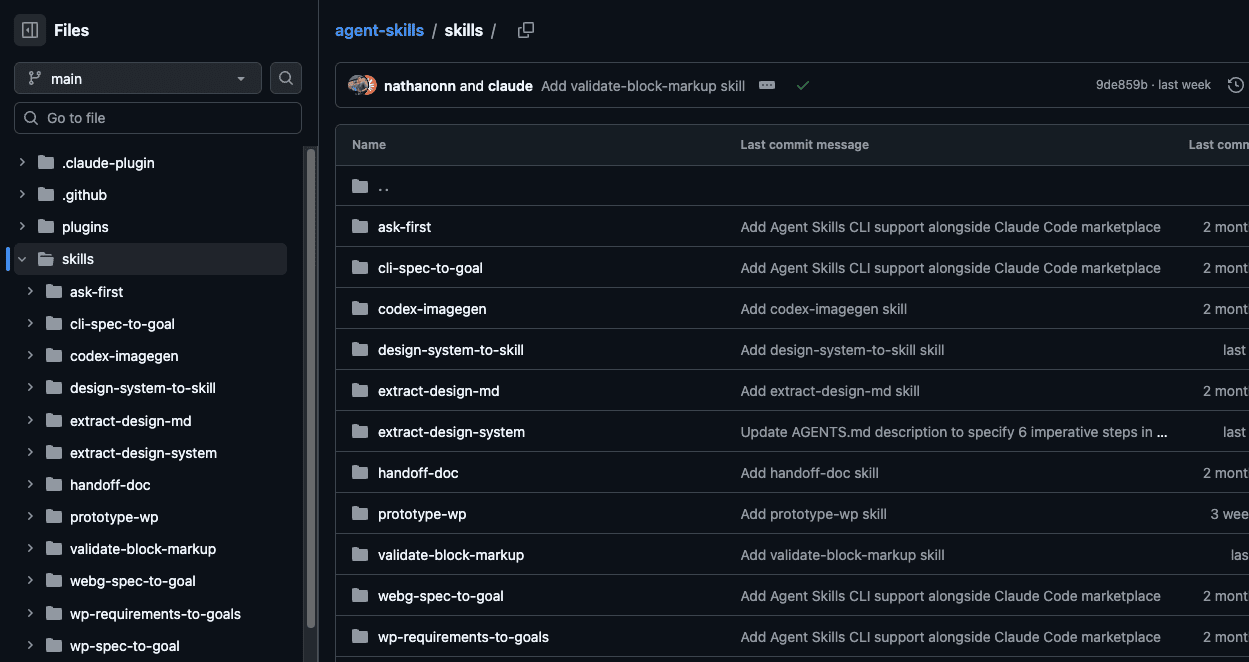
Go to the repository that hosts the skill you want. I went to my agent-skills repo, where I keep the skills I build and share publicly.
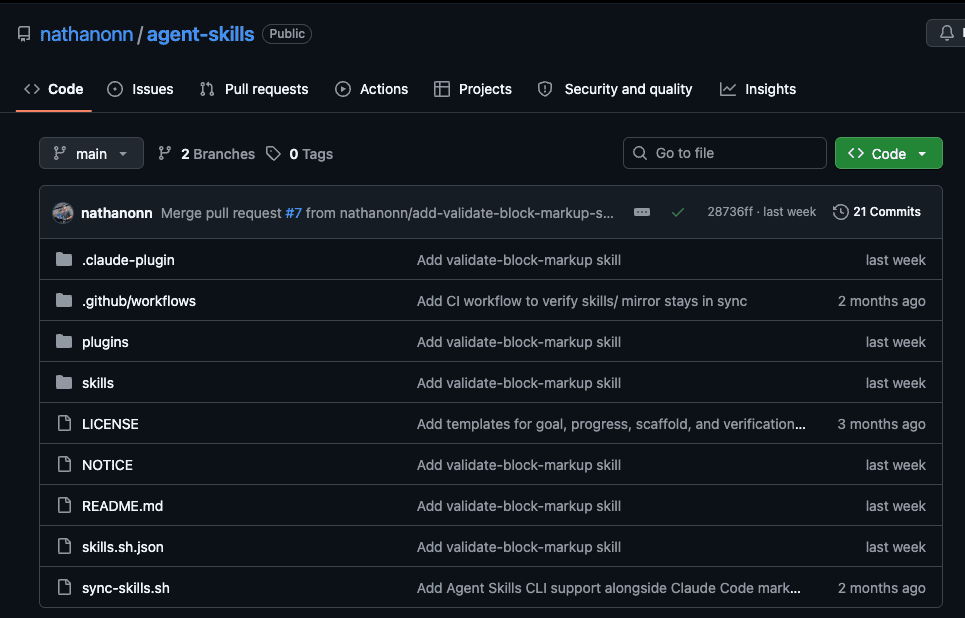
Step 2: Navigate to the skill folder.
Browse into the directory where individual skills live and find the one you’re after. Each skill sits in its own folder with the files ChatGPT Work needs to install it.
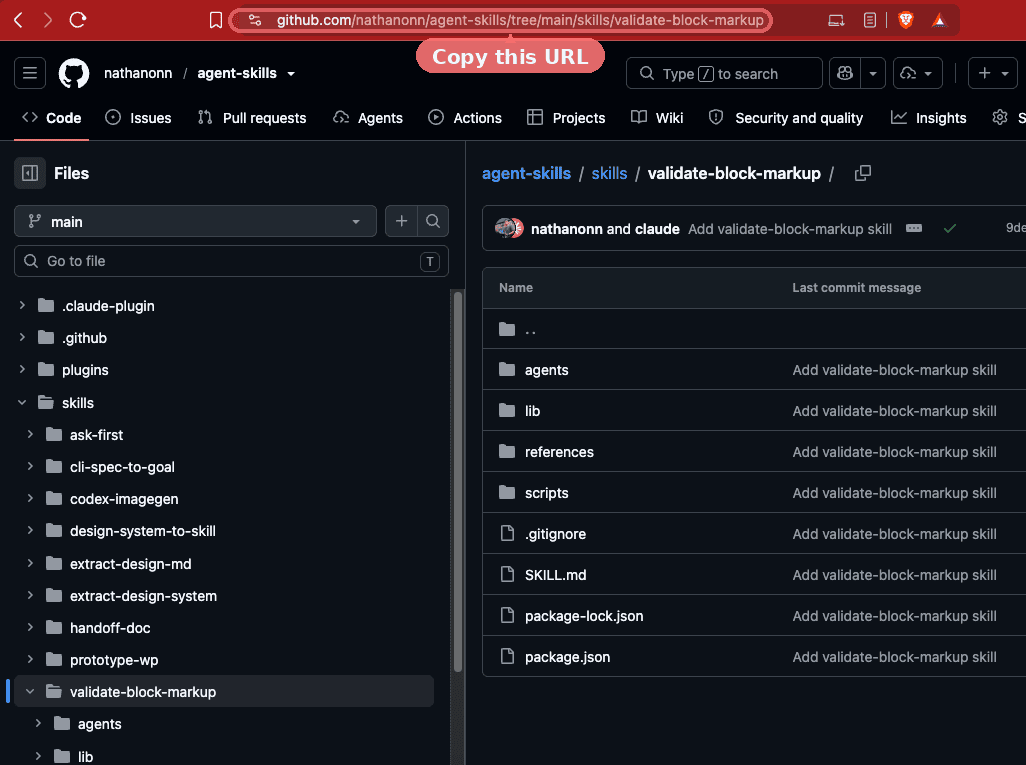
Step 3: Copy the folder URL.
Click into the skill folder and grab the URL from your browser’s address bar. You want the URL of the folder itself, not any individual file inside it.
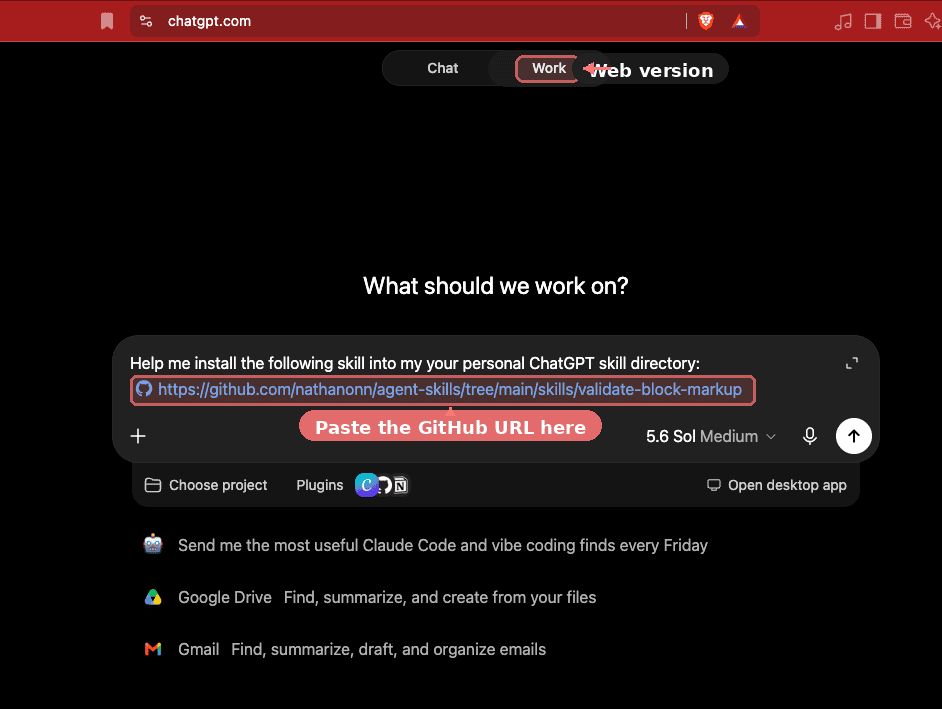
Step 4: Paste the URL into a new ChatGPT Work session.
Start a fresh session in the web version. Type a prompt like this, pasting the folder URL you copied:
Help me install the following skill into my personal ChatGPT skill directory:https://github.com/nathanonn/agent-skills/tree/main/skills/validate-block-markupA plain request with the link. Nothing else needed.
Step 5: Let ChatGPT handle the rest.
Submit the prompt and step back.
ChatGPT Work starts by inspecting the repository. It reads the folder structure, identifies the skill definition file and any supporting assets, and figures out what to pull down.
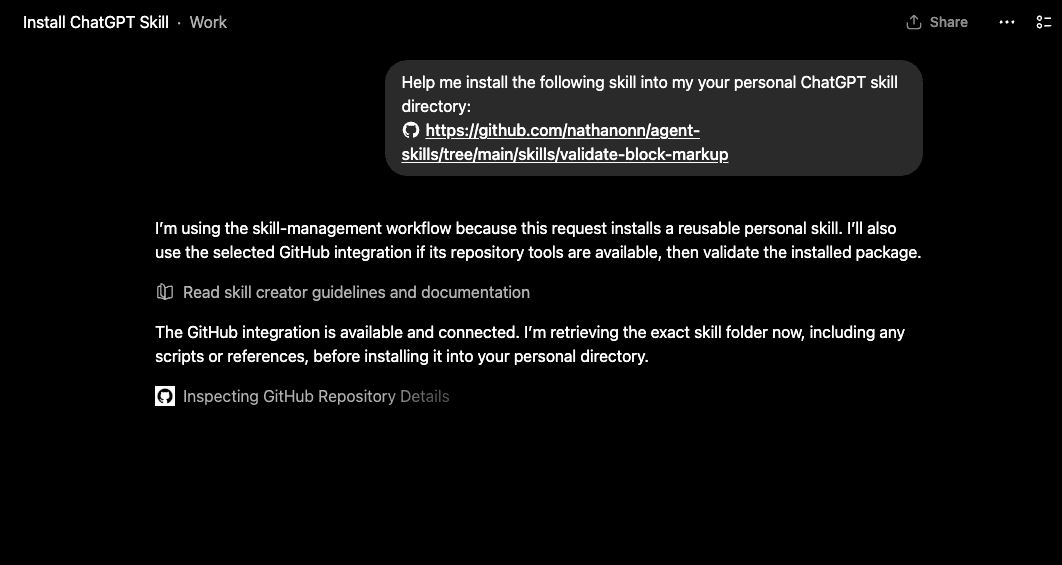
From there, it clones the relevant files and validates them against its skill format requirements. When the install hit a packaging issue, I braced for the error message that would send me back to manual mode. Instead, ChatGPT fixed it and kept going. The whole thing finished without me doing anything.
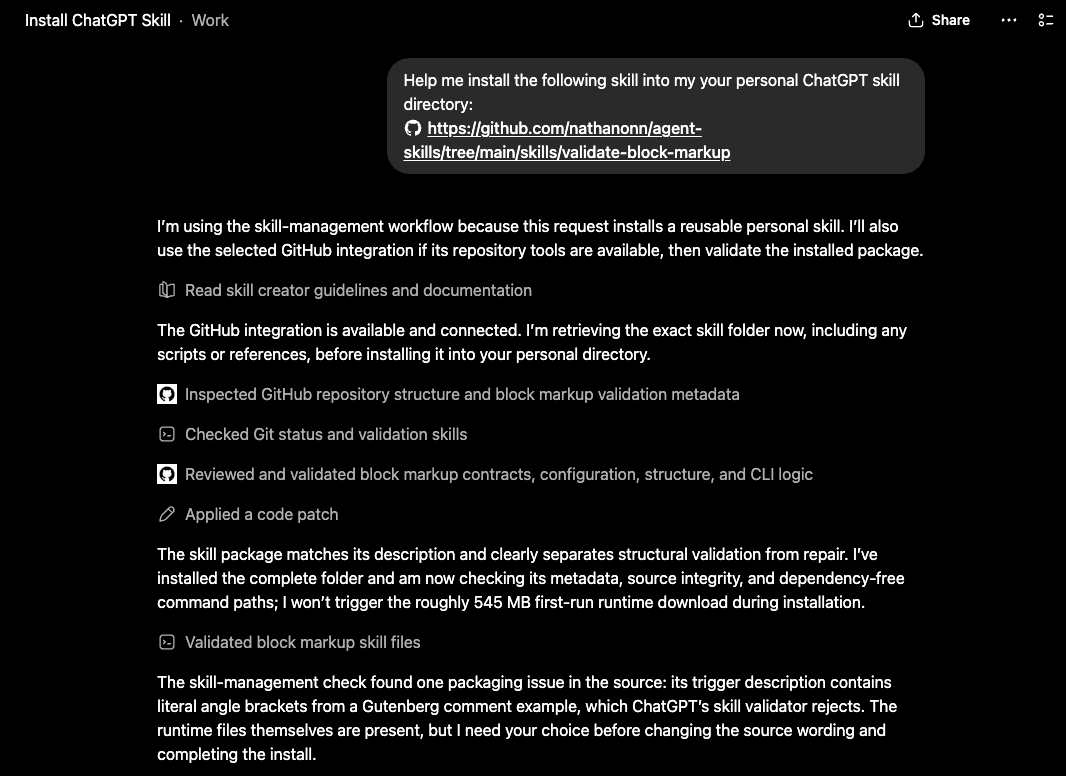
When the process finishes, you get a confirmation message with the skill name and validation results.
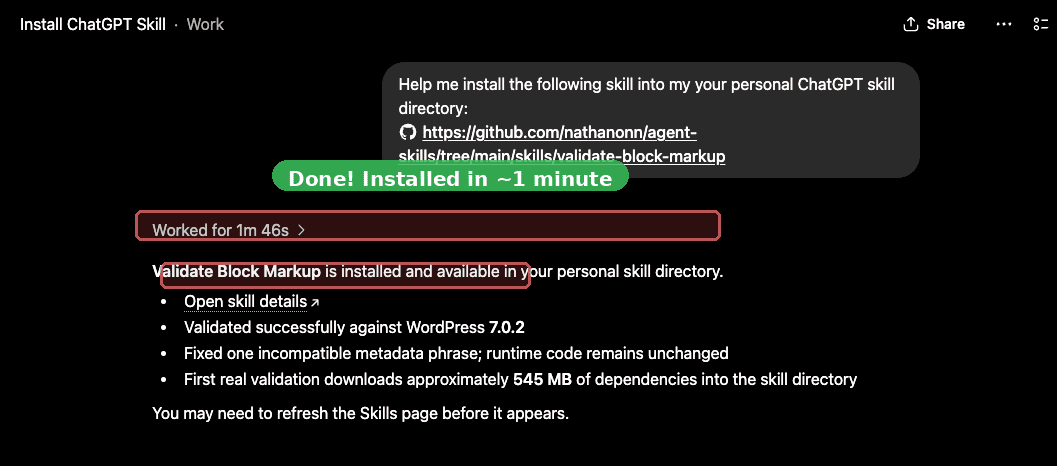
About a minute. From pasting the URL to the confirmation message.
And here’s the kicker: I expected ChatGPT Work to ask me to format the skill a certain way, or flag compatibility problems and kick the ball back. The skill had been built for Claude Code originally, so I was ready for format mismatches, validation failures, the usual cross-platform shenanigans. Instead, it handled the messy parts on its own — detected the packaging issue, fixed it, confirmed the fix, and completed the install.
That moment — watching an AI workspace install its own capability from a single instruction — was when the manual path stopped feeling like a reasonable default.
One prompt did what the manual path made tedious.
Confirming the install
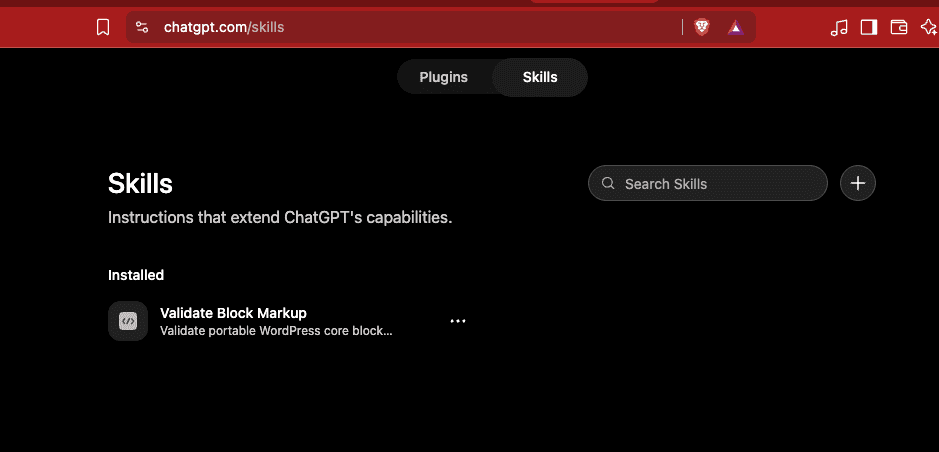
To verify the skill is actually installed, navigate back to the Skills page through the settings path from earlier: Settings, Plugins tab, Browse plugins, Skills tab.
The skill now appears in your installed list, ready to use.
To call an installed skill, start a new session and type the @ symbol followed by the skill name. An autocomplete dropdown appears as you type, showing matching skills from your directory. Select the skill from the dropdown and it becomes active for that session.
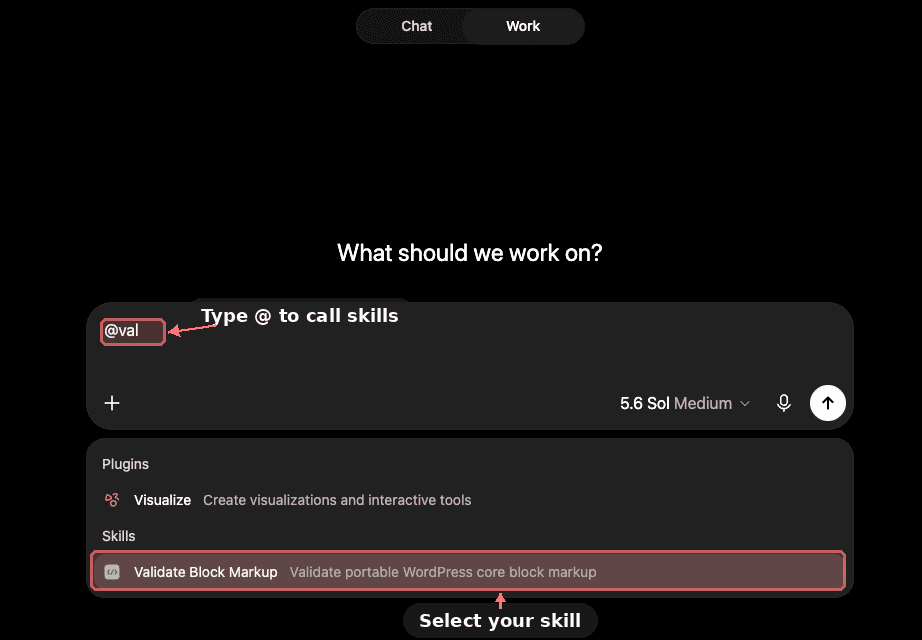
Worth knowing: you need to call the skill at the start of a new session for it to activate. The skill’s instructions load at session start, so adding it mid-conversation won’t pick up its full behavior. This is a small habit to build, but it keeps the experience clean — skills only load when you explicitly ask for them.
Putting the skill to work
With the validate-block-markup skill installed, I tested it on a real task.
I started a new session, called the skill with @, and pasted a chunk of AI-generated HTML — the kind of layout you get from asking AI to build a landing page section. A hero area with a heading, body text, and a call-to-action button.
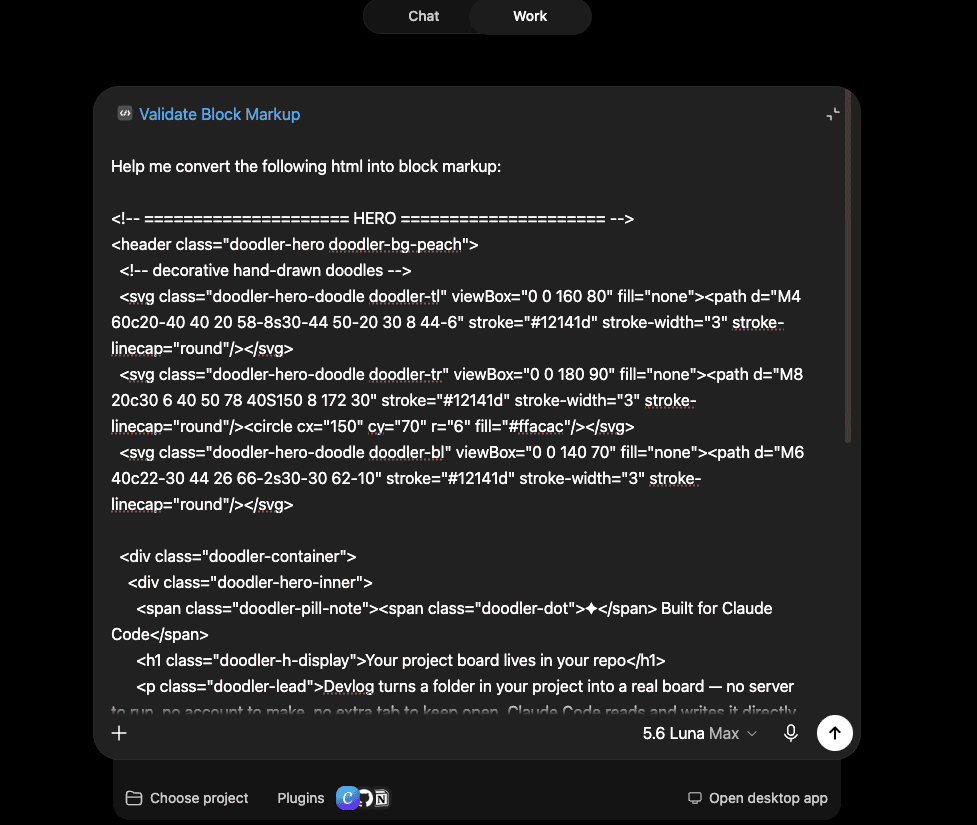
The skill converted the HTML into structured WordPress block markup, wrapping each element in the correct comment tags with proper configuration attributes and nesting them inside the right container blocks. Then it validated the output against the WordPress block grammar to confirm everything would parse correctly in the editor. Valid output — ready to paste into WordPress, where every element becomes an editable block with full sidebar controls. The heading, paragraph, and button each become their own native block type, with the sidebar options your client expects when they click on any element to edit it.
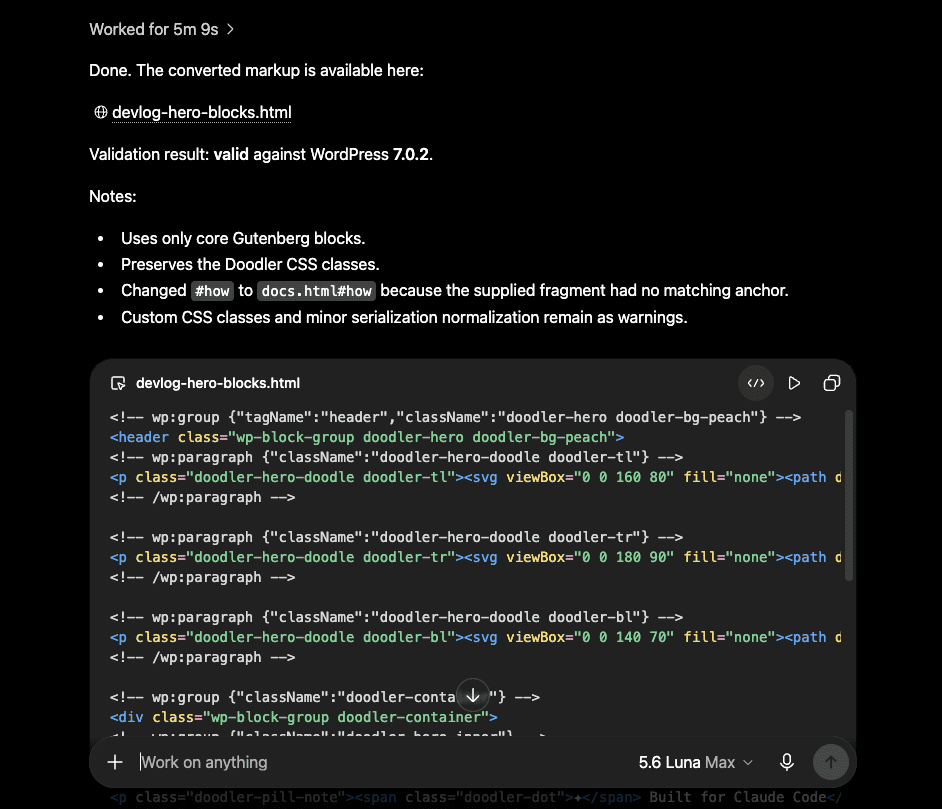
If you’ve read How to Turn AI-Generated HTML Into WordPress Blocks (Without Breaking Them), you know why this matters.
The whole point of converting HTML to block markup is to make AI-generated designs editable inside WordPress. A block the editor can’t parse is a block the client calls you about (usually on a Friday afternoon). Having the validation step happen inside ChatGPT Work means you can check for broken markup before it ever reaches the editor, without opening a terminal.
The skill worked identically in the browser — same validation, same output format. Previously, validating block markup required a local tool running in a terminal, which tied the whole process to a specific machine and a specific setup. The web version removes that dependency.
I can now generate HTML in ChatGPT Work’s web version, convert it to block markup, validate it against the WordPress grammar, and paste the result straight into the editor. The entire workflow happens in one browser tab. The terminal and the code editor stay closed.
(And honestly, it took me longer to find the upload button than it took ChatGPT to install the skill.)
.
.
.
Any skill, any public repo
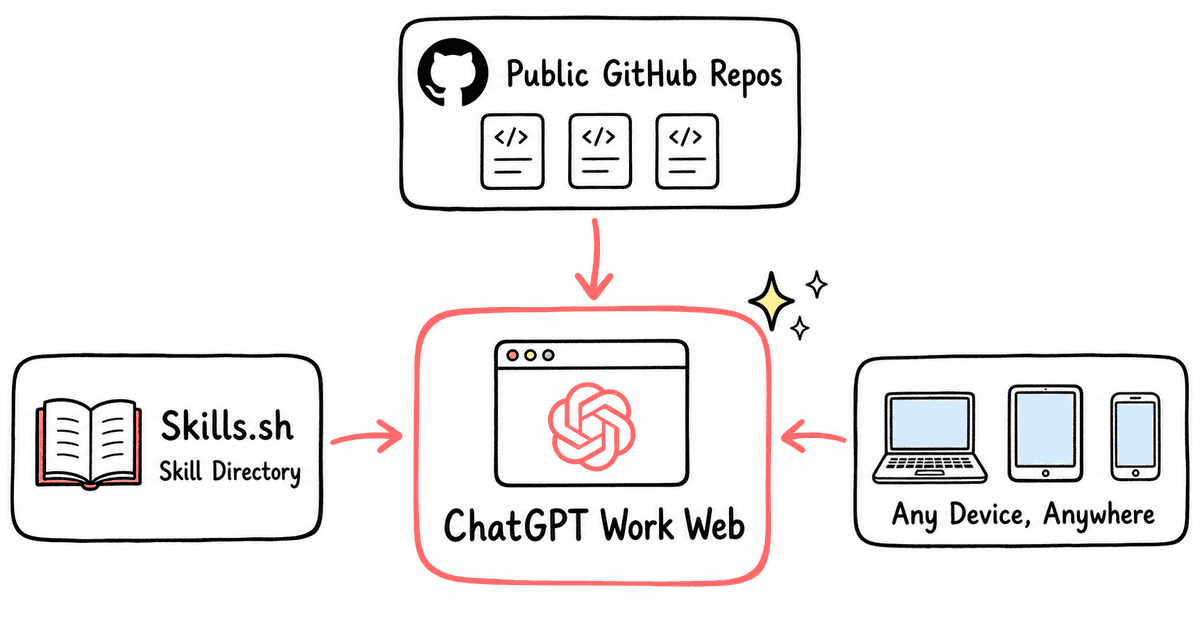
The validate-block-markup skill was my test case, but the method works with anything hosted publicly.
You can install any skill from a public GitHub repository the same way — find the folder, copy the URL, paste it into a new session with an install prompt. This includes everything listed on Skills.sh, the public directory for AI agent skills. Skills.sh catalogs hundreds of community-built skills across categories: code generation, data analysis, content creation, DevOps workflows, and more. Every skill in that directory lives in a public GitHub repo. Browse the catalog, find something that matches your workflow, grab the folder URL, and you’re one prompt away from having it installed.
The practical shift is about where you can work.
Previously, installing a skill meant having the desktop app or a terminal where you could run a CLI command.
The ability to install skills in ChatGPT Work’s web version from any device removes that requirement entirely. Whether you’re on a laptop during a commute or a tablet at a coffee shop, the process stays the same — copy the GitHub URL in your browser, switch to ChatGPT Work, and paste the prompt.
Once installed, skills stay in your personal directory.
They show up whenever you type @ in a new session, across every future session. Install once, use everywhere.
This also changes how you think about building skills. If you’ve published a skill to a public GitHub repo, anyone with access to ChatGPT Work’s web version can install it in about a minute. The distribution channel becomes the repo itself — you share the folder URL, and that’s the entire delivery mechanism.
Every friction point between “this skill exists” and “I’m using this skill” is a place where people give up. Requiring a CLI command loses everyone who doesn’t use a terminal. Requiring a desktop app loses everyone who works from a browser. A GitHub URL and a prompt loses almost nobody.
The larger point: The gap between discovering a useful skill and actually using it collapsed to a single prompt.
You don’t need to download files, create zips, dig through settings, or open a terminal. A browser and a GitHub link are enough. That’s the smallest possible distance between “I want this tool” and “I have this tool.”
If you’ve been building skills for Claude Code, Codex, or any agent that follows the Skills.sh format, those same skills can likely run in ChatGPT Work through this exact install method. The portability runs in every direction.
.
.
.
What to try next
The best way to see this in action is to try it with a skill you’d actually use.
Here’s the process end to end:
- Browse Skills.sh and find a skill that matches something you do regularly
- Click through to its GitHub repo and find the skill folder
- Copy the folder URL from your browser’s address bar
- Open the web version of ChatGPT Work and start a new session
- Paste the URL with a short install prompt, something like “Install this skill into your skill directory”
- Start a new session and call the skill with @
The whole process takes about two minutes, including browsing for the skill.
Once you’ve installed a skill this way, the manual upload path will feel like taking the scenic route — through four settings screens, with a detour to zip your own luggage.
And if you build skills of your own, you now know what the distribution channel looks like: a public repo and a folder URL.
Your next skill is one prompt away from anyone who could use it.

Leave a Comment