How to Turn AI-Generated HTML Into WordPress Blocks (Without Breaking Them)
You ask AI to design a landing page.
Thirty seconds later, you’re looking at a polished layout — hero section with gradient overlays, a three-column pricing grid, testimonials with circular headshots, a footer with social links. It looks like something a client would pay real money for.
(It probably took longer to type the prompt than to generate the design.)
Now get that into WordPress.
That’s where the mood changes.
Getting it into the WordPress block editor in a way where the client can edit the content themselves — change a heading by clicking on it, swap an image through the media library, adjust button colors from a sidebar panel, all without ever seeing a line of code — that’s a different challenge entirely. And it’s the challenge that matters, because a page the client can’t edit is a page you’ll be editing for them. Indefinitely.
For years, the options for WordPress design stayed in the same rotation:
- Hire a designer who knows the platform,
- Buy a pre-made theme or starter template, or
- Use a page builder like Elementor, Divi, or Bricks.
Each one traded time for money or flexibility for complexity in its own way, and each one was the best answer available at the time.
AI rewrites the first half of this equation.
Generating a complete HTML design takes seconds — hero, pricing, testimonials, footer, responsive breakpoints, the whole page. A design that used to take days of back-and-forth now materializes in a single prompt.
The speed is genuine and dramatic.
But the second half — getting that design into the WordPress block editor as editable content your client can maintain — still has no clean path.
You’re left with a beautiful HTML file on one side, a WordPress site on the other, and a manual conversion process in between that quietly eats the time AI just saved you.
.
.
.
The Obvious Approach
The fastest path is the most literal one.
Copy the AI-generated HTML. Open a new page in the WordPress block editor. Add an HTML block. Paste.
The page renders on the front end exactly as designed.
Looks great.
Inside the editor, though, you’re staring at raw code — and every edit becomes a code task. Finding the headline between HTML tags, locating inline styles to adjust spacing, digging through anchor elements to update a link. For you, maybe this is manageable.
Tedious, but doable.
For a client who hired you to build their site so they could manage it independently?
Different story entirely.
I learned this the hard way with a client project last year.
Beautiful landing page, AI-generated in under a minute. Three weeks after handoff, the client needed to update a phone number. One phone number. They opened the editor, saw the HTML block, and called me. That’s when I realized: a page the client can’t edit isn’t actually finished.
Here’s the thing:
The block editor was built to prevent exactly this scenario — a visual interface where site owners manage content without technical knowledge. Click a block, edit the text, hit publish. When you paste raw HTML into an HTML block, you bypass everything the editor was designed to do.
The visual editing tools sit unused, and the client loses the self-service capability they were paying for.
What started as a fast delivery turns into an ongoing maintenance dependency — the kind where every small content change routes back through you, and the time AI saved on design gets spent on indefinite support.
.
.
.
A Better Idea — WordPress Block Markup
Here’s where it gets interesting.
WordPress block editor content has a structure that looks like standard HTML — because it mostly is. The key addition: each block gets wrapped in a pair of comment tags that carry the block’s configuration. These comment markers tell the editor which block type to render, what styling options were selected, and how to display the controls in the sidebar when someone clicks on the block.
Here’s what a styled button looks like in block markup:
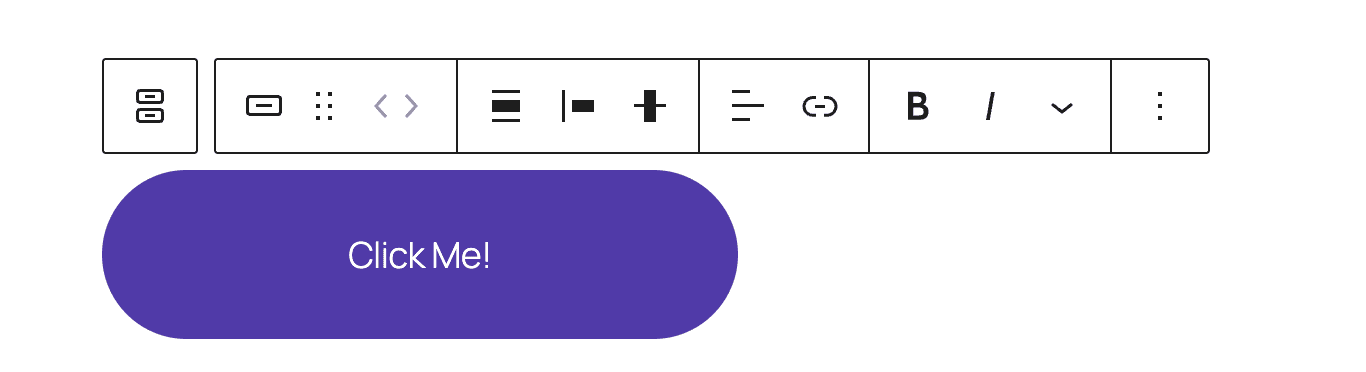
<!-- wp:buttons {"layout":{"type":"flex"}} --><div class="wp-block-buttons"><!-- wp:button {"width":50,"style":{"border":{"radius":"9999px"},"color":{"background":"#5140A5","text":"#FFFFFF"},"typography":{"fontSize":"36px"},"spacing":{"padding":{"top":"1.5rem","right":"3rem","bottom":"1.5rem","left":"3rem"}}}} --><div class="wp-block-button has-custom-width wp-block-button__width-50"><a class="wp-block-button__link has-text-color has-background has-custom-font-size wp-element-button" style="border-radius:9999px;color:#FFFFFF;background-color:#5140A5;padding-top:1.5rem;padding-right:3rem;padding-bottom:1.5rem;padding-left:3rem;font-size:36px">Click Me!</a></div><!-- /wp:button --></div><!-- /wp:buttons -->The comment at the top carries the block’s settings as JSON — background color, text color, padding values. Between the comments sits the rendered HTML, what the visitor sees on the front end. A closing comment marks where the block ends. This pairing of “settings comment + rendered HTML” is what makes blocks editable: the editor reads the settings from the comment and presents them as sidebar controls.
When you shift-paste that markup into the block editor, you get a fully interactive button — background color, text color, padding, link destination — all accessible through the familiar sidebar controls.
The concept follows naturally:
Instead of asking AI to generate plain HTML, ask it to generate block markup directly. If the output uses valid block structure, every element becomes a native WordPress block — text in paragraph blocks, images in image blocks, layouts in properly nested column and group blocks. The client sees the same visual editor they’re used to, with every piece of content editable through the interface WordPress built for exactly this purpose.
(Stay with me — because the concept is sound, and the execution is where things get complicated.)
.
.
.
The Catch — AI Hallucinates Block Markup Too
This is where the plan hits a wall.
Block markup for a single element — a heading, a paragraph, a standalone button — usually comes out clean. Ask AI to generate a full pricing section with nested columns, grouped elements, and multiple styled components, and the output starts to drift.
- A comment tag references an attribute the HTML doesn’t reflect.
- Closing markers end up in wrong positions.
- The JSON settings inside a comment use a format the editor doesn’t recognize.
Each mismatch is individually small. Together, they trigger the error every WordPress developer knows:
“Block contains unexpected or invalid content.”
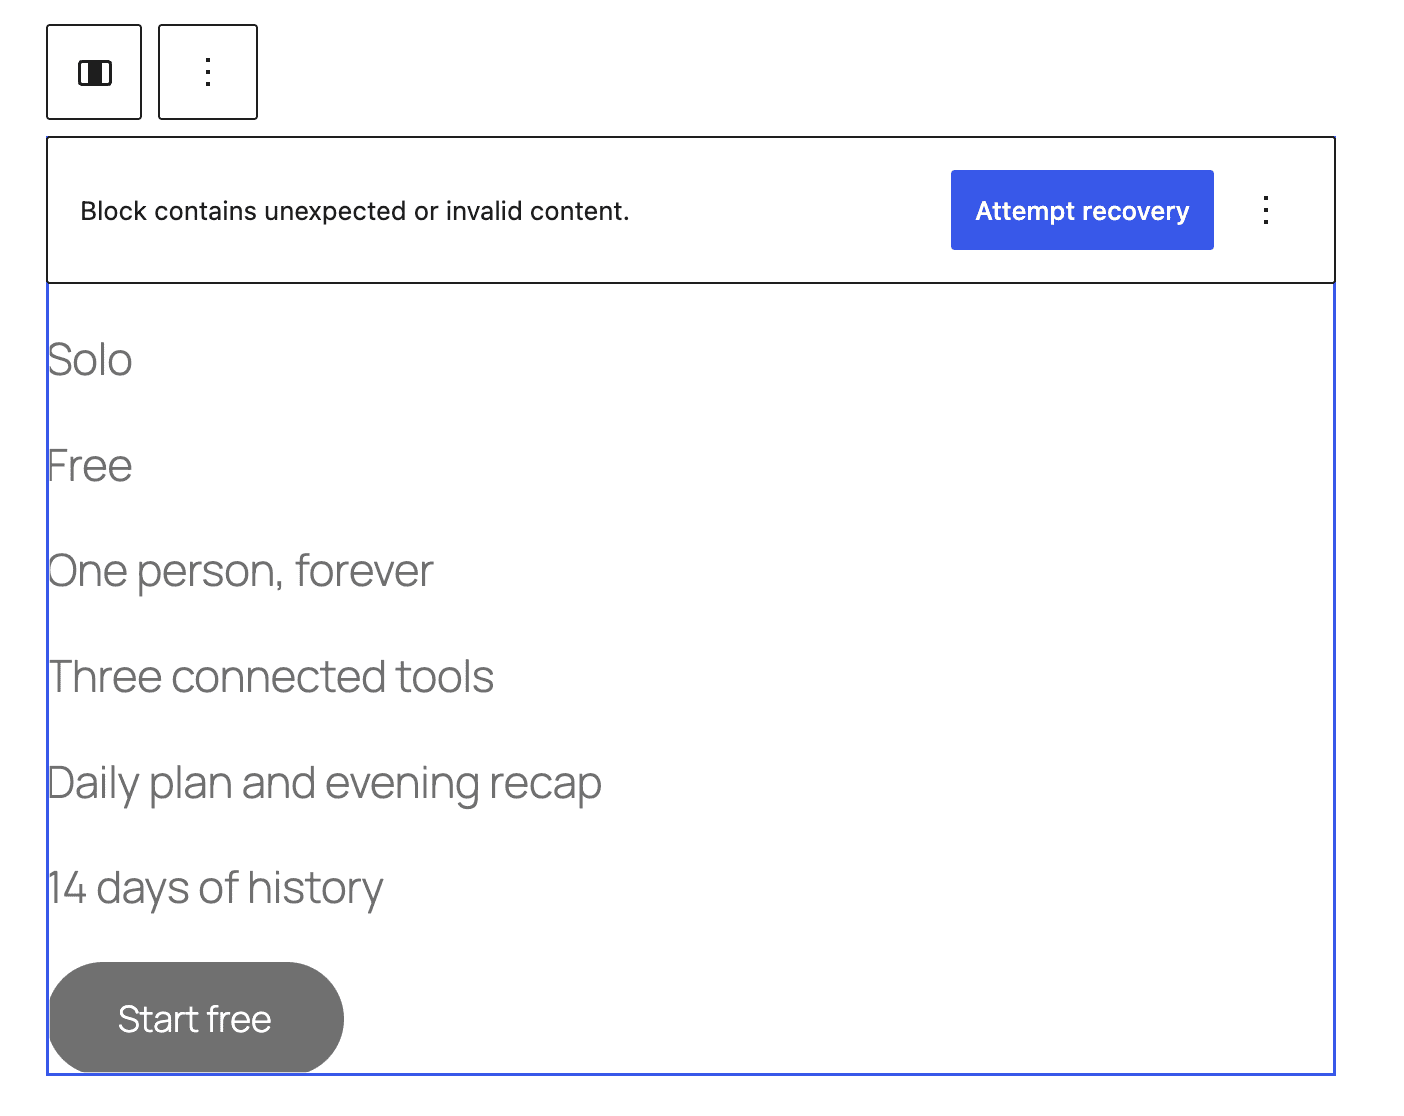
That error means the editor compared the markup against its internal expectations and found a discrepancy. The “Attempt recovery” button sometimes resolves the issue and sometimes strips out the formatting entirely — there’s no predicting which one you’ll get.
Even the best AI models produce this kind of output.
The difficulty is structural:
Block markup needs to satisfy two consumers simultaneously. The browser renders the HTML on the front end. The editor validates the comment structure, checks every attribute against the block type’s registered schema, and verifies that the HTML between the comments matches what it would generate from those settings. When page complexity rises — nested blocks inside groups inside columns — mismatches become almost inevitable.
And the debugging?
Brutal.
Before the skill existed, I tried this approach manually. Asked AI to generate block markup for a full landing page, pasted it in, and watched the errors cascade. Fixing one block broke two others. I spent close to two hours on what should have been a ten-minute paste — and still had three broken sections at the end.
(If you’ve ever untangled holiday lights — pull one knot free and three more tighten somewhere you weren’t even looking — you know this particular brand of shenanigans.)
For a single section, maybe that’s an hour of detective work.
For a full-page layout with dozens of nested blocks, you might spend longer debugging the markup than it would have taken to build the page by hand.
There had to be a better way.
.
.
.
The Solution — Let AI Validate Its Own Output
The WordPress core team already ships libraries that perform exactly these checks — the same validation the editor runs internally when deciding whether to show that “Attempt Block Recovery” prompt.
These libraries compare saved markup against each block type’s expected output and report precisely where each mismatch occurs.
I built a skill called validate-block-markup that makes these validation libraries available to AI during the generation process.
When AI produces block markup, the skill runs it through the same checks the editor uses. If validation fails, the AI sees the specific error — which block broke, what the editor expected, what it actually received, and which attributes caused the mismatch.
And here’s the kicker — the AI corrects its own output and revalidates.
Instead of generating markup and hoping for the best, the workflow becomes:
- generate
- validate
- fix
- revalidate
Failures get fed back with enough context for the AI to understand what went wrong and make a targeted correction.
By the time you receive the final output, it’s already passed the same structural checks the block editor will run when you paste it in.
(That two-hour debugging session I mentioned? The skill handles the same work in seconds — and catches things I would have missed.)
The skill is open source and available at github.com/nathanonn/agent-skills.
Install it with one command:
npx skills add nathanonn/agent-skills --skill validate-block-markupIt works with Claude Code, Codex, Cursor, GitHub Copilot, and other AI coding agents — any tool that supports skills.
.
.
.
The Full Workflow — From HTML to Editable Blocks
Let me walk you through the complete process.
We’ll start with a landing page that AI generated as plain HTML and convert it into fully editable WordPress block editor content.
Here’s the original design — a full page with a hero section, feature grid, pricing cards, and footer:
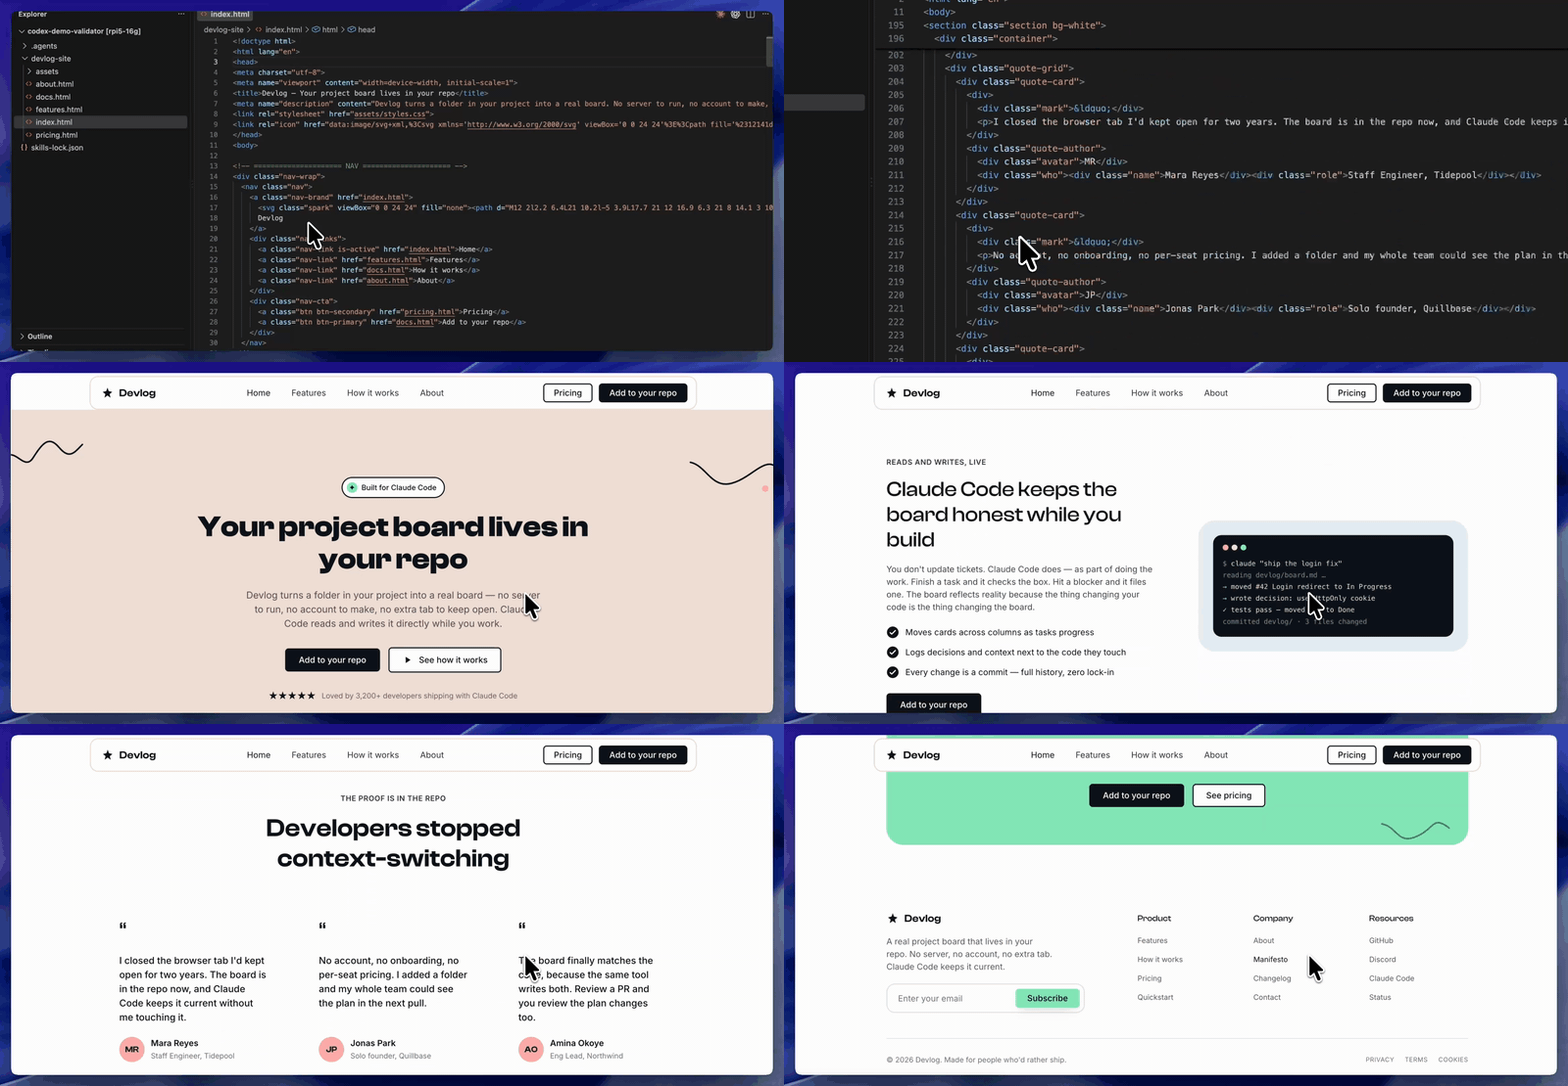
The goal: get this entire design into the WordPress block editor as native, editable blocks — with clean separation between markup and styles.
Step 1: Install the Skill
One command sets it up in your project:
npx skills add nathanonn/agent-skills --skill validate-block-markup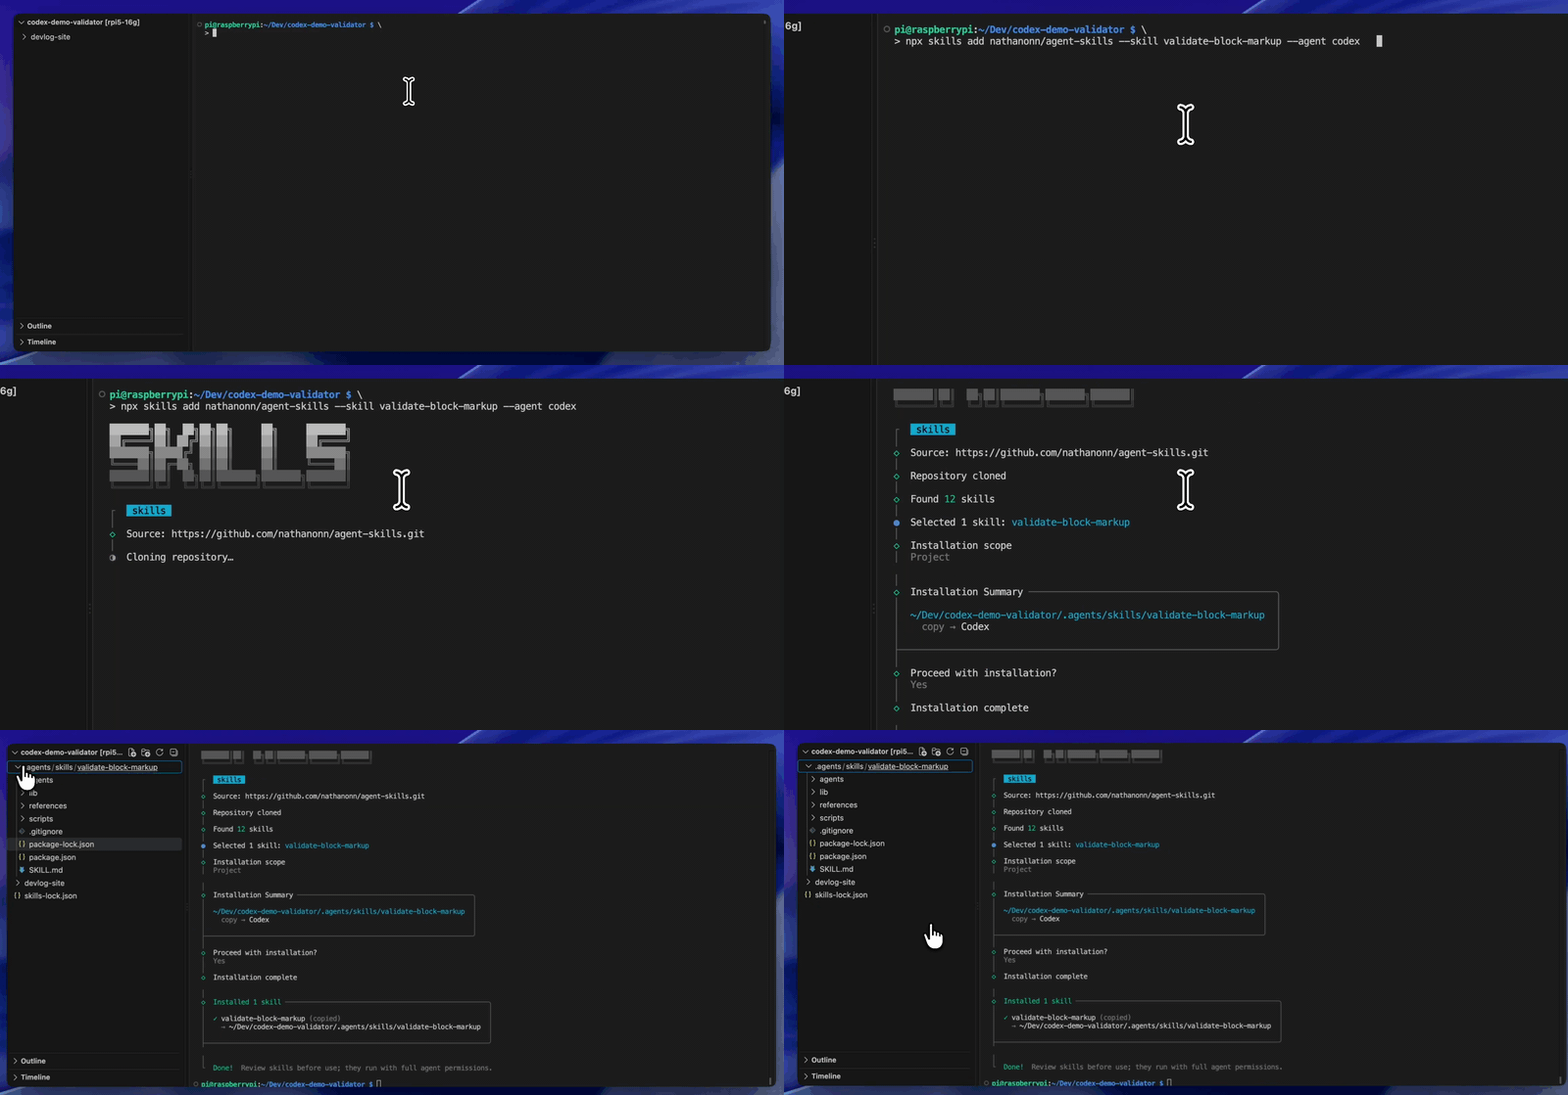
Step 2: Ask AI to Convert the HTML to Block Markup
Point the AI at your HTML file and describe what you need. Here’s the prompt I used:
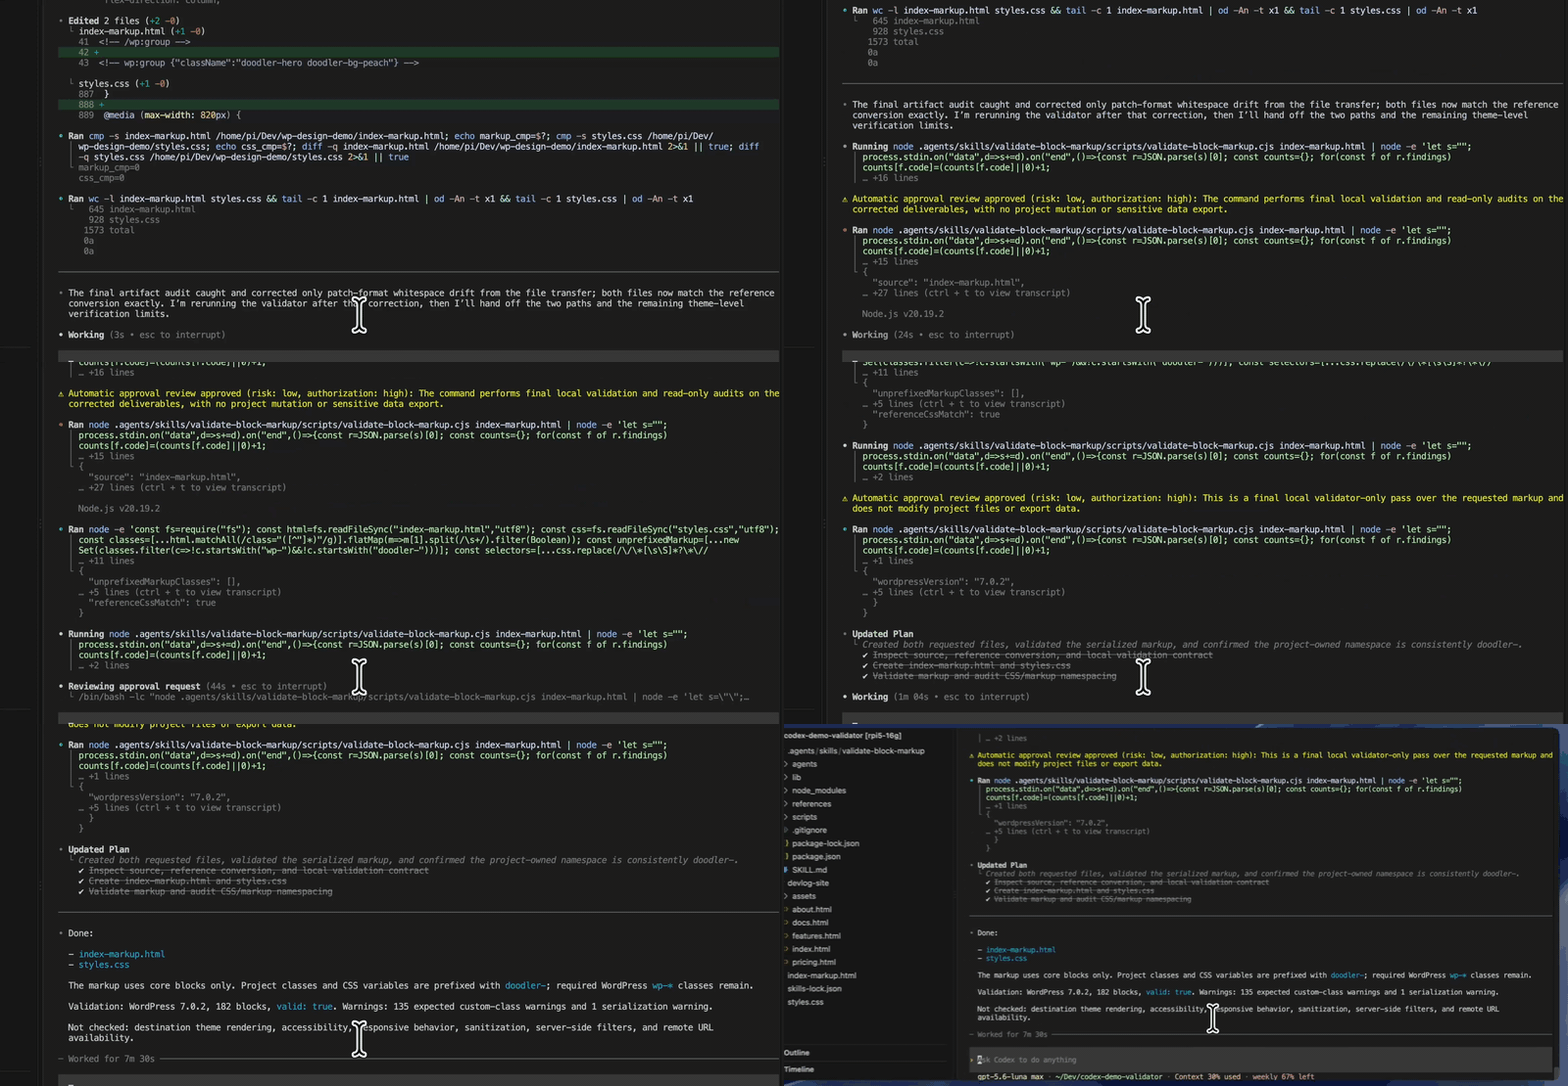
I need this html: @devlog-site/index.html in html markup that can be used in WordPress block editor. Use core blocks onlyPut it at: index-markup.htmlPut the css at a separate file: styles.cssAll the css needs to be prefix with doodler-Three things happening in that prompt: convert to block markup using only core blocks, prefix all CSS selectors to prevent conflicts with the active theme, and output the markup and styles as separate files.
A quick note on “core blocks only” — WordPress ships with a built-in library of block types: paragraphs, headings, images, buttons, columns, groups, and dozens more. These blocks are available on every WordPress installation without plugins. By constraining the AI to core blocks, the resulting markup works on any WordPress site, regardless of what plugins are installed. No dependencies, no compatibility concerns.
As the AI works through the conversion, the validation skill activates automatically.
Each section of block markup gets checked against the WordPress validation libraries in the background. When a block fails — wrong nesting, mismatched attributes, a comment structure the editor wouldn’t accept — the AI sees the error with full context and corrects the markup before moving to the next section.
You can watch this happen in real time.
Sections that pass validation move forward. Sections that fail get corrected and revalidated on the spot. The AI handles the debugging loop on its own — the same loop that took me two hours by hand — and the final output arrives pre-validated.
Step 3: Paste Into the WordPress Block Editor
Open your page in the WordPress block editor and switch to Code Editor view. Shift-paste the validated markup. Switch back to the visual editor.
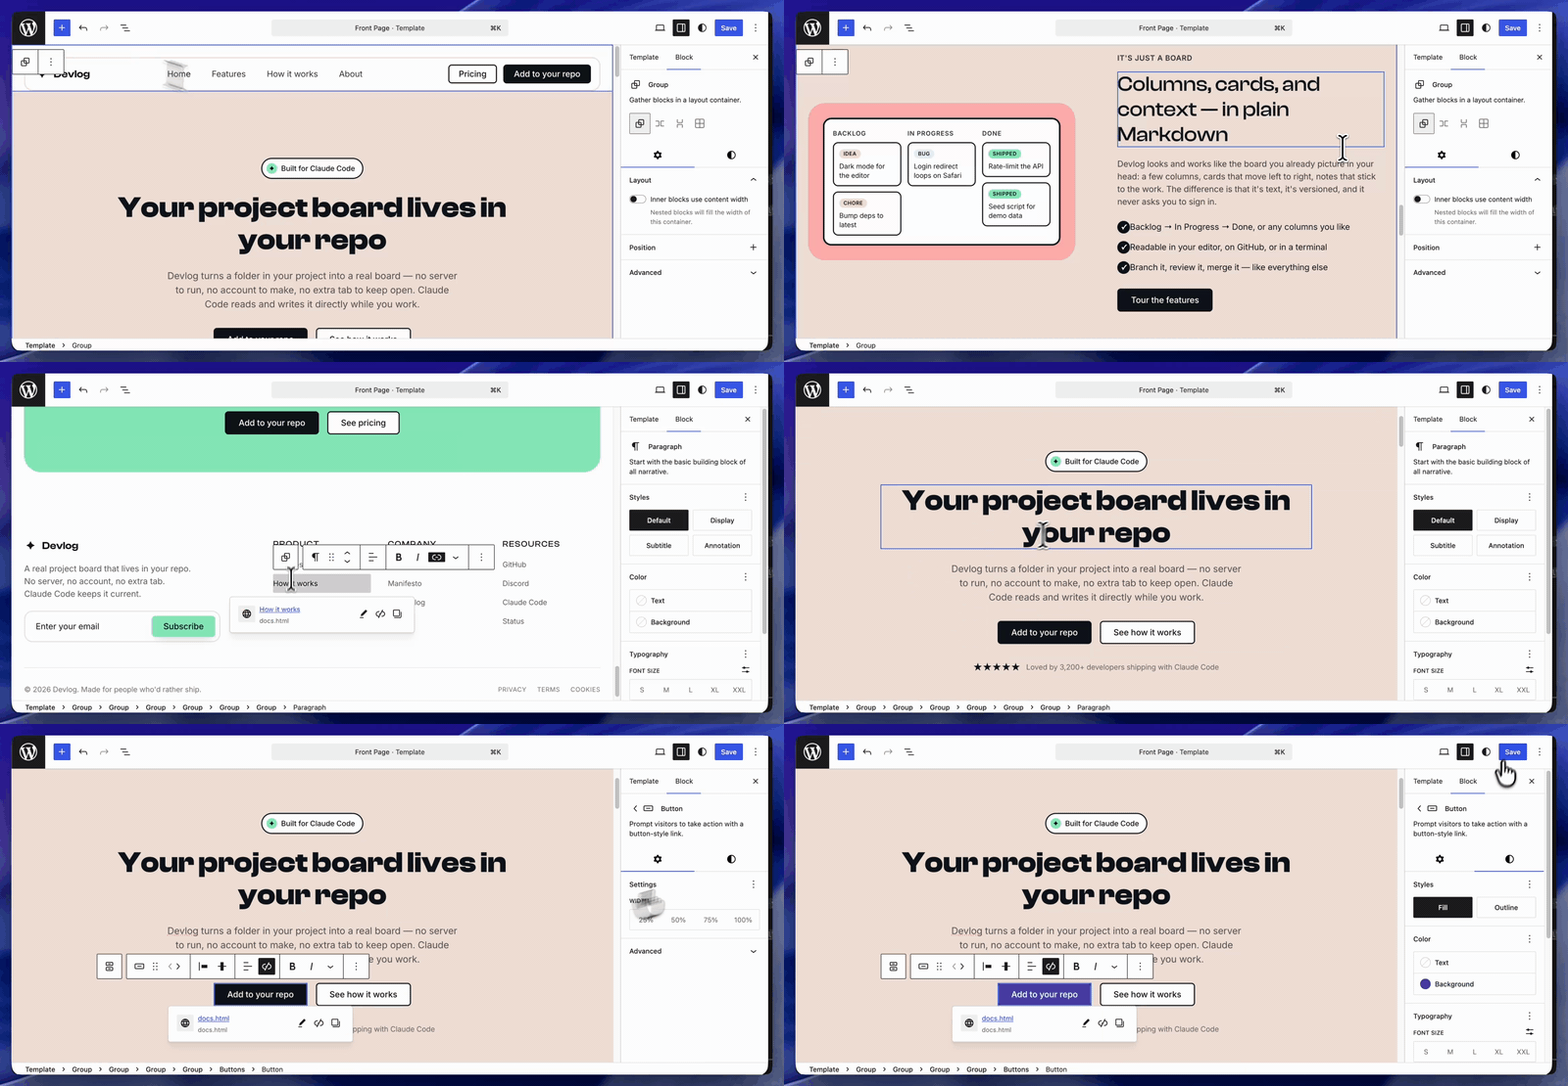
Every element shows up as a native, editable WordPress block. Columns render with proper nesting. Groups contain their child blocks correctly. Paragraphs, buttons, and images all appear with their sidebar controls fully functional.
And critically — no “Attempt recovery” prompts anywhere on the page.
I’ll be honest — the first time I pasted an entire validated page and saw zero recovery prompts, I scrolled through twice just to make sure I wasn’t missing something. Every block, every nested column, every styled button — all clean. That was the moment this stopped being an experiment.
The client can click on any block and edit it through the visual interface — change text inline, adjust colors through the sidebar, rearrange sections by dragging.
The page works exactly like content they built directly in the editor. No special instructions needed.
.
.
.
Why This Matters — The Client Handoff
Here’s the practical payoff — and if you build WordPress sites for clients, this is the section that matters most.
A client who receives a WordPress site expects to manage their own content — updating copy when their business evolves, swapping images for seasonal campaigns, adjusting layouts as their needs change. The block editor handles all of this through a visual interface that requires zero technical knowledge. That’s the whole reason WordPress built it.
When AI-generated HTML sits inside an HTML block, you’ve delivered a page the client can see but can’t meaningfully touch.
Every future content change routes back through you. The site looks finished, but the client’s independence — the thing they were paying for — doesn’t actually exist.
(If you’ve ever handed over a site and then fielded a call every time the client needed a comma changed, you know how fast “finished” starts feeling like “ongoing.”)
Converting that same HTML into validated block markup changes the dynamic entirely.
The client receives a page where every section behaves like the WordPress content they already know how to work with — drag blocks to rearrange the layout, change colors through sidebar controls, edit text by clicking on it, add new sections from the block inserter. The visual editor becomes a functional tool for them, working the way it was designed to work.
👉 This is where AI design speed and WordPress block editor editability finally meet. The validate-block-markup skill ensures AI-generated output passes the editor’s structural validation and arrives as clean, editable blocks your client can maintain.
And the workflow scales.
One landing page, five inner pages, an entire site redesign — the process stays the same. Generate the HTML, convert to block markup with validation, paste into the editor. Each page arrives with every block editable, every section rearrangeable, every piece of content accessible through the visual tools WordPress already provides.
Your client gets a site they can actually own — and you move on to the next project instead of fielding change requests.
.
.
.
Try It With Your Own Designs
Install the validate-block-markup skill:
npx skills add nathanonn/agent-skills --skill validate-block-markupThe full repository is at github.com/nathanonn/agent-skills.
Pick an AI-generated landing page — a portfolio layout, a services page, whatever design is sitting on your desktop right now. Run it through the workflow: install the skill, ask AI to convert the HTML to block markup, and paste the validated output into the WordPress block editor.
Then hand the page to someone who’s never written a line of code and watch them edit it — clicking a heading to change it, dragging a section to a new position, managing their own content without calling you.
That’s the whole point.

Leave a Comment