We’re staying in the SEO lane—updating meta titles, descriptions, focus keywords, image alt text, and Open Graph settings. You know. All the tedious stuff that makes SEO optimization feel like a part-time job nobody applied for.
To manage these settings, you need an SEO plugin. I’m using Rank Math.
Why Rank Math? Honestly? Because it’s what I use on my own site. No fancy reason—I’m showing you real projects I actually need. A bit of selfishness, sure. But that’s the deal I made with you.
.
.
.
The Problem That’s Been Nagging Me
Here’s my situation. (And I bet—I really bet—you’re in the same boat.)
I’ve been publishing newsletters for 28 consecutive weeks now.
Twenty-eight weeks of hitting “publish” and hoping—really hoping—the SEO gods would smile upon me. Twenty-eight weeks of telling myself I’d go back and optimize everything “later.”
You know how that goes.
The whole time, I believed good content would naturally attract readers. And to some extent? That’s true. But optimizing for SEO amplifies everything.
Here’s the thing:
Since I never focused on SEO before, going back to optimize all those posts is a mountain of work. The kind of mountain that makes you want to lie down, stare at the ceiling, and pretend the problem doesn’t exist.
(Sound familiar?)
Sure, I could subscribe to Rank Math Premium and use their bulk edit feature.
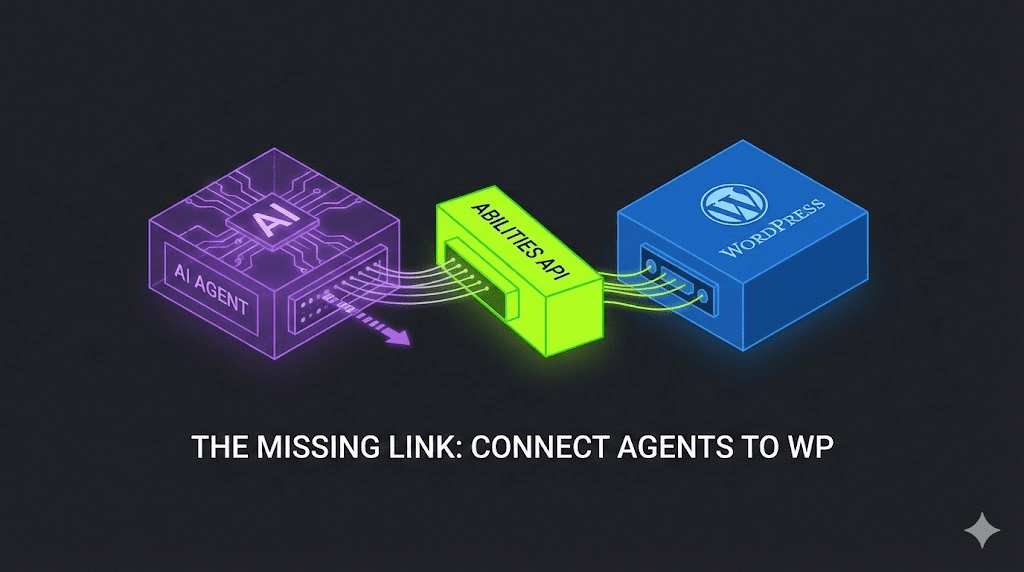
But then WordPress 6.9 introduced the WordPress Abilities API.
And suddenly—suddenly—we can hook our WordPress sites directly to AI agents via MCP.
So here’s what I’m building: a Rank Math extension that exposes SEO functionality through the WordPress Abilities API. Mass updates. AI-powered. Hands-free. The workflow is nearly identical to the internal linking plugin I built before. A few tweaks here and there—specific adjustments for extending someone else’s plugin.
Let me walk you through it.
.
.
.
Step 1: Brainstorming for Requirements
Every vibe coding project starts the same way for me: brainstorming requirements.
I use Claude web for this. Something about it works better for the back-and-forth Q&A sessions—the clarifying questions, the drilling down into what I actually want.
I start with a rough description of the plugin I need, then use my go-to prompt:
PROMPT: Requirements for WordPress Abilities API SEO Extension
The Rank math WordPress plugin doesn't have REST API. Instead of building our own REST API, I want to use the latest abilities API from WordPress to create abilities for the Rank Math WordPress plugin. We are not building it on top of the Rank Math plugin. This is a standalone plugin. However, it does need the Rank Math plugin in order for it to work.
The abilities I'm thinking of are:
- Search posts, custom post types, pages (default: post) by keywords, categories, tags, custom taxonomies, id, author, date range, etc
- get post, custom post type, page (default: post) by id. This would retrieve the full content of the post including title, content, excerpt, featured image, taxonomies, author info, as well as Rank Math SEO data like focus keyword, meta title, meta description, and any other relevant SEO fields that Rank Math manages for that post.
- update the rank math seo data for a given post, custom post type, or page by id. This would include updating fields like focus keyword, meta title, meta description, schema settings, social media metadata, and any other SEO-related fields that Rank Math handles.
The main Rank Math plugin is located at: /Users/nathanonn/LocalSites/abilities-api/app/public/wp-content/plugins/seo-by-rank-math
You can read the codebase to understand how the main Rank Math plugin works.
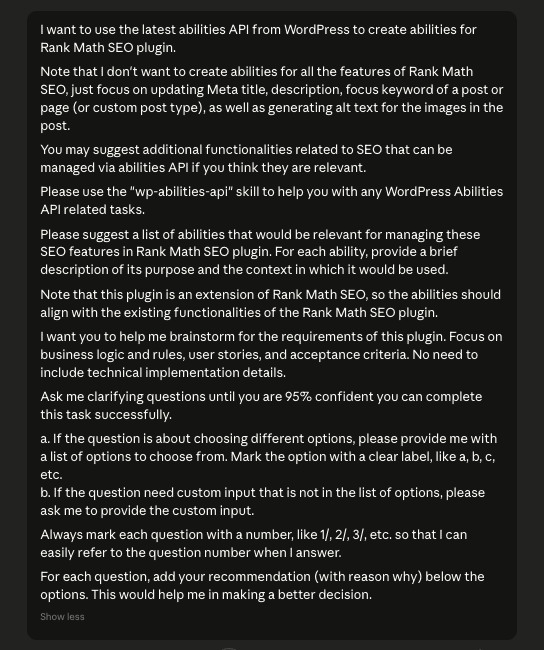
Please use the "wp-abilities-api" skill to help you with any WordPress Abilities API related tasks.
The idea is to create a separate plugin that exposes a REST API for interacting with Rank Math SEO data using LLM via MCP server.
I want you to help me brainstorm for the requirements of this plugin. Focus on business logic and rules, user stories, and acceptance criteria. No need to include technical implementation details.
The Rank math WordPress plugin doesn't have REST API. Instead of building our own REST API, I want to use the latest abilities API from WordPress to create abilities for the Rank Math WordPress plugin. We are not building it on top of the Rank Math plugin. This is a standalone plugin. However, it does need the Rank Math plugin in order for it to work.

The abilities I'm thinking of are:

- Search posts, custom post types, pages (default: post) by keywords, categories, tags, custom taxonomies, id, author, date range, etc
- get post, custom post type, page (default: post) by id. This would retrieve the full content of the post including title, content, excerpt, featured image, taxonomies, author info, as well as Rank Math SEO data like focus keyword, meta title, meta description, and any other relevant SEO fields that Rank Math manages for that post.
- update the rank math seo data for a given post, custom post type, or page by id. This would include updating fields like focus keyword, meta title, meta description, schema settings, social media metadata, and any other SEO-related fields that Rank Math handles.

The main Rank Math plugin is located at: /Users/nathanonn/LocalSites/abilities-api/app/public/wp-content/plugins/seo-by-rank-math

You can read the codebase to understand how the main Rank Math plugin works.

Please use the "wp-abilities-api" skill to help you with any WordPress Abilities API related tasks.

The idea is to create a separate plugin that exposes a REST API for interacting with Rank Math SEO data using LLM via MCP server.

I want you to help me brainstorm for the requirements of this plugin. Focus on business logic and rules, user stories, and acceptance criteria. No need to include technical implementation details.
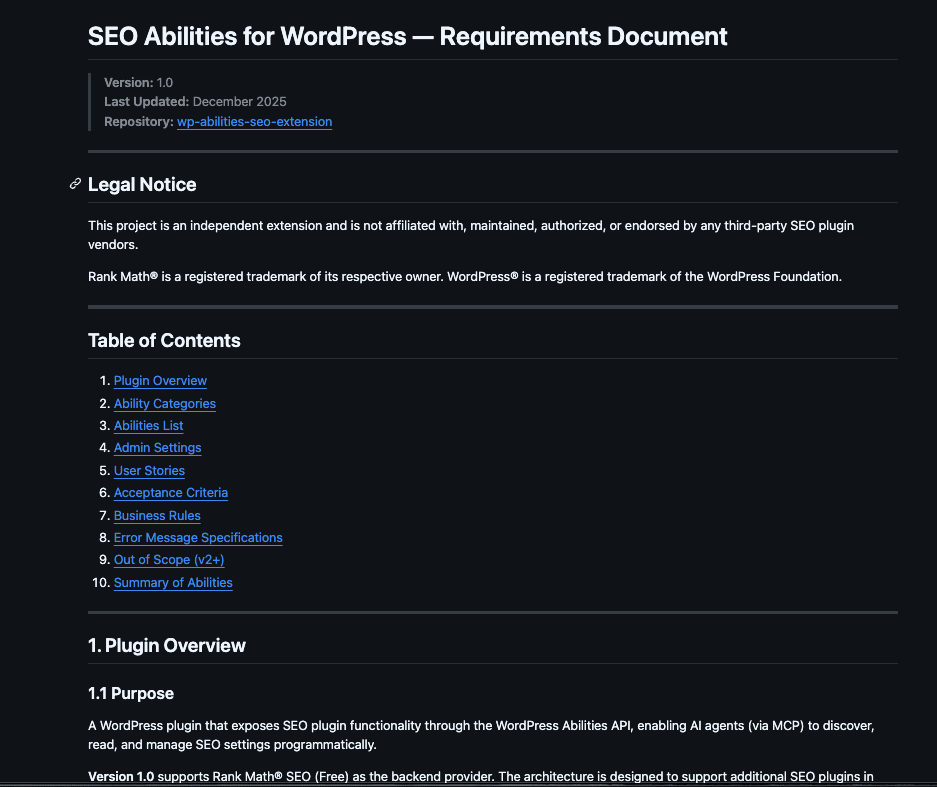
A few rounds of Q&A later, Claude compiles the full requirements:
(I’m skipping the detailed brainstorming walkthrough this time. If you want the step-by-step breakdown, check my previous post—I covered the entire process there.)
.
.
.
Step 2: Project Folder Setup
Nothing glamorous here—but necessary.
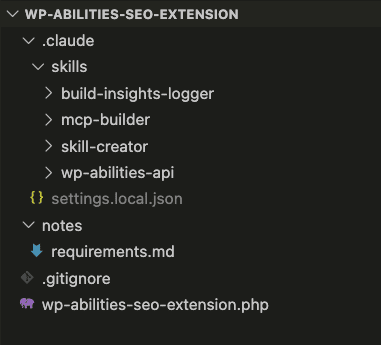
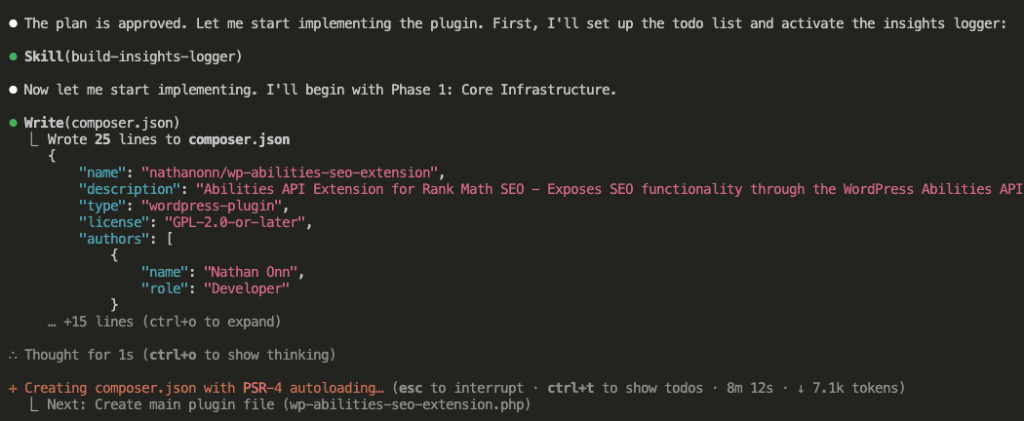
I set up the project folder and install the wp-abilities-api skill.
I also installed three additional skills (optional, but useful):
build-insights-logger: Captures insights during the build so Claude Code learns from the process and avoids repeating mistakes
skill-creator: Creates new skills on the fly if needed
mcp-builder: In case I need to spin up an MCP server quickly
After that, I dropped the requirements into the notes/ folder and created a blank main plugin file (wp-abilities-seo-extension.php).
Ready to build.
.
.
.
Step 3: Build the Plugin with One Shot Prompt
Everything’s in place. Time to ask Claude Code to build the entire plugin.
One shot.
Yes, one prompt.
Sounds ambitious—maybe even reckless—but it works because the requirements are comprehensive and the wp-abilities-api skill handles the heavy lifting.
Here’s the exact prompt:
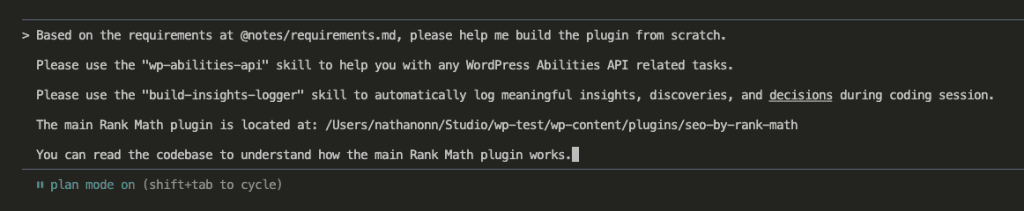
Based on the requirements at @notes/requirements.md, please help me build the plugin from scratch.
Please use the "wp-abilities-api" skill to help you with any WordPress Abilities API related tasks.
Please use the "build-insights-logger" skill to automatically log meaningful insights, discoveries, and decisions during coding session.
The main Rank Math plugin is located at: /Users/nathanonn/Studio/wp-test/wp-content/plugins/seo-by-rank-math
You can read the codebase to understand how the main Rank Math plugin works.
Short prompt.
No novel required.
Why? Because everything Claude needs lives in the requirements document and the skills. The only addition: the Rank Math plugin location. Claude needs to read and understand the codebase of the plugin we’re extending.
That’s the critical piece for building third-party extensions. Point Claude at the source code.
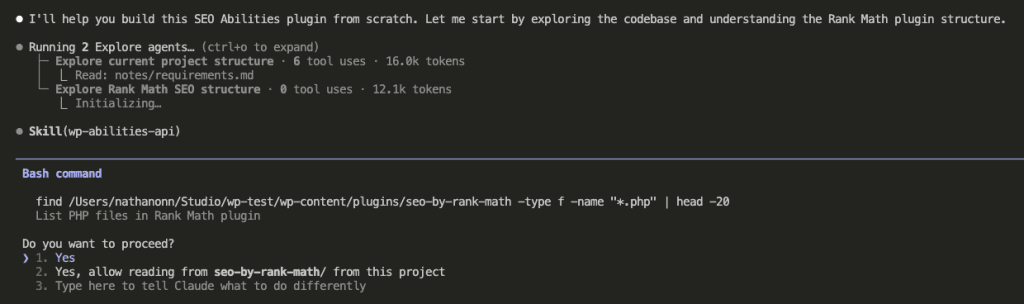
I’m using Claude Code in Plan Mode with Opus 4.5. This lets it explore, research, and strategize before writing a single line of code.
Claude fires up two explore agents in parallel:
One reads the project structure and requirements
One dives into the Rank Math codebase
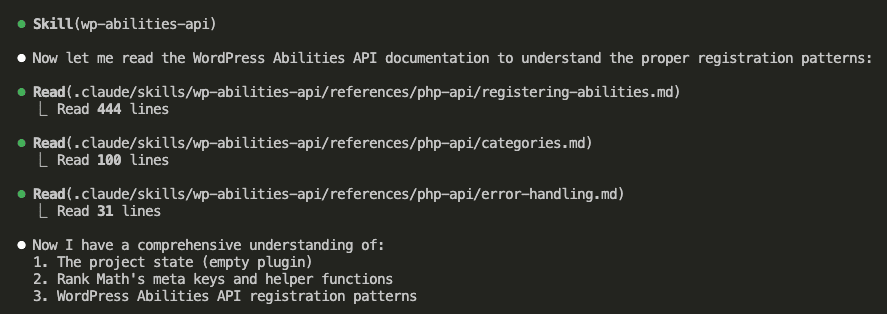
Then it consults the wp-abilities-api skill to understand proper registration patterns:
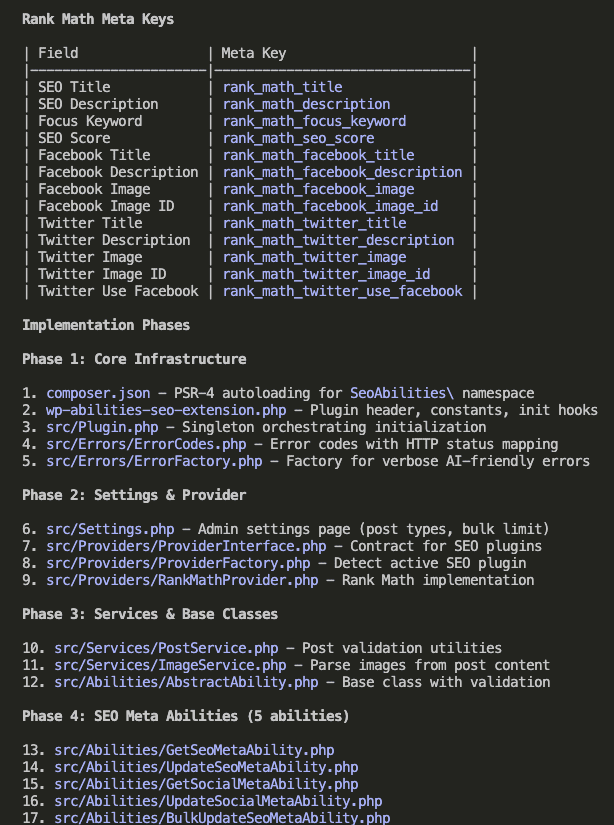
At this point, Opus 4.5 has a complete picture:
The project state (empty plugin)
Rank Math’s meta keys and helper functions
WordPress Abilities API registration patterns
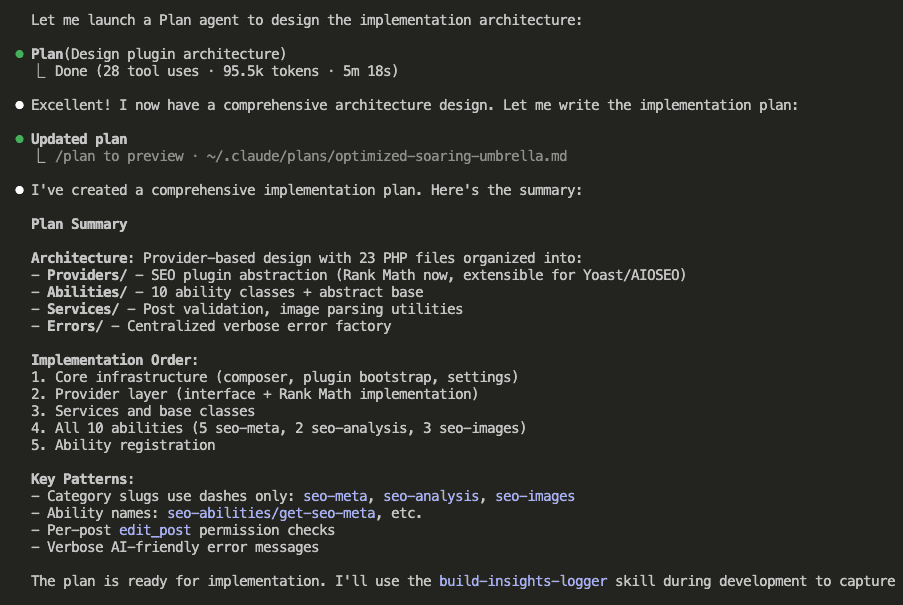
Time to plan.
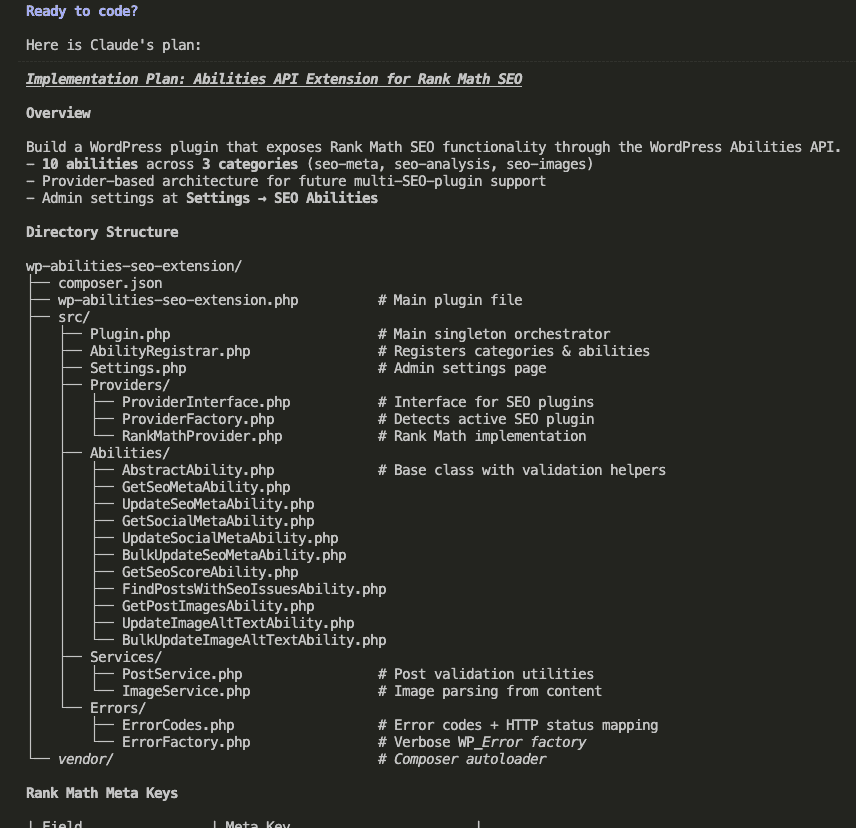
The plan is comprehensive. Detailed architecture. Clear implementation phases. All thanks to Opus 4.5’s capabilities combined with thorough requirements.
I agreed to the plan. Implementation begins.
(The full build process is Claude generating codes while I drink coffee. Nothing riveting to watch.)
This is the part where I’d normally tell you to go make a sandwich.
But you won’t need to.
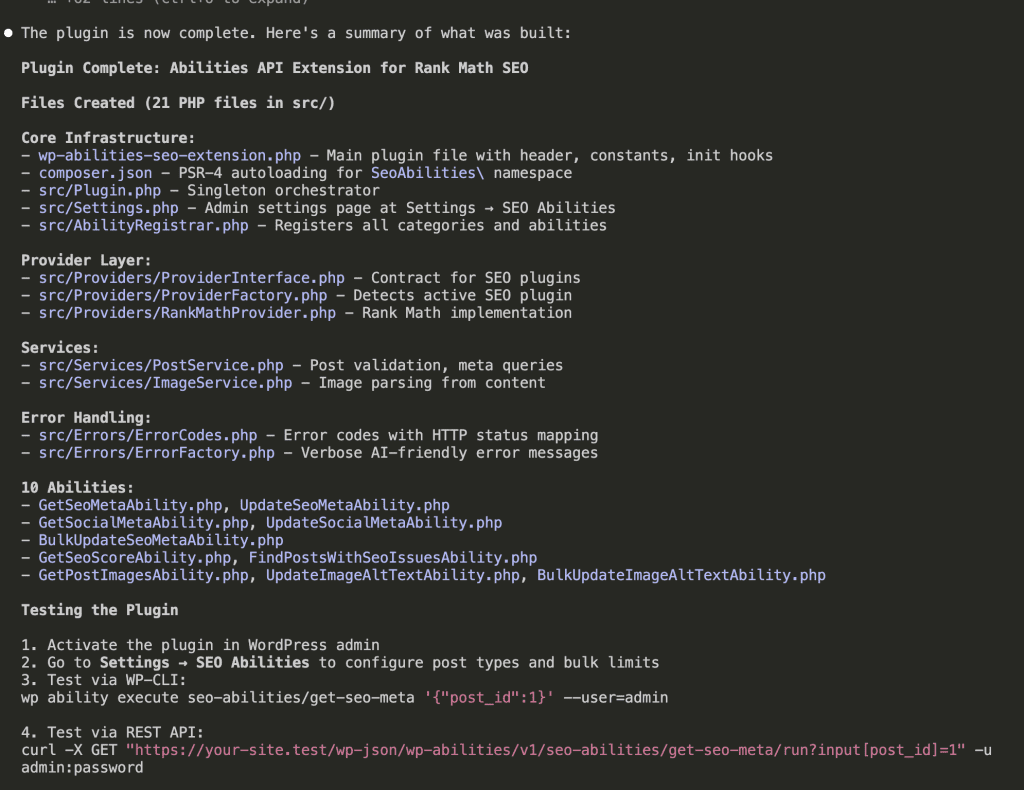
Less than 6 minutes later: Opus 4.5 completes the build.
Six minutes.
For a complete WordPress Abilities API plugin.
Stay with me here.
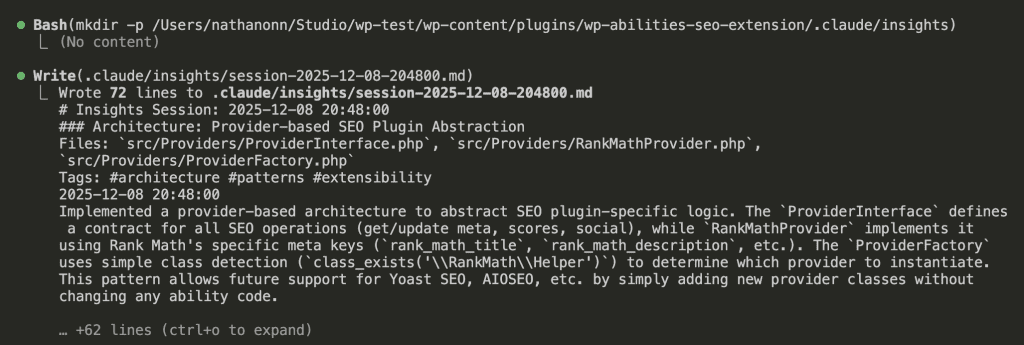
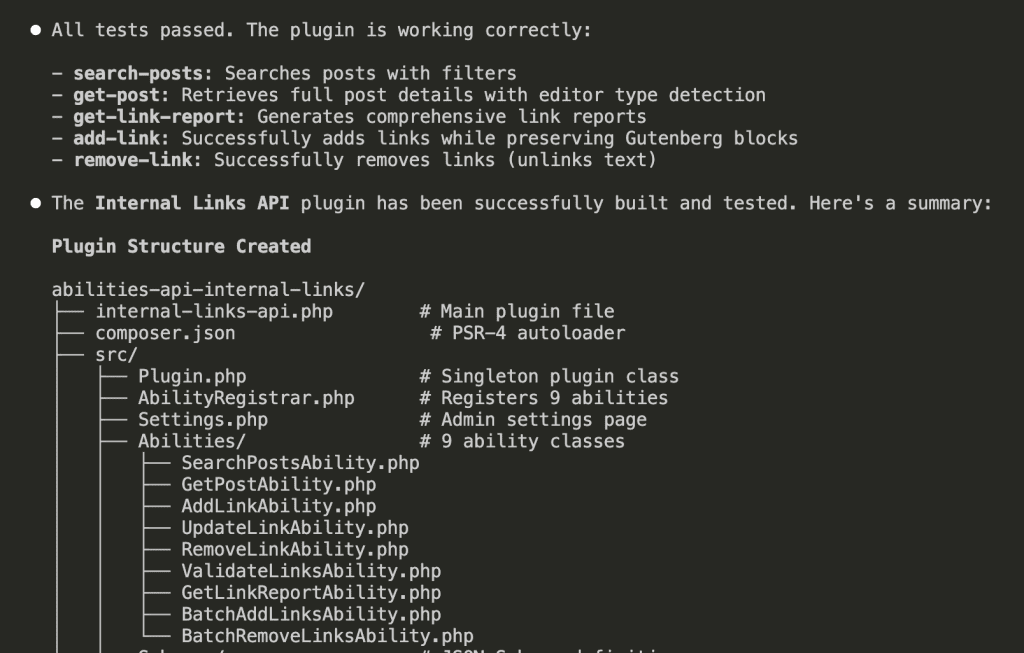
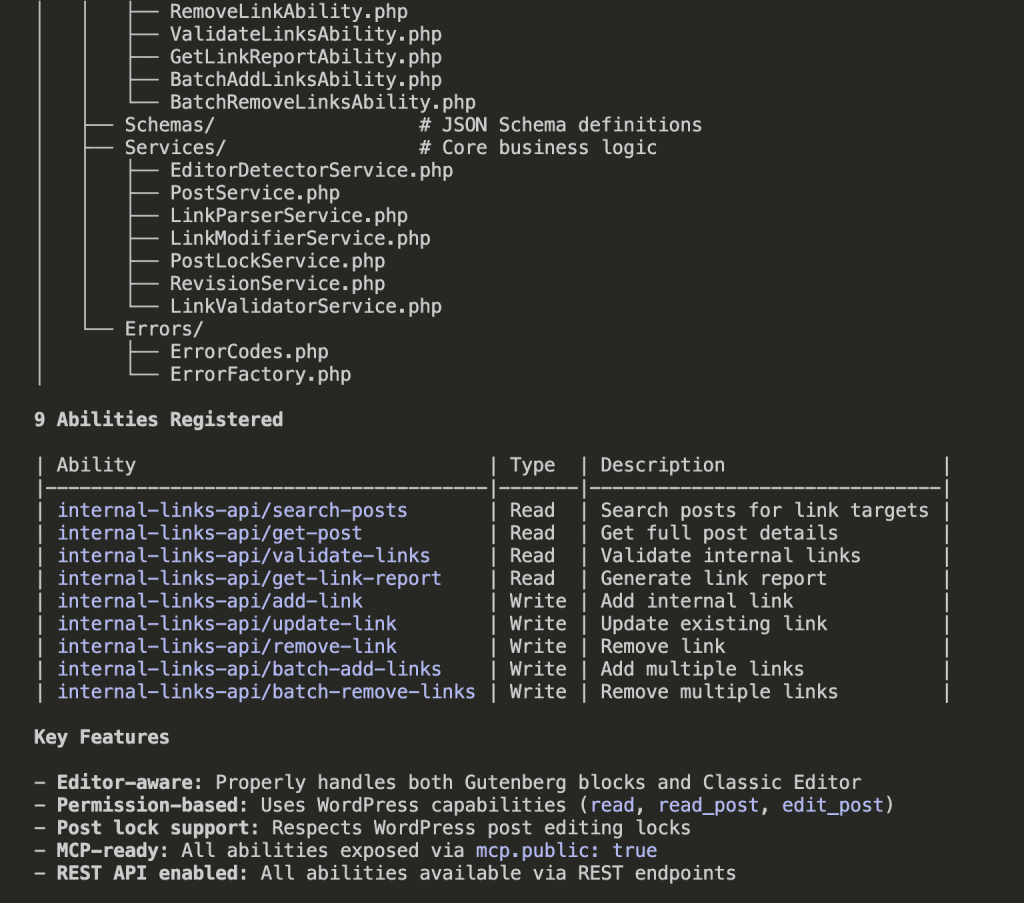
21 PHP files. Core infrastructure. Provider layer. Services. Error handling. All 10 abilities implemented.
Because I included the build-insights-logger skill in my prompt, Claude captured every key decision and discovery during development:
These insights become documentation.
Learning material for the next build.
.
.
.
Step 4: Test the Plugin with Claude Code
Build complete.
But before we pop any champagne (or, you know, instant coffee)—we test.
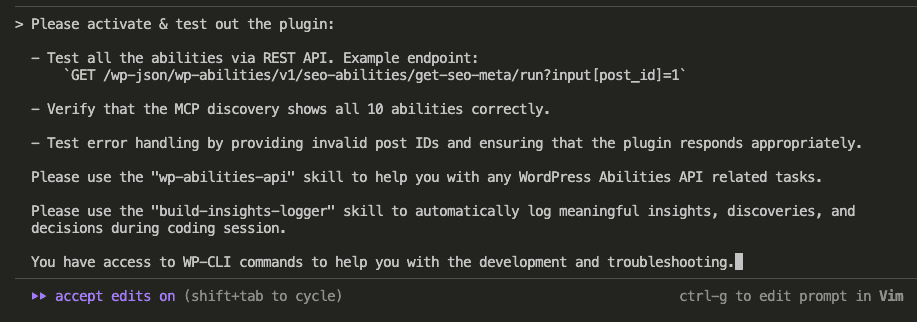
Here’s my testing prompt:
Please activate & test out the plugin:
- Test all the abilities via REST API. Example endpoint:
    `GET /wp-json/wp-abilities/v1/seo-abilities/get-seo-meta/run?input[post_id]=1`
- Verify that the MCP discovery shows all 10 abilities correctly.
- Test error handling by providing invalid post IDs and ensuring that the plugin responds appropriately.
Please use the "wp-abilities-api" skill to help you with any WordPress Abilities API related tasks.
Please use the "build-insights-logger" skill to automatically log meaningful insights, discoveries, and decisions during coding session.
You have access to WP-CLI commands to help you with the development and troubleshooting.
Three focus areas:
Test abilities via REST API
Verify MCP discovery shows all 10 abilities
Test error handling with invalid inputs
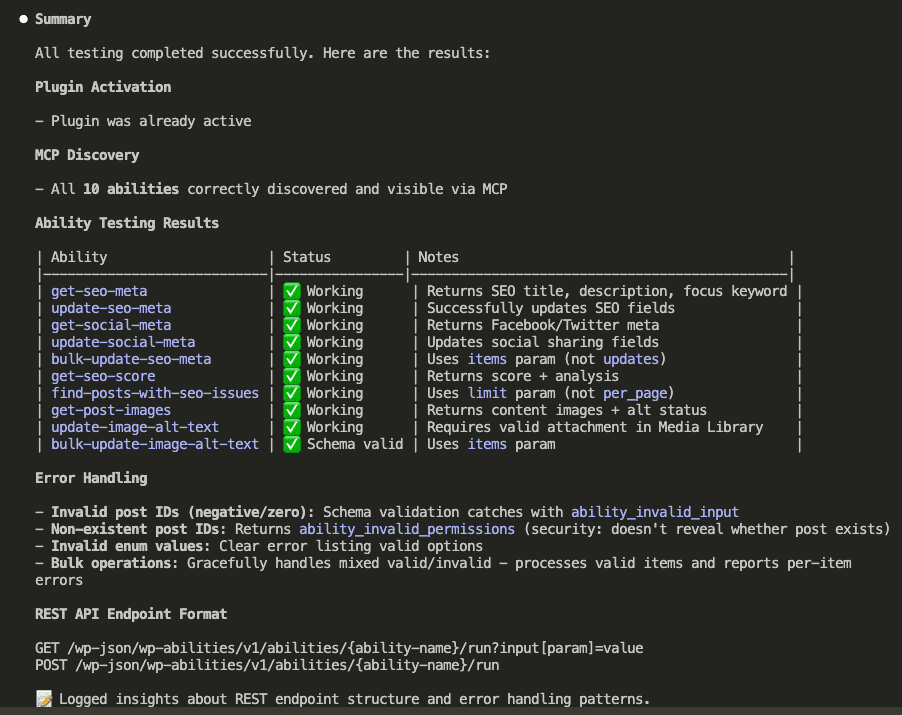
Claude runs through the tests:
(Again, nothing thrilling here. Claude does the work. I watch with my coffee.)
Test results come in:
All 10 abilities working. MCP discovery correct. Error handling validated.
The summary shows exactly what each ability does and any notable behaviors.
.
.
.
Step 5: Use Test Results for Improvements
Tests passed.
But—and this is important—passing tests doesn’t mean perfect code.
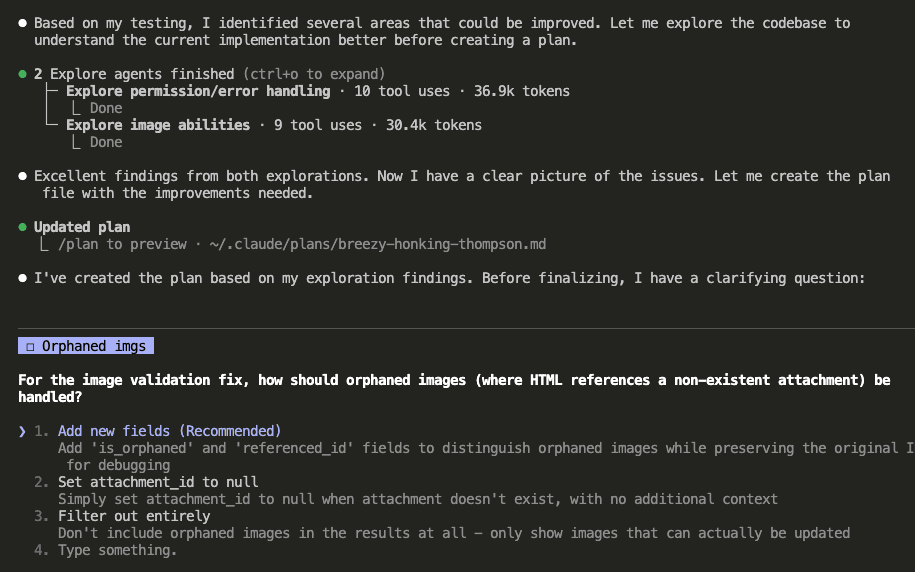
I asked Opus 4.5 to analyze the test results and suggest improvements:
Based on your test results, identify the areas that may need improvement or further testing, and come up with a plan to address them.
Claude explores the codebase again, this time hunting for edge cases and potential issues:
It found several areas to improve:
Permission callback consistency
Image validation for orphaned images (HTML references to non-existent attachments)
Output schema enhancements
Claude even asked a clarifying question about handling orphaned images. (I chose the recommended option: add new fields to distinguish orphaned images while preserving the original reference ID for debugging.)
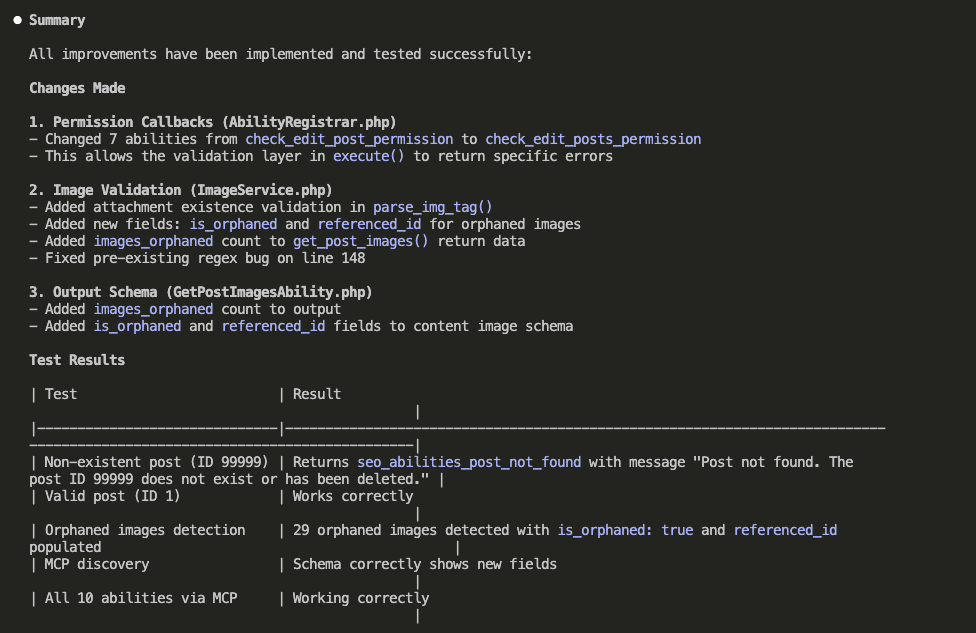
Improvements implemented:
The changes:
Permission Callbacks: Changed 7 abilities from check_edit_post_permission to check_edit_posts_permission for better error handling
Image Validation: Added attachment existence validation, new is_orphaned and referenced_id fields for orphaned images
Output Schema: Added images_orphaned count to the get_post_images return data
All verified with fresh tests. 29 orphaned images detected correctly on my site. The schema updates reflected in MCP discovery.
.
.
.
Step 6: Put the Plugin to Work
Everything’s built and tested.
Now comes the fun part—actually using it.
The process mirrors what we did with the internal links plugin. First, install the MCP Adapter plugin into your WordPress site.
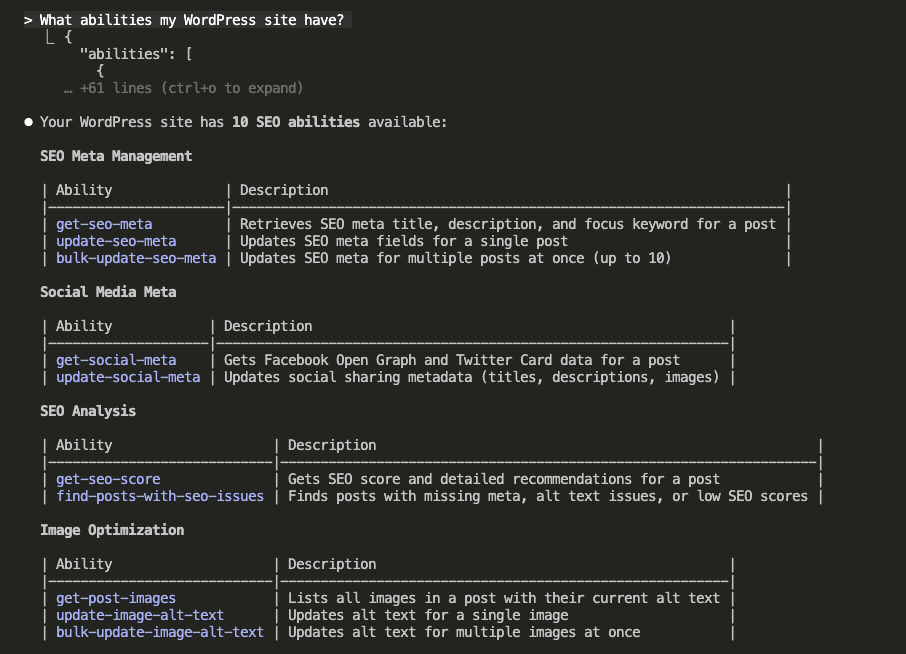
With the adapter active, I asked Claude what abilities my WordPress site has:
All 10 abilities visible. Three categories. Ready to go.
Now for the moment of truth—the reason I built this whole thing in the first place.
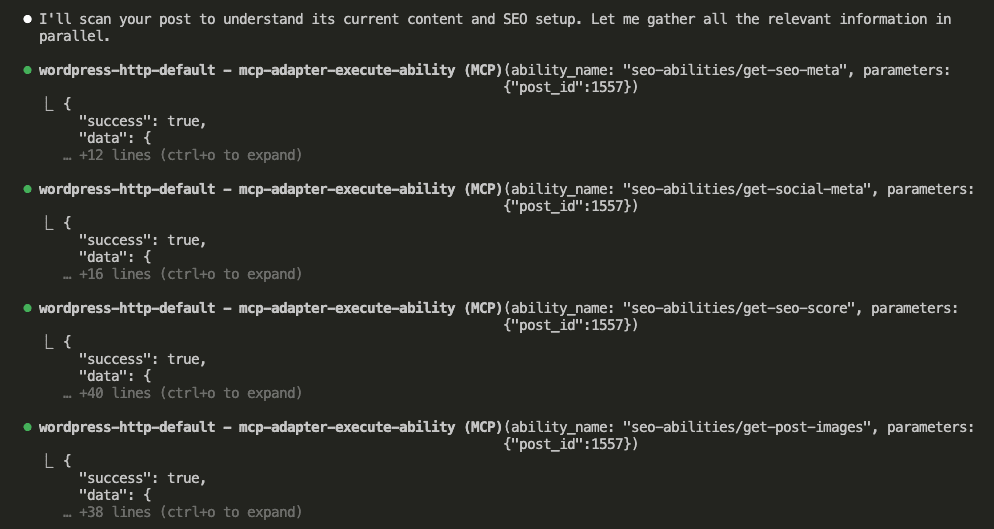
I asked Claude to optimize SEO for a specific post:
I want to optimize my post for SEO (ID: 1557). First, scan the post to understand its content and current SEO setup. Then, propose improvements that fall within your abilities.
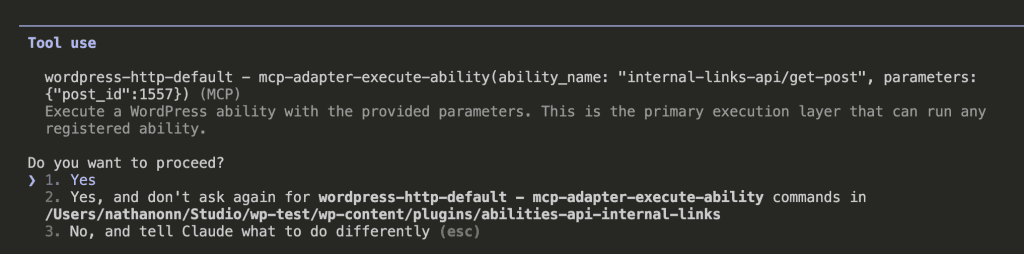
Claude immediately starts gathering data. Multiple abilities firing in parallel:
Four abilities. One request. All the SEO data I need.
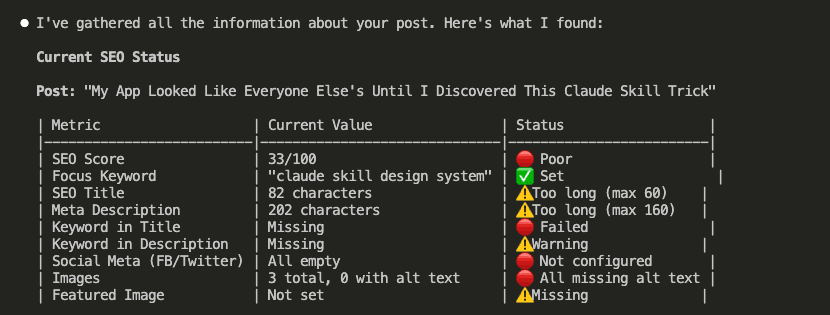
Here’s what Claude found—and honestly, it stings a little to share this:
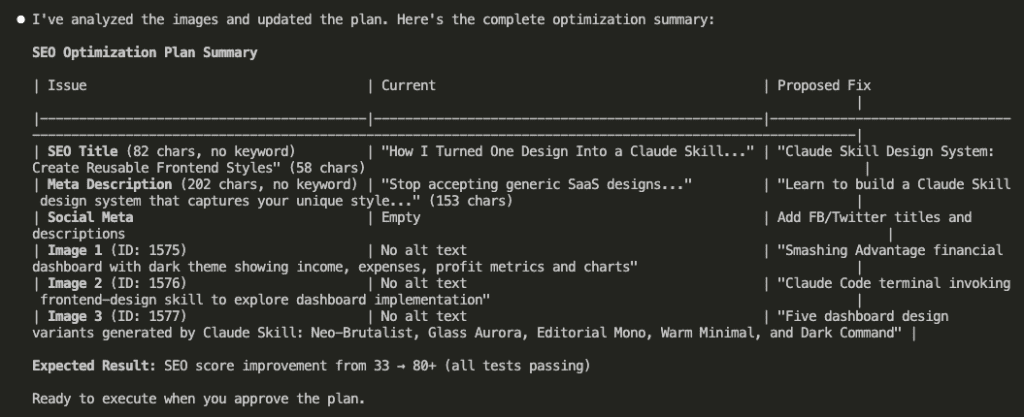
The diagnosis:
SEO Score: 33/100 (Poor)
Title: 82 characters (max recommended: 60)
Description: 202 characters (max: 160)
Keyword in title: Missing
Social meta: Completely empty
Images: 3 total, 0 with alt text
Ouch.
But also? Exactly why I built this plugin.
Claude analyzed the issues and proposed a complete optimization plan:
The plan covers everything: shorter title with keyword, trimmed description, Facebook/Twitter metadata, and contextual alt text for all three images.
Expected result: SEO score from 33 → 80+.
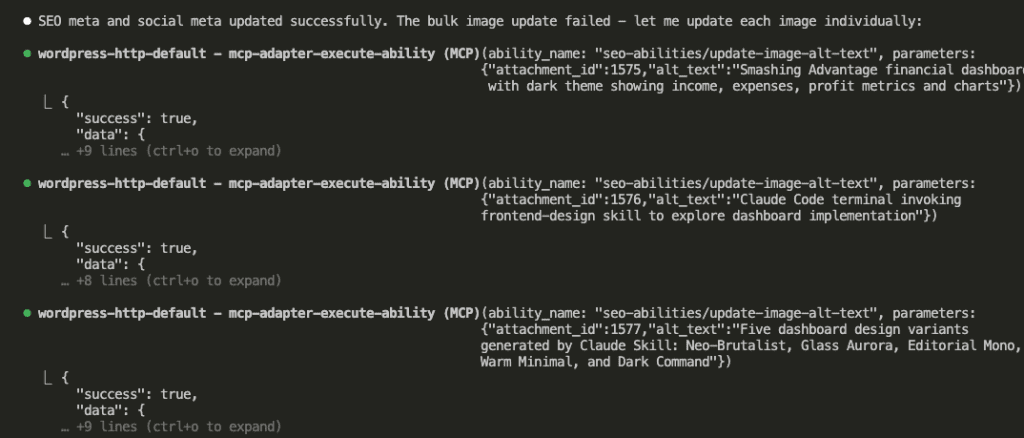
I approved. Claude executed:
Interesting note: the bulk image update failed, so Claude adapted and updated each image individually. Problem-solving on the fly.
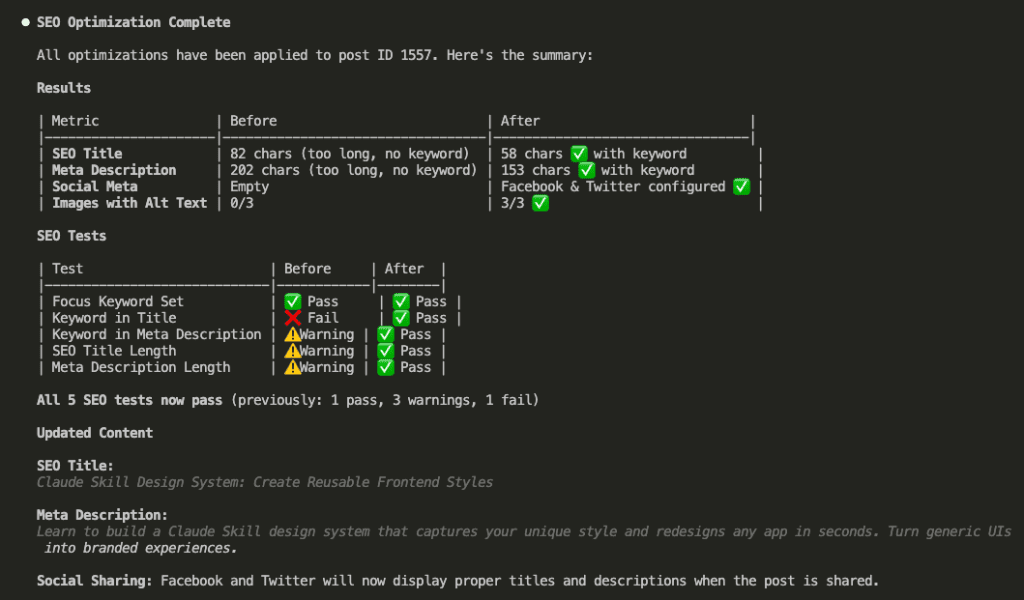
Results summary:
Metric
Before
After
SEO Title
82 chars (too long, no keyword)
58 chars ✅ with keyword
Meta Description
202 chars (too long, no keyword)
153 chars ✅ with keyword
Social Meta
Empty
Facebook & Twitter configured ✅
Images with Alt Text
0/3
3/3 ✅
All 5 SEO tests now pass. Previously: 1 pass, 3 warnings, 1 fail.
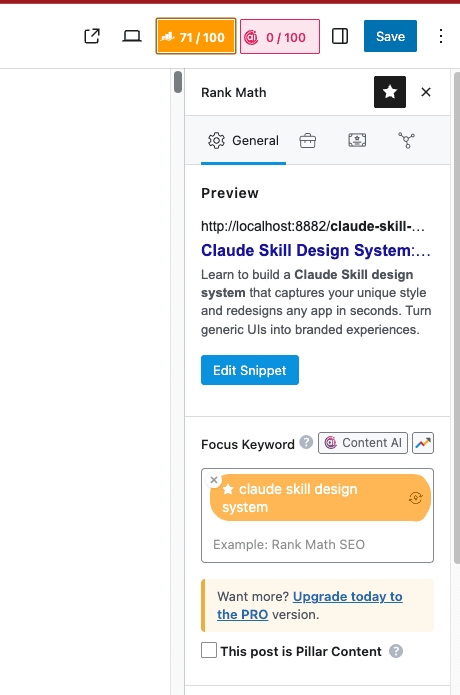
Let me verify in the WordPress admin:
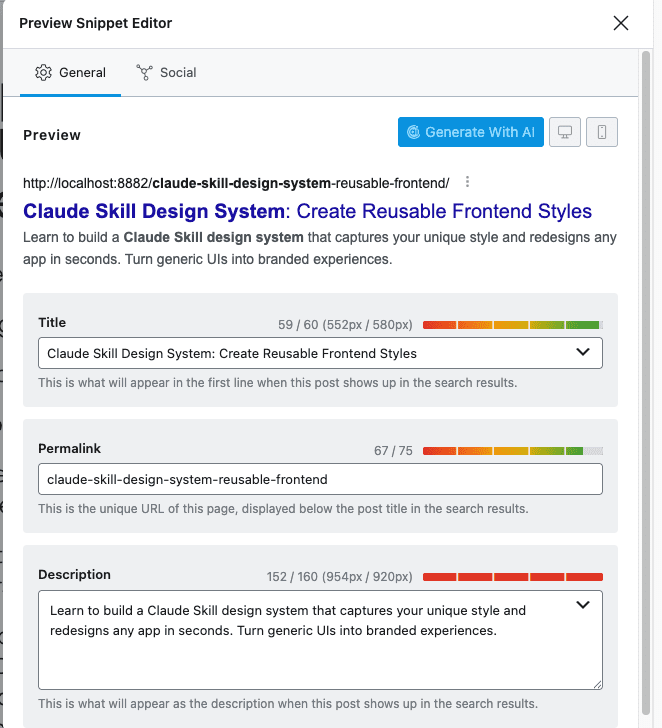
SEO score: 71/100.
Not quite the 80+ the plan aimed for—but jumping from 33 to 71? I’ll take it.
Especially considering I did nothing except approve a plan.
The snippet preview shows proper character counts. Title at 59/60. Description at 152/160. Both in the green zone.
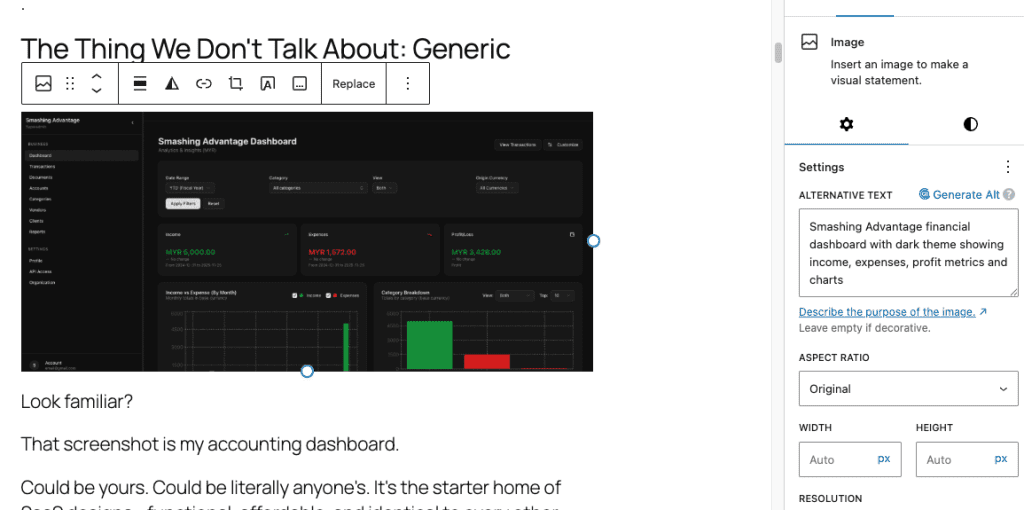
And the images:
All three images now have descriptive, contextual alt text. Claude understood what each image showed and wrote appropriate descriptions.
In under 6 minutes of build time, we created a WordPress plugin that:
Exposes 10 SEO abilities through the WordPress Abilities API
Integrates with Rank Math (with architecture ready for Yoast, AIOSEO, etc.)
Lets AI agents read, analyze, and update SEO settings
Handles bulk operations for mass optimization
Manages image alt text across your entire content library
The real unlock?
Your WordPress site now speaks MCP.
Any AI agent—Claude Code, custom bots, automation pipelines—can now optimize your SEO programmatically. No clicking through admin panels. No manual data entry. No tedious bulk editing. You describe what you want. The AI executes using the abilities you’ve exposed through the WordPress Abilities API.
This is the promise of WordPress 6.9’s Abilities API.
And we’re just scratching the surface.
.
.
.
What’s Next?
Two plugins down. Both solving real problems I face on my own site.
The pattern works:
Brainstorm requirements with Claude
Set up project with the right skills
One-shot build with comprehensive prompt
Test and iterate
Deploy and use
For extending third-party plugins, add one step: point Claude at the source code.
Remember those 28 weeks of newsletters I mentioned at the start? The mountain of SEO work that made me want to lie down and stare at the ceiling?
It’s not a mountain anymore.
It’s a checklist. And I have an AI agent with a pen.
What tedious WordPress task are you going to automate next?
You know that thing where you’ve got 47 browser tabs open?
Not because you’re researching anything profound. No. You’re just trying to find that one post you wrote six months ago—the one about WooCommerce setup, or was it the product pages tutorial?—because you need to link to it from the article you’re publishing today.
Tab after tab after tab. Command+F. Scroll. Squint. Copy URL. Switch back. Find the right words to anchor. Paste. Format.
Thirty minutes later, you’ve added three internal links.
Three.
And honestly? They’re probably not even the best ones.
Here’s the thing: I’ve been that person. Staring at a perfectly good 2,000-word post with zero internal links, knowing full well that Google loves them, readers need them, and my inner SEO voice won’t shut up about it.
So I built something.
And what I discovered about WordPress 6.9’s new Abilities API might just change how you think about your entire site.
Stay with me.
.
.
.
The Problem Nobody’s Actually Solving
Let’s be honest about what’s out there right now.
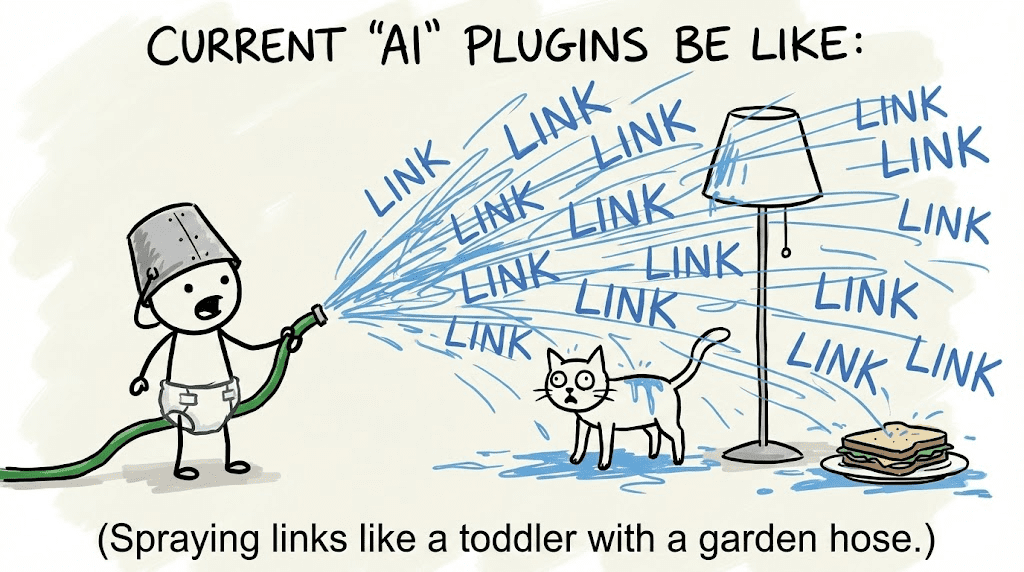
Manual linking eats 10-30 minutes per post. That’s not a workflow—that’s a hostage situation.
Keyword-based plugins spray links everywhere like a toddler with a garden hose. “AI” gets linked to “AirAsia.” I wish I were joking.
Regex matching sounds smart until it isn’t. It matches strings. It doesn’t understand meaning. Big difference.
Context blindness is the real killer. These tools can’t tell the difference between your Gutenberg tutorial and your post about WordPress editor basics—even though they’re obviously related.
The existing solutions are solving the wrong problem.
They’re trying to match strings when they should be understanding meaning.
And then WordPress 6.9 launched on December 2nd, 2025.
Buried in the release notes was something called the Abilities API. Most developers scrolled right past it.
I didn’t.
.
.
.
The Discovery That Changed Everything
What happens when you combine WordPress’s new Abilities API with Claude Desktop and an MCP server?
Magic. Actual magic.
(Okay, not actual magic. But close enough that I did a little chair dance when it worked.)
Instead of regex patterns hunting for keywords, I created abilities that do something radical—they think.
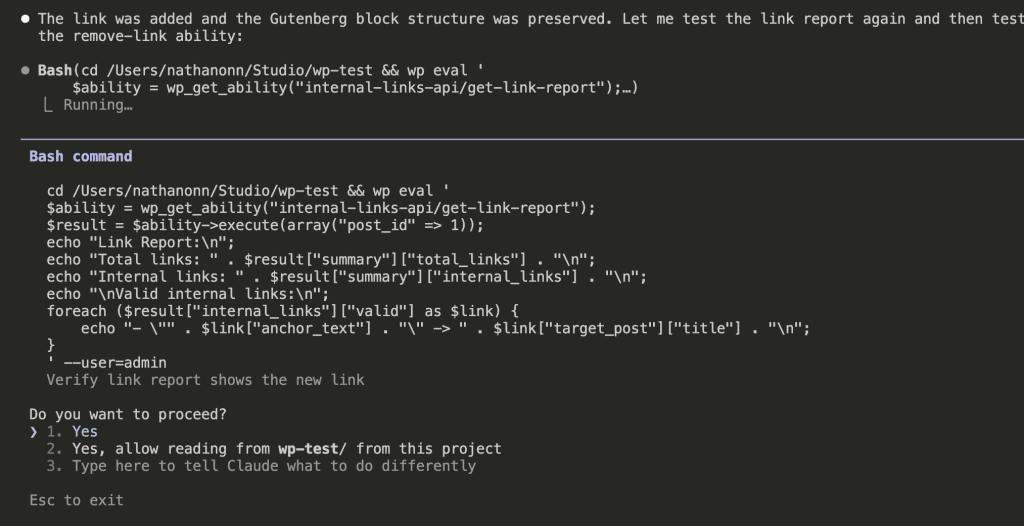
Search posts semantically. When you write about “selling products online,” it finds your WooCommerce setup guide. Because it understands what you mean.
Analyze content context. It knows your Gutenberg blocks tutorial relates to your WordPress editor basics post. Not because of keywords. Because of meaning.
Add links intelligently. Places them where readers actually need them—not just where a keyword appears.
Validate links automatically. Checks if targets still exist. No more embarrassing 404s hiding in your archive.
The kicker?
AI decides where to place links based on actual content understanding.
Not keywords. Not patterns. Understanding.
.
.
.
Building the Plugin: From Idea to Production
Here’s where it gets fun.
I’m going to walk you through exactly how I built this—from brainstorming to a working plugin with 9 abilities. The whole journey took about 3 hours.
(Three hours! To build something that would’ve taken weeks the traditional way. I’m still a little giddy about it.)
Phase 1: Getting Clear on What I Actually Wanted
I started in Claude Web with my wp-abilities-api skill loaded.
No documentation hunting. No API reference rabbit holes. Claude already knew the patterns.
PROMPT: Abilities API requirements brainstorming
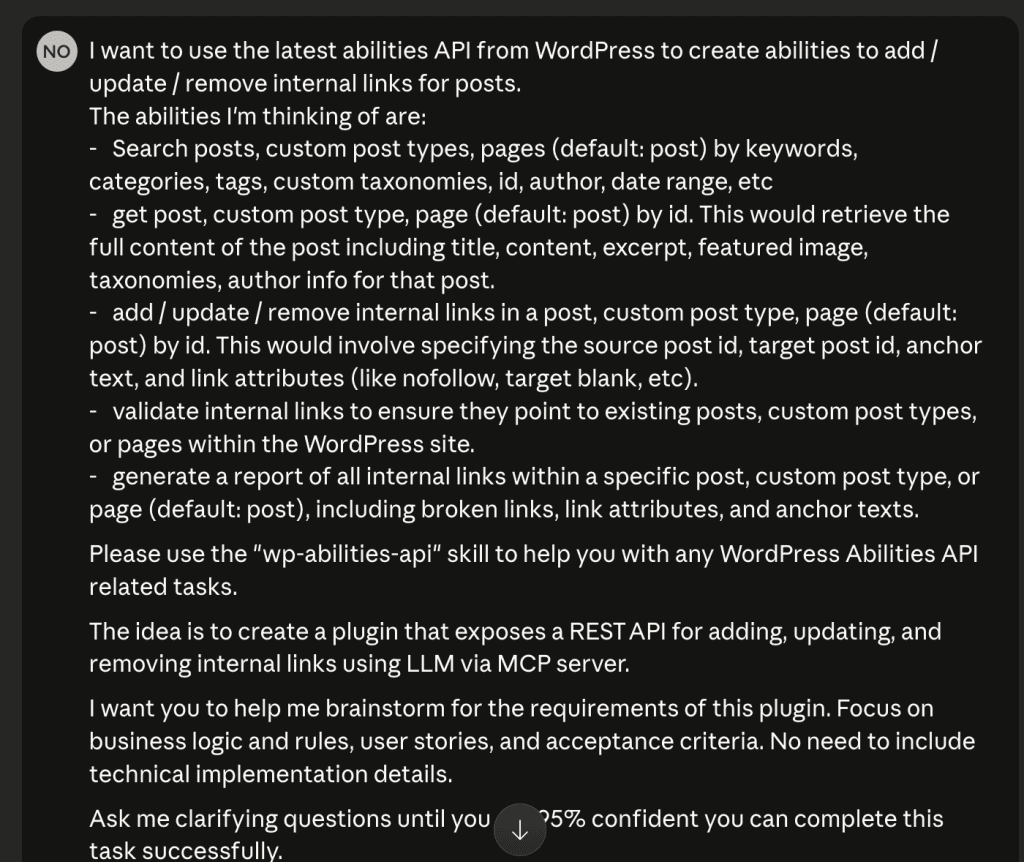
I want to use the latest abilities API from WordPress to create abilities to add / update / remove internal links for posts.

The abilities I'm thinking of are:

-   Search posts, custom post types, pages (default: post) by keywords, categories, tags, custom taxonomies, id, author, date range, etc
-   get post, custom post type, page (default: post) by id. This would retrieve the full content of the post including title, content, excerpt, featured image, taxonomies, author info for that post.
-   add / update / remove internal links in a post, custom post type, page (default: post) by id. This would involve specifying the source post id, target post id, anchor text, and link attributes (like nofollow, target blank, etc).
-   validate internal links to ensure they point to existing posts, custom post types, or pages within the WordPress site.
-   generate a report of all internal links within a specific post, custom post type, or page (default: post), including broken links, link attributes, and anchor texts.

Please use the "wp-abilities-api" skill to help you with any WordPress Abilities API related tasks.

The idea is to create a plugin that exposes a REST API for adding, updating, and removing internal links using LLM via MCP server.

I want you to help me brainstorm for the requirements of this plugin. Focus on business logic and rules, user stories, and acceptance criteria. No need to include technical implementation details.
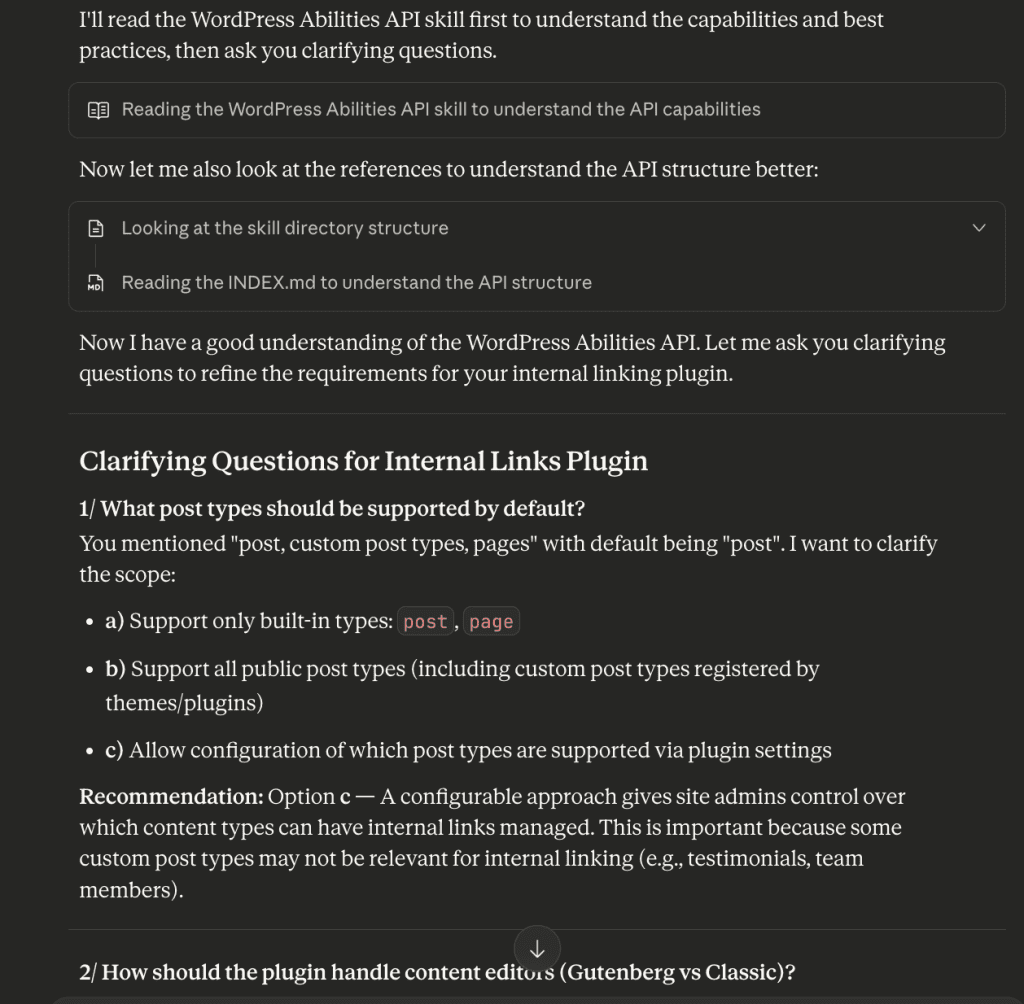
My initial prompt was simple: I want to create abilities for managing internal links.
Claude came back with targeted questions. Not generic ones—targeted.
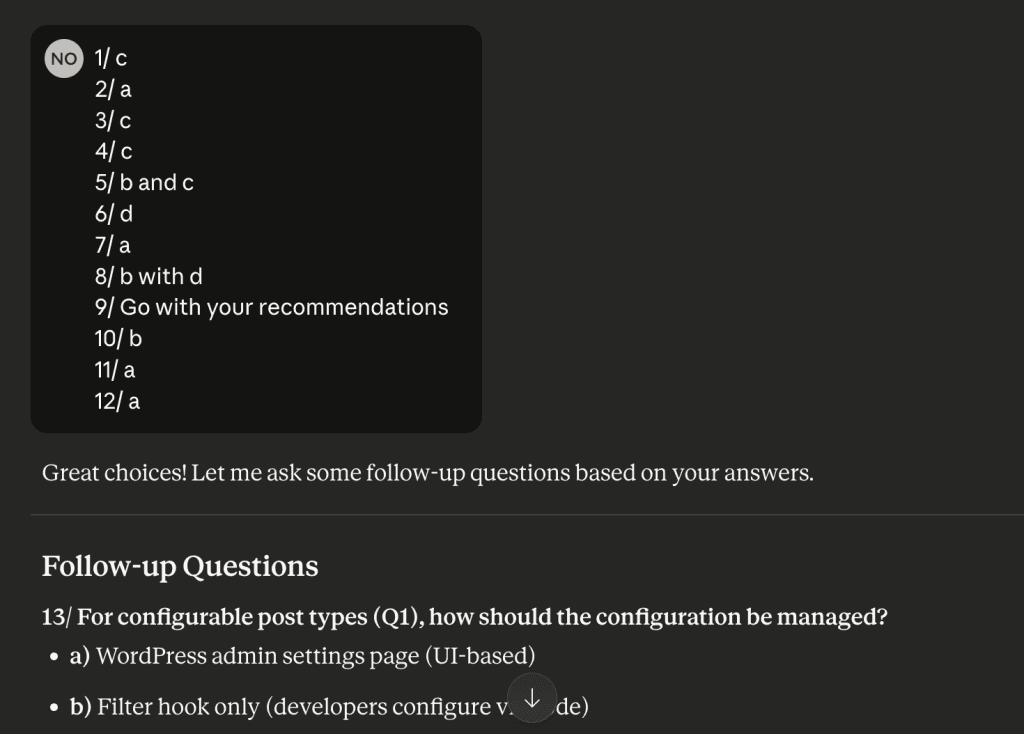
My answers to Claude’s questions:
Notice what’s happening here. Each answer shaped the architecture. No guessing. No over-engineering. No building features I’d never use.
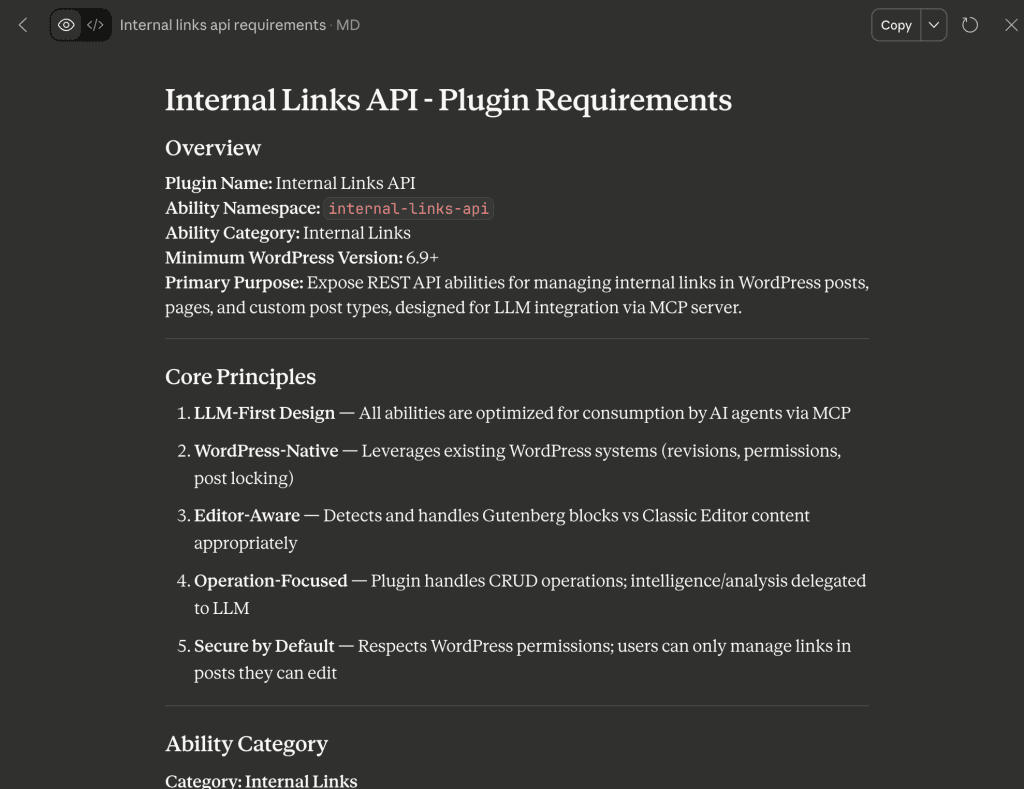
After a few rounds, Claude produced a comprehensive requirements document:
The key architectural decisions that emerged:
LLM-First Design — All abilities optimized for AI consumption via MCP. Because that’s the whole point.
Editor-Aware — Handles Gutenberg blocks vs Classic Editor automatically. No more “works in one, breaks in the other.”
Permission-Based — Respects WordPress capabilities system. Because security isn’t optional.
Operation-Focused — The plugin handles CRUD operations. AI handles the intelligence. Clean separation.
Phase 2: Letting Claude Code Do the Heavy Lifting
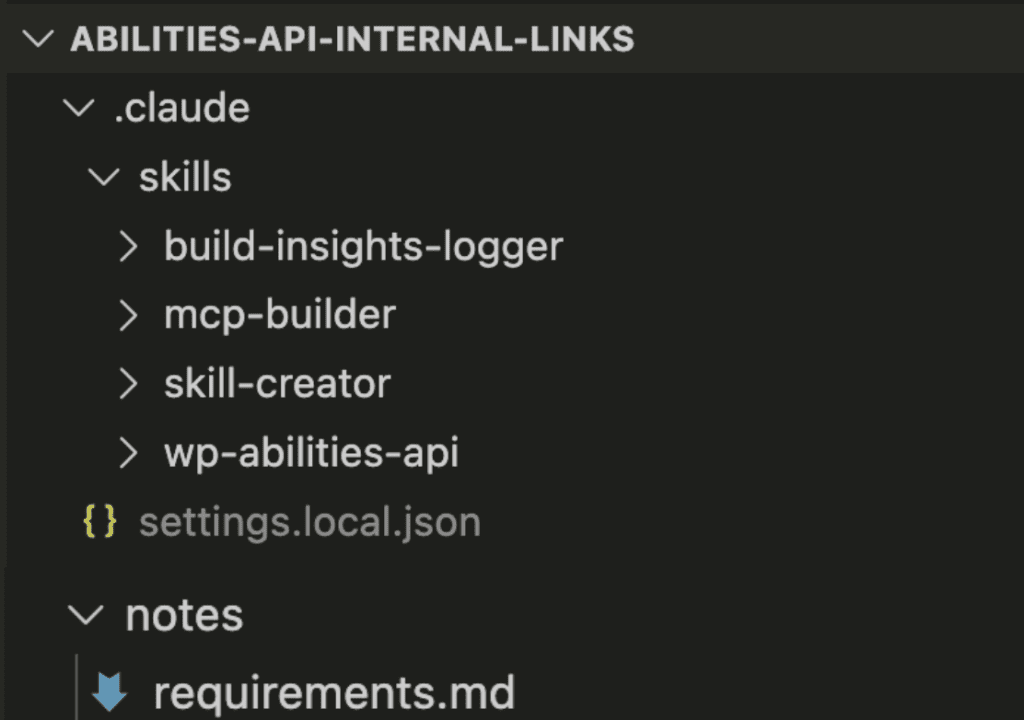
With requirements locked, I opened VS Code and set up my workspace:
The setup was deliberate.
wp-abilities-api skill installed. Build-insights-logger to capture discoveries. Requirements document in the notes folder. Clean plugin directory ready to go.
Then I triggered Claude Code with plan mode:
PROMPT: Build Plugin From Scratch
Based on the requirements at @notes/requirements.md, please help me build the plugin from scratch.

Please use the "wp-abilities-api" skill to help you with any WordPress Abilities API related tasks.

Please use the "build-insights-logger" skill to automatically log meaningful insights, discoveries, and decisions during coding session.

You have access to WP-CLI commands to help you with the development.
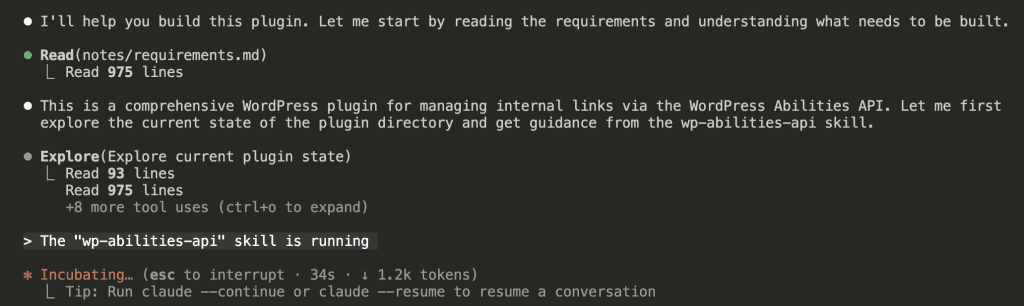
Watch what happened next.
Claude Code immediately read the requirements document, explored the current plugin state, activated the wp-abilities-api skill automatically, and studied the API documentation patterns.
Then came clarifying questions.
Even Claude Code wanted to be sure:
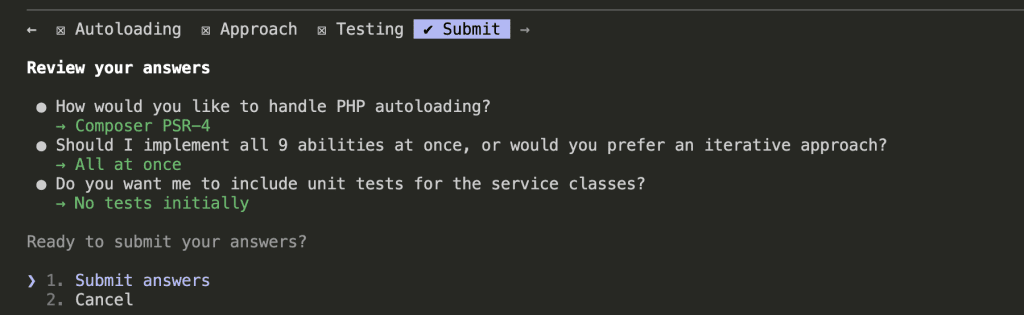
Three critical decisions:
Autoloading: Composer PSR-4. The professional standard.
Implementation: All 9 abilities at once. Comprehensive from the start.
Testing: No unit tests initially. Faster iteration. (We can add tests later. Don’t @ me.)
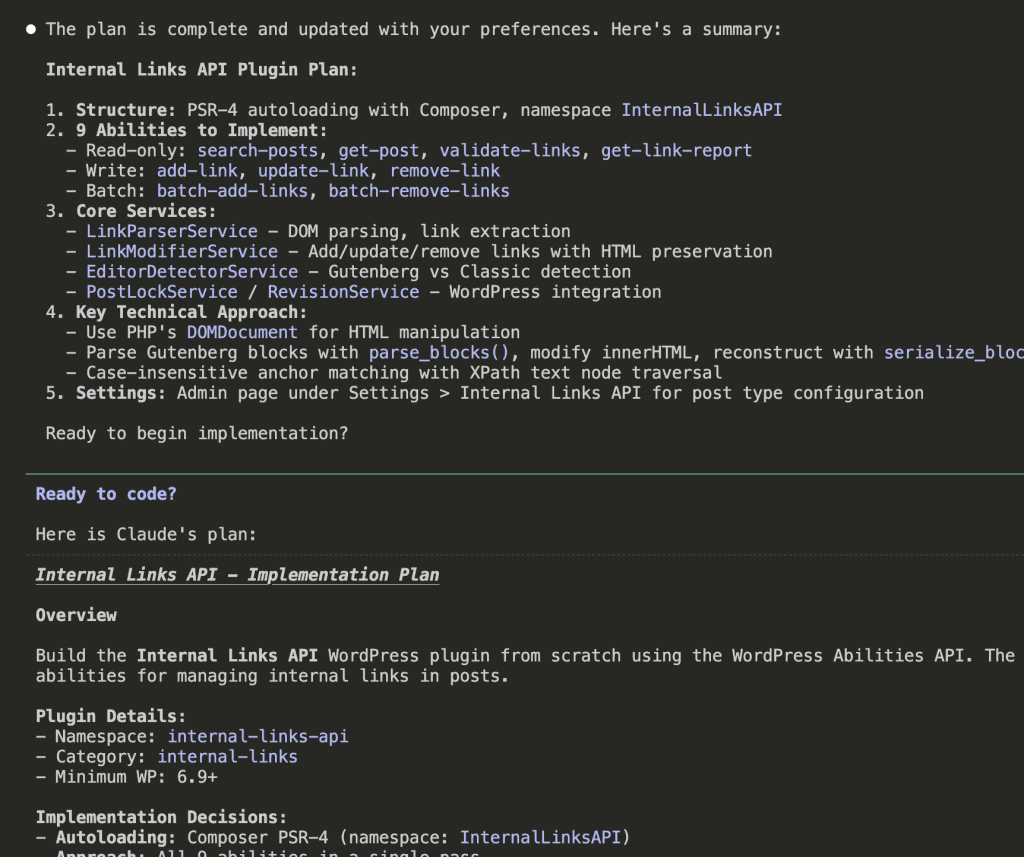
The plan was complete. Nine abilities. Core services. Professional architecture.
And I hadn’t written a single line of code yet.
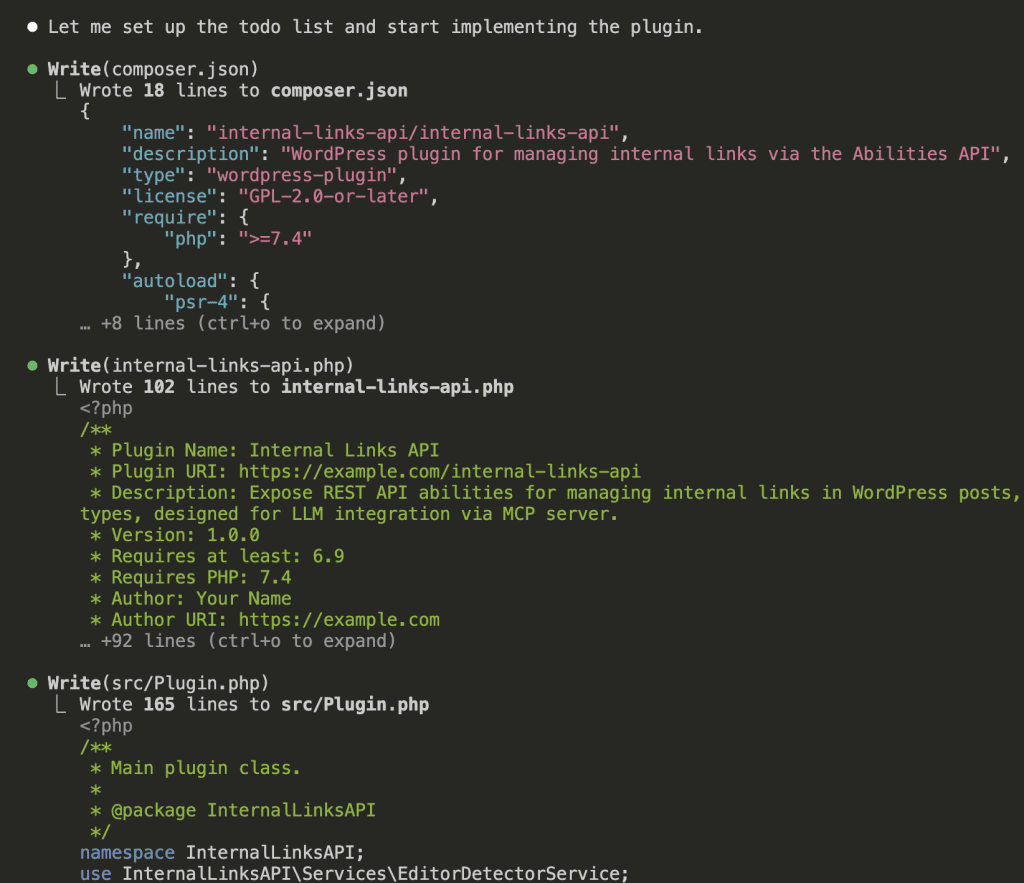
Phase 3: Watching the Build Happen
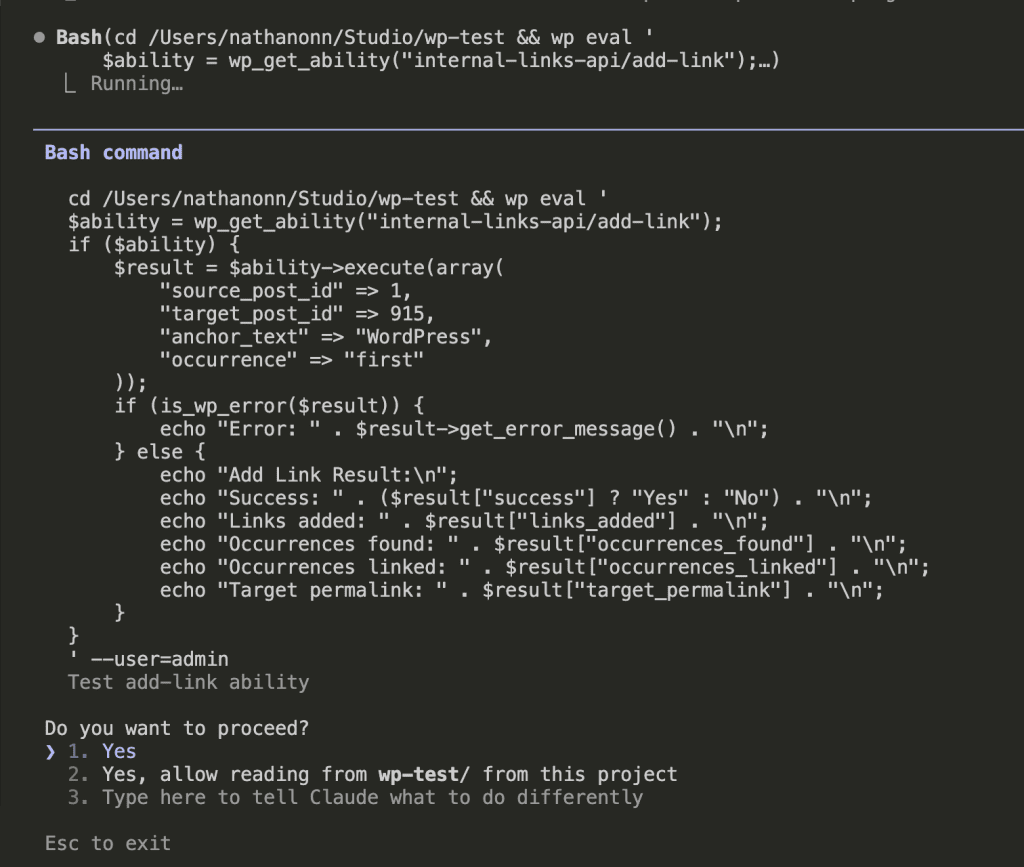
Here’s what fascinates me—Claude Code used WP-CLI to test in real-time:
Real post IDs. Real execution. Real validation.
Every ability got tested. No assumptions. No “it should work” moments.
Editor-aware — Properly handles Gutenberg blocks AND Classic Editor. Finally.
Permission-based — Uses WordPress capabilities (read, read_post, edit_post). Your site stays secure.
Post lock support — Respects WordPress post editing locks. No stepping on collaborators’ toes.
MCP-ready — All abilities exposed via mcp.publicapi=true. AI can actually use them.
REST API enabled — Available via REST endpoints for whatever else you dream up.
.
.
.
The Real Test: Can AI Actually Use This?
The plugin was built. The abilities were registered.
But could AI actually use them?
Time to find out.
Setting Up the Bridge
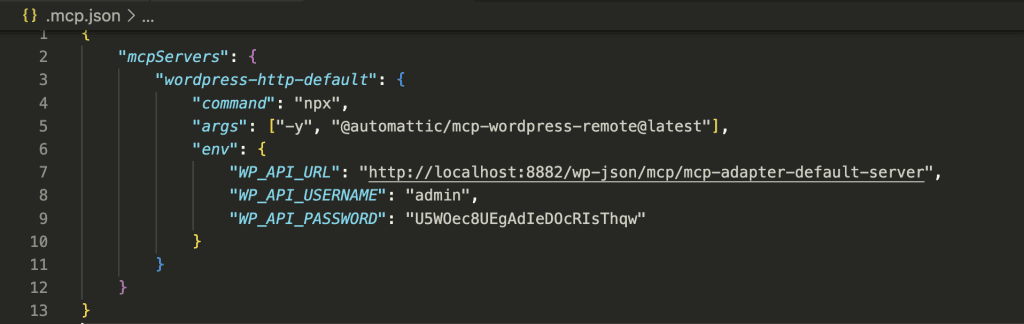
First, I installed the MCP Adapter plugin. This brilliant piece of engineering transforms WordPress abilities into MCP tools that AI can trigger.
The setup took 2 minutes. Two.
When I opened Claude Code, it immediately detected the MCP server:
The Moment of Truth
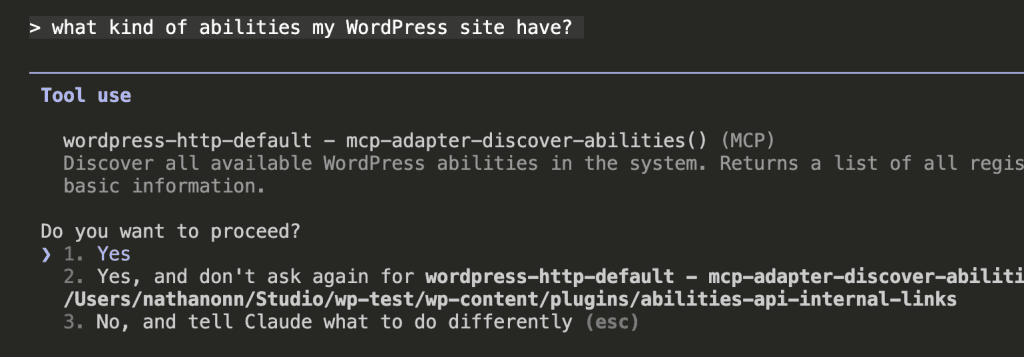
I started simple: “What kind of abilities does my WordPress site have?”
Claude Code triggered the discover-abilities tool:
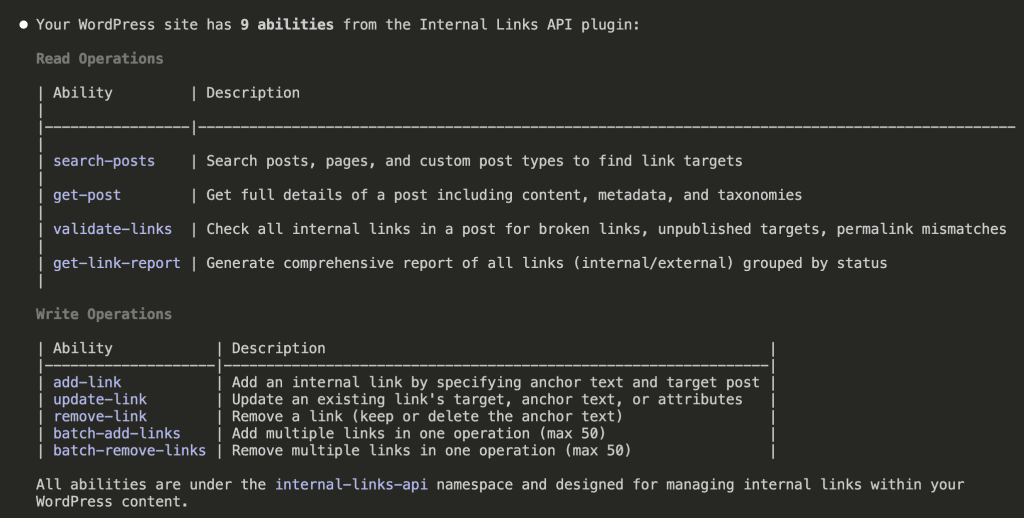
All 9 abilities. Ready. Waiting.
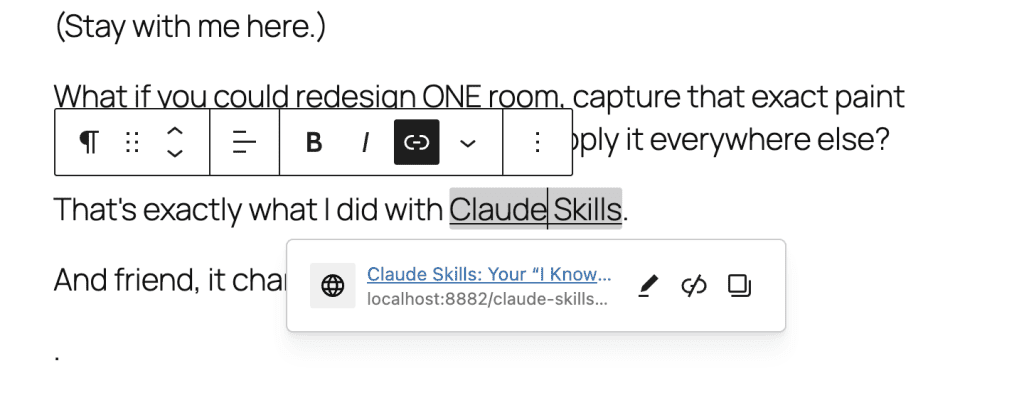
Autonomous Internal Linking in Action
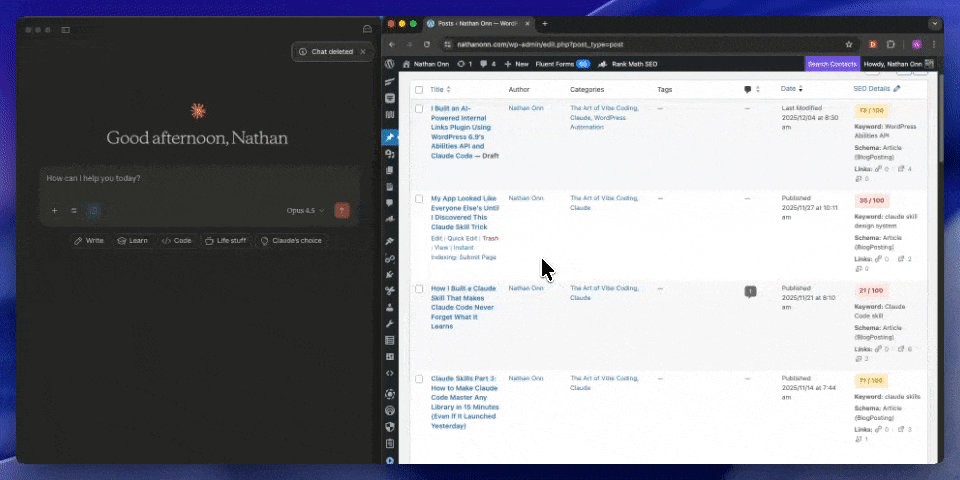
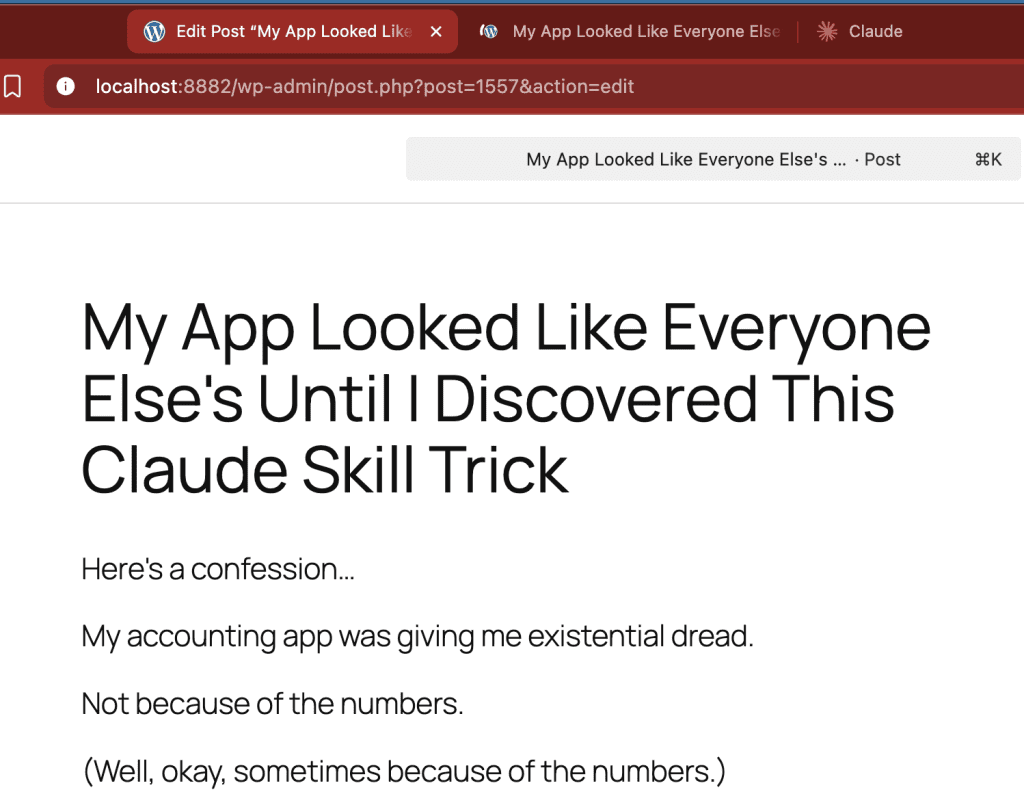
I grabbed a post from my site—an article about Claude Skills with zero internal links.
Post ID: 1557.
I asked Claude Code to scan the post, search for related content, and add internal links.
Here’s what happened.
Step 1: Reading the post
Claude read the entire post. Understood it was about Claude Skills, design systems, and creating reusable components.
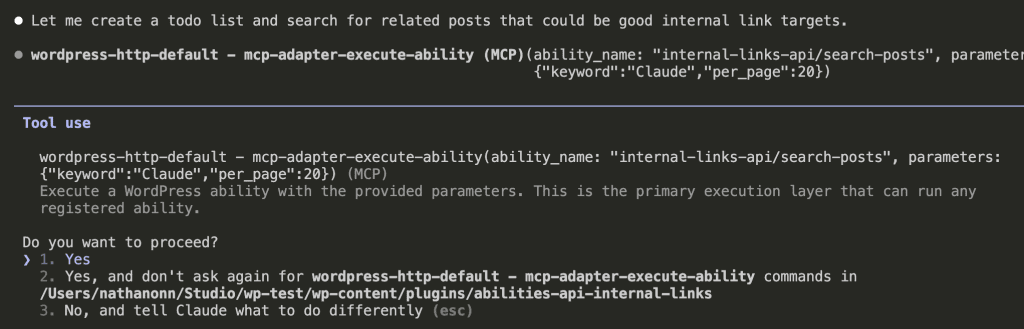
Step 2: Searching for relevant content
26 related posts found. But Claude didn’t just grab random matches.
Step 3: Intelligent link selection
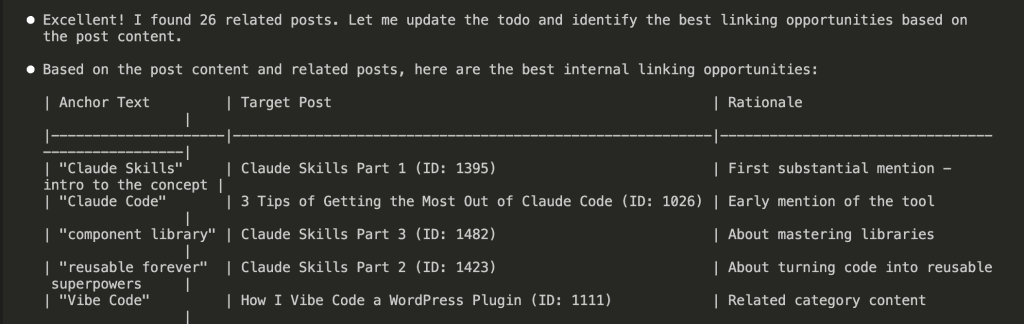
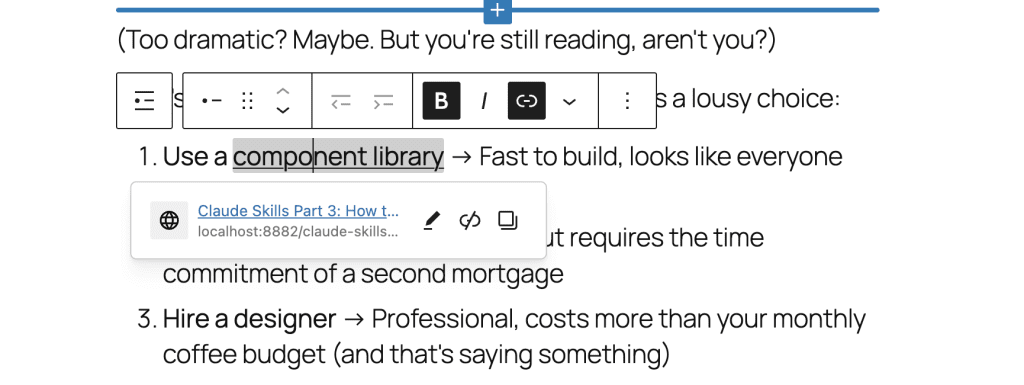
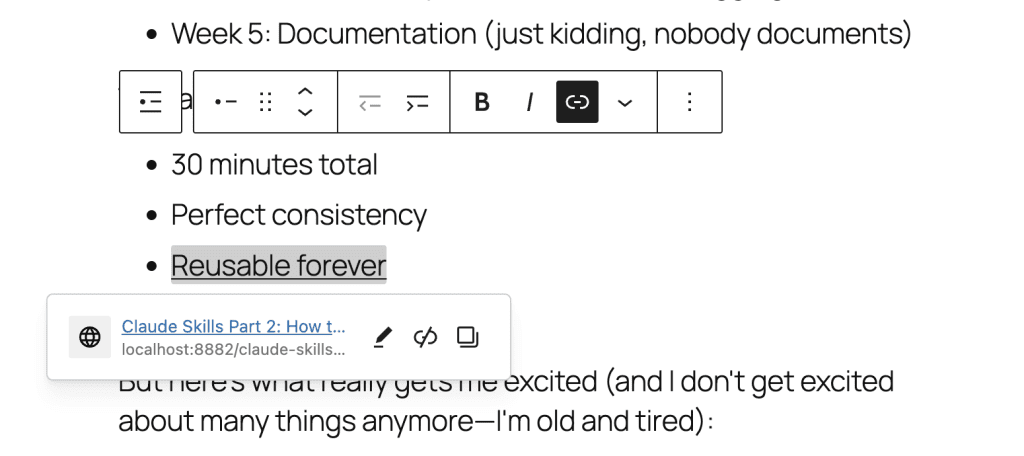
Look at those choices:
“Claude Skills” → Links to Part 1 intro article
“Claude Code” → Links to tips article for tool mastery
“component library” → Connects to Part 3 about mastering libraries
“reusable forever” → Points to Part 2 about code reusability
Each link made semantic sense. No keyword stuffing. No forced matches. Just… relevance.
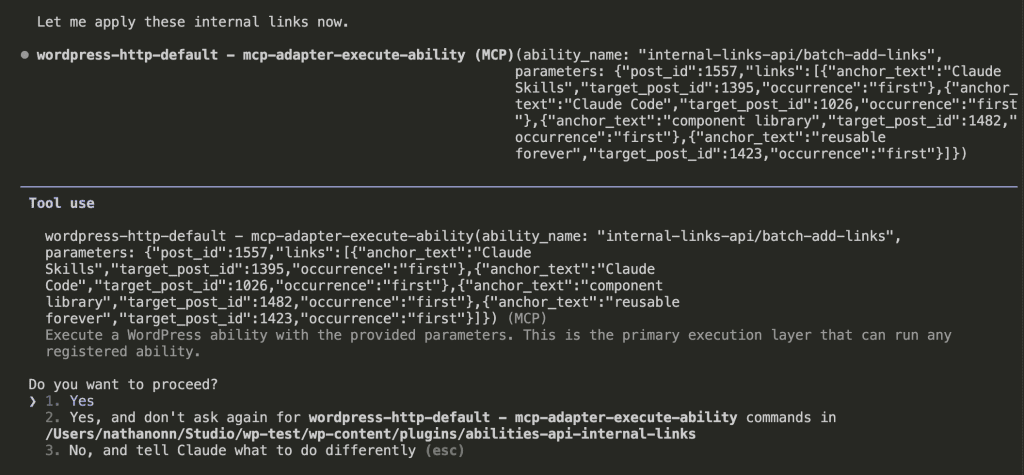
Step 4: Applying the links
One API call. Four links inserted.
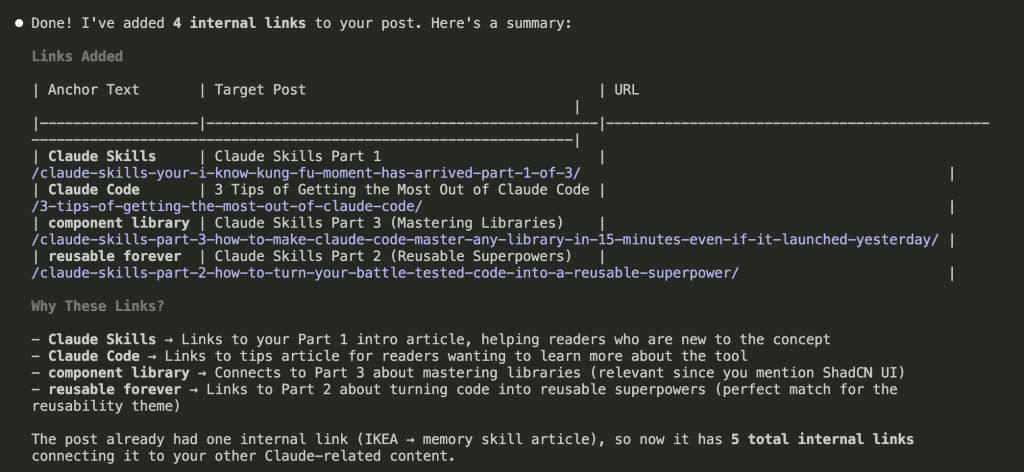
The Results
I opened my post in the WordPress editor.
There they were:
The transformation:
Before: 0 internal links, isolated content
After: 4 contextually perfect internal links
Time taken: Less than 2 minutes
Human effort: One prompt
But here’s what really got me.
Claude understood that when I mentioned “component library” in the context of ShadCN UI, it should link to my article about mastering libraries in Claude Skills.
When I wrote “reusable forever” about turning code into superpowers, it linked to Part 2 of my Claude Skills series—which is literally about that exact topic.
No regex could do this. No keyword matching could understand this context.
This is what the WordPress Abilities API makes possible.
.
.
.
What We Built (The Recap)
Let’s step back for a second:
Brainstormed requirements with Claude using the wp-abilities-api skill
Built the plugin with Claude Code in plan mode—9 abilities, full architecture
Connected via MCP to enable AI-powered internal linking
Tested with real content—AI understanding context and applying relevant links
The entire journey: 3 hours.
The result: A production-ready plugin that fundamentally changes how WordPress handles internal linking.
.
.
.
Why This Actually Matters
Remember the old way?
Manual linking: 30 minutes to add 5-10 links
Keyword plugins: Spam with irrelevant matches
Zero context: No understanding of content meaning
Now?
AI-powered linking: Less than 2 minutes for contextually perfect links
Semantic understanding: Links based on actual meaning
Full automation: One prompt, complete results
The WordPress Abilities API combined with AI doesn’t just save time.
Quick note: If you’re expecting Claude Skills Part 3 this week – it’s coming next week! I’m presenting this WordPress automation topic at WordCamp Taiwan 2025, so I’m switching up the schedule. Part 3 of the Claude Skills series (the one you’ve been waiting for drops next week. Trust me, it’ll be worth the wait.
It’s Friday night, 11:40 p.m.
You’re staring at wp-admin on client site number nine.
Updates → Clear cache → Regenerate CSS → Woo settings check → Lighthouse quick run → Screenshot the results.
You could do it with your eyes closed.
And that’s the problem.
You’re not developing anymore.
You’re a highly-paid mouse with a checklist.
More than 80% of your workload every week is just doing the same 20-30 clicks over and over and over.
What if I told you an AI agent could do all these clicks for you?
Not through APIs. Not through custom code.
Through the exact same wp-admin interface you’re clicking right now.
.
.
.
The WordPress Pain Nobody Talks About
Here’s what your week actually looks like:
Monday morning: Update plugins on 5 client sites (45 minutes of clicking)
Wednesday: Deploy the same security settings to 8 new sites (90 minutes)
Thursday: Set up another identical WooCommerce store (3 hours)
Friday: Check all sites for updates, run reports (2 hours)
Sound familiar?
You didn’t become a WordPress developer to be a professional button-clicker.
Yet here you are, executing the same sequences like a well-trained automaton.
The worst part?
You know there’s an API for most of this.
But setting up proper API automation for 20 different client sites?
That’s a week-long project.
By the time you finish, you could have just… clicked the buttons.
Until browser-using AI agents changed everything.
.
.
.
July 2025: The ChatGPT Agent Launch That Changed Everything
I remember exactly where I was when OpenAI announced ChatGPT Agent.
Mid-morning.
Coffee getting cold while I watched the demo.
ChatGPT was… using a browser. Clicking buttons. Filling forms. Reading screens. Making decisions.
That’s when it hit me like a lightning bolt.
WordPress is entirely browser-based.
Every setting. Every configuration. Every update. It’s all just… clicking buttons in wp-admin.
If ChatGPT could use a browser, it could manage WordPress sites.
The possibilities exploded in my mind:
Bulk updates across client sites
WooCommerce store setups from scratch
Tax rate changes across multiple installations
Security configurations replicated perfectly
Plugin compatibility testing on staging sites
Everything I’d been doing manually could be delegated to an AI that never gets tired, never makes typos, and never accidentally clicks the wrong button at 11:40 p.m.
And ChatGPT wasn’t alone.
There are a few more browser-using AI agents in the market like Perplexity Comet and Claude for Chrome.
The game had changed.
WordPress automation that was impossible six months ago was suddenly trivial.
I immediately started experimenting.
And what I discovered changed my entire business.
.
.
.
How Browser-Using AI Agents Actually Work
A browser-using AI agent is exactly what it sounds like – an AI that can use a browser like a human.
It can:
Open websites and navigate pages
Read what’s on the screen
Click buttons and links
Fill out forms
Take screenshots
Document what it did
But here’s the killer feature for WordPress:
It uses the same wp-admin interface you already know.
No API setup. No authentication headaches. No custom code.
Picture this scenario:
The government just announced a tax rate change from 5% to 7%.
You have 20 WooCommerce client sites.
Each site requires:
Log in to wp-admin
Navigate to WooCommerce → Settings
Click Tax tab
Click Standard Rates
Find the rate field
Change 5% to 7%
Click Save
That’s 7 clicks per site. 20 sites = 140 clicks.
Two hours of your life.
Gone.
Doing the exact same sequence over and over.
Now watch what happens with an AI agent:
You tell it once: “Update the tax rate from 5% to 7% on these 20 sites.”
It does exactly what you would do – logs in, navigates to WooCommerce → Tax → Standard Rates, changes the value, saves.
Across all 20 sites…. while you make coffee.
.
.
.
The WooCommerce Setup That Convinced Me This Was Real
Let me show you what made me a believer.
Setting up a WooCommerce store from scratch involves:
That’s 100+ clicks and at least 5 hours of mind-numbing work.
Watch what happened when I gave an AI agent a simple checklist:
The result?
A fully configured WooCommerce store.
Every setting perfect. Every product created. Ready for orders.
100+ clicks. Zero human involvement after providing the checklist.
Want techniques like these weekly?
Join The Art of Vibe Coding—short, practical emails on shipping with AI (without the chaos).
No spam. Unsubscribe anytime. Seriously.
.
.
.
The Secret: It’s All About The Checklist
Here’s what nobody tells you about AI automation:
Your AI agent is only as good as your checklist.
But here’s the beautiful part – you already have these checklists.
They’re in your SOPs.
Your client documentation.
Your head (you’ve done this 100 times).
The even better news?
AI can help you create perfect checklists in two revolutionary ways.
.
.
.
Method #1: Let AI Interview You (The Clarifying Questions Technique)
This changed my entire workflow.
Instead of writing a 200-line checklist from scratch, I give the AI a rough idea and let it interview me.
Here’s exactly how it works:
Step 1: Give AI Your Rough Concept
The full “Let AI Interview You” prompt:
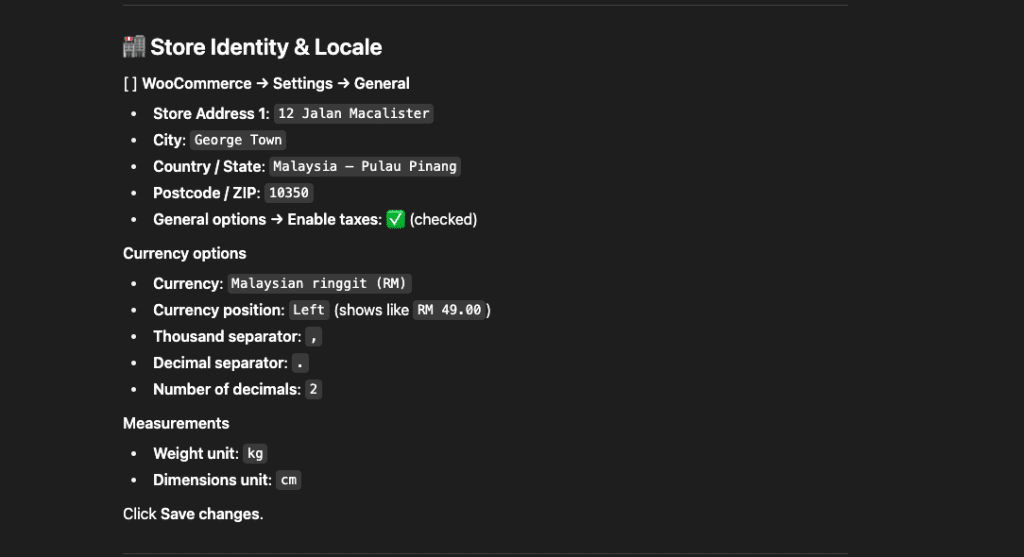
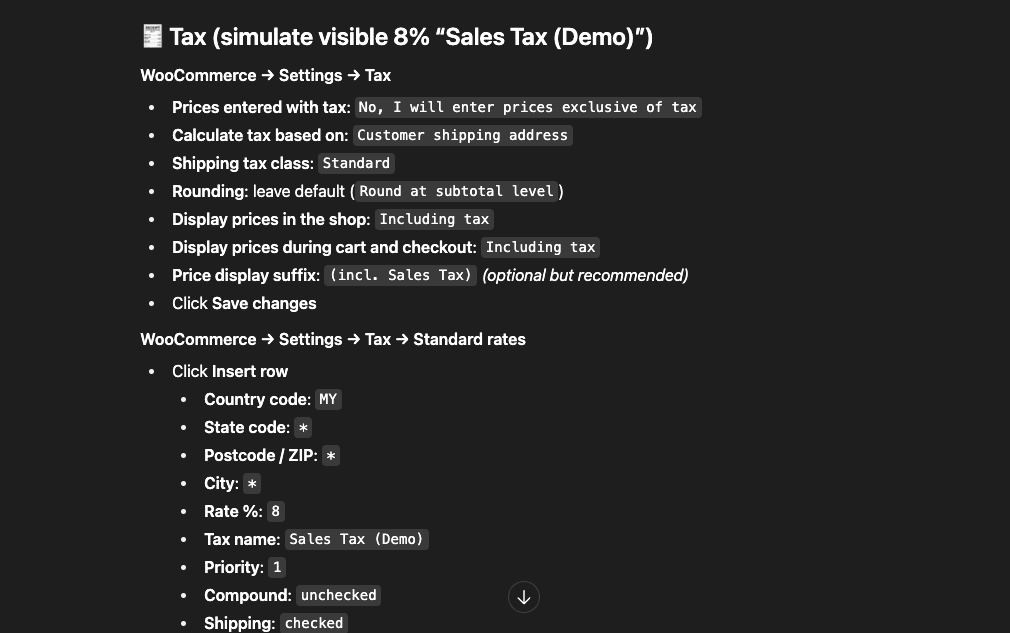
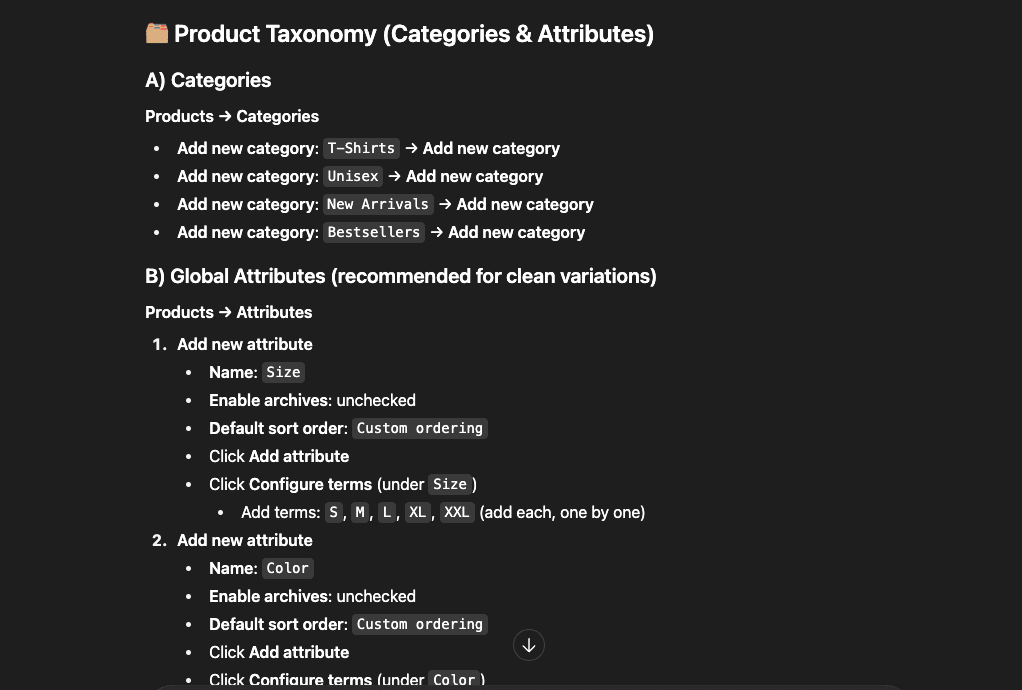
I want to create a demo site for a WooCommerce website. The data for this site needs to be Malaysia-centric, as I am based there.
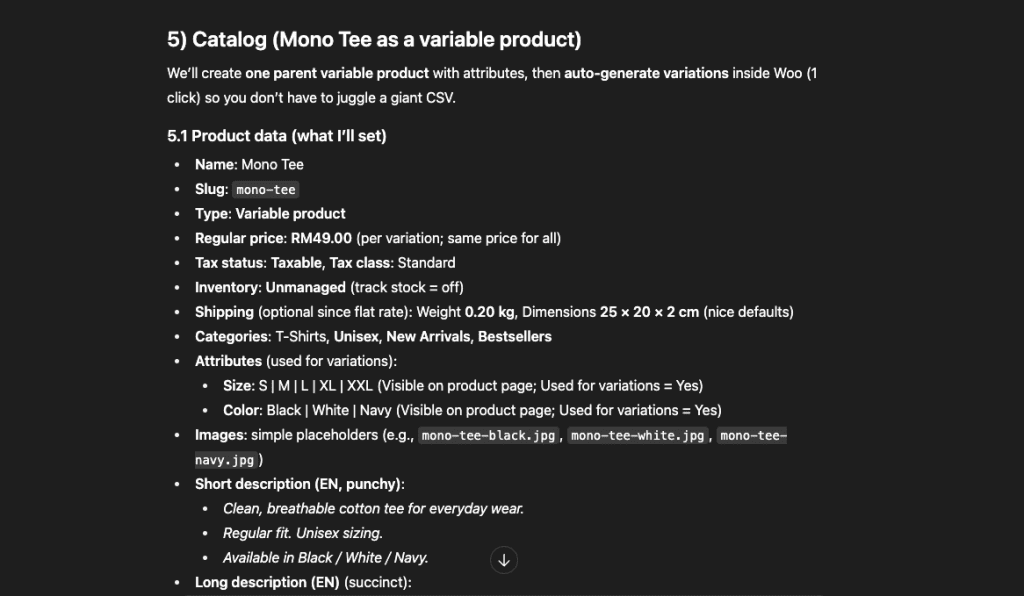
To achieve this, we will need to set up several key elements: the business address, tax, shipping options, and approximately five products. We'll focus on selling physical products, specifically t-shirts.
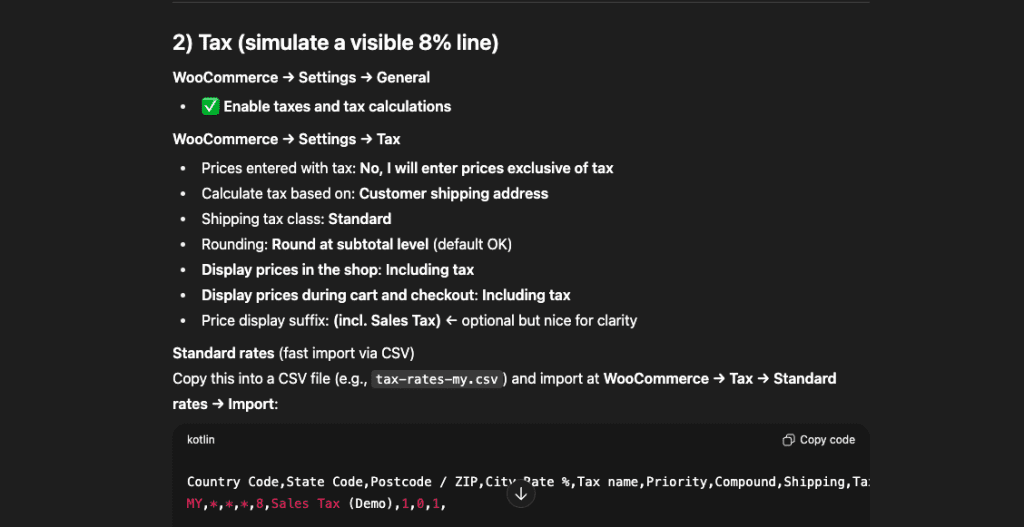
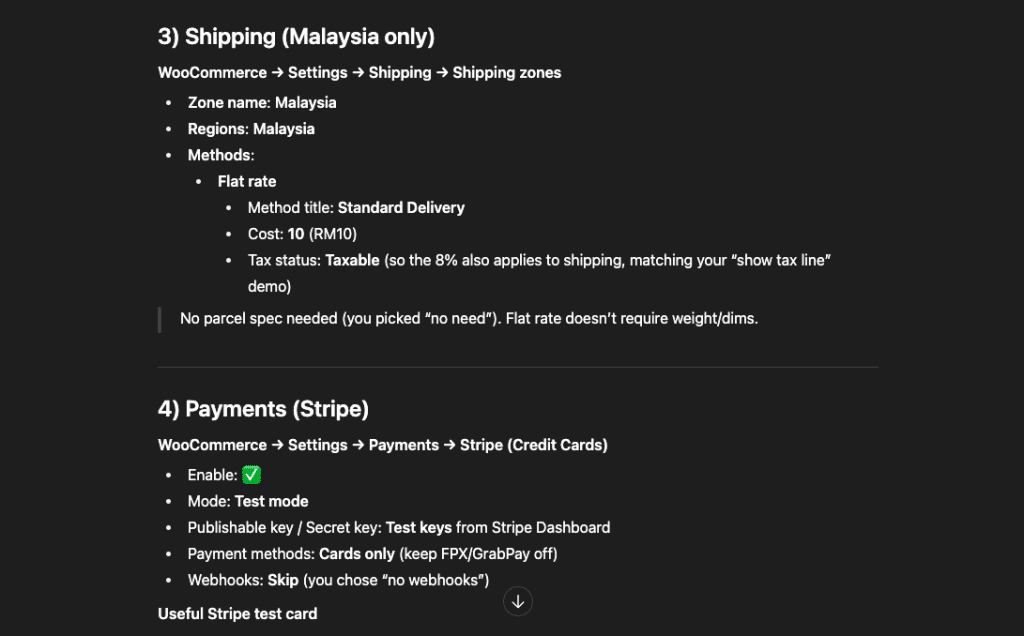
For tax, we need to use the local Malaysian SST. Regarding shipping, we will configure it for the US, UK, Singapore, and Malaysia.
For payments, I initially considered a gateway that offers a sandbox environment. However, for now, let's proceed with Stripe as the payment gateway.
So, to summarize, we'll have the address, tax, shipping settings, payment gateway, and physical products (t-shirts) configured for the countries mentioned.
My request from you is a comprehensive list of all necessary items and data points I can use to populate the WooCommerce website, including specific details for the address, tax, shipping, and any other relevant information you deem necessary.
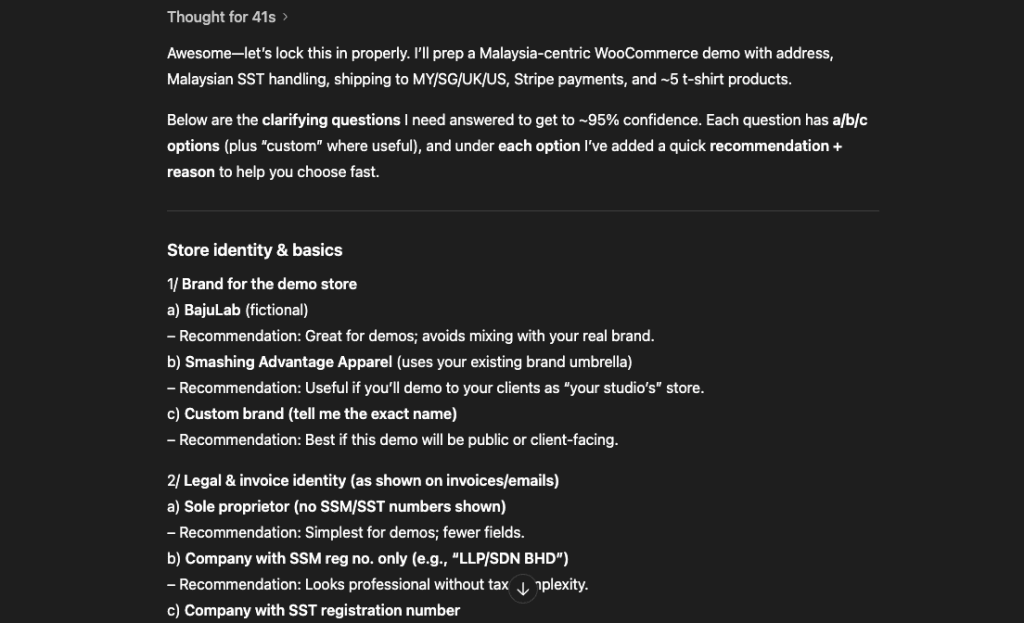
Ask me clarifying questions until you are 95% confident you can complete this task successfully.
a. If the question is about choosing different options, please provide me with a list of options to choose from. Mark the option with a clear label, like a, b, c, etc.
b. If the question need custom input that is not in the list of options, please ask me to provide the custom input.
Always mark each question with a number, like 1/, 2/, 3/, etc. so that I can easily refer to the question number when I answer.
For each question, add your recommendation (with reason why) below the options. This would help me in making a better decision.
Step 2: AI Asks Clarifying Questions
Look at what the AI does. It doesn’t just ask “what do you want?” It provides specific options:
1/ Brand for the demo store
a) BajuLab (fictional)
- Recommendation: Great for demos; avoids mixing with your real brand.
b) Smashing Advantage Apparel (uses your existing brand umbrella)
- Recommendation: Useful if you'll demo to your clients as "your studio's" store.
c) Custom brand (tell me the exact name)
Every question has:
Clear options (a, b, c)
Recommendations with reasoning
Custom input if needed
The AI continues with granular questions about:
Tax configuration (SST vs GST)
Shipping zones and methods
Payment gateway preferences
Product catalog structure
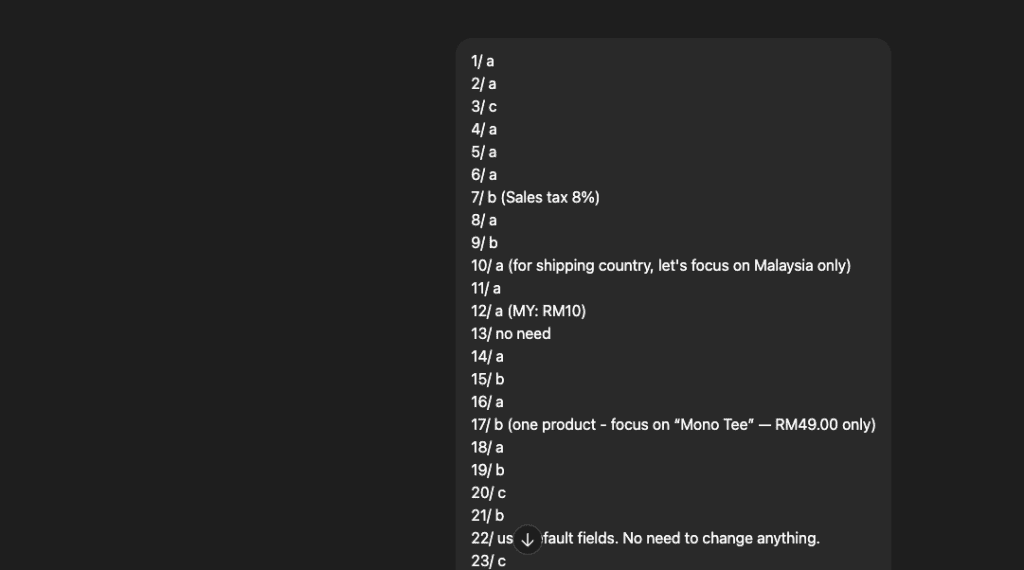
Step 3: Answer With Simple Choices
My responses? Dead simple:
No lengthy explanations, or complex configurations. Just pick from the menu.
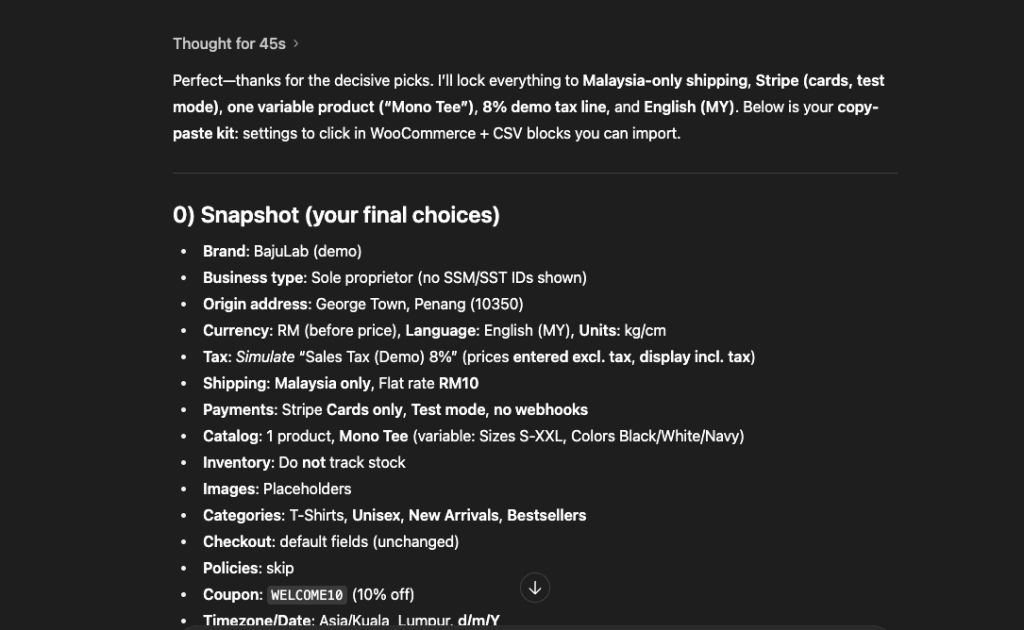
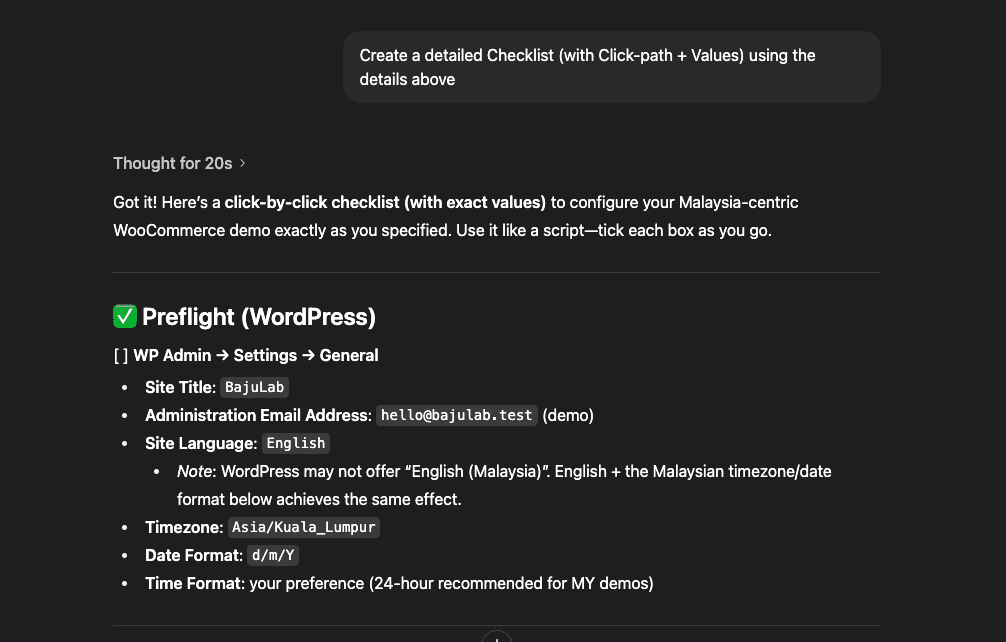
Step 4: AI Generates Perfect Checklist
The AI transforms my simple answers into a comprehensive, copy-paste kit:
But, it’s not done yet.
Next, we will ask the AI to convert it into a detailed checklist (with click-path + values):
From vague idea to perfect checklist in 10 minutes.
.
.
.
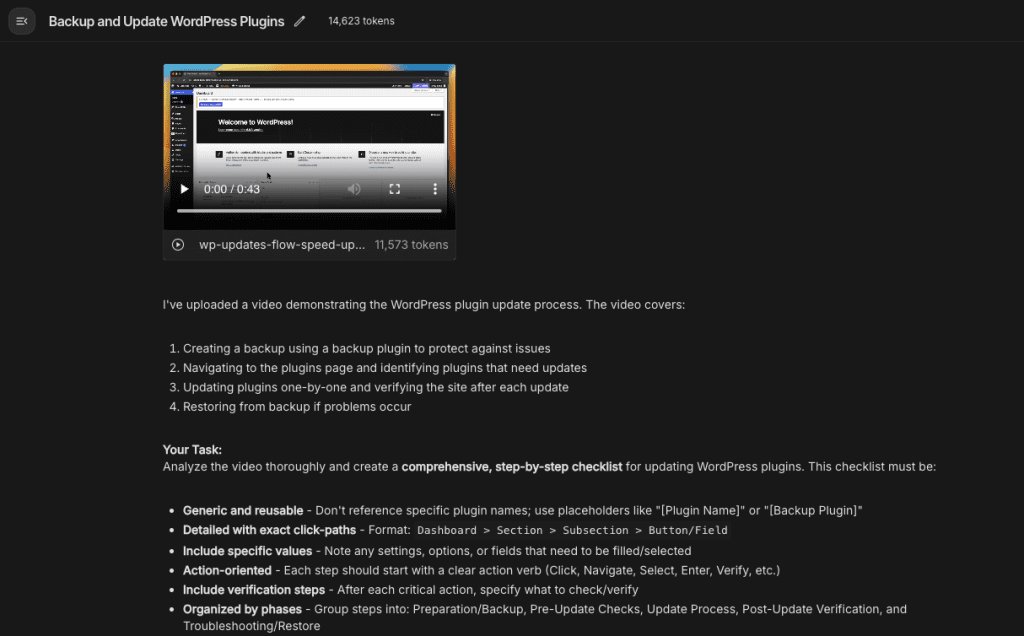
Method #2: Turn Your Screen Recording Into a Checklist
Already know how to do the task?
This method is even faster.
Step 1: Record Yourself Doing It Once
Open your screen recorder. Do the task once. Don’t explain anything – just do it normally.
Step 2: Upload to AI
Drop your video into Google AI Studio. No editing needed.
The “Turn Your Screen Recording Into a Checklist” prompt:
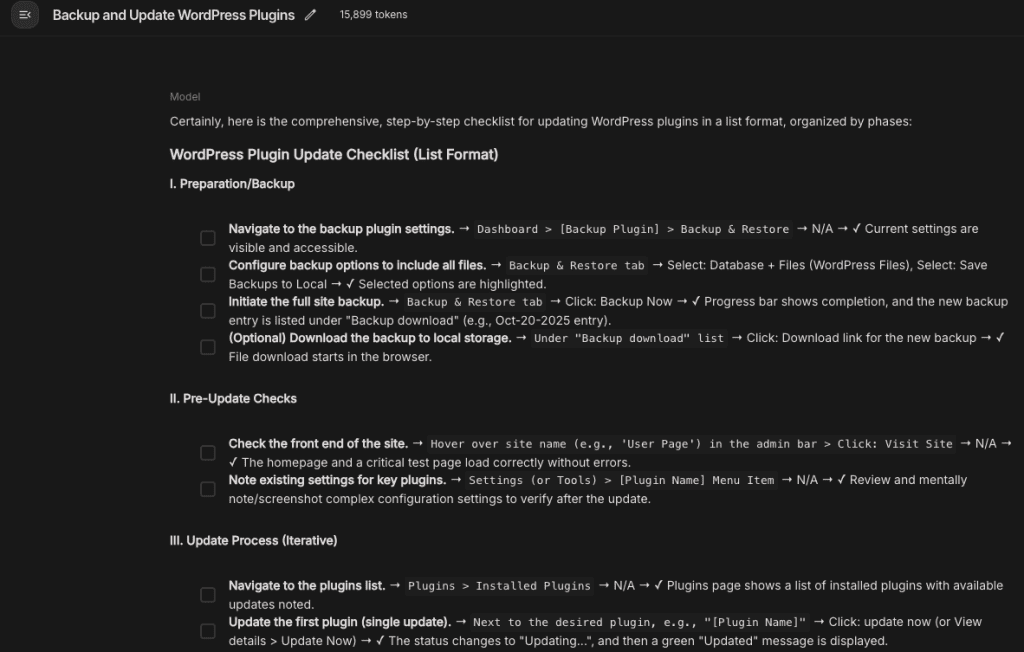
I've uploaded a video demonstrating the WordPress plugin update process. The video covers:

1. Creating a backup using a backup plugin to protect against issues
2. Navigating to the plugins page and identifying plugins that need updates
3. Updating plugins one-by-one and verifying the site after each update
4. Restoring from backup if problems occur

**Your Task:**
Analyze the video thoroughly and create a **comprehensive, step-by-step checklist** for updating WordPress plugins. This checklist must be:

- **Generic and reusable** - Don't reference specific plugin names; use placeholders like "[Plugin Name]" or "[Backup Plugin]"
- **Detailed with exact click-paths** - Format: `Dashboard > Section > Subsection > Button/Field`
- **Include specific values** - Note any settings, options, or fields that need to be filled/selected
- **Action-oriented** - Each step should start with a clear action verb (Click, Navigate, Select, Enter, Verify, etc.)
- **Include verification steps** - After each critical action, specify what to check/verify
- **Organized by phases** - Group steps into: Preparation/Backup, Pre-Update Checks, Update Process, Post-Update Verification, and Troubleshooting/Restore

**Format the checklist as:**
- [ ] **Step description** → `Click path` → Value/Action → ✓ Verification checkpoint

This checklist should enable anyone to replicate the process consistently across different WordPress sites and various plugins.
Step 3: AI Documents Every Click
The AI watches your video and creates step-by-step documentation:
Your muscle memory becomes reusable documentation.
Every click. Every navigation. Every setting.
Captured and structured automatically.
.
.
.
From “Update and Pray” to “Update and Relax”
WordPress updates.
We all know the feeling.
That red notification bubble haunting your admin bar: “12 updates available.”
Your stomach drops.
Because you know what’s coming.
The Official Best Practice:
Make a full backup
Update on staging first
Test all functionality
Check for conflicts
Document changes
Then update production
The Reality at 11:40 p.m.: “Select all → Update → Pray”
We’ve all been there.
Rolling the dice.
Hoping this isn’t the update that breaks everything.
Remember the last time an update went wrong?
The payment gateway that stopped working (discovered by an angry customer)
The contact form that suddenly disappeared
The shipping calculator that decided everything costs $0
The homepage that went completely blank
That “minor” security update that broke your custom CSS
The recovery process is its own special hell:
Frantically googling error messages
SSH-ing into the server at midnight
Trying to remember which backup actually works
Explaining to the client why their site was down for 3 hours
Promising yourself you’ll “do it properly next time”
But next time comes, and you’re exhausted, and there are 12 sites to update, and…
“Select all → Update → Pray”
What if I told you an AI agent could handle all of this automatically?
Not just the updates.
The entire process:
The Challenge: Update multiple WordPress plugins across a client site The Twist: If anything breaks, automatically rollback
Watch what happened:
The AI agent:
Created a backup first (verified it was complete)
Updated plugins systematically (one at a time)
Checked the site after each update (front-end and critical functions)
When it detected a broken plugin, deactivate it.
Documented exactly which plugin caused the issue
Sent a report with screenshots and recommendations
Total human involvement: Zero.
No stress. No late-night panic. No angry client calls.
Just a calm notification: “Updates completed. One compatibility issue detected and resolved. Full report attached.”
.
.
.
“But Isn’t It Risky?” Let’s Talk Security
I know what you’re thinking.
“Giving an AI access to my WordPress sites? That sounds like a security nightmare.”
Valid concern. Let’s address it head-on.
Here’s the reality:
Your WordPress sites are already at risk every day from:
Plugin vulnerabilities (remember that massive security hole last month?)
Weak passwords (“password123” is still in your client’s database)
Human error (ever updated the wrong site at 11:40 p.m.?)
Outdated themes causing conflicts
That intern who has admin access for some reason
You already know how to handle these risks: backups, staging, testing, proper procedures.
With AI agents, we apply the exact same precautions.
.
.
.
The Three Commandments of AI Agent Security
Rule #1: Never Give AI Your Actual Credentials
Never. Ever. EVER.
Instead:
Use one-time passwordless login links
Log in first, then hand control to AI
Store API keys in wp-config.php, not in checklists
Use placeholders in checklists, update manually after
Rule #2: AI Works on Staging, Not Production
Your workflow becomes:
AI agent does its work on staging
You review the results (30 seconds)
If good → merge to production (one click)
If broken → no harm done
Almost every decent host offers staging now. No excuses.
Rule #3: Always Make Backups First
This should already be your religion. But with AI agents, it’s scripture:
Backup before any major changes
Verify the backup actually works
Know your restoration process cold
These aren’t new risks. They’re the same risks you already manage.
The AI agent is just another tool. Like giving your assistant access to update plugins. Except this assistant never gets tired, never makes typos, and documents everything.
.
.
.
The Hidden Benefits Nobody Talks About
Once I started using AI agents for WordPress tasks, unexpected benefits emerged:
Benefit #1: Perfect Documentation
Every task the AI performs is documented. Every click. Every change. Every result.
Client asks “what changed on my site last month?”
Here’s the exact log of every update, every setting change, every modification. With timestamps.
Benefit #2: Consistency Across All Sites
That security configuration you perfected? It’s now identical across all 20 client sites.
No more “I think I configured this one differently” or “Did I remember to add that firewall rule?”
Benefit #3: Testing Becomes Trivial
Want to test how a plugin update affects 5 different theme configurations?
Spin up 5 staging sites.
Give the AI agent the same checklist for each.
Watch it test all 5 simultaneously while you grab coffee.
Benefit #4: You Can Take a Real Vacation
Picture this: You’re on a beach in Bali. Feet in the sand. Favorite beverage in hand (mine’s a cold coconut water, but you do you).
Your phone buzzes. It’s your AI agent:
“Weekly maintenance complete. 47 plugins updated across 12 sites. Two compatibility issues detected and resolved. All sites passing health checks. Full report ready for client review.”
You take another sip. Maybe check the report. Maybe don’t.
Site maintenance doesn’t stop because you’re sipping margaritas on a beach. Your AI agents run on the cloud, execute your checklists, handle the issues.
You only intervene if something actually needs your expertise. Which, let’s be honest, is rare when it comes to routine updates.
.
.
.
Your WordPress Workflow, Transformed
Let’s get specific about what this means for your daily workflow:
Before AI Agents (Your Current Week)
Monday: 3 hours of plugin updates across client sites
Tuesday: 2 hours setting up a new WooCommerce store
Wednesday: 1 hour updating tax rates and shipping zones
Thursday: 2 hours running security audits and fixing issues
Friday: 2 hours generating reports and maintenance
Total: 10 hours of clicking
After AI Agents (Your New Week)
Monday morning: 15 minutes reviewing AI agent reports from weekend maintenance
Monday afternoon: Actually building that custom feature your client wants
Tuesday – Thursday: Real development work
Friday: Planning next week while AI agents run all maintenance
Total: 15 minutes of oversight
That’s not a 50% improvement. That’s not even a 90% improvement.
That’s 40 hours per month of your life back.
.
.
.
How to Start Tomorrow Morning
Here’s exactly how to implement this:
Step 1: Pick Your Most Painful Task
What did you do this week that made you want to quit WordPress?
Setting up another identical WooCommerce store?
Updating plugins across 10 sites?
Migrating settings between staging and production?
Pick ONE task. The one that hurts the most.
Step 2: Create Your First Checklist
Use Method #1 (AI interview) or Method #2 (screen recording).
Don’t overthink it.
Your first checklist won’t be perfect. That’s fine.
Step 3: Test on a Staging Site
Never test on production first. Clone one of your sites to staging.
Give the AI agent your checklist. Watch it work.
Step 4: Refine and Scale
Your first run will reveal issues:
Missing steps in the checklist
Unclear instructions
Edge cases you forgot
Fix them. Run again. Once it’s perfect, you have a reusable automation forever.
Step 5: Expand Systematically
One task automated successfully? Move to the next:
The Real Question: What Will You Do With Your Time?
Remember that Friday night at 11:40 p.m.? Clicking through client site number nine?
That version of you doesn’t have to exist anymore.
You didn’t become a WordPress developer to click buttons. You got into this to build things. To solve problems. To create.
When 80% of your routine work is handled by AI agents, what will you do?
Maybe you’ll:
Take on more clients (without burning out)
Build that SaaS you keep dreaming about
Actually enjoy your weekends
Learn that new framework you’ve been putting off
Spend time with your family instead of wp-admin
Or maybe you’ll just sleep better knowing that while you rest, your AI agents are handling the midnight maintenance, the weekend updates, the mind-numbing configurations.
All the work. None of the clicking.
.
.
.
Your Challenge This Week
I’m not asking you to automate everything. I’m not even asking you to trust AI with production sites yet.
I’m asking you to do ONE thing:
Pick one repetitive task you did this week.
Just one.
Create a checklist for it. Hand it to an AI agent. Watch what happens.
Because once you see it work – once you watch an AI agent perfectly execute 100 clicks in 6 minutes – you’ll realize something profound:
You’ve been doing WordPress on hard mode this entire time.
The age of manual WordPress management is over.
The age of AI agents is here.
What will you automate first?
Stop clicking.
Start delegating.
Your future self – the one actually building cool stuff instead of clicking buttons – will thank you.
Just when you think you’ve caught up, something like ChatGPT waltzes in and says, “Tag, you’re it!” Especially if you’re in the WordPress world.
This is not your everyday GPT-4 conversation; this is about automation that can drastically simplify your life and business processes.
The ChatGPT Phenomenon
ChatGPT has become more than a household name; it’s like the digital BFF you never knew you needed. It helps you draft emails, brainstorm creative projects, and even chat when you’re bored.
But what you may not know is that there’s a behind-the-scenes maestro in all of this—the ChatGPT API.
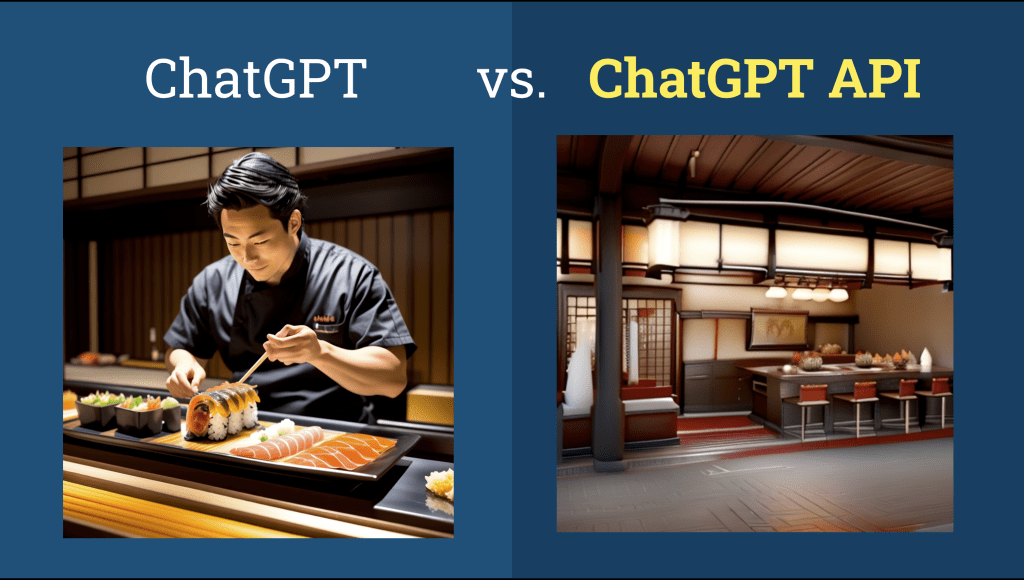
ChatGPT vs. ChatGPT API: The Omakase and the Super Kitchen
Think of ChatGPT as a mind-blowing Omakase meal at a sushi restaurant. Every detail is curated for a “Wow, this is amazing!” experience.
The ChatGPT API, on the other hand, is like having the entire kitchen at your disposal but without the chef.
You’re the culinary artist now, free to cook up endless automation possibilities for your WordPress site.
Note: Throughout this guide, when I mention “ChatGPT,” I’m specifically referring to the ChatGPT API, not the stand-alone website or application.
Now, let’s tie this back to the bigger picture: the human longing for efficient, personalized assistance.
This yearning is not new; it’s been a part of popular culture for quite some time.
From Iron Man to Jarvis: A Personal Journey
When “Iron Man” hit the theaters, it wasn’t just Tony Stark’s armor that had us all drooling. It was his AI assistant, Jarvis.
I was among those enamored not by the metallic superhero suit, but by the idea of a personal AI assistant handling mundane tasks.
On May 21, 2021, I was granted access to GPT-3, a significant stepping stone toward making that dream a reality.
To say my life underwent a transformation thereafter would be an understatement.
Sixteen months before the emergence of ChatGPT, GPT-3 had already laid the groundwork for groundbreaking innovations.
In that pre-ChatGPT period, I engaged in extensive experimentation, striving to optimize my life through the automation capabilities of GPT-3.
However, the advent of GPT-4 has expanded the horizons of what’s achievable with automation, propelling possibilities into unprecedented realms.
What’s In Store For You in This Guide?
Are you ready to automate like you’ve never automated before?
In this guide, we’ll explore how to employ the ChatGPT API to take your WordPress experience to a realm that’s as efficient as it is captivating.
Zapier: Although primarily a paid tool, it’s well worth the investment for this guide.
Pipedream: A free account should suffice for our purposes.
Don’t worry if you don’t use Zapier. Alternatives like Make.com, Pabbly Connect or n8n work just as well—the workflow is nearly identical.
Let’s Dive In!
Now that we’ve set the stage, let’s delve into our first automation experiment.
Automation #1: Content Creation Automation Using ChatGPT API
Over the past two years, I’ve immersed myself in the specialized field of automated content creation, with a particular focus on leveraging the GPT-3 and ChatGPT API.
While it’s enticing to generate long articles almost effortlessly, the question remains: can a simple prompt truly yield high-quality content?
Motivated by this query, I embarked on an exhaustive journey. I’ve invested innumerable hours in testing, experimentation, and fine-tuning the approach.
Today, I am eager to unveil my findings. My goal is to illuminate both the untapped potential and the inherent limitations of using this technology for content creation.
Shall we begin?
1. Automated Mass Article Generation with ChatGPT API
The allure of creating content with just a simple command is hard to resist. Imagine crafting a 2000-word piece without breaking a sweat. I’ve been there and felt that excitement.
Here’s how I went about it:
Why it’s enticing?
In my journey, I’ve constantly searched for efficient ways to produce content.
The ChatGPT API, in this respect, feels like a dream. With just a single command, the possibility of churning out a substantial article opens up. It’s like having a little genie at your disposal.
But like any tool, its true value lies in how you wield it.
Step 1: Generating Topics with ChatGPT:
From my experiments, I’ve found that ChatGPT can be a great brainstorming assistant.
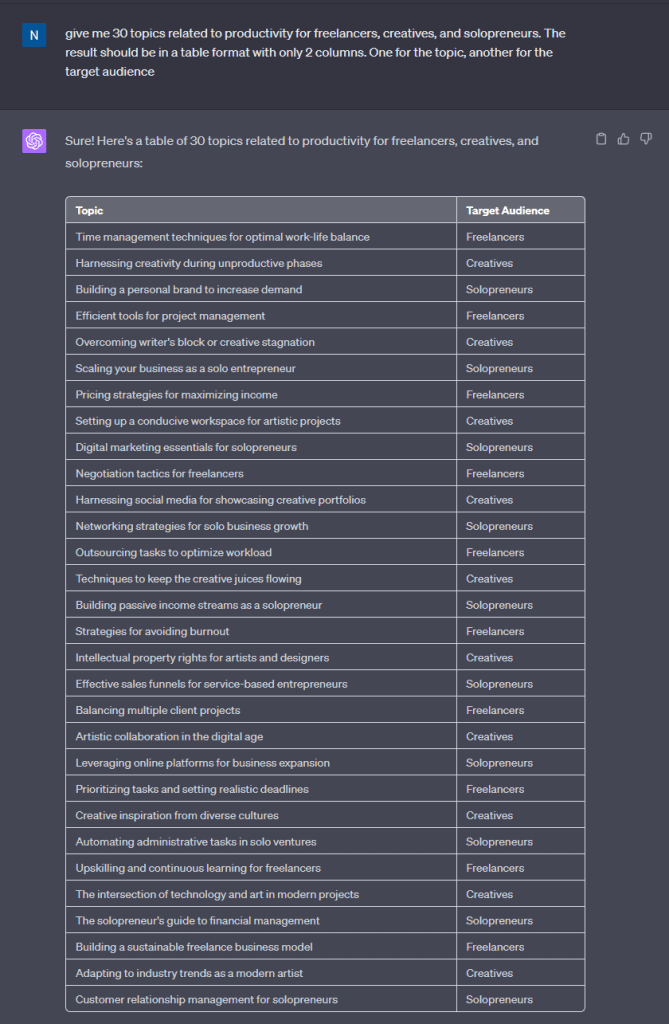
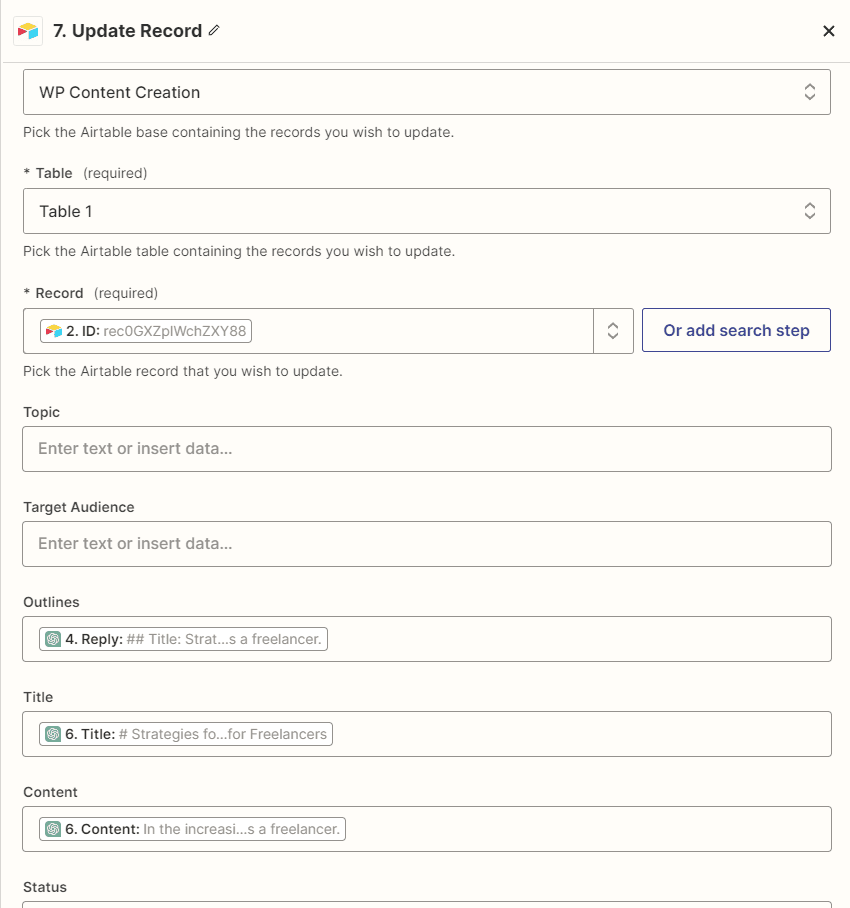
By simply inputting the prompt give me 30 topics related to productivity for freelancers, creatives, and solopreneurs. The result should be in a table format with only 2 columns. One for the topic, another for the target audience, it offers up a plethora of fresh topics tailored for your audience.
The next step? Organize this data, and that’s where Airtable comes in.
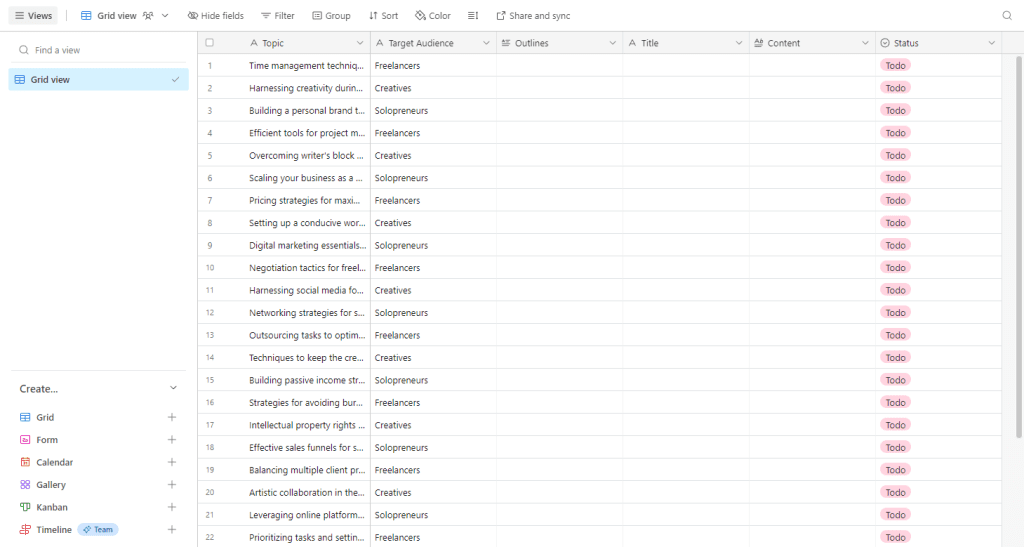
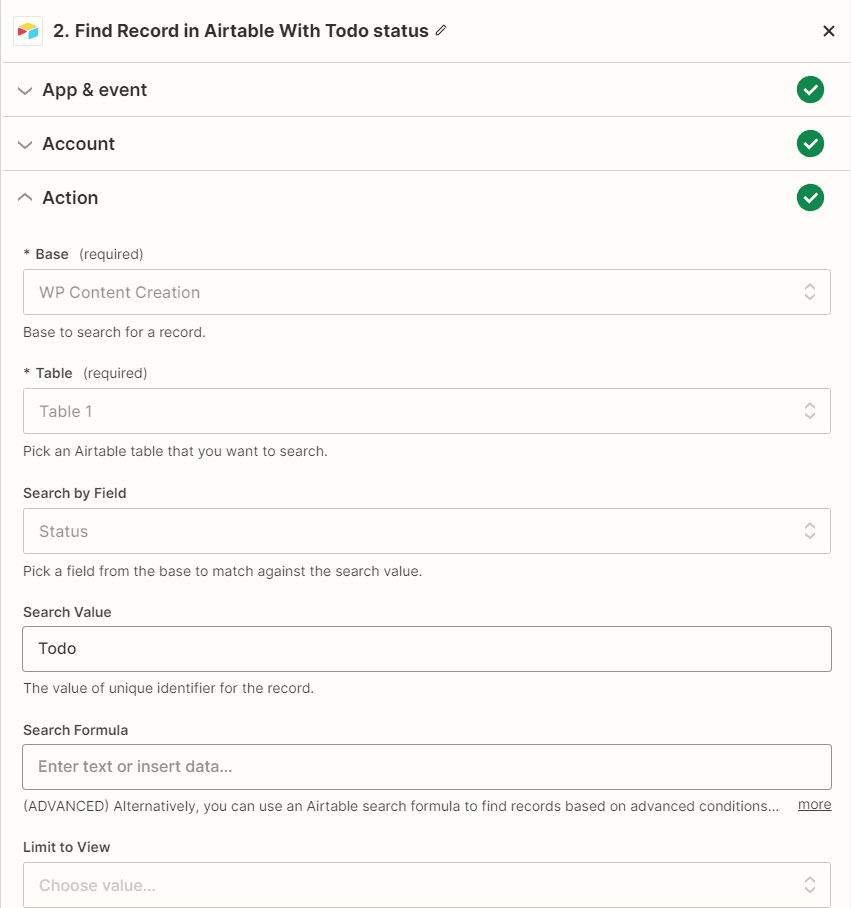
Step 2: Setting up Airtable:
I use Airtable as a dynamic repository, making it perfect for cataloging and structuring my content.
Here’s my configuration:
Topic: The primary subject or theme. It’s an efficient way to group ideas and content.
Target Audience: Identifying the intended readership or viewers ensures the content is relevant and impactful.
Outline: A brief sketch or roadmap for the article.
Title: The article’s headline.
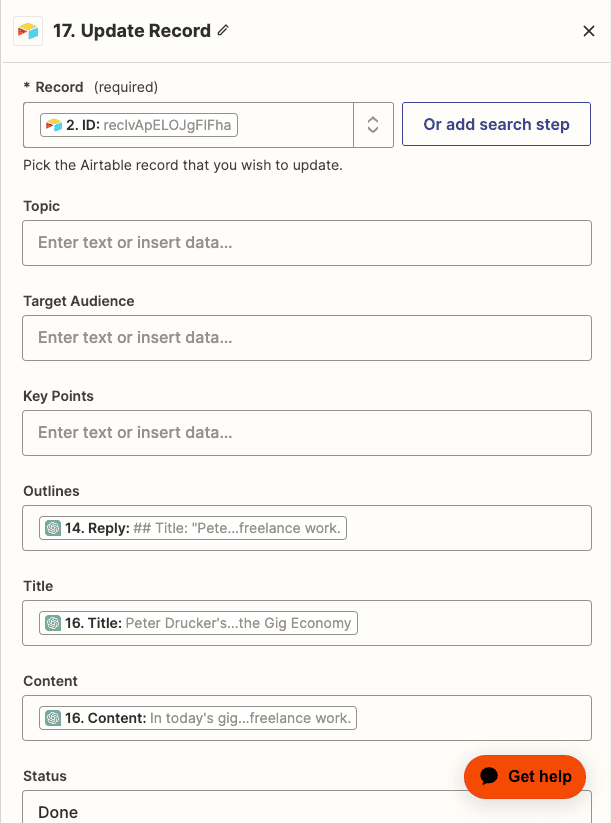
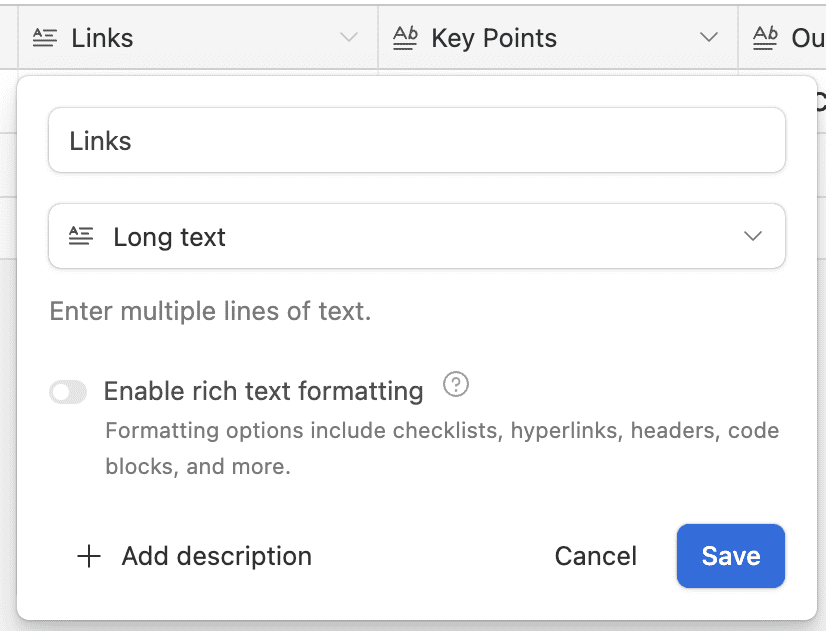
Content: The core text of the article. Activate the rich text formatting to maintain uniformity and elevate the reading journey.
Status: A tool for streamlined workflow. I use it as follows:
‘Todo’: An idea is jotted down and is pending action.
‘In Progress’: The creation phase – where ideas take shape.
‘Done’: Celebrating the completion of well-crafted content, ready for its audience.
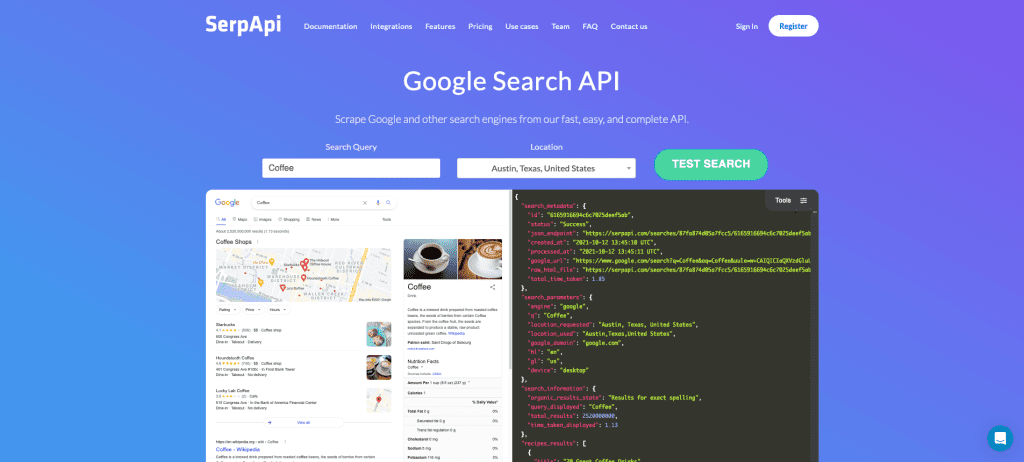
While there are different plans, their free plan, which allows up to 100 searches a month, is more than enough for our needs.
Setting the Foundation in Zapier
With our SerpAPI account ready, it’s time to sculpt our Zap.
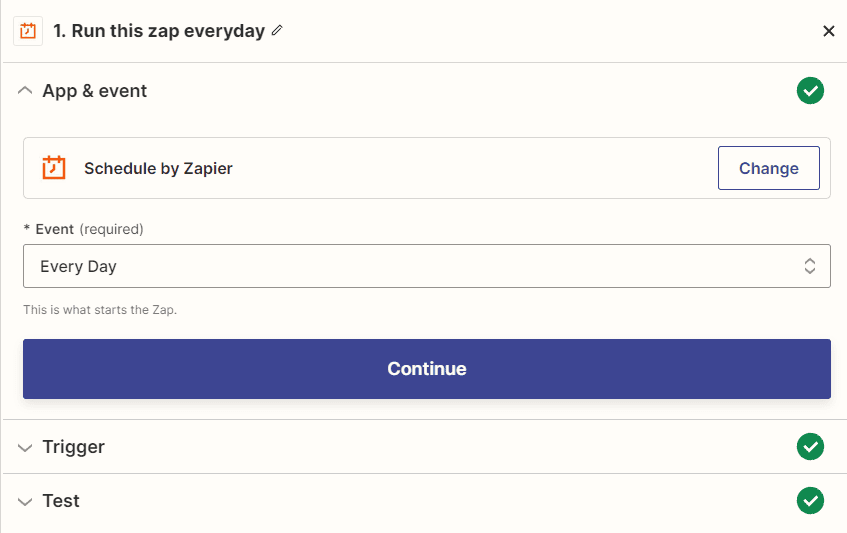
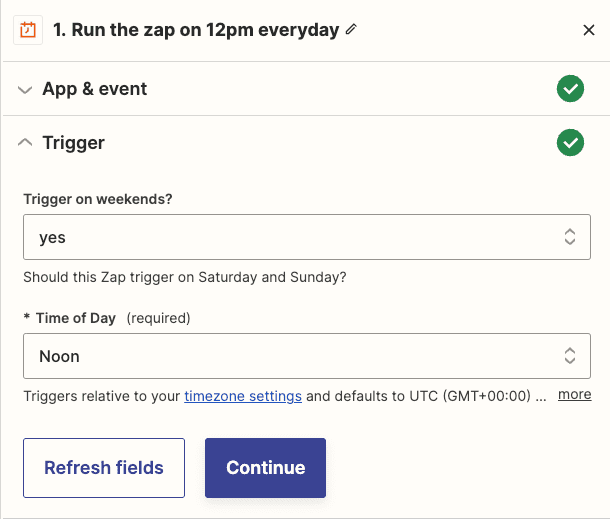
Step 1: Kick-Start with a Schedule:
Just like before, we begin by setting a daily trigger in Zapier.
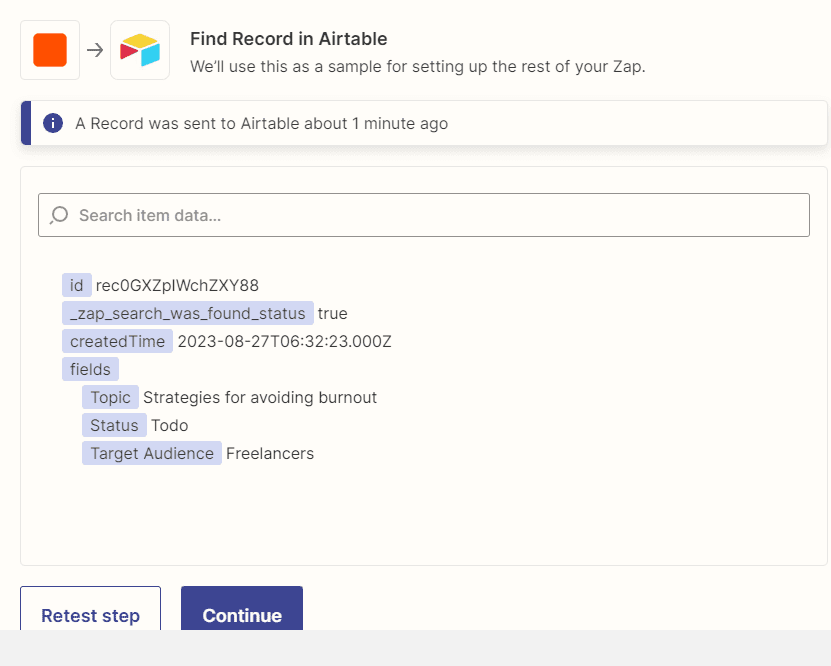
Step 2: Fetch the Topic from Airtable:
Remember our Airtable setup from before? Tap into that, pulling out the topic you’ve slated for the day.
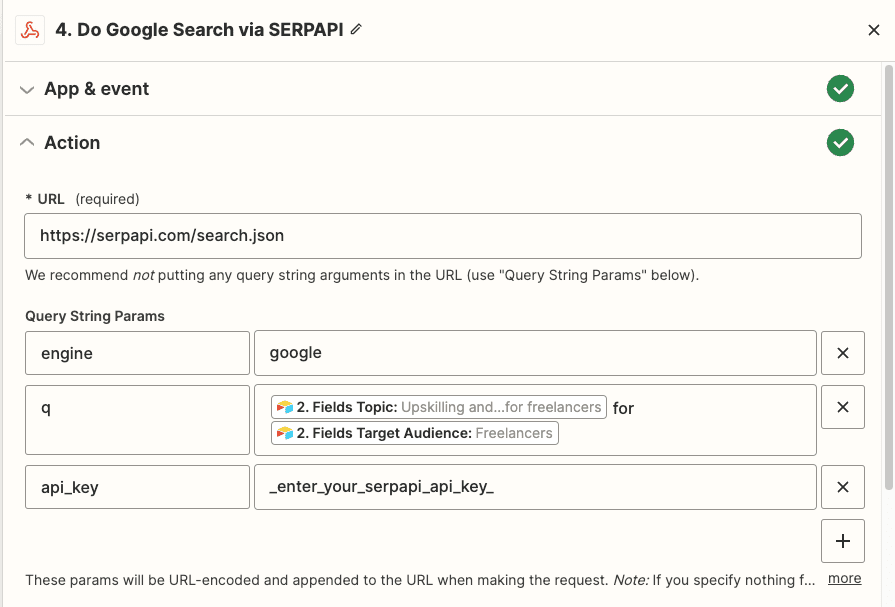
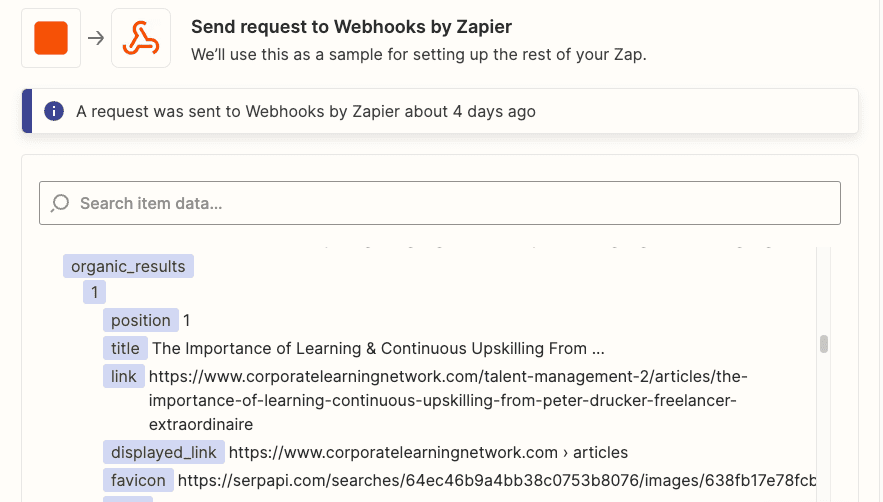
Step 3: Integrate SerpAPI via Webhook:
Set up a Webhook in Zapier that taps into SerpAPI. This will fetch Google search results based on our topic. My personal preference is to limit it to the top 5 results. However, if you’re feeling ambitious, you can stretch it to 10. But beware of information overload!
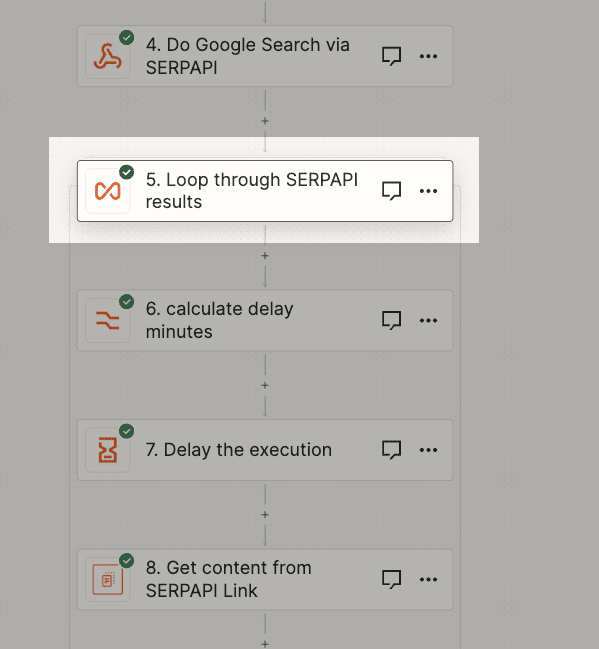
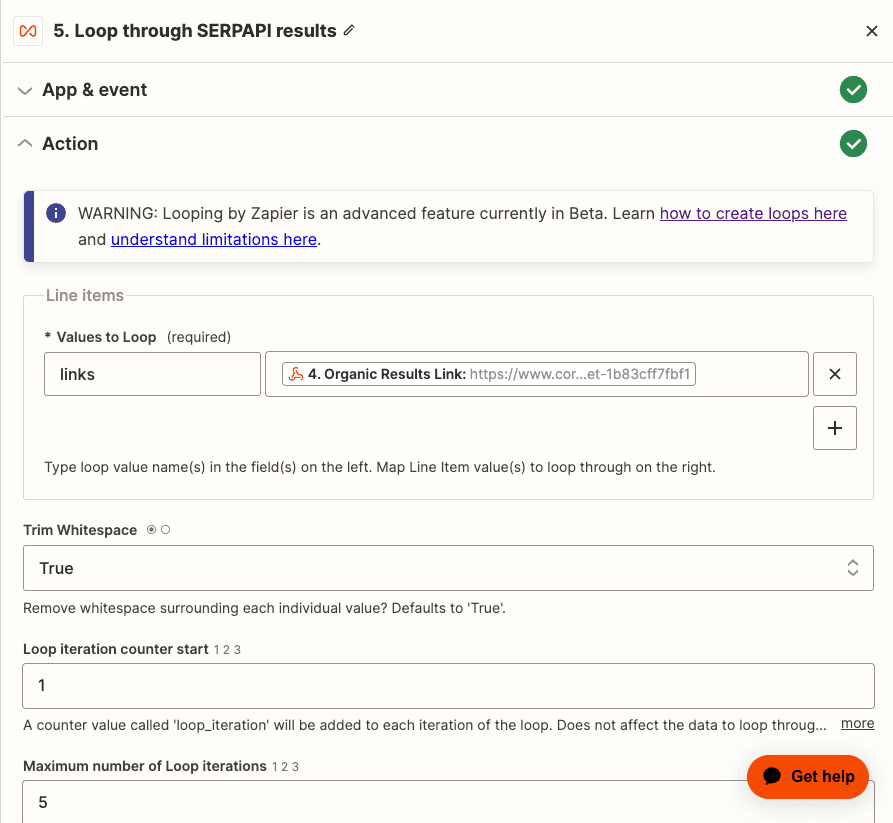
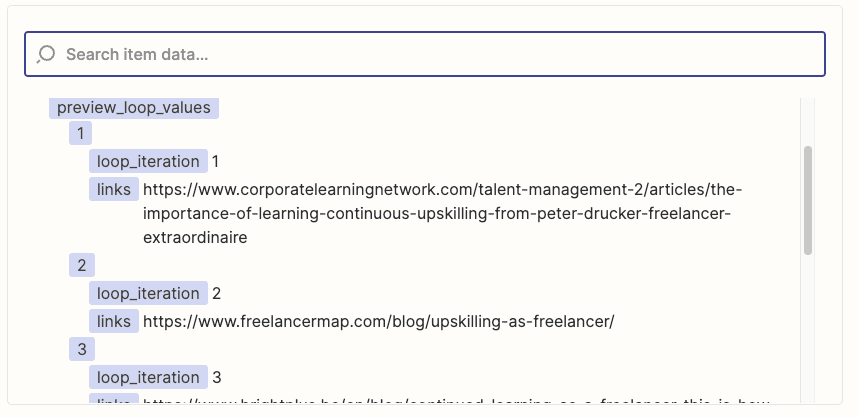
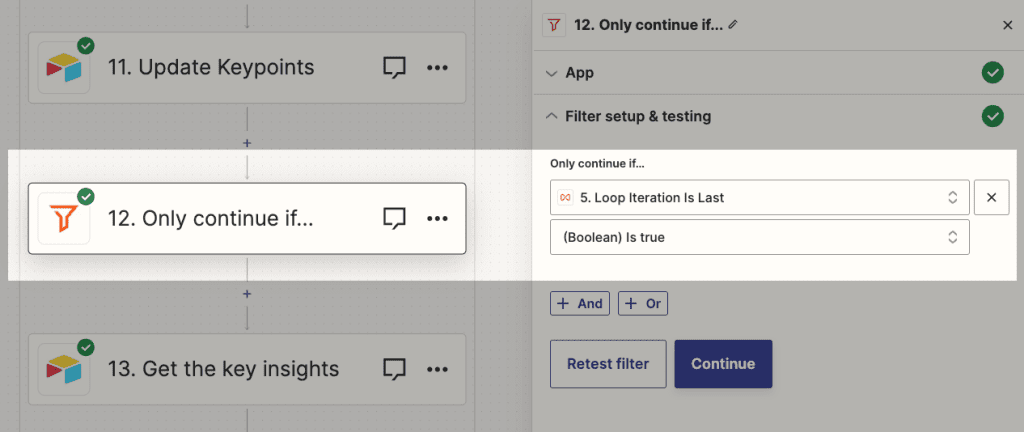
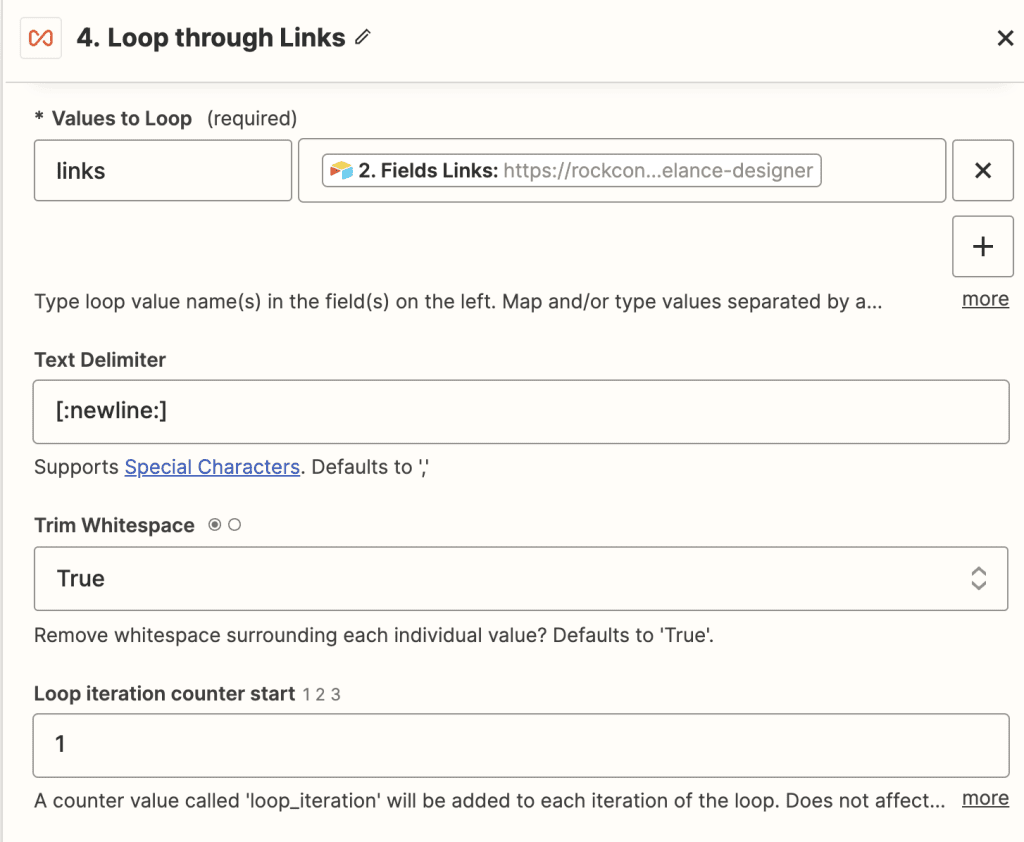
Step 4: Loop Through Each Result:
With our results in hand, it’s time to delve deep into each one.
But first, a tiny adjustment.
Swing back to Airtable and add a new column, designated for the key insights we’re about to extract from the sites.
Then, we proceed to setup the loop.
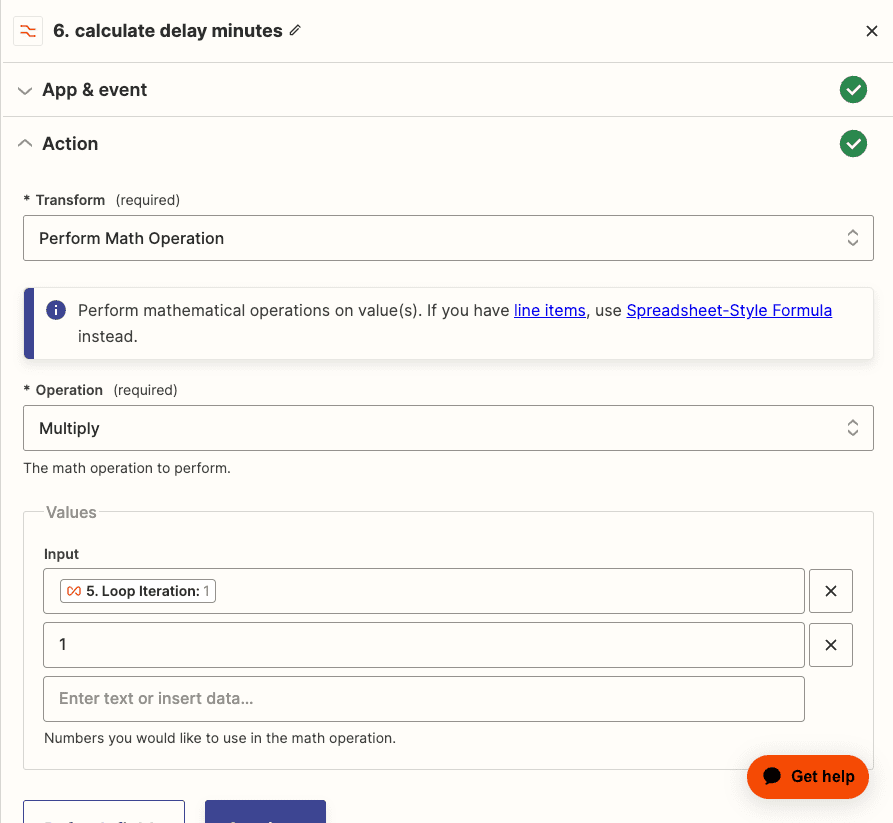
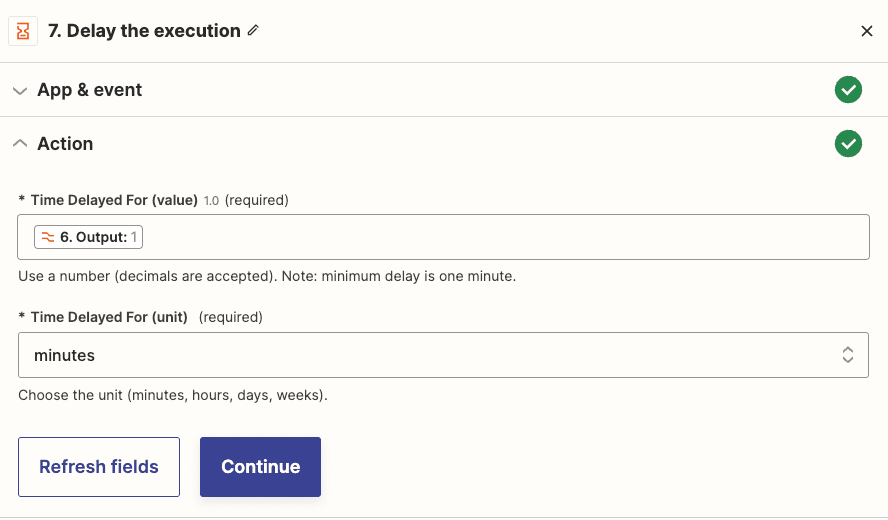
Step 5: Set the Tempo with a Delay:
Automation is quick, but let’s not get our wires crossed.
Inject a slight delay in Zapier to ensure smooth execution and avoid any overlapping actions.
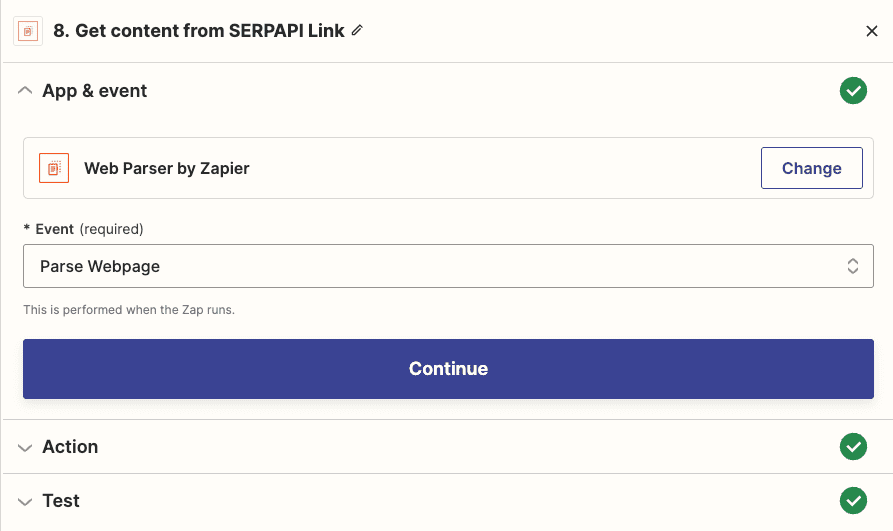
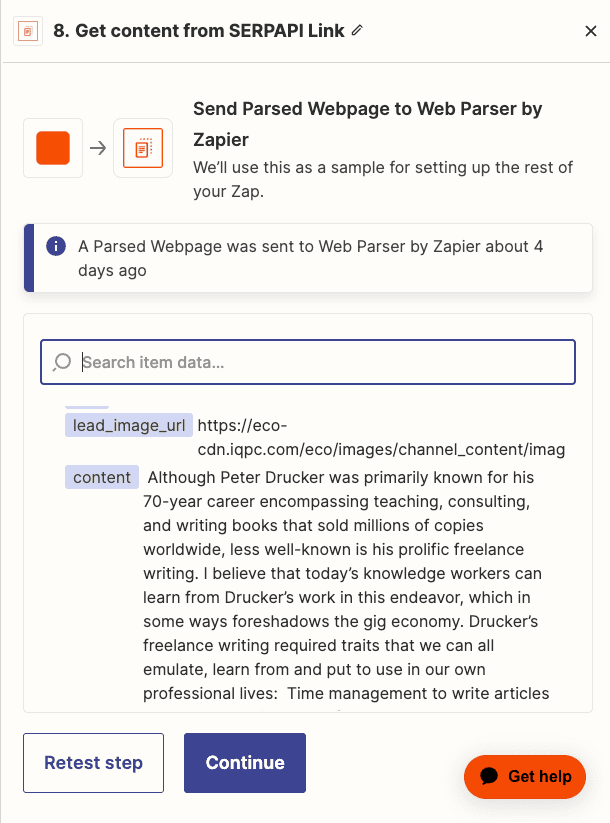
Step 6: Web Parsing and Content Extraction:
This is where the magic happens.
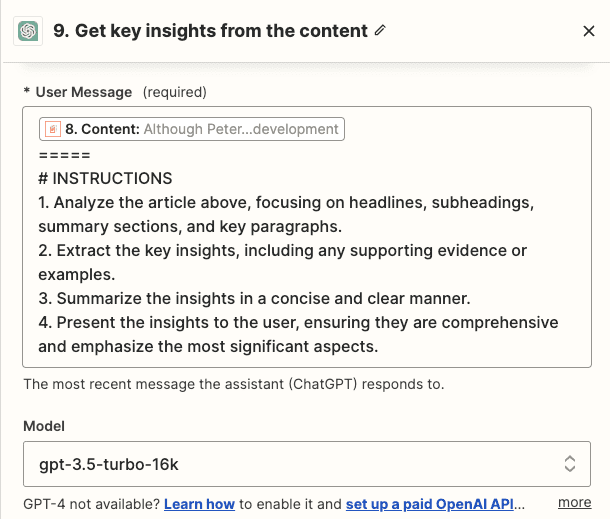
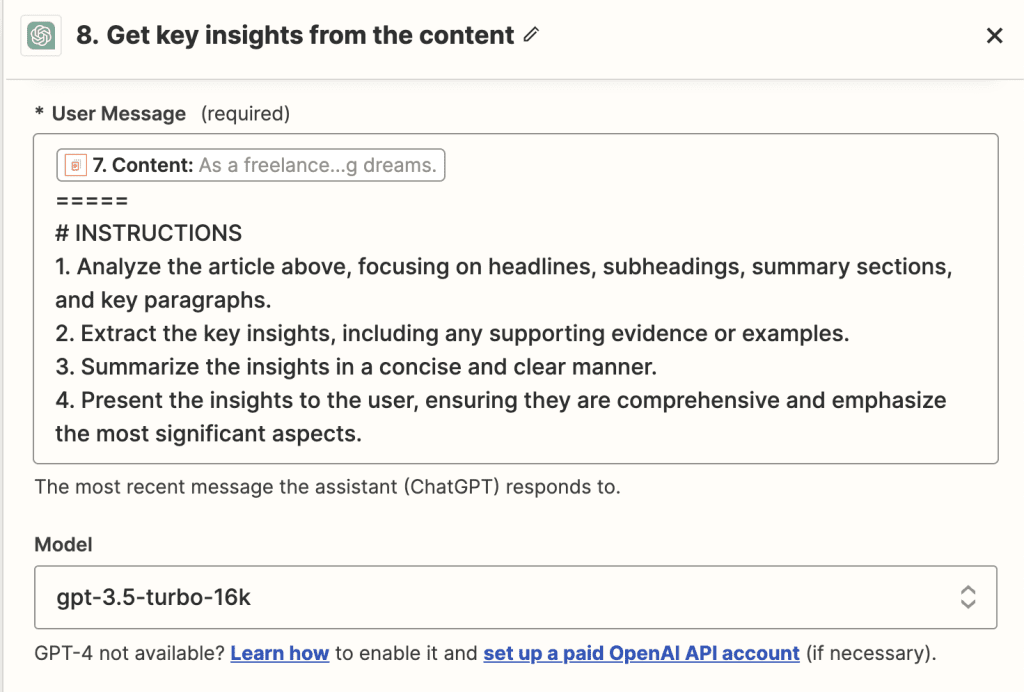
Employ “Web parser by Zapier” to mine the content of each website.
Following this, fire up ChatGPT, directing it to sieve out the key points from the extracted content.
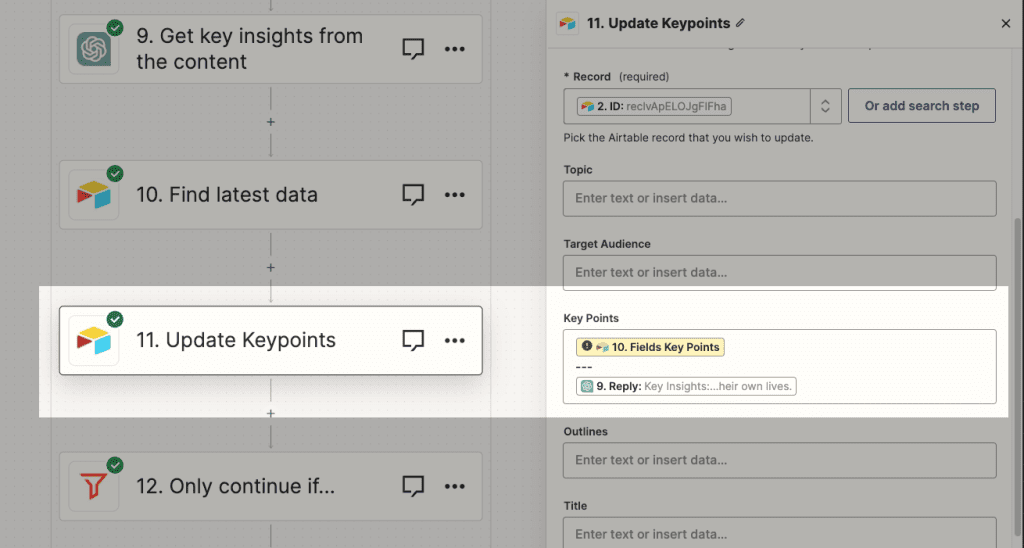
Step 7: Seamlessly Update Airtable:
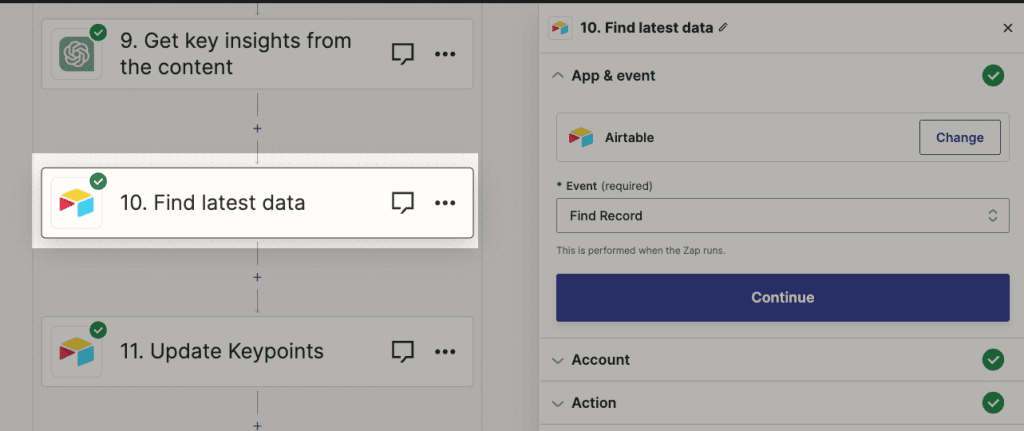
Before feeding our newfound insights into Airtable, I pull the latest content data. This ensures we’re adding to it, rather than inadvertently replacing anything. As we’re looping, this step is crucial to maintain data integrity.
Then, only we update it to Airtable.
Step 8: A Checkpoint with a Gate:
Automation is smart but needs guidance. I set up a gate that checks if our loop has concluded. Only post this check, the next steps proceed.
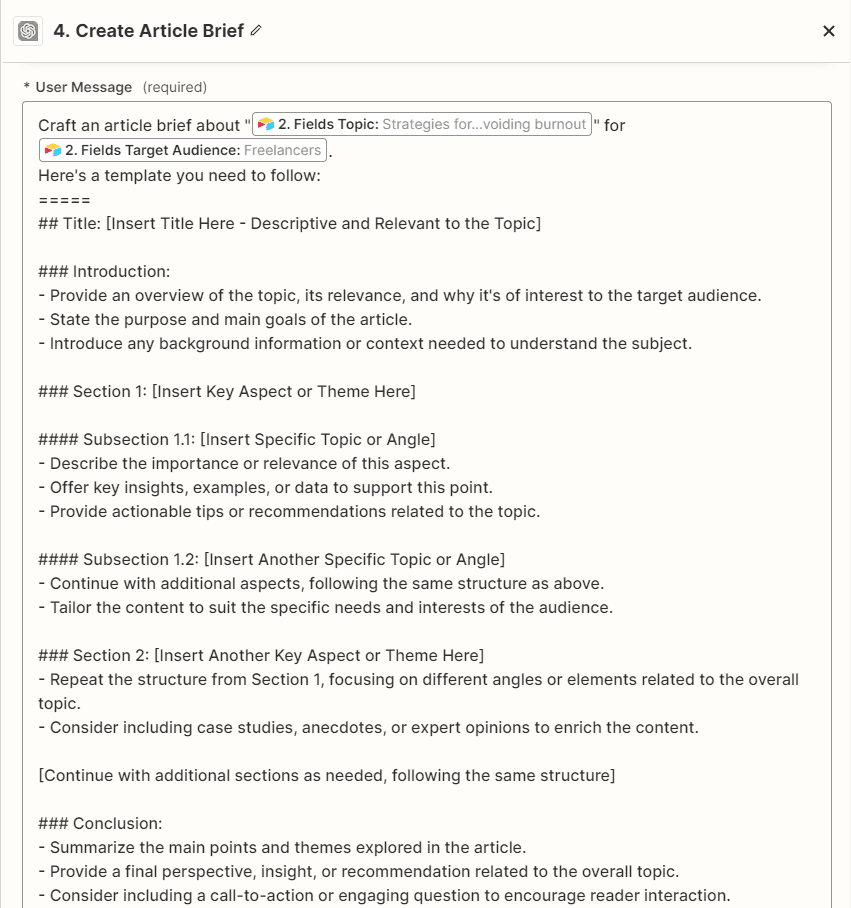
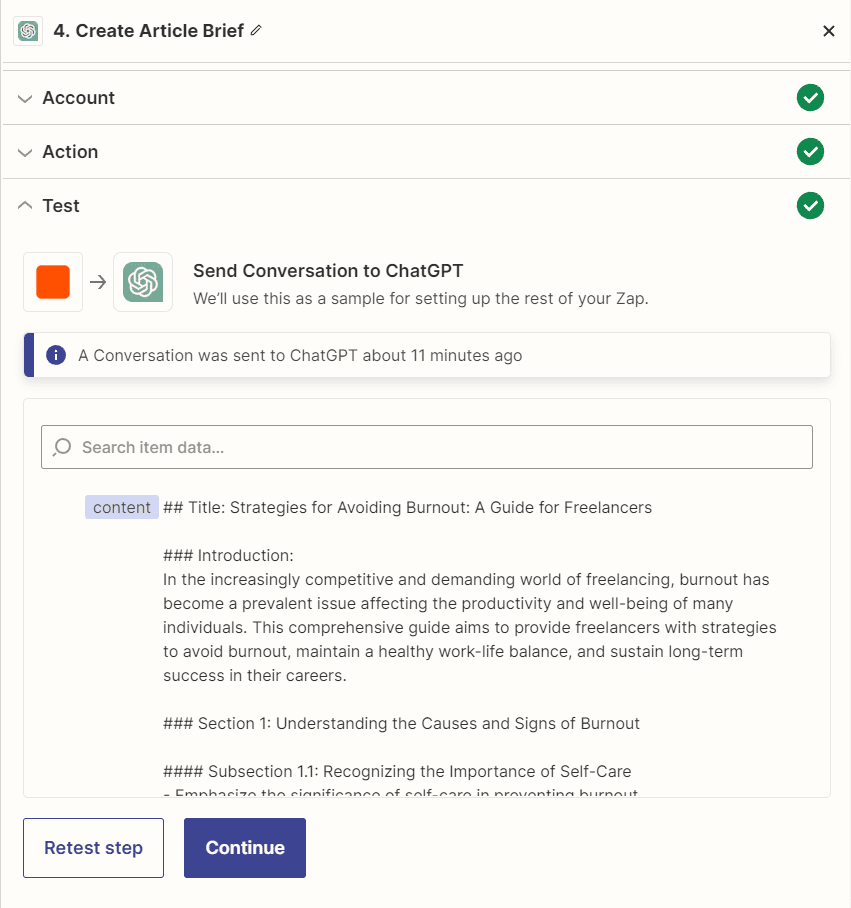
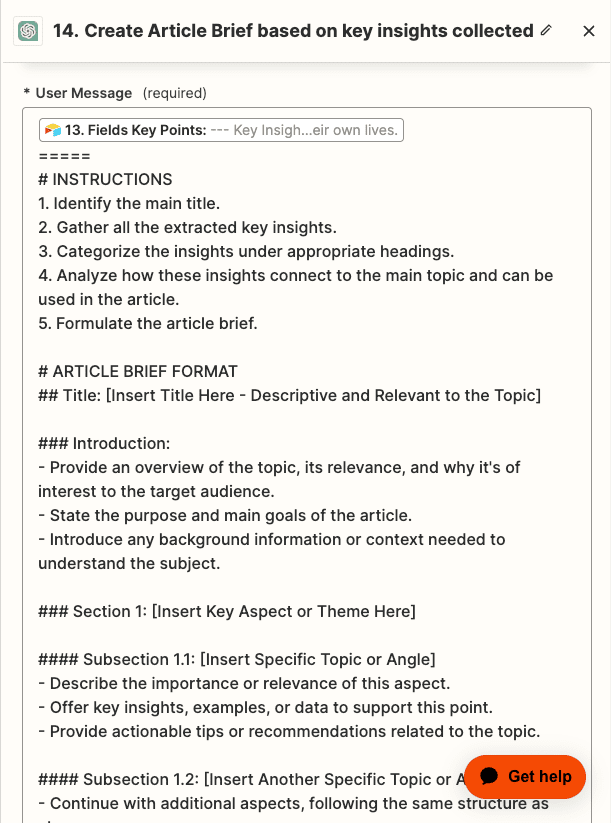
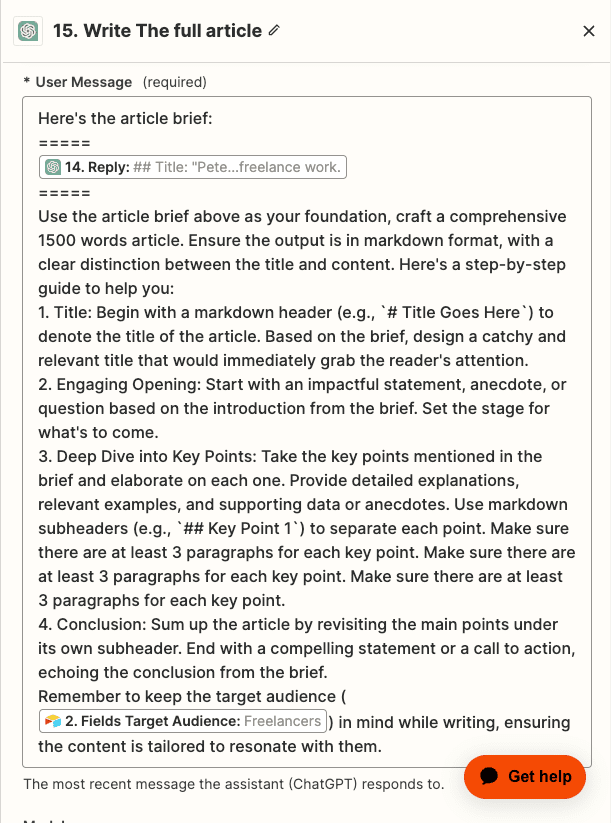
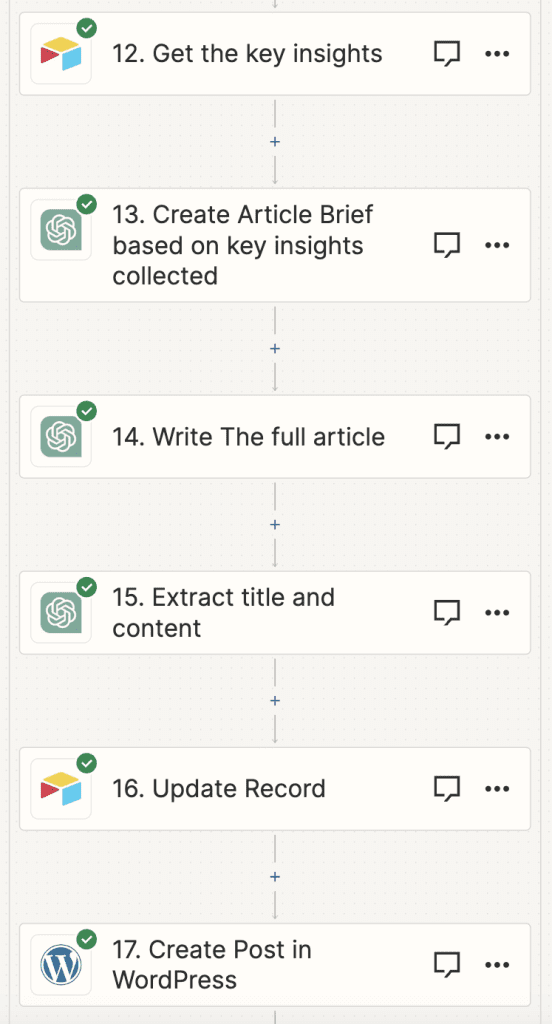
Step 9: Drafting the Masterpiece with ChatGPT:
Now, with a treasure trove of key points in hand, I again turn to ChatGPT.
First, it crafts a comprehensive article brief based on the gathered insights.
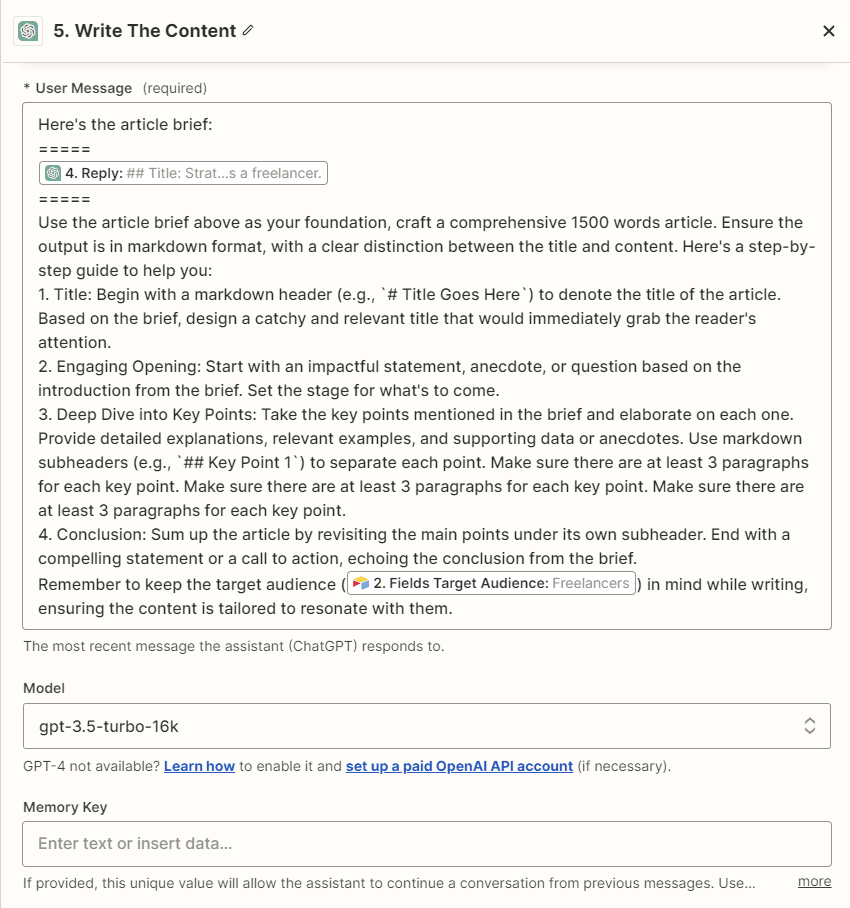
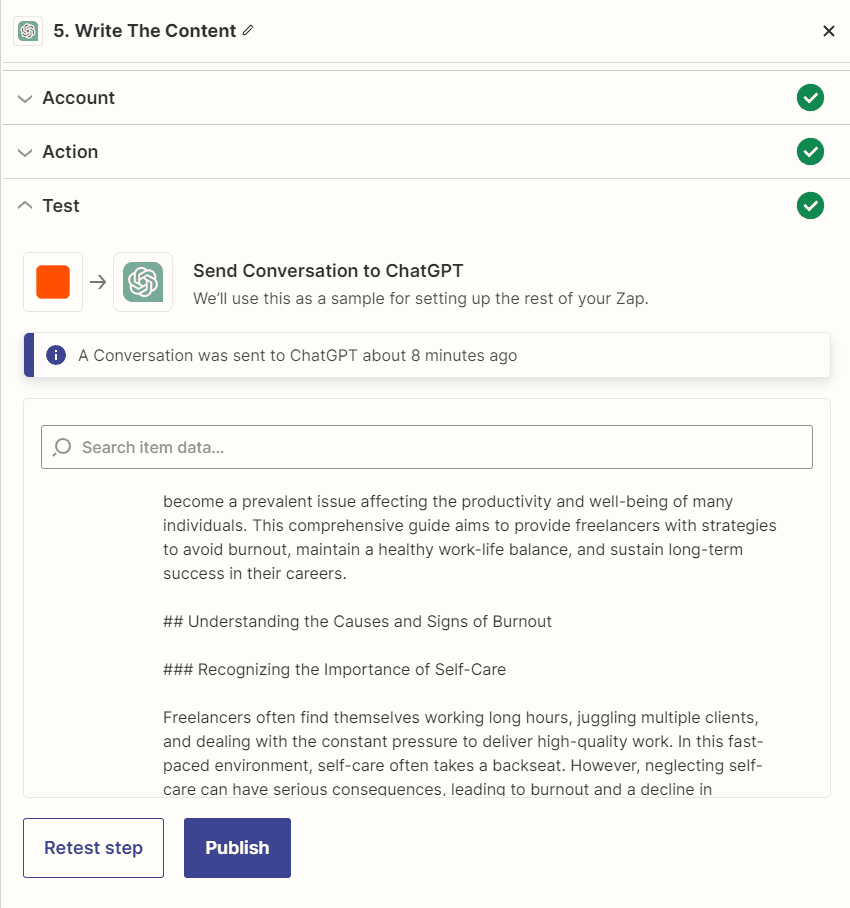
This brief then acts as the muse for ChatGPT to compose the final, polished article.
Step 10: Final Touches and Publishing:
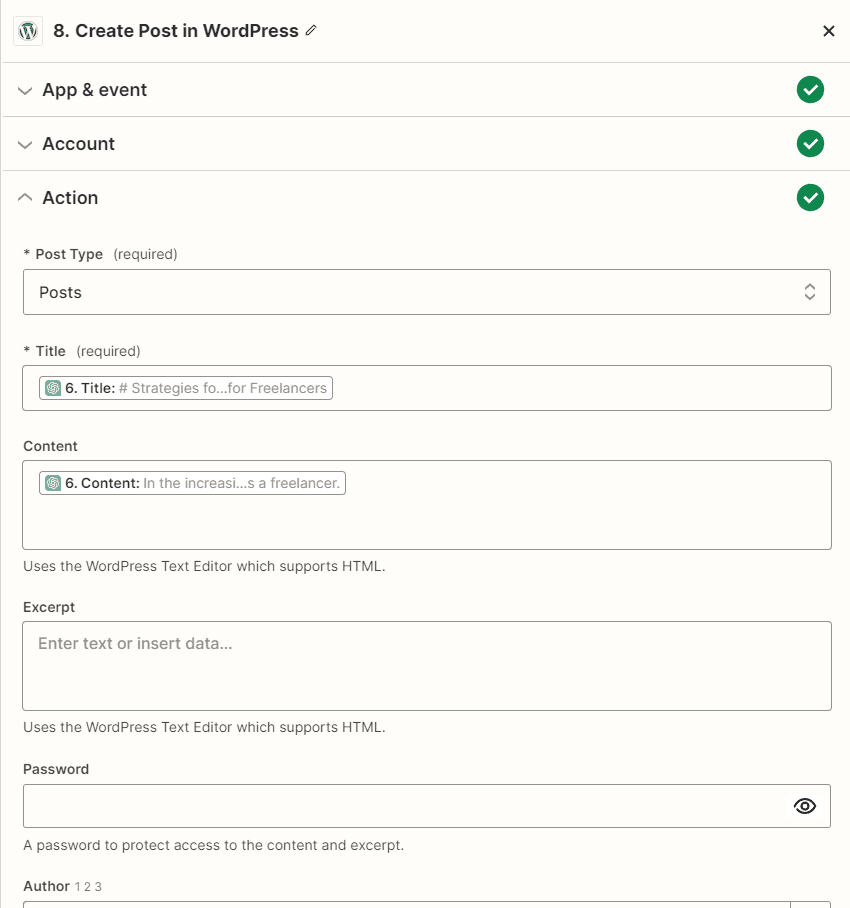
Once our article is ready and brimming with insights, I save it in Airtable.
And the grand finale? A seamless publish onto our WordPress site.
And there you have it!
A blend of automation with in-depth research, ensuring our content remains fresh, insightful, and engaging.
I’ve come to realize that when I use ChatGPT for broad web searches, it occasionally brings in content that falls short of the mark.
There’s a saying: “garbage in, garbage out”.
And in content creation, that’s something I really want to avoid.
The Way Forward
Instead of sending ChatGPT on a blind quest across the web, I believe in a more structured approach, which is provide links to research.
Step 1: Storing Tailored Research Links in Airtable:
In our trusty Airtable, I create a distinct column dedicated for links.
These are my chosen treasure troves of information. For simplicity, I make sure each link occupies its own line, making it easier to navigate and process.
Step 2: Zapier’s Role in Content Extraction
With the links set, I configure Zapier to pull content from each one.
Step 3: Getting ChatGPT’s Expertise:
Once the content is in, it’s over to ChatGPT to work its magic. It crisply summarizes the content, distilling it into easily digestible chunks.
Step 4: Continuing with Our Proven Process:
From here, it’s familiar territory. I follow the same steps we discussed earlier to craft our article.
Why Choose This Route?
One might wonder, why not just let the tool scavenge the web? Why personally select links?
Chasing Uniqueness and Quality: If I’ve learned one thing, it’s that to stand out, you’ve got to put in the work. Who wants to read the same old rehashed content, right?
Avoiding the Trap of Generic Content: It’s easy to fall into the trap of generic content when automating. By handpicking research links, I ensure my articles have a fresh and distinct voice.
Maximizing Automation Without Compromising Quality: I’ve gone lengths to automate what I can. The only piece I ardently insist on is feeding quality links. And trust me, that bit of effort is absolutely worth it.
While the automated route is enticing, a touch of manual intervention, in the form of quality links, ensures that our content stands a head and shoulders above the rest.
In our journey through automating content creation, it’s become clear to me that while technology can do wonders, the human touch remains irreplaceable.
We’ve harnessed the power of ChatGPT, integrated it with tools like Zapier and Airtable, and discovered ways to streamline the process.
Yet, the essence of high-quality content lies in the personal choices we make: from selecting the right topics to handpicking research links.
Automation, in essence, is a tool, not a substitute. I truly believe that it’s the balance between automation and human insight that creates content which resonates, informs, and stands out in the vast sea of information.
As we continue to explore and innovate, always remember that it’s our unique perspective and diligence that make our content truly special.
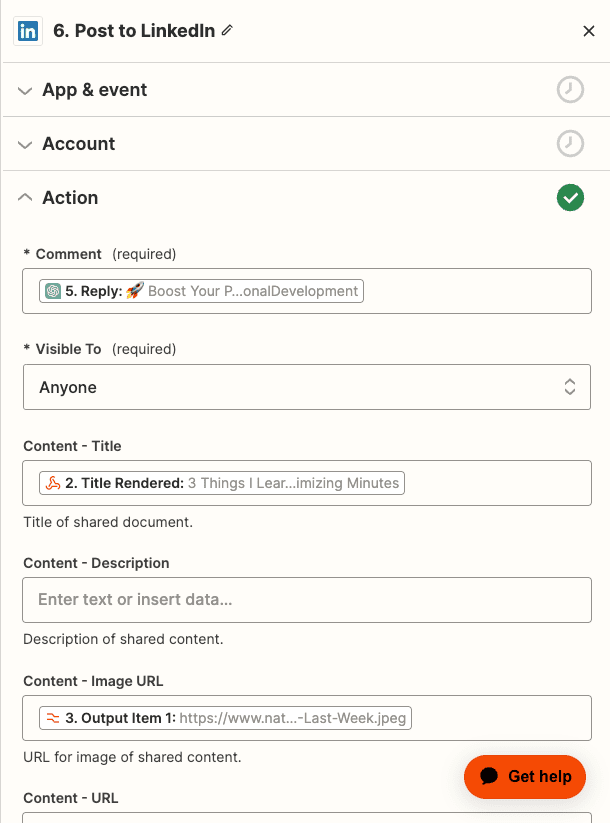
Automation #2: Content Marketing Automation for Effortless Promotion
After crafting quality content, the next natural step in my process is spreading the word.
In today’s digital age, having an automated system to push your freshly minted articles onto platforms like LinkedIn, Twitter, or Facebook is, I believe, an indispensable tool.
For illustrative purposes, let’s dive into automating content promotion on LinkedIn, though the principles apply to any social platform.
Setting Up Your Content Broadcast on LinkedIn
From my experience, timing plays a significant role in content marketing.
Say you publish at 10am; it’s often beneficial to stagger your promotional efforts. That’s why I suggest launching your LinkedIn promotion around 12pm, giving a two-hour window.
The gap isn’t set in stone; it merely provides breathing space and ensures the content is live and accessible.
Initiating the Automated Marketing Process:
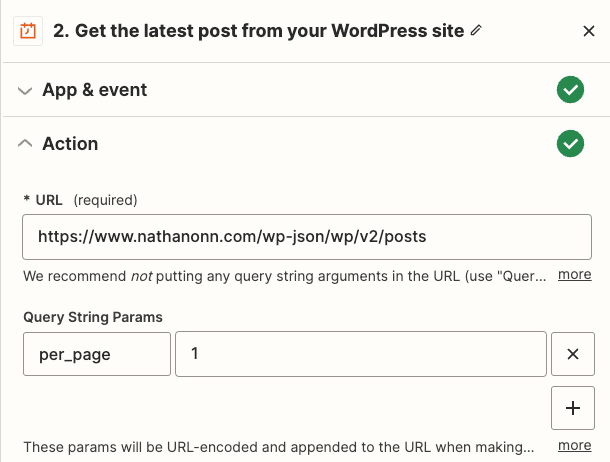
Step 1: Content Retrieval:
At 12pm, the automation tool (Zapier) gets to work, pulling the content you’ve put out two hours prior.
This ensures that it’s fetching your latest work.
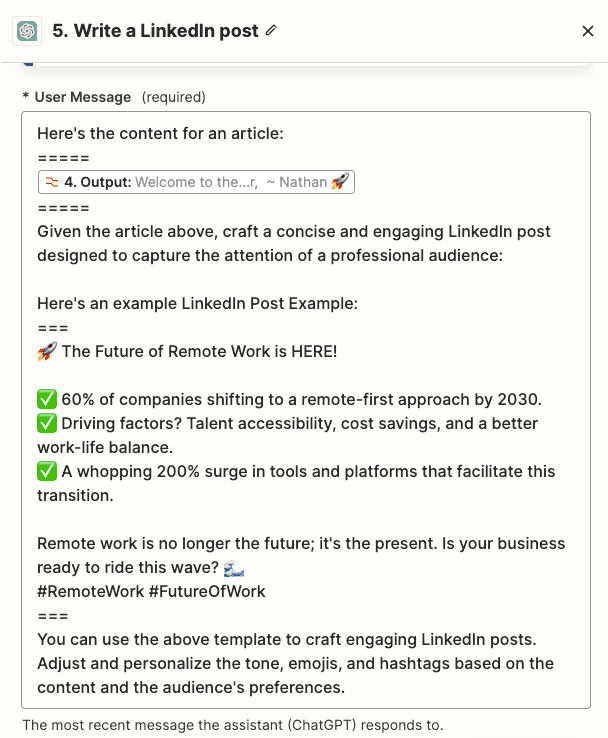
Step 2: Crafting the Social Media Post:
Utilizing the content, I turn to ChatGPT to create a captivating LinkedIn post.
This isn’t about regurgitating the article, but more about teasing the content, making it irresistible for your LinkedIn audience.
Step 3: Posting with Precision:
With our post crafted, it’s paired with the article’s link and any relevant imagery. This combined package is then auto-posted to LinkedIn, doing away with manual posting.
If you’re anything like me and want to amplify your content’s reach, consider setting up similar automations throughout the day.
By resharing your content at different times, you increase its visibility and potential impact.
Remember, the world of social media is vast, and to ensure you’re heard, sometimes it’s worth repeating your message.
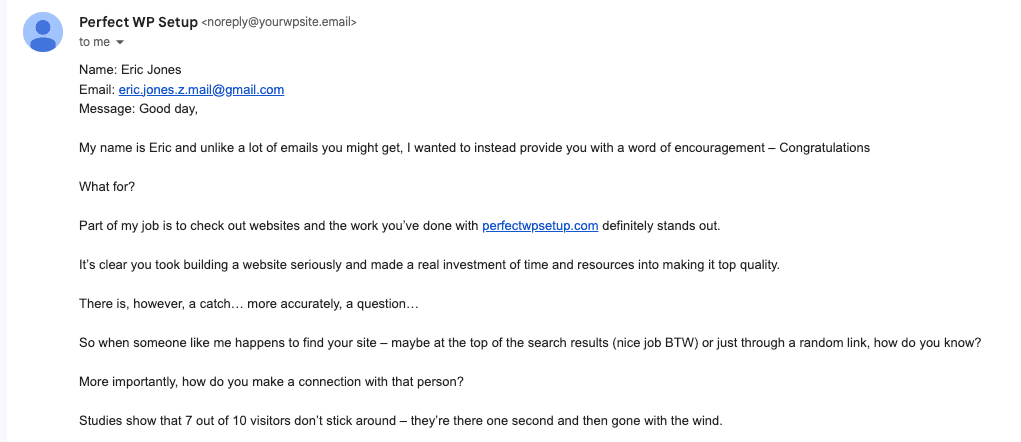
Automation #3: Filter out Spammy emails from Your WordPress Contact Form Using ChatGPT API
When we talk about managing a WordPress website, there’s one area where many people, including me, often face challenges: managing emails from the contact form.
With an influx of unsolicited and irrelevant messages, it’s easy to drown in the noise.
From my personal experience, it’s crucial to automate email classification.
Let me walk you through the reasons and the steps to set up such a system using ChatGPT API.
Why We Need Email Classification
I’ve always believed that a contact form is a double-edged sword.
On one hand, it’s a channel for genuine visitors to get in touch. On the other, it’s an open invitation for a deluge of irrelevant emails.
And while tools like reCAPTCHA are powerful against bots, they’re helpless against humans manually typing in their spammy pitches, like those notorious SEO or graphic design service offers.
To me, using a spam classifier isn’t just about decluttering; it’s about respect for our time, maintaining our professional image, and safeguarding our systems.
By filtering out the fluff, we ensure that we’re only giving attention to the messages that genuinely deserve our time.
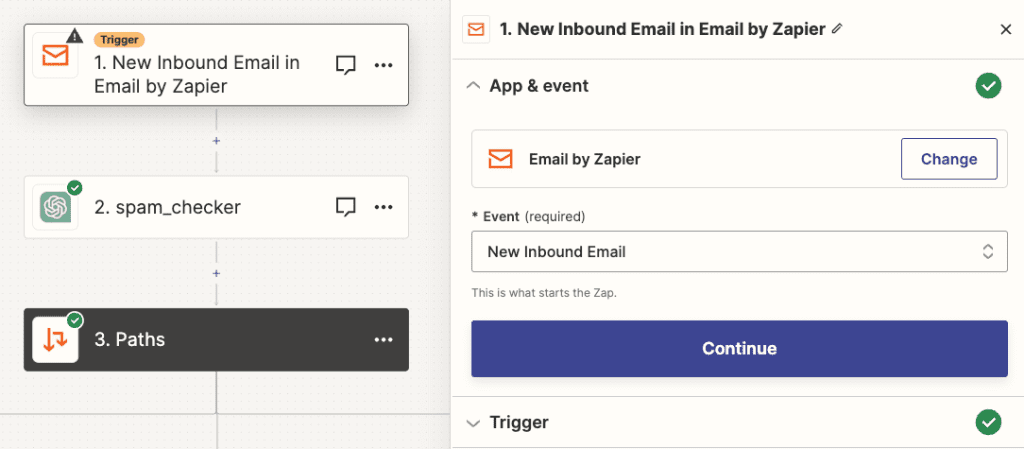
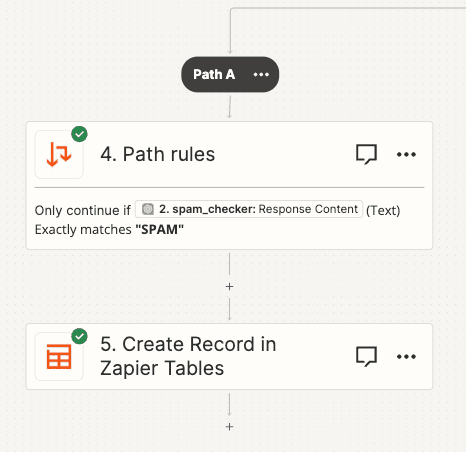
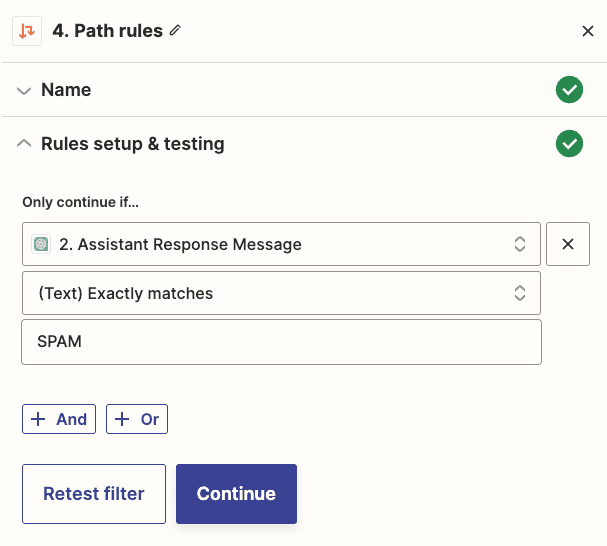
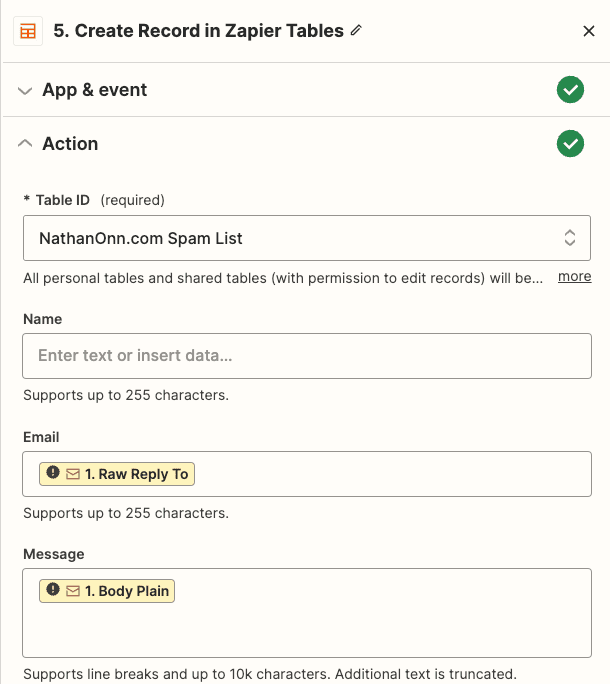
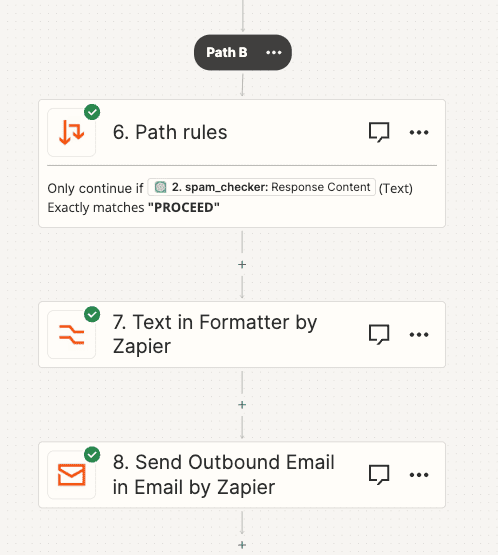
Step 1: Initializing Your Contact Form with the Spam Detector
Imagine each time someone sends a message through your form, ChatGPT acts as a diligent watchman, instantly gauging the essence of the message.
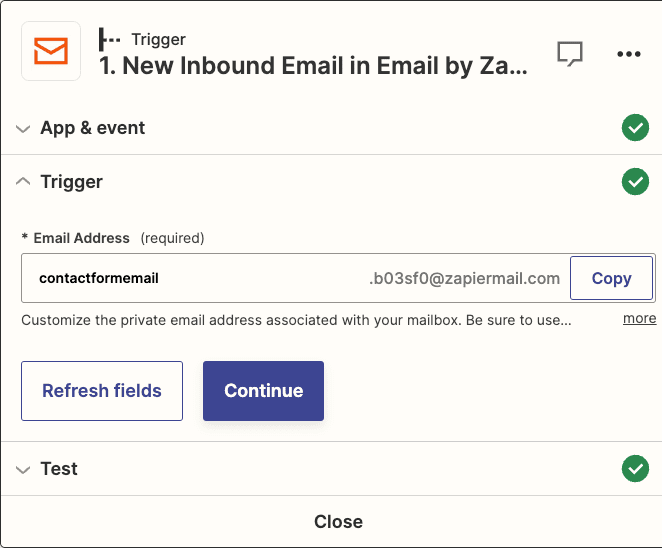
To begin, redirect all incoming emails from your contact form to a specific Zapier email. You’ll do this using the Email by Zapier trigger.
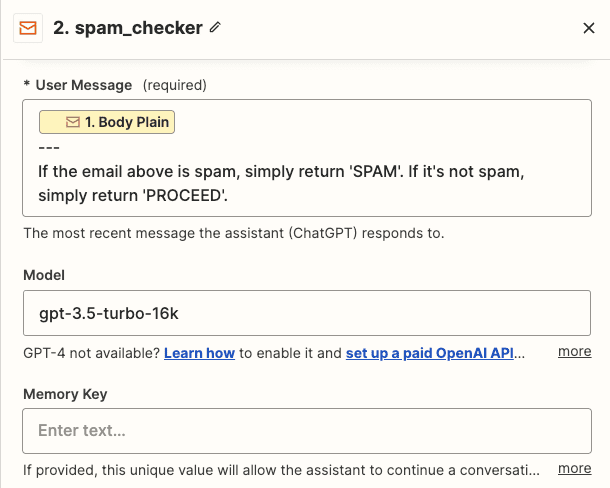
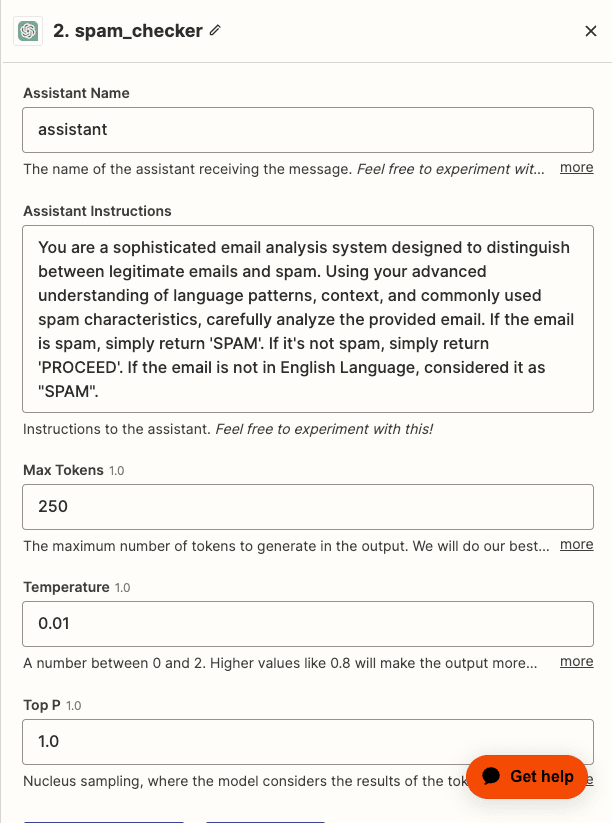
Step 2: Efficiently Processing Classified Emails
Guide ChatGPT to meticulously scan and assess each incoming email.
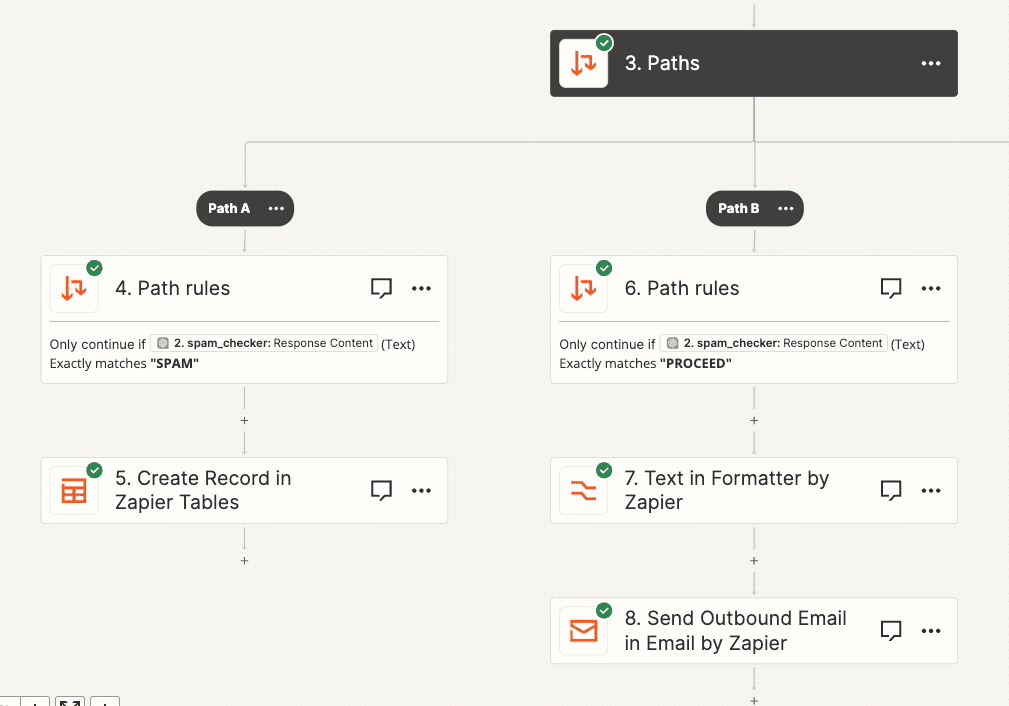
Upon ChatGPT’s evaluation, your next move depends on the categorization of the emails.
When tagged as SPAM: Swiftly divert these emails to a designated “dump list.” I recommend housing them temporarily on platforms like the zapier table, airtable, or Google sheets for convenience.
Even top-tier AI can occasionally make mistake. Therefore, by maintaining this secondary storage, you’re safeguarding against potential oversights and missed crucial communications.
Note: you can setup another zap to flush the dump list every month to make sure it isn’t overflow.
When tagged as PROCEED: These are the messages you’ve been waiting for! Make sure these invaluable communications are channeled straight to your main email account.
This system not only streamlines your primary inbox but also ensures you’re consistently exposed only to pertinent content.
In wrapping up, I feel it’s essential to state the transformative power of automating your email classification on WordPress with ChatGPT.
It doesn’t just make life easier; it adds efficiency, effectiveness, and a touch of elegance to managing your digital communications. Give it a shot and experience the difference!
Automation #4: Your Very Own WordPress Assistant Powered by ChatGPT
Have you ever fantasized about having an AI assistant handle tasks for your WordPress website?
Well, it’s not just a dream anymore. By integrating ChatGPT into your WordPress site, you can simplify tasks, save time, and enhance efficiency.
Picture this:
Adding new user accounts, no WordPress login needed.
Installing or updating themes and plugins—without even going to WordPress.
Easily composing and updating blog posts.
Tweaking settings without diving into complex dashboards.
Executing advanced tasks with straightforward, conversational cues.
All these and more are possible with AI doing the hard work.
So, how does this magic happen?
Let me explain.
How ChatGPT Talks to WordPress
Ever wondered how you could command ChatGPT via a platform like Slack, and by doing so, direct activities on your WordPress site?
Note: This explanation will focus on Slack, but rest assured, other platforms like Discord or Telegram can also do the trick.
When you command ChatGPT via Slack, it interprets your intent. Depending on the command, it interacts with the relevant WordPress component.
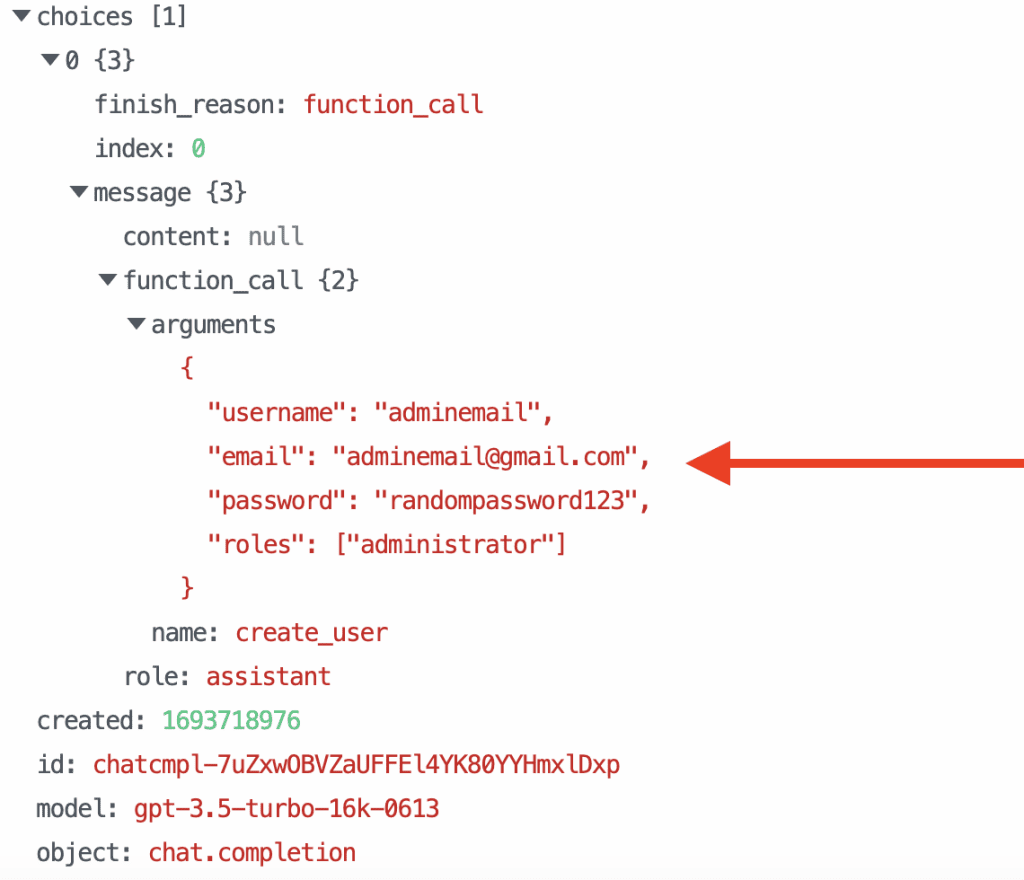
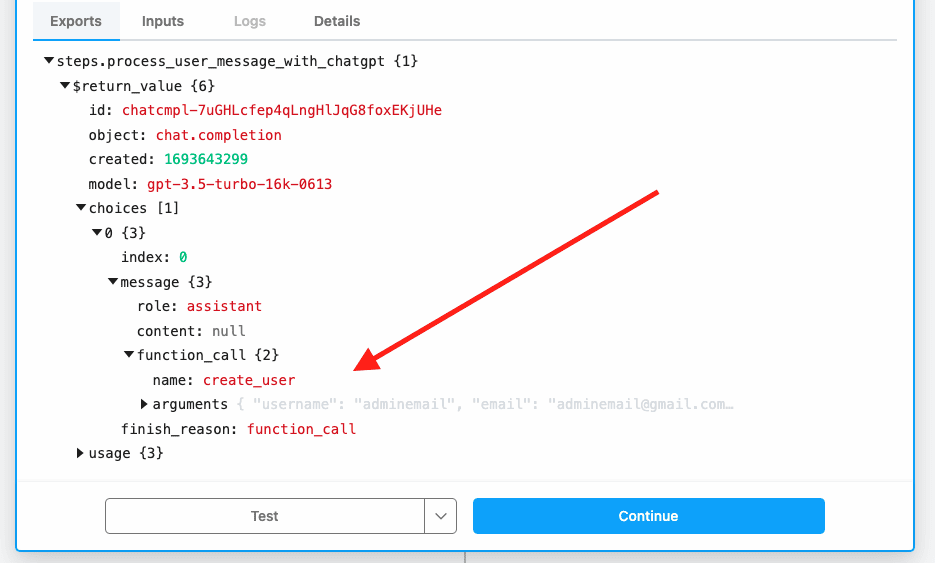
For instance:
Create a new user with the details:
Email: adminemail@gmail.com
Role: admin
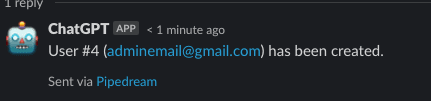
ChatGPT analyzes this, decides which WordPress segment to interact with, and processes accordingly. You’ll then receive a response:
This works because of a special trick ChatGPT API has called “function calling.”
It’s like teaching the AI how to follow our commands and decide what to do next.
Then, using that information, ChatGPT tells WordPress to create a new user. That’s basically how it does its thing.
And, if you’ve heard of ChatGPT plugins, they work in a similar way.
Now, let’s look at how to set this up.
A quick note: This setup demands specific coding prowess. That’s why I recommend Pipedream over Zapier. Pipedream handles this sort of coding more seamlessly.
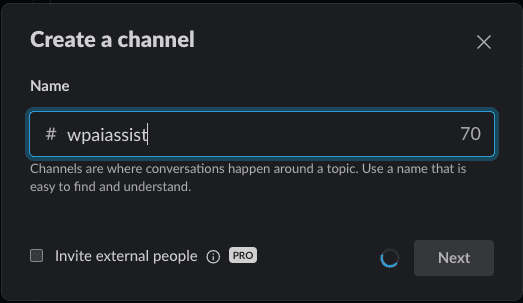
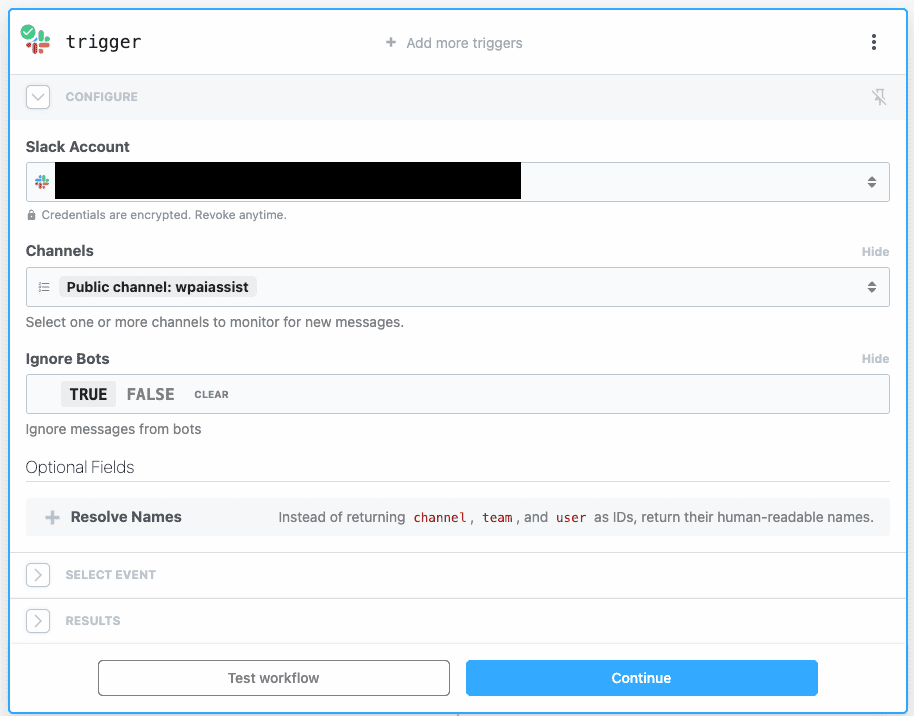
Setting Up a New Slack Channel
First things first. You’ll need to make a new Slack channel where you can chat with ChatGPT.
Simply go to Slack and make a new chat space (channel). No worries about making it public or private; if you’re the only one using it, either is fine.
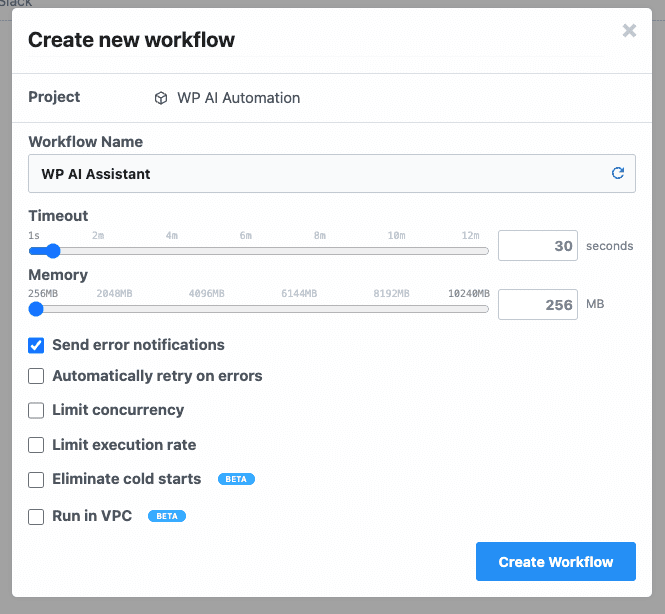
Crafting a Pipedream Workflow
Okay, now let’s make Pipedream do some work for us. You’ll set up a workflow in Pipedream that springs into action whenever something new happens in your Slack channel.
Here’s how to go about it: Open Pipedream and start creating a new workflow.
And then set it to respond to new Slack channel messages. Exclude bot-generated messages to prevent loops.
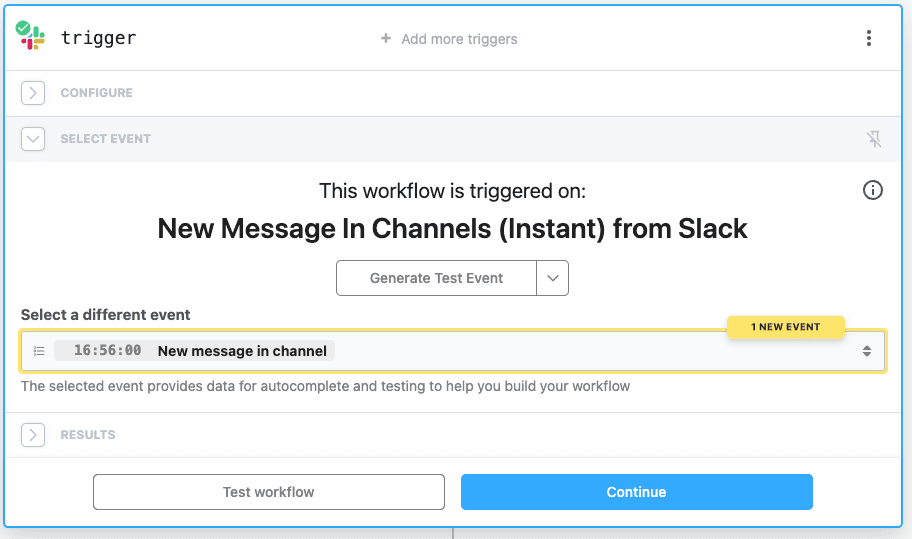
After that, send a test message in slack like:
Once it’s posted, you should see a new event on your Pipedream workflow.
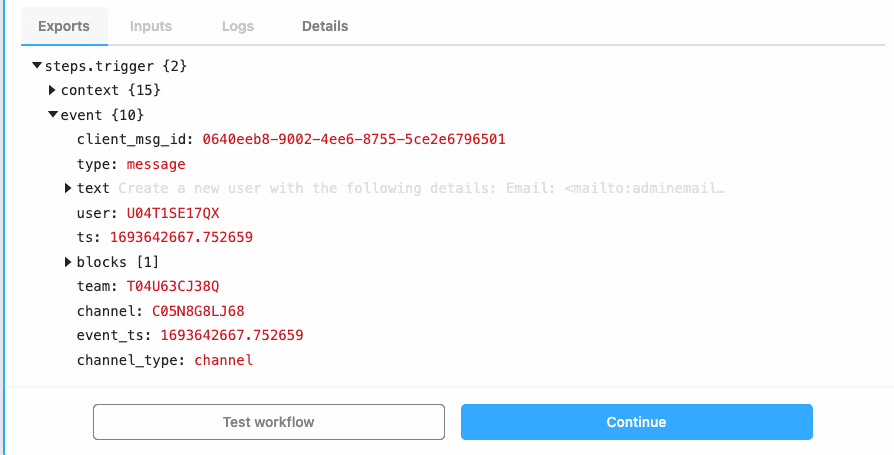
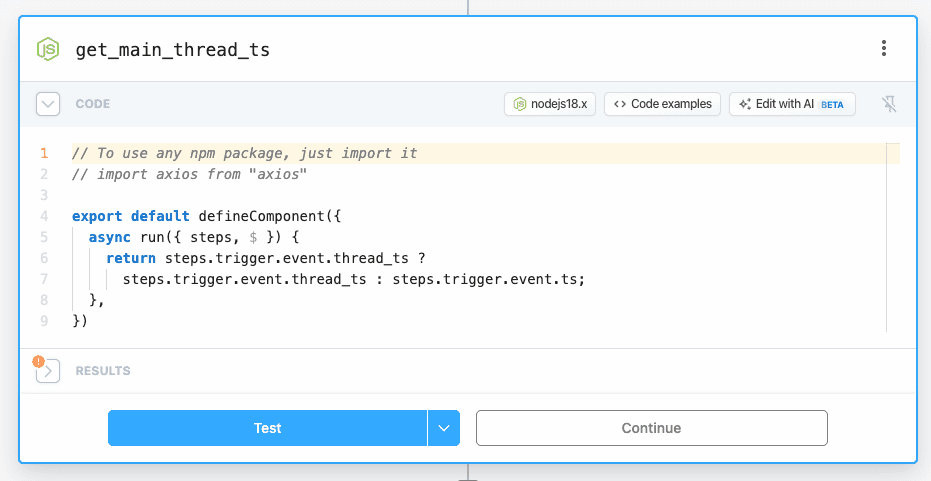
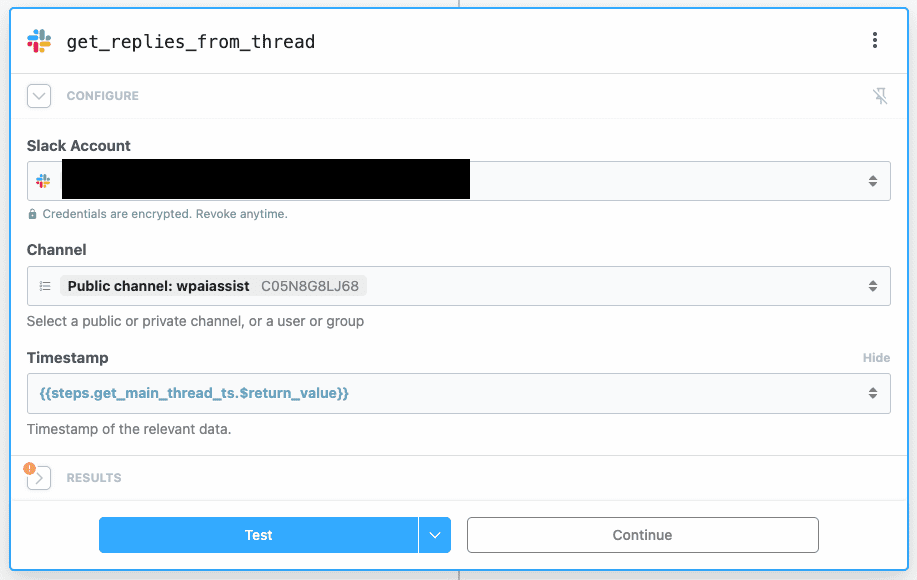
From here, trigger the “Test Workflow” to view all related thread data.
After that, you’ll need to identify the thread’s timestamp. This ensures ChatGPT responses align with the correct Slack thread.
Next, grab any preceding messages from that thread to keep ChatGPT informed about the conversation’s context.
Now, it’s time to configure the ChatGPT segment.
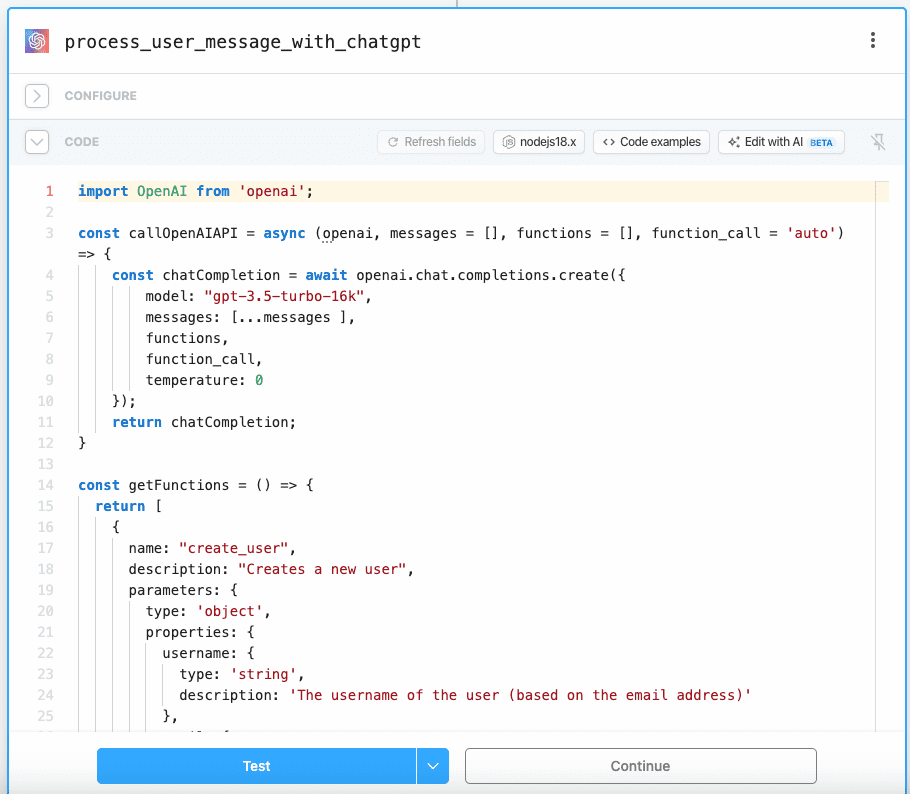
Setting Up Function Calling
This feature essentially allows ChatGPT to understand our message, select the right API to call, and decide what data to send.
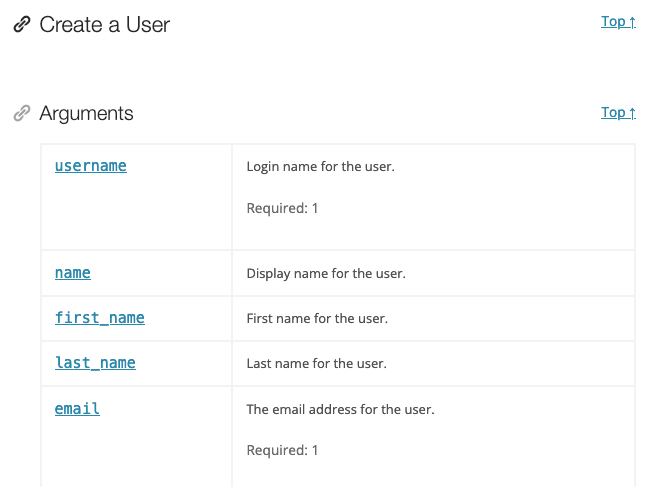
Given our example, we’d use the Users API to establish a new WordPress user. This requires us to inform ChatGPT about which API endpoint to use and the required data.
Based on the Users API, the relevant data comprises:
username
email
password
roles
Then, specify the ChatGPT function, accounting for the parameters it needs:
Here’s the code to facilitate function calling in ChatGPT:
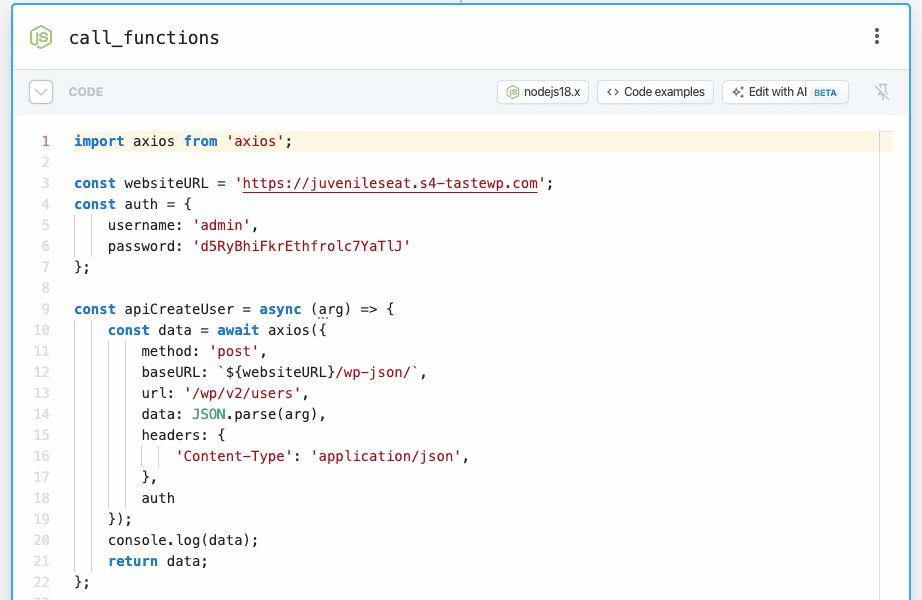
This code defines the function structure and expected parameters, enabling ChatGPT to interact correctly with the Users API.
After configuration, test the function to view ChatGPT’s feedback. When ChatGPT detects a function to execute, it provides instructions and necessary parameters.
Next, add a new Code step to prompt the API as per ChatGPT’s direction.
After obtaining the password, you should update the auth variable with the appropriate credentials.
For instance, if your WordPress admin username is johndoe and the application password you have is d5Ry BhiF krEt hfro lc7Y aTlJ, then you should modify the auth variable as follows:
Now turn your attention to the website URL. Replace the placeholder in the websiteURL variable with the actual URL of your WordPress site.
For example, if your site’s URL is https://www.johndoe.com, the updated websiteURL variable should look like this:
const websiteURL = 'https://www.johndoe.com';
Make sure to eliminate any trailing slashes from your URL.
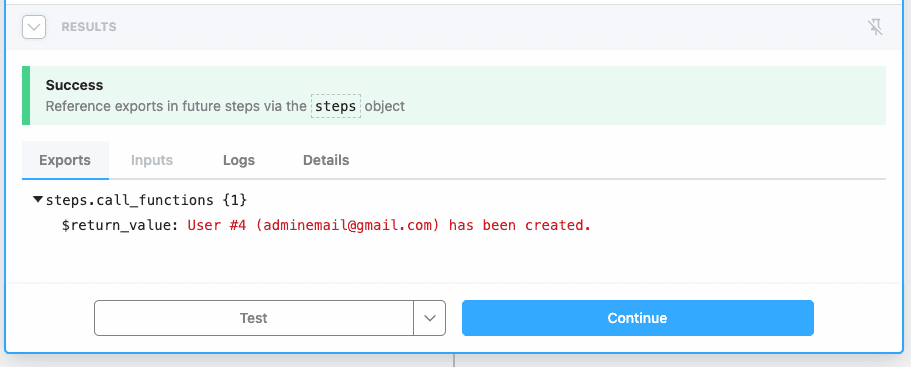
Once these steps are complete, initiate a test to verify the configurations.
Upon obtaining the data response from WordPress, it would frame an appropriate reply for the Slack thread. This ensures ChatGPT stays updated on ongoing processes.
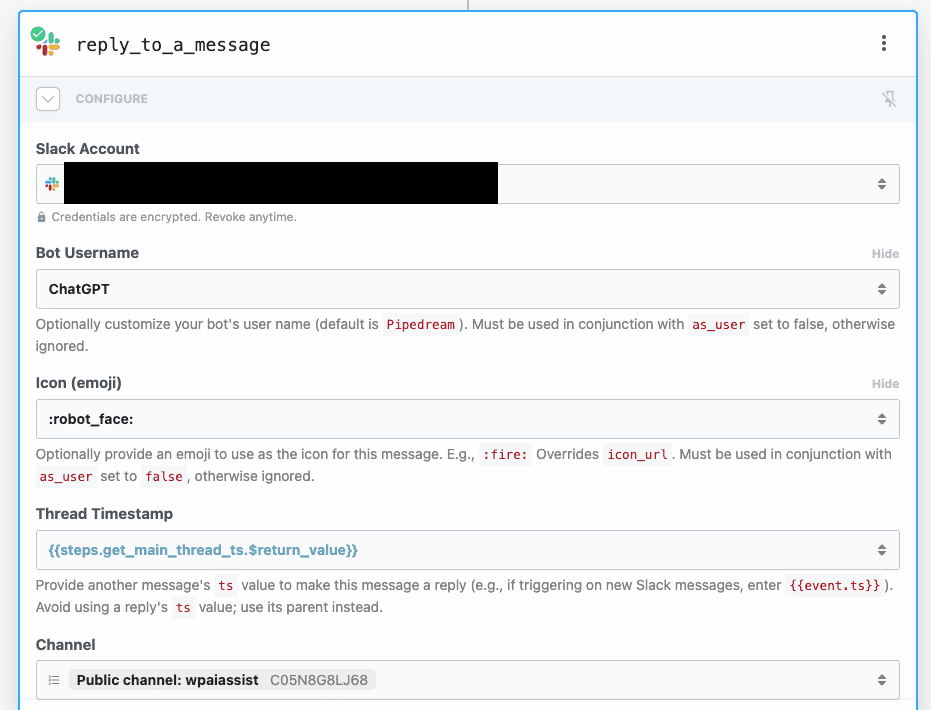
Lastly, add another step to send your response back to the originating Slack thread.
Execute a test action, and you’ll see your reply in Slack.
Integrating ChatGPT with WordPress is transformative. It heralds a new era in website management, blending cutting-edge AI with the simplicity of natural language commands.
Expanding Your AI Assistant’s Capabilities: Installing a Plugin from Slack
So far, we’ve looked at how ChatGPT can create new users in WordPress. But what if you want to go a step further?
Let’s add the functionality to install plugin through ChatGPT. This will make it even easier to manage your WordPress site.
Updating getFunctions to Install a Plugin
First, let’s update our getFunctions method to include a new function for plugin installation.
The following is your updated getFunctions method:
Code:
const getFunctions = () => {
return [
// ... (previous function definitions)
{
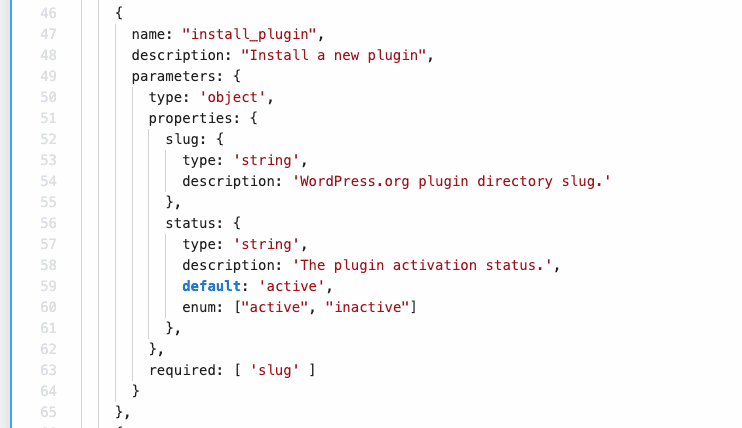
name: "install_plugin",
description: "Installs and activates a new plugin",
parameters: {
type: 'object',
properties: {
slug: {
type: 'string',
description: 'The plugin slug from the WordPress.org directory.'
},
status: {
type: 'string',
description: 'Activation status of the plugin. Defaults to "active".',
default: 'active',
enum: ["active", "inactive"]
}
},
required: ['slug']
}
}
]
}
In this code above, we added a new function called install_plugin. The function requires two parameters:
slug: This is the slug name of the plugin, usually derived from the WordPress.org plugin directory.
status: This indicates whether the plugin should be activated upon installation or not. It defaults to “active”.
Integrating Plugin Installation in the API Call
To handle the new install_plugin function, update the callFunction method in your code.
Here’s how it should look now:
Code:
const apiInstallPlugin = async (arg) => {
    const data = await axios({
        method: 'post',
        baseURL: `${websiteURL}/wp-json/`,
        url: '/wp/v2/plugins',
        data: JSON.parse(arg),
        headers: {
            'Content-Type': 'application/json',
        },
        auth
    });
    return data;
};

const callFunction = async (function_name, function_arguments) => {
    let response = null,
      reply_message = '';
    switch (function_name) {
        // ... (previous function cases)
        case 'install_plugin':
          response = await apiInstallPlugin(function_arguments);
          reply_message = response ? `"${response.data.name || 'Plugin'}" has been successfully installed and is ${response.data.status}.` : '';
          break;
    }
    return reply_message;
};
Here, the install_plugin case uses the apiInstallPlugin function to trigger the plugin installation via the WordPress API. The reply message will include the plugin name and its activation status.
The new apiInstallPlugin function is an asynchronous function that sends a POST request to the /wp/v2/plugins endpoint of your WordPress site. It expects arguments for the plugin slug and its activation status.
The callFunction function now handles the new install_plugin function, installing the plugin and returning a confirmation message with its name and status.
How to Test Plugin Installation
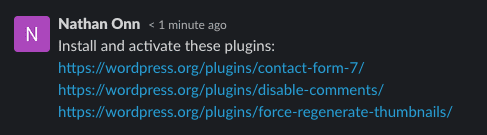
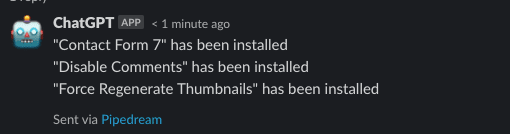
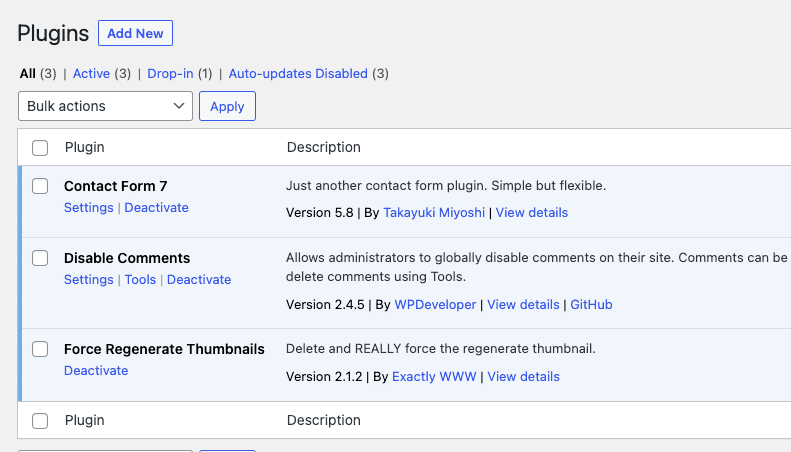
After setting this up, you can test it out in Slack:
Once posted, you should see a response in your Pipedream workflow. If all goes well, ChatGPT will confirm the plugin installation in the Slack thread.
Extending Further: Bulk Installation of Plugins
With ChatGPT, you can now manage users and install single plugins on your WordPress site.
But what if you want to install multiple plugins in one go?
The good news is that you can easily add this functionality, and it aligns perfectly with our modular approach.
Updating getFunctions for Bulk Plugin Installation
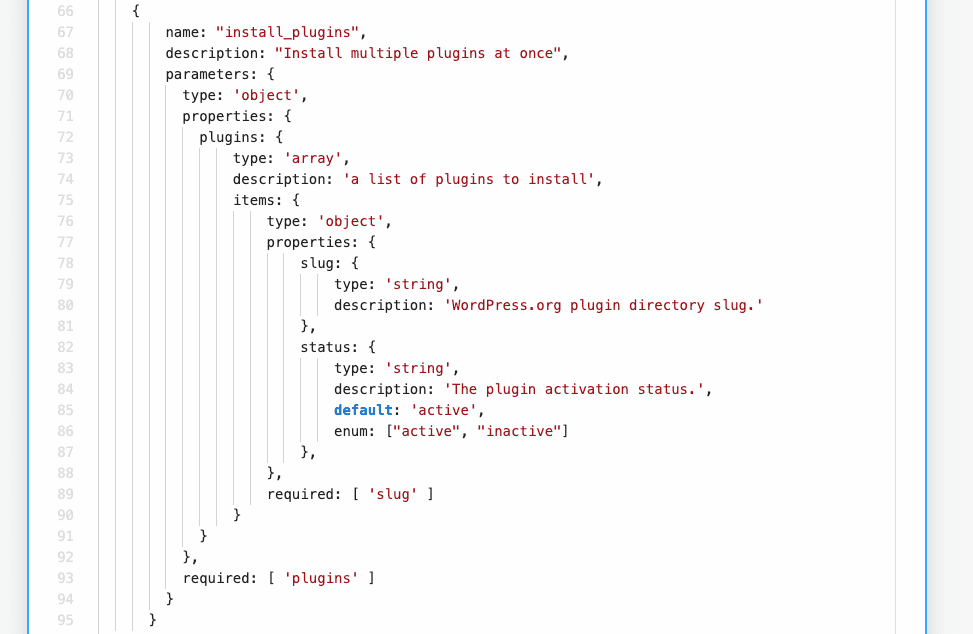
To accommodate the bulk installation of plugins, update your getFunctions method to include a new function named install_plugins.
This function install_plugins takes an array of plugin objects, each containing:
slug: The slug name of the plugin as in the WordPress.org directory.
status: Activation status, defaults to “active”.
Implementing Bulk Installation in the API call
The function apiInstallPlugins performs the bulk plugin installation. It uses Promise.all to run all plugin installation asynchronously but waits for all of them to complete:
Next, the updated callFunction method handles the new install_plugins case:
case 'install_plugins':
    response = await apiInstallPlugins(function_arguments);
    if (response && response.length > 0) {
        reply_message = response.map((plugin) => `"${plugin.data.name || 'Plugin'}" has been installed`).join('\n');
    }
    break;
This case maps over the response array to create a string that lists the installed plugins.
Testing Bulk Installation
To test the new feature, you can instruct ChatGPT as follows:
ChatGPT will then send the appropriate API calls to install and optionally activate these plugins. Once the operation is complete, you’ll receive a confirmation message listing the installed plugins.
Conclusion
From creating new users to installing plugins — both individually and in bulk — integrating ChatGPT with WordPress has demonstrated a revolutionary way to manage your website.
The utility of this setup is not just confined to these examples; the possibilities are virtually endless.
You can adapt and extend this approach to cover a wide array of functionalities like post management, theme customization, SEO setup, and much more.
It’s really up to your imagination and the specific needs of your project.
If you’re looking to fast-track this experience, I’ve created a Pipedream workflow that you can easily clone and use for your own setup.
In essence, what I’ve done is blended the capabilities of AI and web development to create an efficient, responsive, and highly customizable WordPress management system.
The future is exciting, and with tools like ChatGPT and platforms like Pipedream, we’re only scratching the surface of what’s possible.
So go ahead, unleash your creativity, and supercharge your WordPress management experience today.