Taking WordPress to Infinity and Beyond with ChatGPT API
Ah, the digital revolution.
Just when you think you’ve caught up, something like ChatGPT waltzes in and says, “Tag, you’re it!” Especially if you’re in the WordPress world.
This is not your everyday GPT-4 conversation; this is about automation that can drastically simplify your life and business processes.
The ChatGPT Phenomenon
ChatGPT has become more than a household name; it’s like the digital BFF you never knew you needed. It helps you draft emails, brainstorm creative projects, and even chat when you’re bored.
But what you may not know is that there’s a behind-the-scenes maestro in all of this—the ChatGPT API.
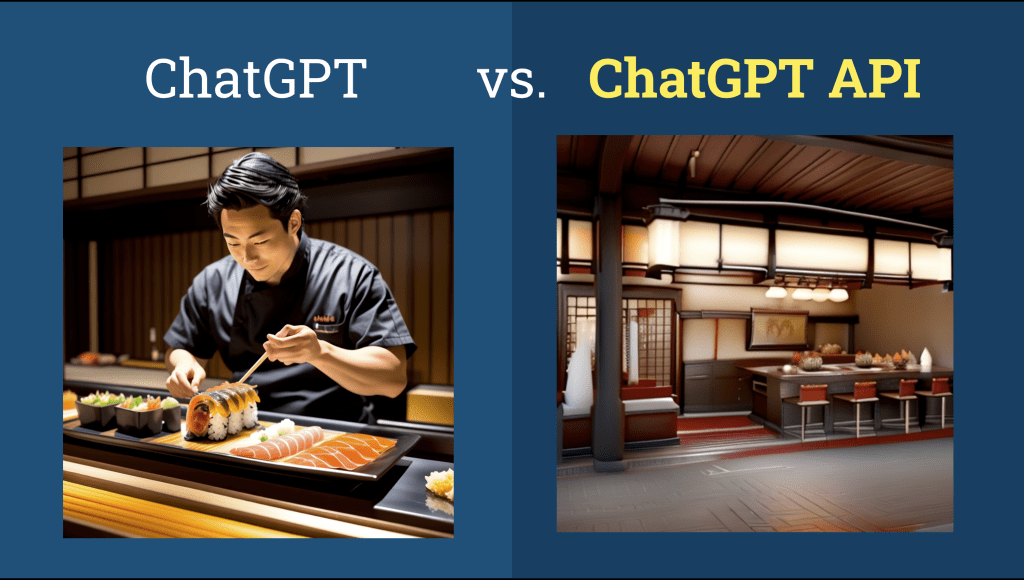
ChatGPT vs. ChatGPT API: The Omakase and the Super Kitchen
Think of ChatGPT as a mind-blowing Omakase meal at a sushi restaurant. Every detail is curated for a “Wow, this is amazing!” experience.
The ChatGPT API, on the other hand, is like having the entire kitchen at your disposal but without the chef.
You’re the culinary artist now, free to cook up endless automation possibilities for your WordPress site.
Note: Throughout this guide, when I mention “ChatGPT,” I’m specifically referring to the ChatGPT API, not the stand-alone website or application.
Now, let’s tie this back to the bigger picture: the human longing for efficient, personalized assistance.
This yearning is not new; it’s been a part of popular culture for quite some time.
From Iron Man to Jarvis: A Personal Journey
When “Iron Man” hit the theaters, it wasn’t just Tony Stark’s armor that had us all drooling. It was his AI assistant, Jarvis.
I was among those enamored not by the metallic superhero suit, but by the idea of a personal AI assistant handling mundane tasks.
On May 21, 2021, I was granted access to GPT-3, a significant stepping stone toward making that dream a reality.
To say my life underwent a transformation thereafter would be an understatement.
Sixteen months before the emergence of ChatGPT, GPT-3 had already laid the groundwork for groundbreaking innovations.
In that pre-ChatGPT period, I engaged in extensive experimentation, striving to optimize my life through the automation capabilities of GPT-3.
However, the advent of GPT-4 has expanded the horizons of what’s achievable with automation, propelling possibilities into unprecedented realms.
What’s In Store For You in This Guide?
Are you ready to automate like you’ve never automated before?
In this guide, we’ll explore how to employ the ChatGPT API to take your WordPress experience to a realm that’s as efficient as it is captivating.
Tools You’ll Need
To follow along, you’ll require a few tools:
- OpenAI API Key: Here’s where you can get it.
- Zapier: Although primarily a paid tool, it’s well worth the investment for this guide.
- Pipedream: A free account should suffice for our purposes.
Don’t worry if you don’t use Zapier. Alternatives like Make.com, Pabbly Connect or n8n work just as well—the workflow is nearly identical.
Let’s Dive In!
Now that we’ve set the stage, let’s delve into our first automation experiment.
Automation #1: Content Creation Automation Using ChatGPT API
Over the past two years, I’ve immersed myself in the specialized field of automated content creation, with a particular focus on leveraging the GPT-3 and ChatGPT API.
While it’s enticing to generate long articles almost effortlessly, the question remains: can a simple prompt truly yield high-quality content?
Motivated by this query, I embarked on an exhaustive journey. I’ve invested innumerable hours in testing, experimentation, and fine-tuning the approach.
Today, I am eager to unveil my findings. My goal is to illuminate both the untapped potential and the inherent limitations of using this technology for content creation.
Shall we begin?
1. Automated Mass Article Generation with ChatGPT API
The allure of creating content with just a simple command is hard to resist. Imagine crafting a 2000-word piece without breaking a sweat. I’ve been there and felt that excitement.
Here’s how I went about it:
Why it’s enticing?
In my journey, I’ve constantly searched for efficient ways to produce content.
The ChatGPT API, in this respect, feels like a dream. With just a single command, the possibility of churning out a substantial article opens up. It’s like having a little genie at your disposal.
But like any tool, its true value lies in how you wield it.
Step 1: Generating Topics with ChatGPT:
From my experiments, I’ve found that ChatGPT can be a great brainstorming assistant.
By simply inputting the prompt give me 30 topics related to productivity for freelancers, creatives, and solopreneurs. The result should be in a table format with only 2 columns. One for the topic, another for the target audience, it offers up a plethora of fresh topics tailored for your audience.
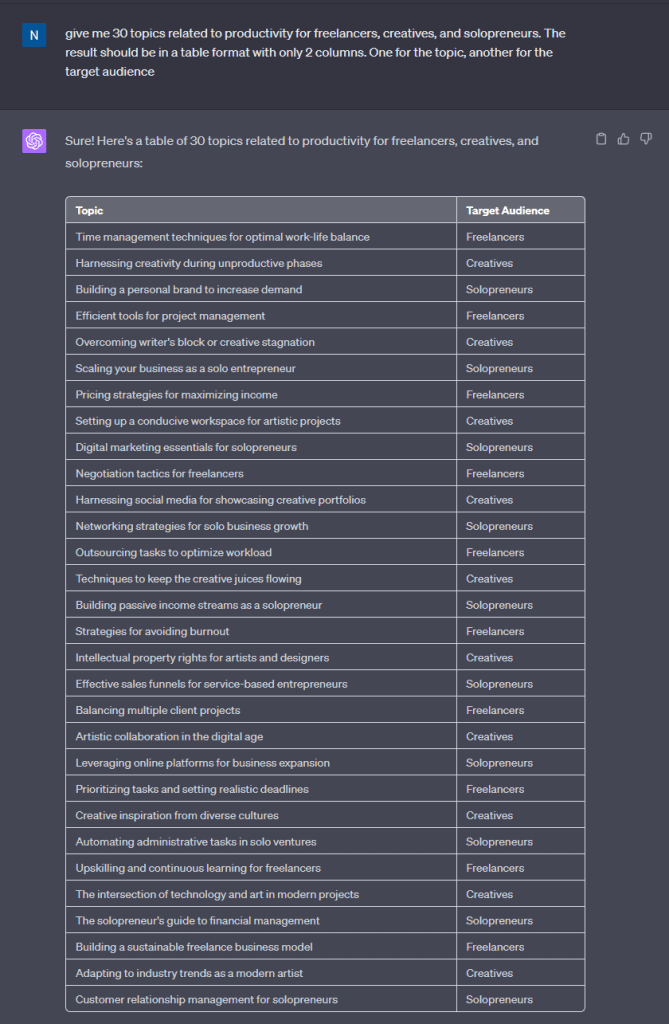
The next step? Organize this data, and that’s where Airtable comes in.
Step 2: Setting up Airtable:
I use Airtable as a dynamic repository, making it perfect for cataloging and structuring my content.
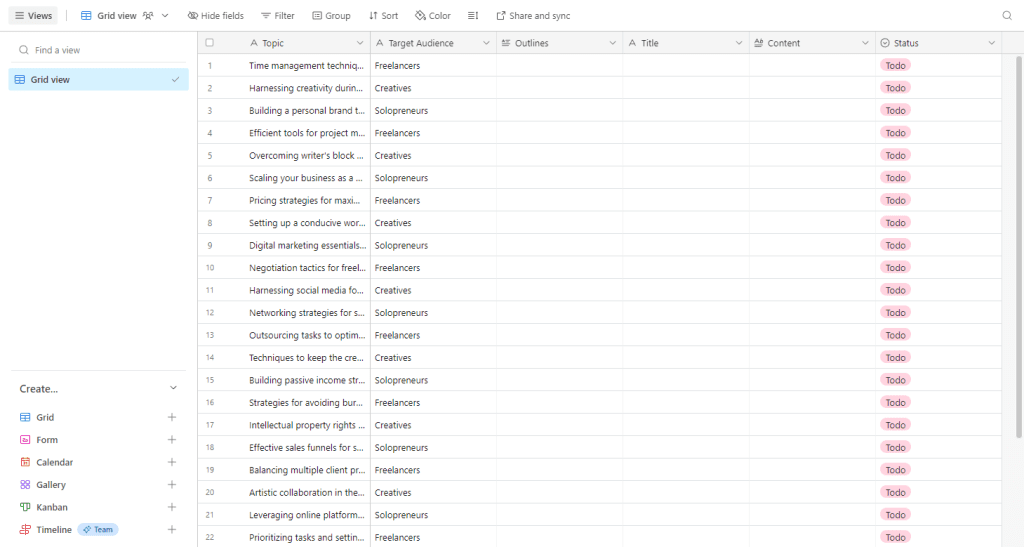
Here’s my configuration:
- Topic: The primary subject or theme. It’s an efficient way to group ideas and content.
- Target Audience: Identifying the intended readership or viewers ensures the content is relevant and impactful.
- Outline: A brief sketch or roadmap for the article.
- Title: The article’s headline.
- Content: The core text of the article. Activate the rich text formatting to maintain uniformity and elevate the reading journey.
- Status: A tool for streamlined workflow. I use it as follows:
- ‘Todo’: An idea is jotted down and is pending action.
- ‘In Progress’: The creation phase – where ideas take shape.
- ‘Done’: Celebrating the completion of well-crafted content, ready for its audience.
For a practical illustration, visit this Airtable example.
Step 3: Zapier Automation:
Efficiency thrives on automation. This is where Zapier, my trusted sidekick, steps in to make things seamless:
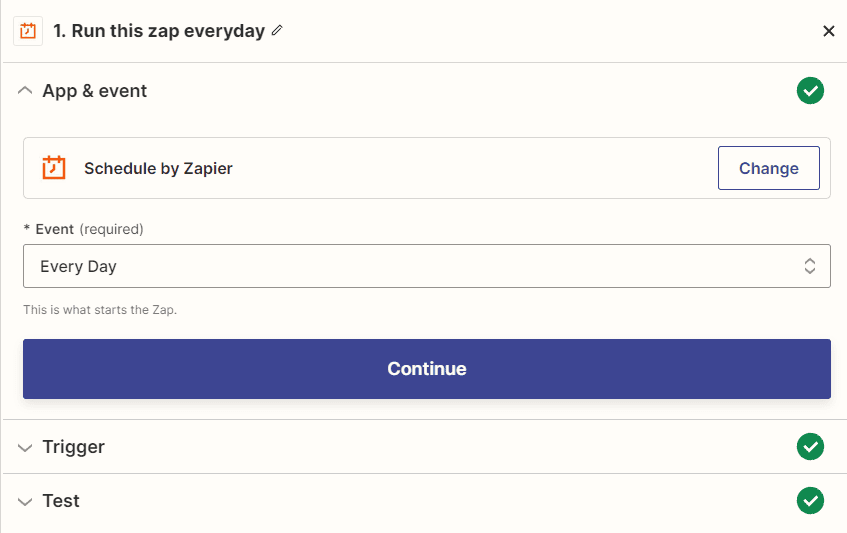
1. Setting the Stage:
To kick things off, I establish a daily routine in Zapier, defining precisely when the magic should commence.
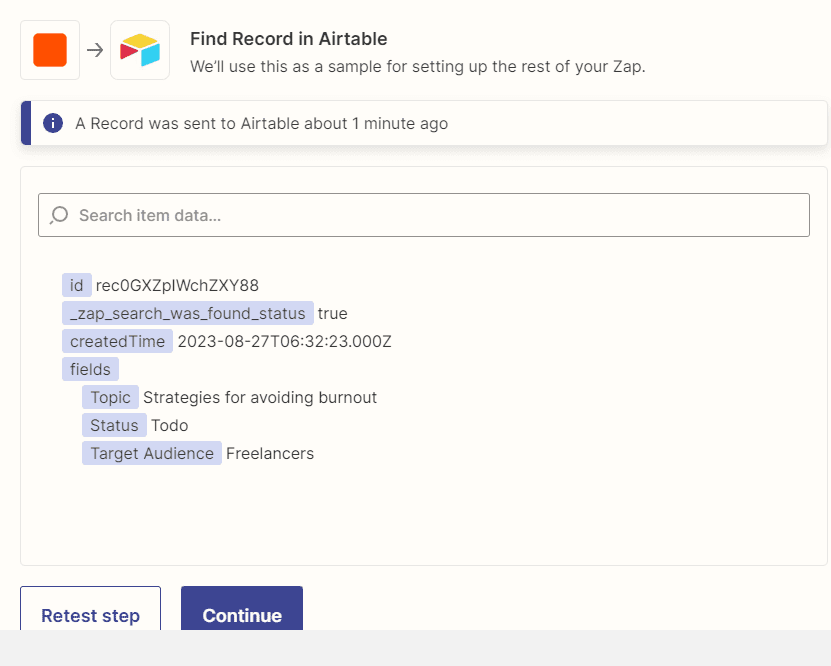
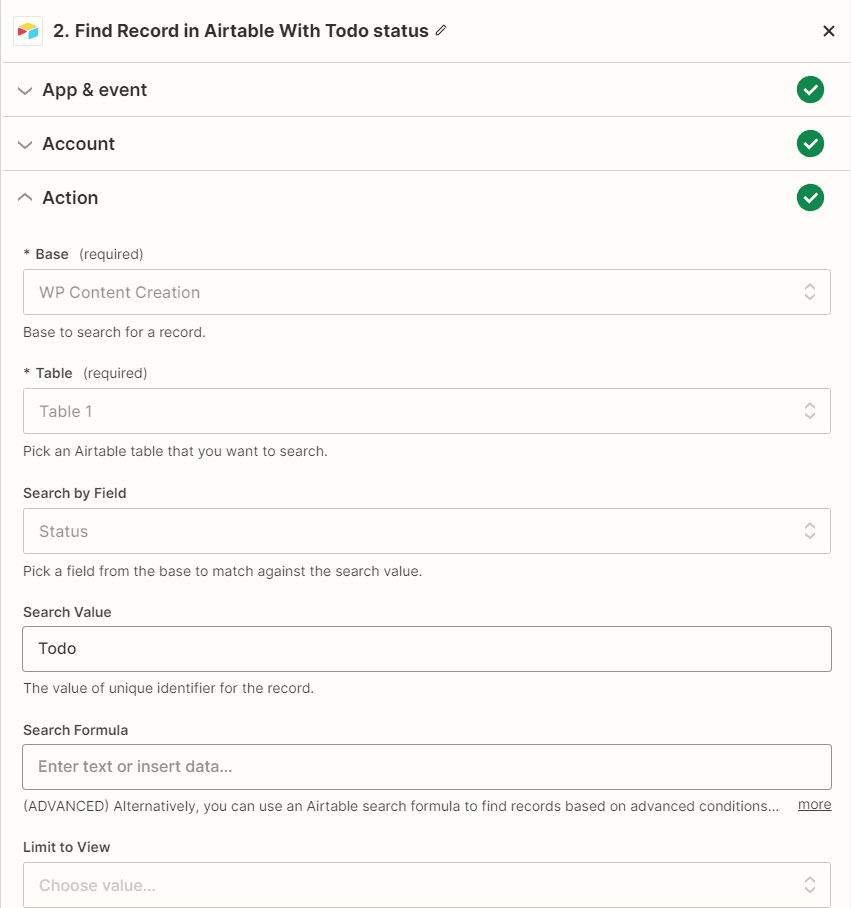
2. Scouting for Topics in Airtable:
Zapier then leverages its Airtable ‘find record’ action. Its mission? To comb through Airtable and pinpoint a topic marked ‘Todo’.

3. Drafting with ChatGPT:
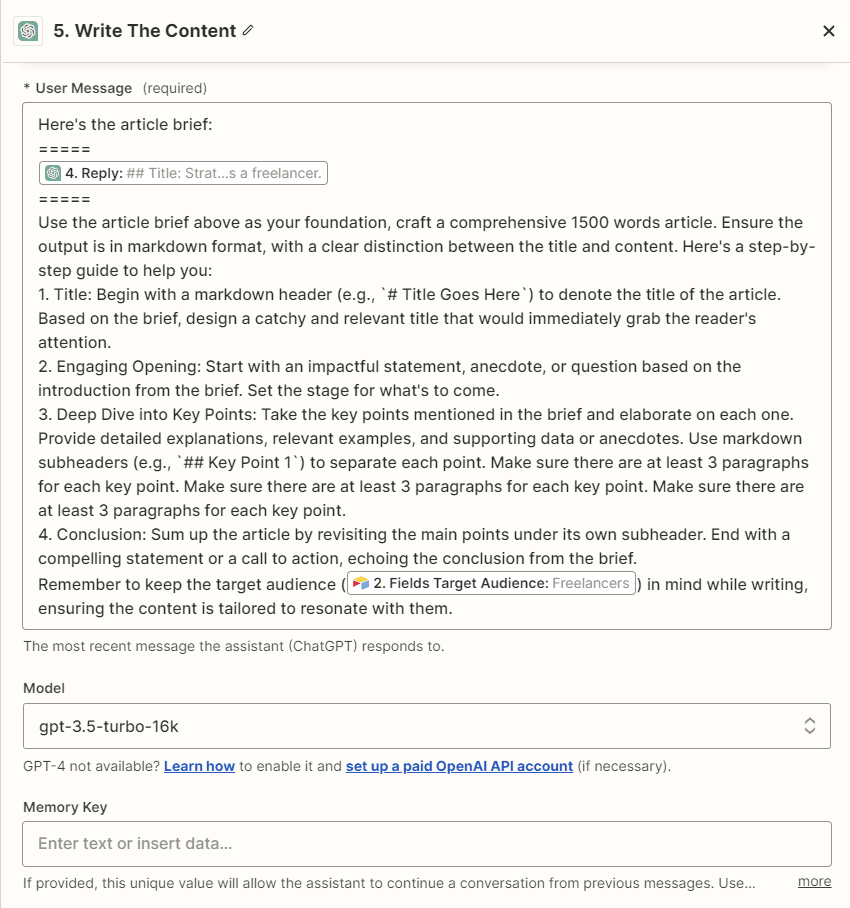
With the selected topic, we turn to our digital maestro, ChatGPT. Here, it takes on two pivotal roles:
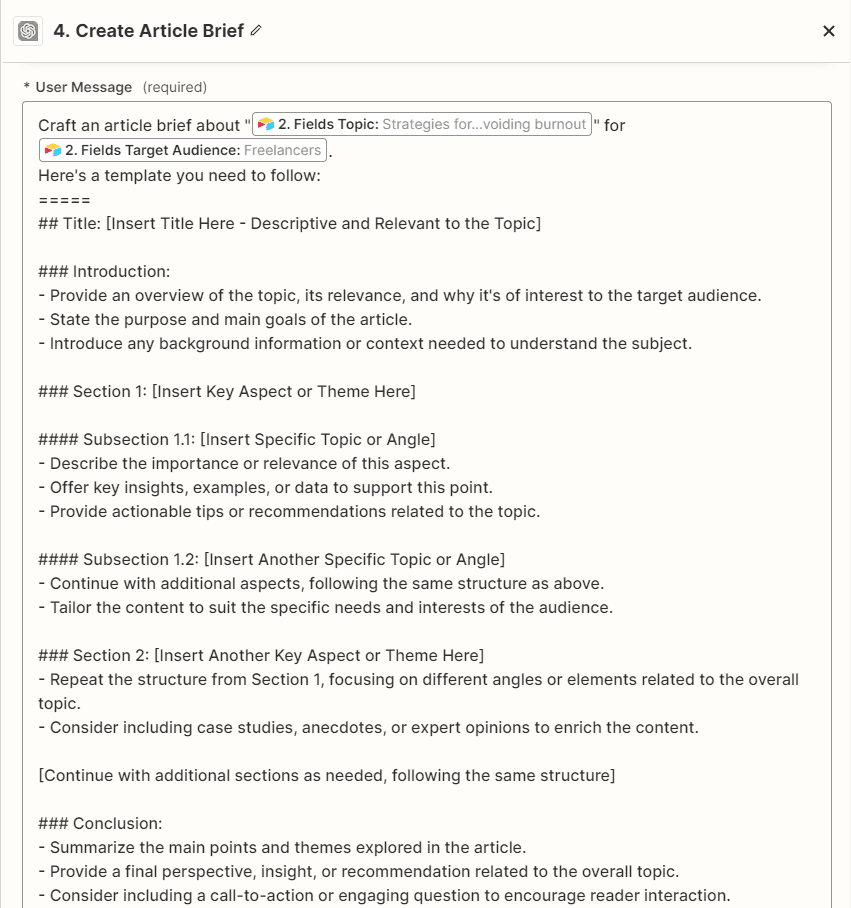
3.1 Crafting a Brief:
Using the title and target audience details, ChatGPT sketches an outline, setting the groundwork for the article.
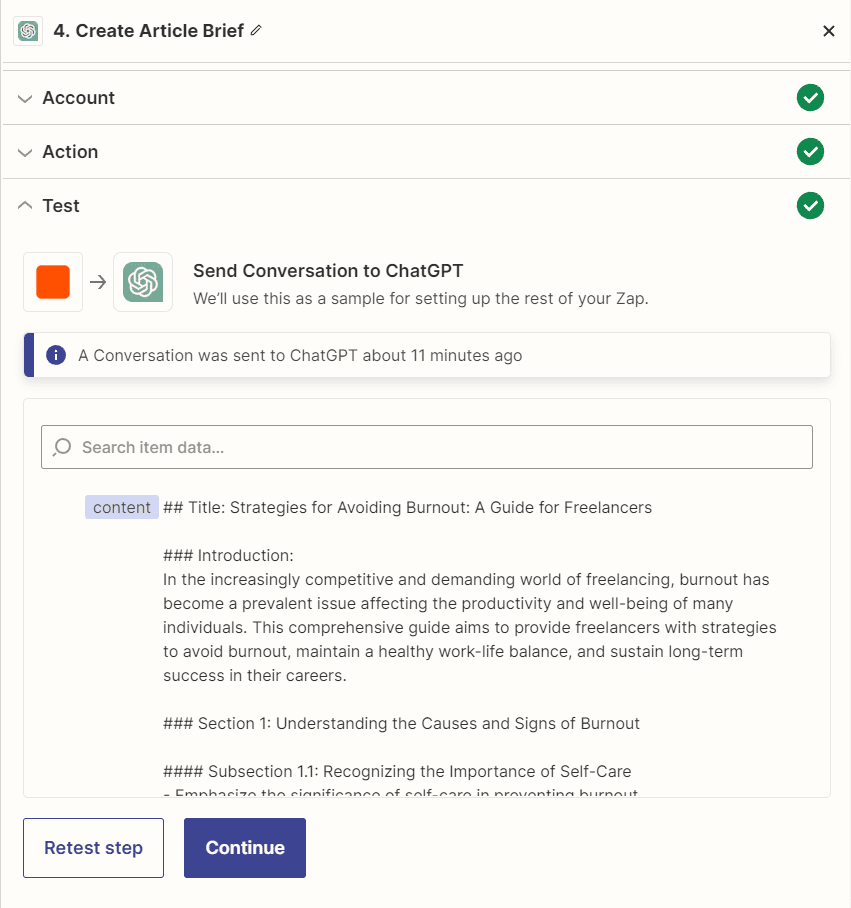
3.2 Building the Narrative:
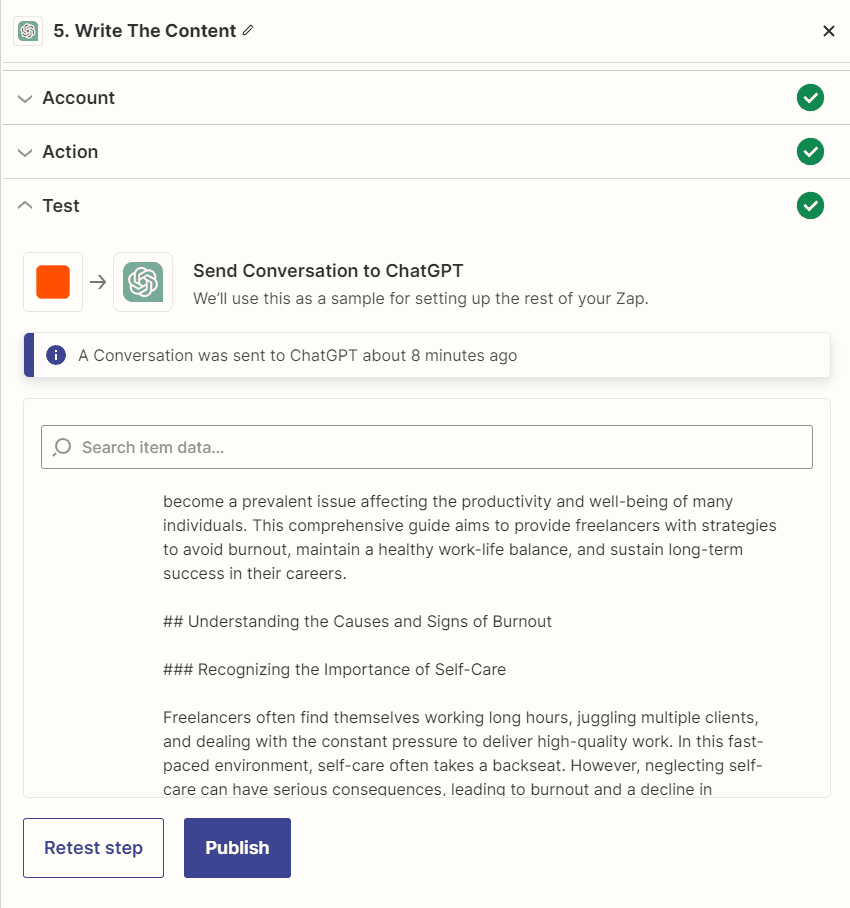
Armed with the outline, ChatGPT then meticulously crafts the full article, giving life to the idea.
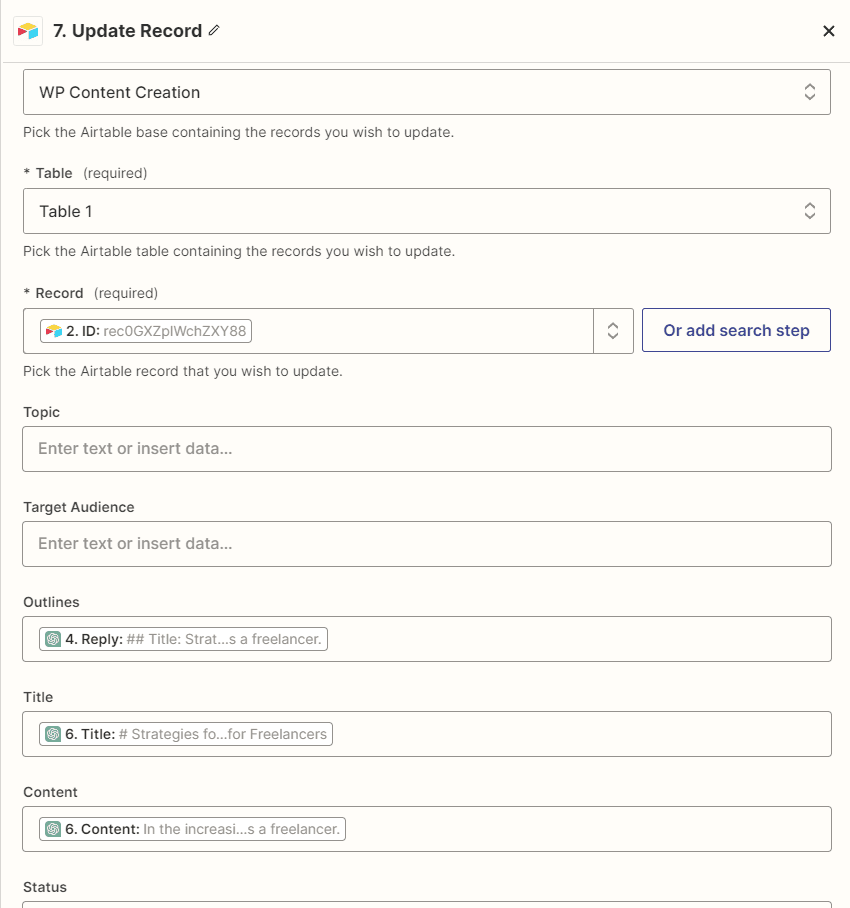
4. Organizing the Outcome:
Once sculpted to perfection, the article finds its place in Airtable—organized, categorized, and awaiting its debut.
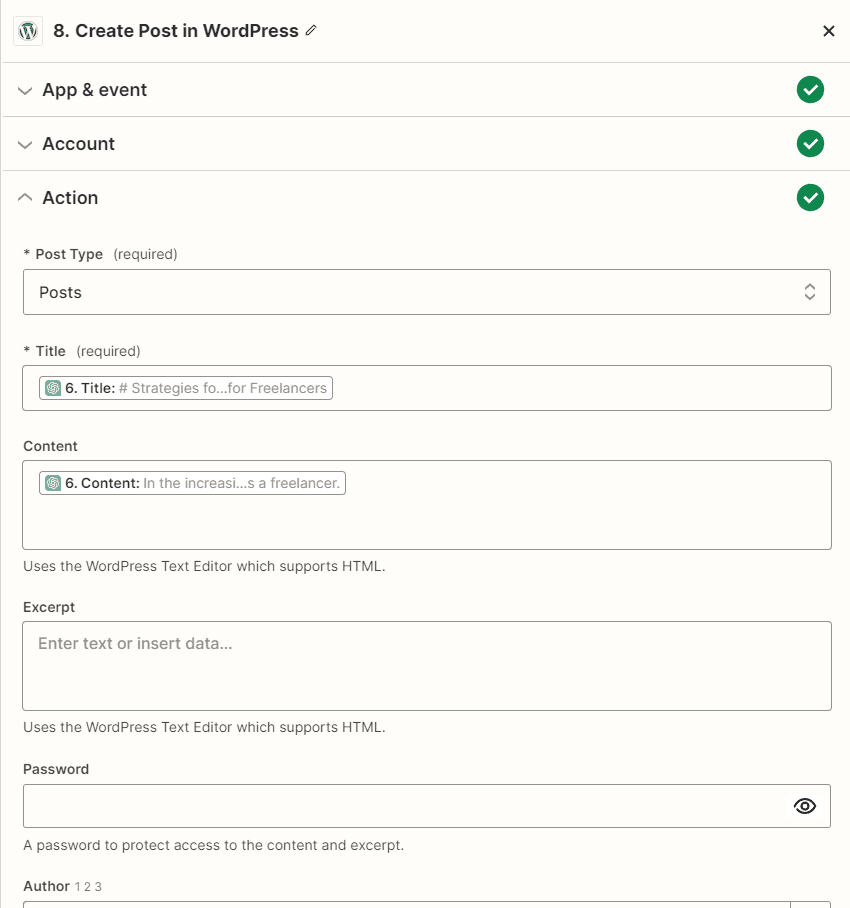
5. Publication Prelude:
The grand finale? Employing the WordPress ‘create post’ action, the article gracefully takes the stage, inviting the world to revel in its content.
To sum it up, it’s a harmonious ballet of ChatGPT, Airtable, and Zapier, synchronized perfectly to the rhythm of streamlined content creation.
Want to replicate this efficiency in your workflow? Get the full Zap template here: https://go.nathanonn.com/zap-wp-content-creation
2. Enhancing Article Quality with a Research Tool
The world of automated content creation is mesmerizing, isn’t it? But like any tool, it has its drawbacks.
Let me walk you through some challenges I’ve encountered and how I’ve worked around them.
The Problem with Solely Depending on ChatGPT
When I first began using ChatGPT, the novelty was exhilarating.
But over time, I noticed a trend. The articles, though coherent and informative, had a certain… sameness to them.
As more enthusiasts jumped on the ChatGPT bandwagon, the internet began flooding with eerily similar content.
For readers, this repetition became a bore, making them drift away.
That’s when I realized: depending solely on ChatGPT meant compromising on originality.
Incorporating a Research Phase
In my pursuit of authenticity, I realized the value of good old-fashioned research.
Just because I was automating the content creation didn’t mean I had to forgo the depth that comes from thorough study.
The strategy is simple but effective:
- Research Google based on the article’s title. This would gave us a broader perspective on what’s already out there.
- Next, summarize the crux of the top search results. This step added layers to the content, making it richer and more informative.
- From these summaries, we use ChatGPT to fish out the five most captivating tidbits related to the topic. These became the pillars of our article.
- With this foundation, we direct ChatGPT to draft an article outline, which then blossomed into the full content.
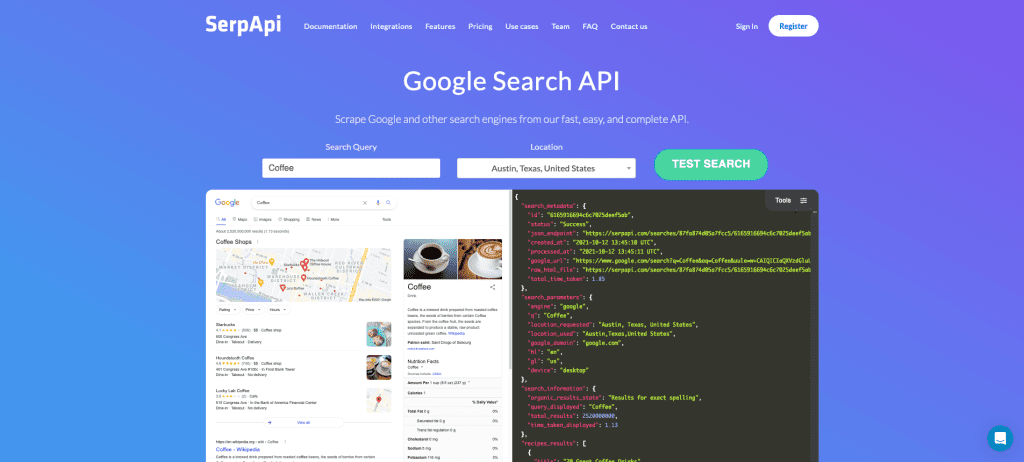
Using SerpAPI:
My secret weapon in this journey? SerpAPI. It allowed me direct access to Google’s search results. With it, I could effortlessly:
- Fetch the top 5 results related to the topic. This ensured I was capturing the most relevant content.
- Dive into these articles to distill the essence. The goal? To condense the key insights from these pieces.
- The best part? I didn’t have to do this manually. With the help of Zapier, these tasks were automated, further streamlining my workflow.
if you copy from one author, it’s plagiarism, but if you copy from many, it’s research.
Wilson Mizner
Step-by-Step Zapier Setup for Research Integration
Let’s dive deep into the nitty-gritty of the setup. Trust me, it’s simpler than it sounds!
Getting Started with SerpAPI
To commence our research, SerpAPI is our tool of choice. So, first things first, sign up for a free account on SerpAPI and secure your API key.
While there are different plans, their free plan, which allows up to 100 searches a month, is more than enough for our needs.
Setting the Foundation in Zapier
With our SerpAPI account ready, it’s time to sculpt our Zap.
Step 1: Kick-Start with a Schedule:
Just like before, we begin by setting a daily trigger in Zapier.

Step 2: Fetch the Topic from Airtable:
Remember our Airtable setup from before? Tap into that, pulling out the topic you’ve slated for the day.

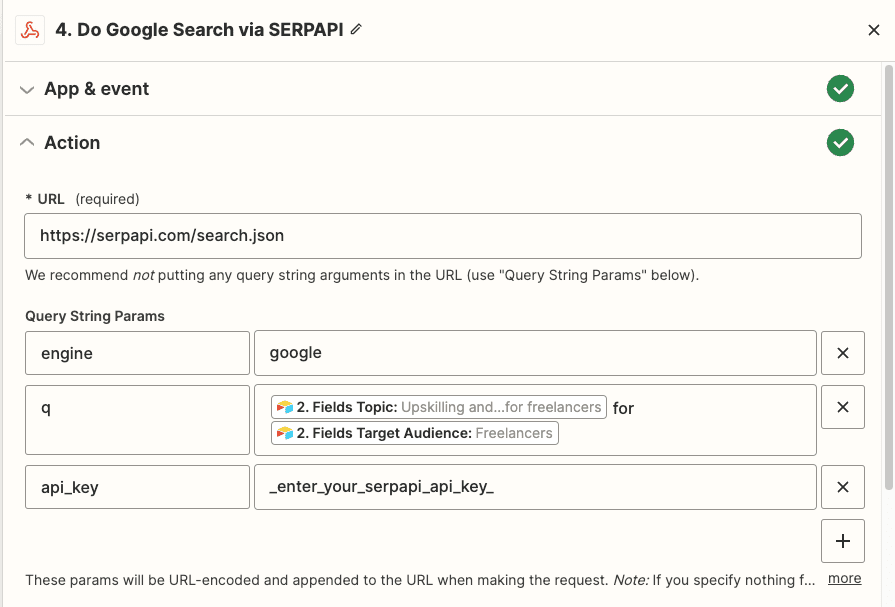
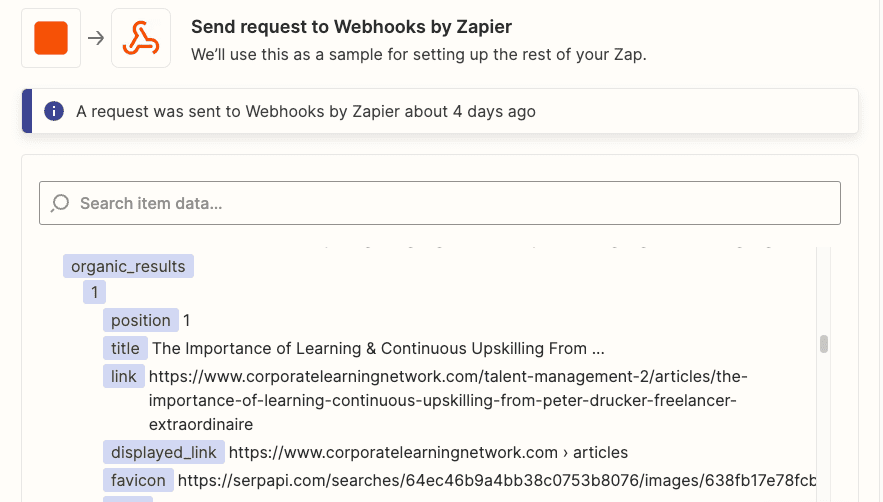
Step 3: Integrate SerpAPI via Webhook:
Set up a Webhook in Zapier that taps into SerpAPI. This will fetch Google search results based on our topic. My personal preference is to limit it to the top 5 results. However, if you’re feeling ambitious, you can stretch it to 10. But beware of information overload!
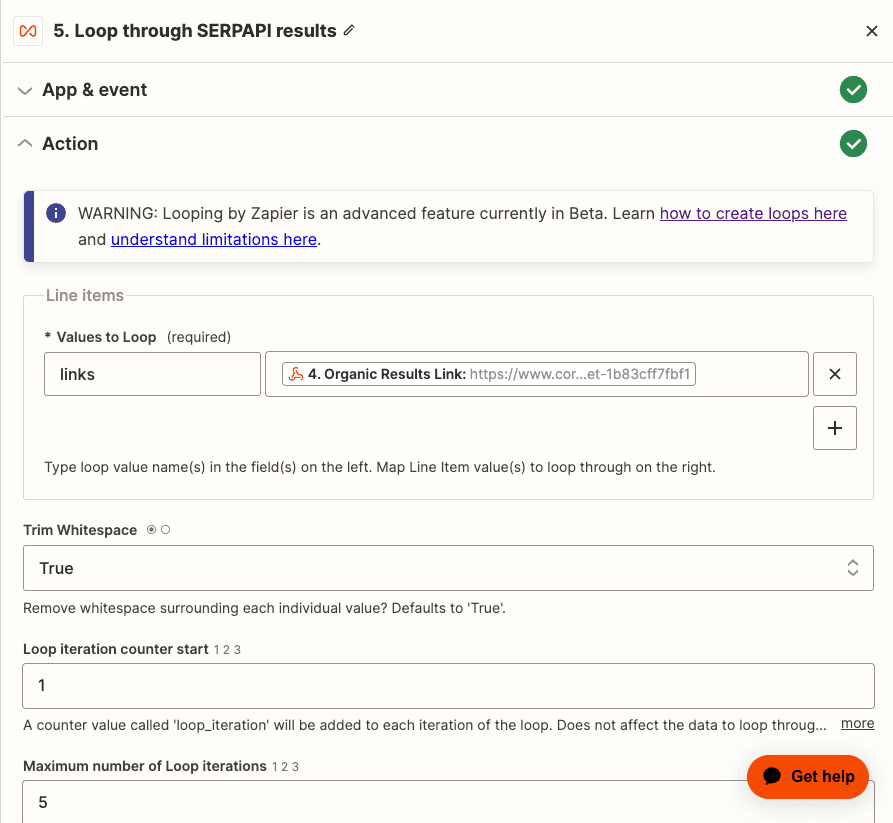
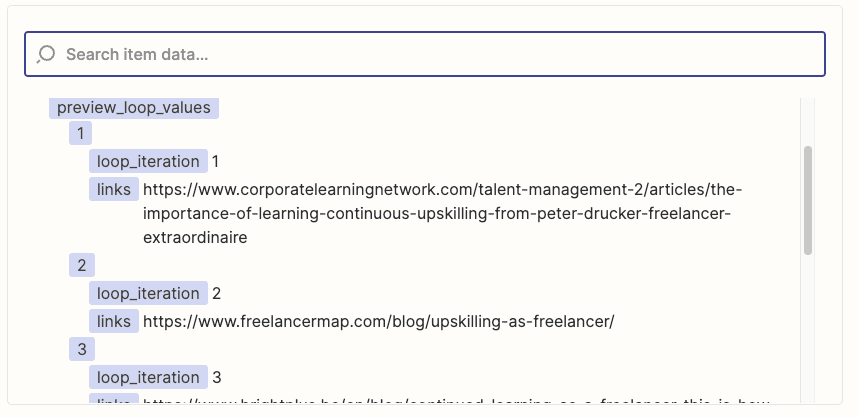
Step 4: Loop Through Each Result:
With our results in hand, it’s time to delve deep into each one.
But first, a tiny adjustment.
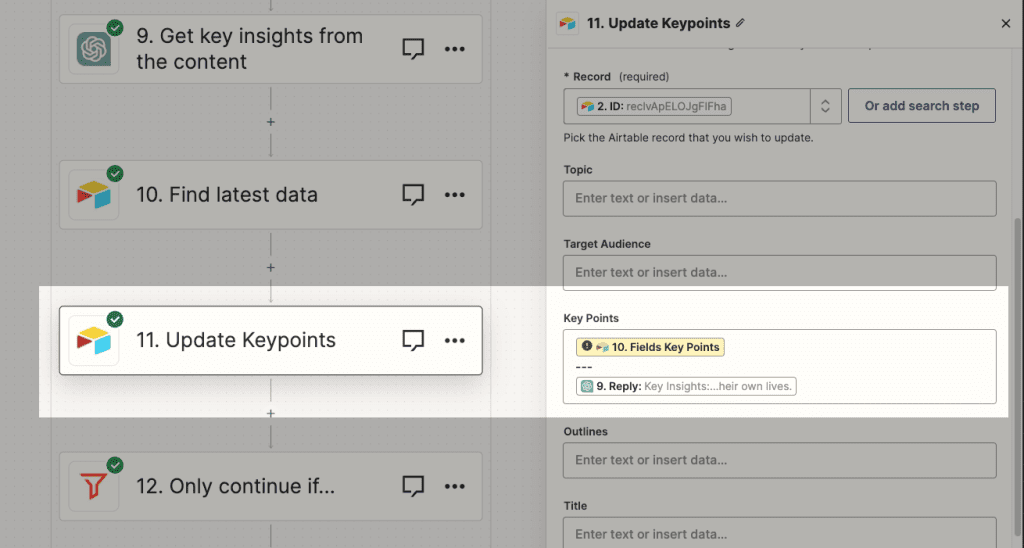
Swing back to Airtable and add a new column, designated for the key insights we’re about to extract from the sites.

Then, we proceed to setup the loop.
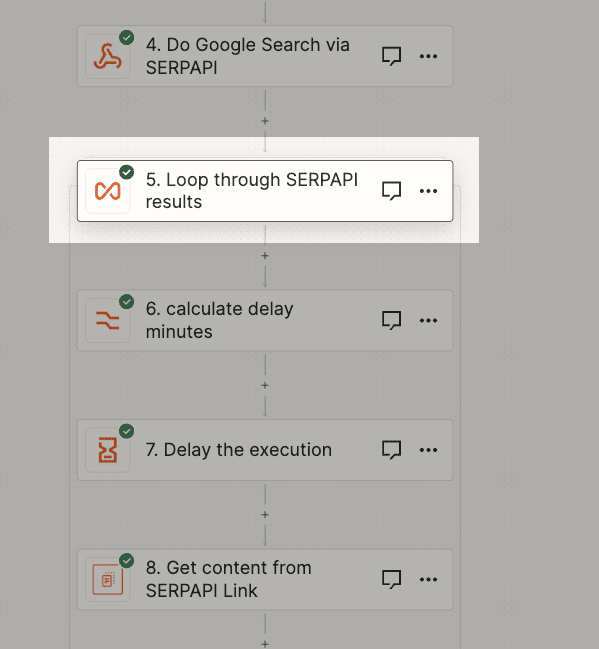
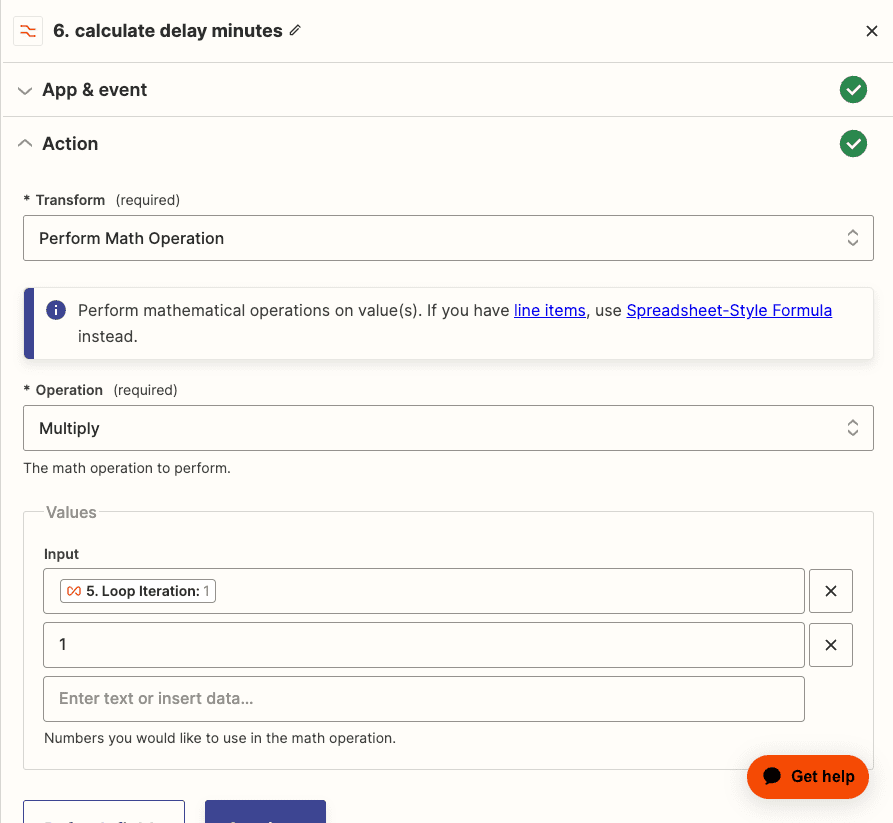
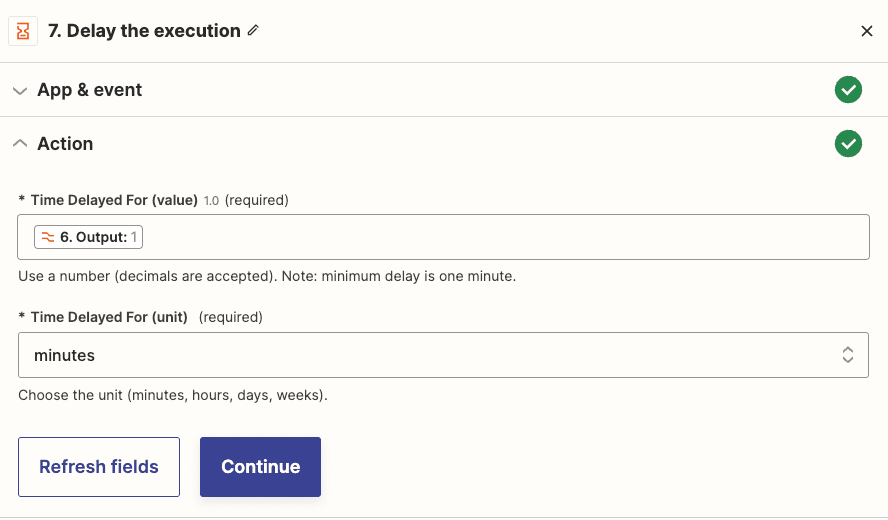
Step 5: Set the Tempo with a Delay:
Automation is quick, but let’s not get our wires crossed.
Inject a slight delay in Zapier to ensure smooth execution and avoid any overlapping actions.
Step 6: Web Parsing and Content Extraction:
This is where the magic happens.
Employ “Web parser by Zapier” to mine the content of each website.
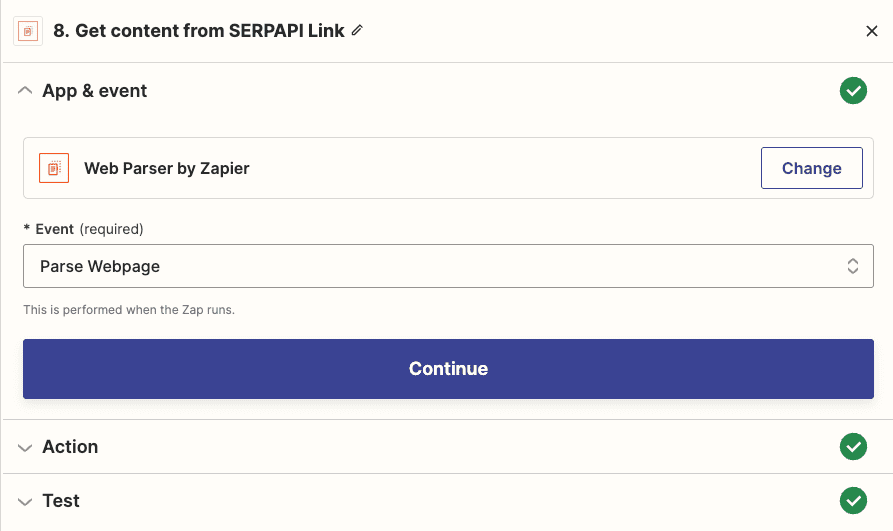
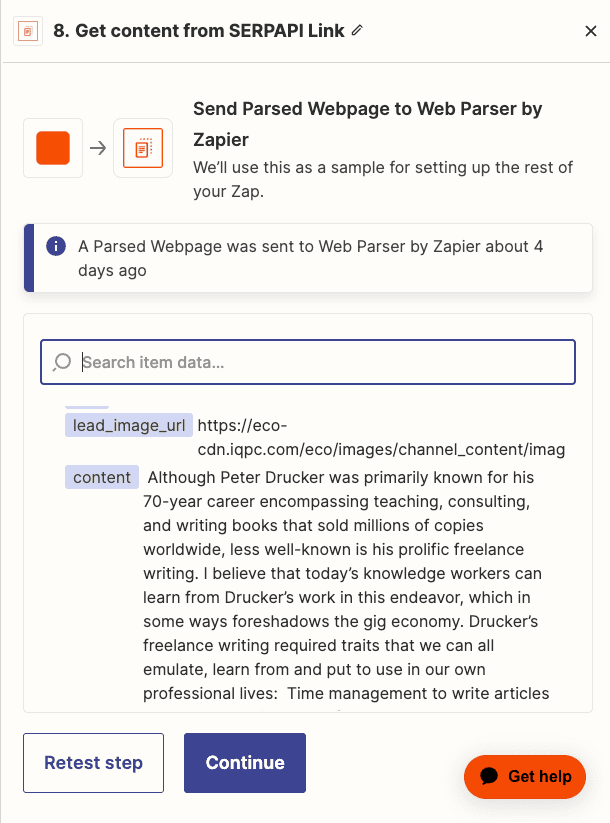
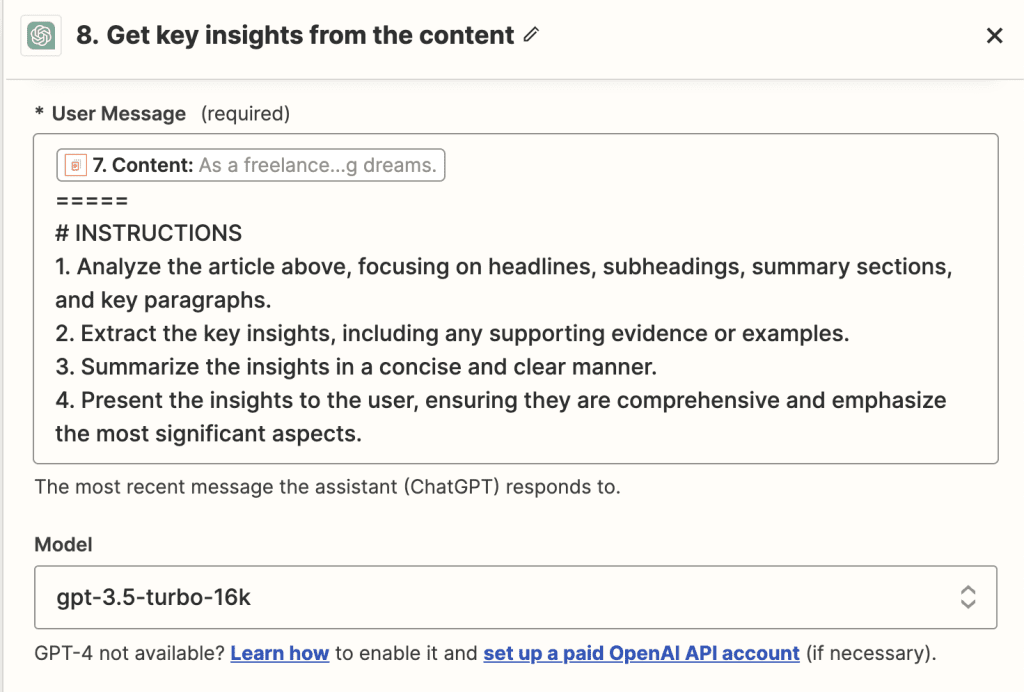
Following this, fire up ChatGPT, directing it to sieve out the key points from the extracted content.
Step 7: Seamlessly Update Airtable:
Before feeding our newfound insights into Airtable, I pull the latest content data. This ensures we’re adding to it, rather than inadvertently replacing anything. As we’re looping, this step is crucial to maintain data integrity.
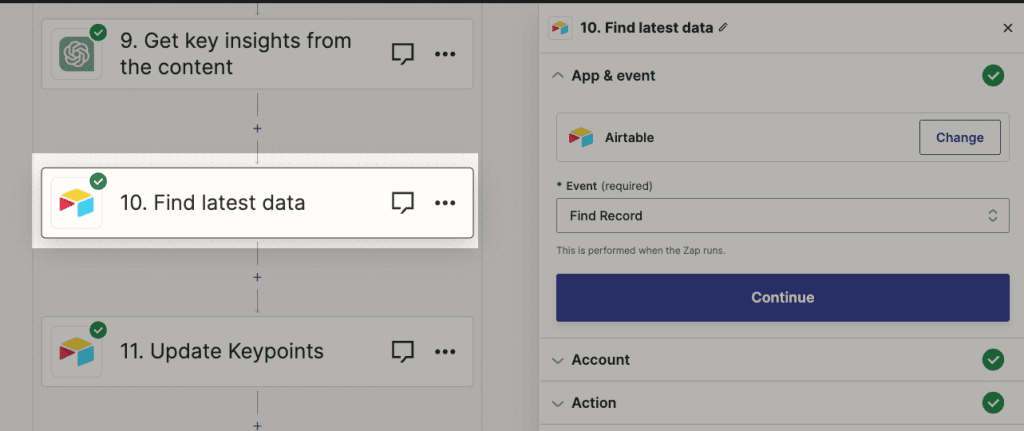
Then, only we update it to Airtable.
Step 8: A Checkpoint with a Gate:
Automation is smart but needs guidance. I set up a gate that checks if our loop has concluded. Only post this check, the next steps proceed.
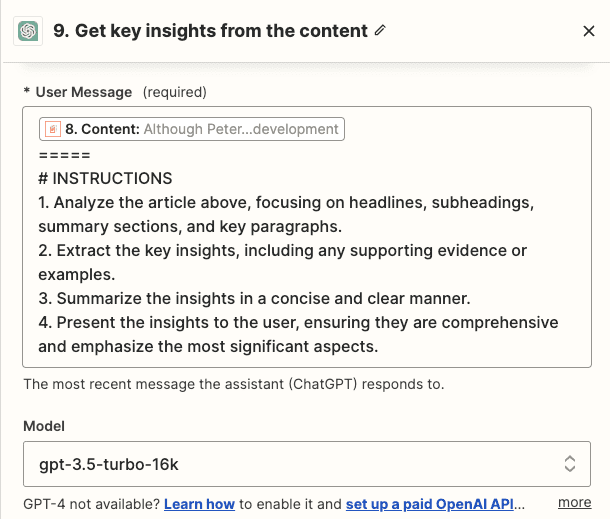
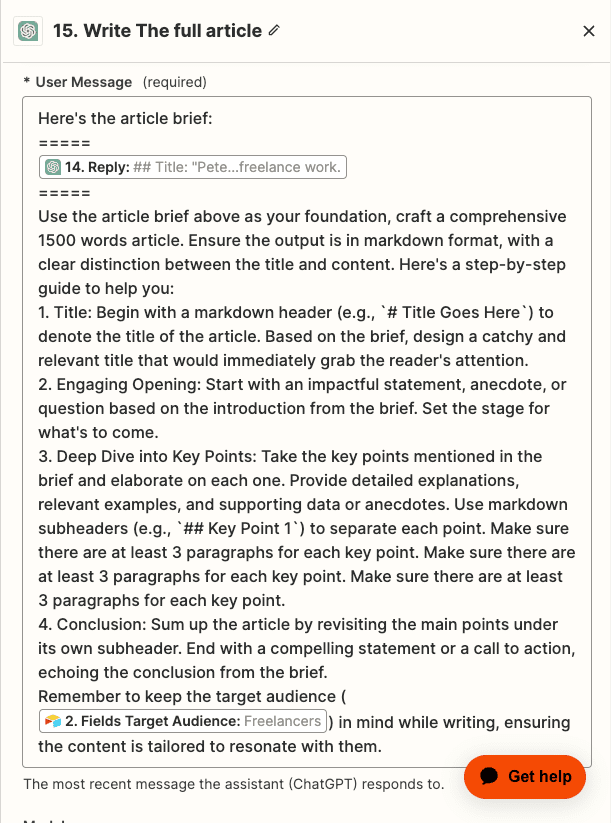
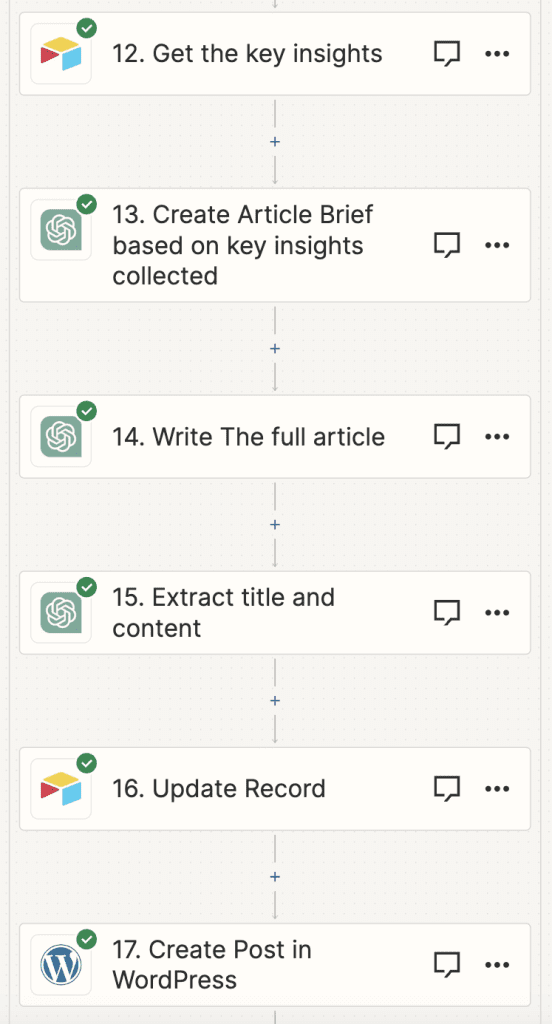
Step 9: Drafting the Masterpiece with ChatGPT:
Now, with a treasure trove of key points in hand, I again turn to ChatGPT.
First, it crafts a comprehensive article brief based on the gathered insights.
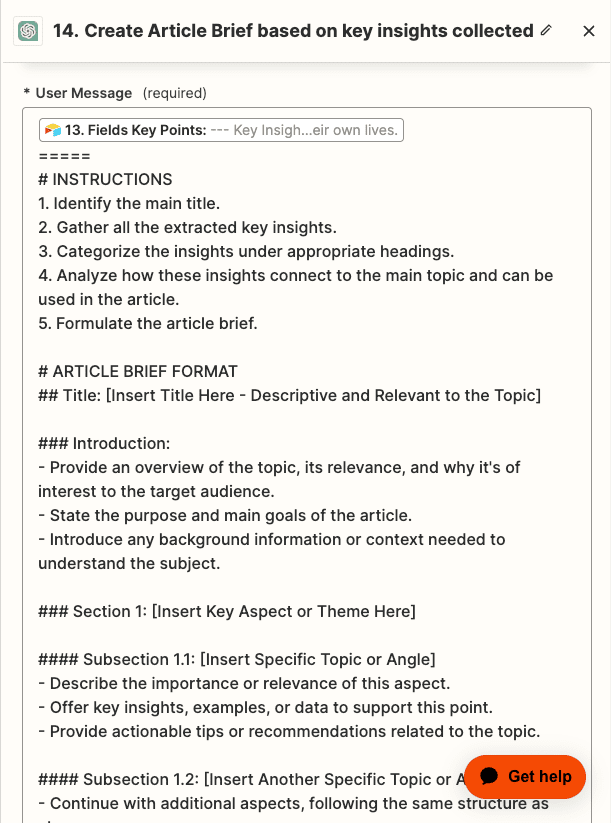
This brief then acts as the muse for ChatGPT to compose the final, polished article.
Step 10: Final Touches and Publishing:
Once our article is ready and brimming with insights, I save it in Airtable.
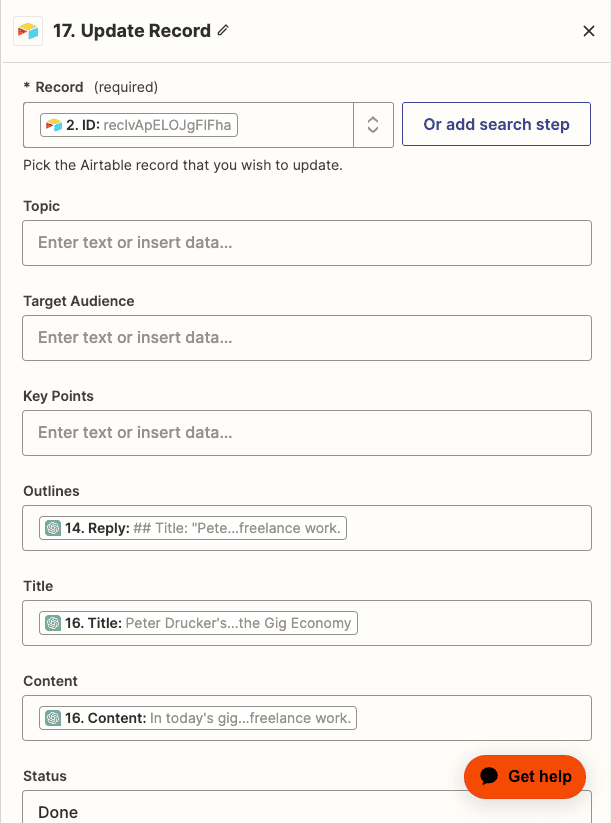
And the grand finale? A seamless publish onto our WordPress site.

And there you have it!
A blend of automation with in-depth research, ensuring our content remains fresh, insightful, and engaging.
Want to replicate this Zapier workflow? Get the full Zap template here: https://go.nathanonn.com/wp-content-creation-research
But, is that all?
3. Providing Directed Research for Better Content
The Issue with Open-ended Web Hunts
I’ve come to realize that when I use ChatGPT for broad web searches, it occasionally brings in content that falls short of the mark.
There’s a saying: “garbage in, garbage out”.

And in content creation, that’s something I really want to avoid.
The Way Forward
Instead of sending ChatGPT on a blind quest across the web, I believe in a more structured approach, which is provide links to research.
Step 1: Storing Tailored Research Links in Airtable:
In our trusty Airtable, I create a distinct column dedicated for links.
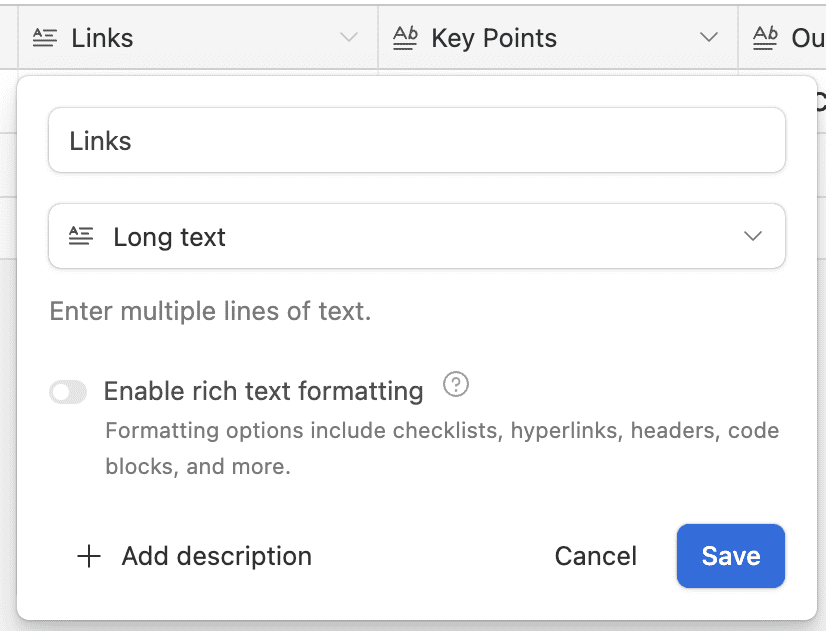
These are my chosen treasure troves of information. For simplicity, I make sure each link occupies its own line, making it easier to navigate and process.
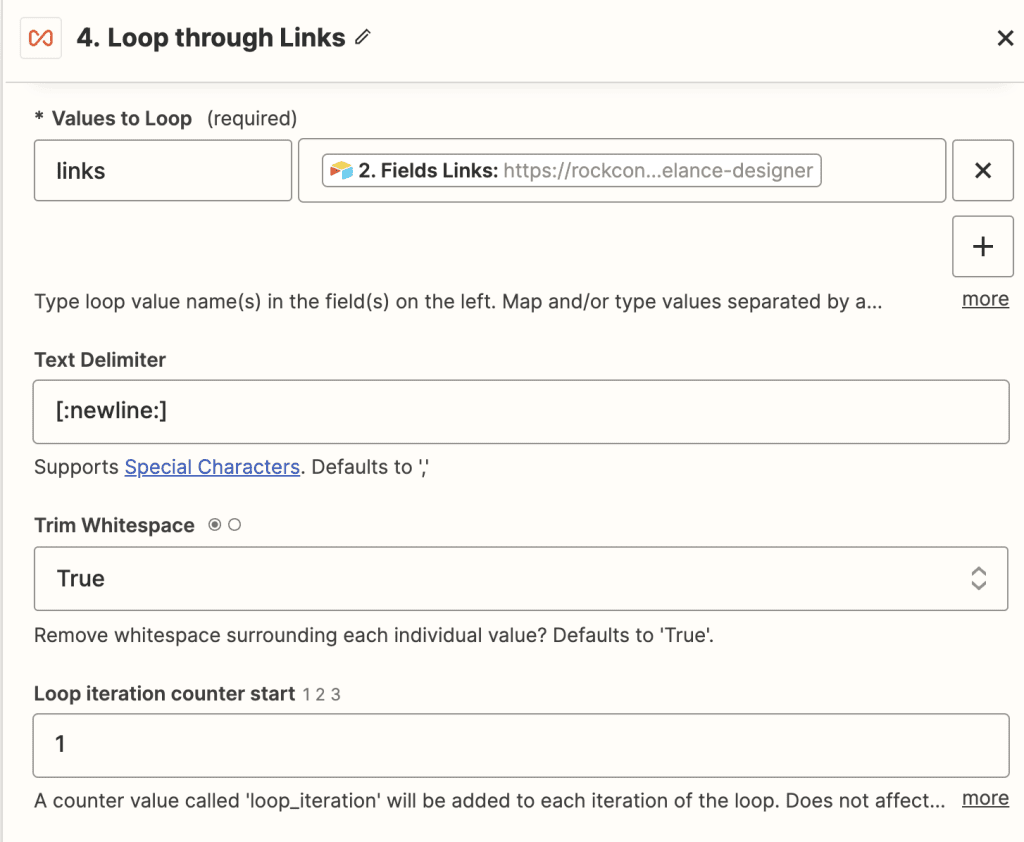
Step 2: Zapier’s Role in Content Extraction
With the links set, I configure Zapier to pull content from each one.

Step 3: Getting ChatGPT’s Expertise:
Once the content is in, it’s over to ChatGPT to work its magic. It crisply summarizes the content, distilling it into easily digestible chunks.
Step 4: Continuing with Our Proven Process:
From here, it’s familiar territory. I follow the same steps we discussed earlier to craft our article.
Why Choose This Route?
One might wonder, why not just let the tool scavenge the web? Why personally select links?
- Chasing Uniqueness and Quality: If I’ve learned one thing, it’s that to stand out, you’ve got to put in the work. Who wants to read the same old rehashed content, right?
- Avoiding the Trap of Generic Content: It’s easy to fall into the trap of generic content when automating. By handpicking research links, I ensure my articles have a fresh and distinct voice.
- Maximizing Automation Without Compromising Quality: I’ve gone lengths to automate what I can. The only piece I ardently insist on is feeding quality links. And trust me, that bit of effort is absolutely worth it.
While the automated route is enticing, a touch of manual intervention, in the form of quality links, ensures that our content stands a head and shoulders above the rest.
Want to replicate this Zapier workflow? Get the full Zap template here: https://go.nathanonn.com/content-creation-directed-research
In our journey through automating content creation, it’s become clear to me that while technology can do wonders, the human touch remains irreplaceable.
We’ve harnessed the power of ChatGPT, integrated it with tools like Zapier and Airtable, and discovered ways to streamline the process.
Yet, the essence of high-quality content lies in the personal choices we make: from selecting the right topics to handpicking research links.
Automation, in essence, is a tool, not a substitute. I truly believe that it’s the balance between automation and human insight that creates content which resonates, informs, and stands out in the vast sea of information.
As we continue to explore and innovate, always remember that it’s our unique perspective and diligence that make our content truly special.
Automation #2: Content Marketing Automation for Effortless Promotion
After crafting quality content, the next natural step in my process is spreading the word.
In today’s digital age, having an automated system to push your freshly minted articles onto platforms like LinkedIn, Twitter, or Facebook is, I believe, an indispensable tool.
For illustrative purposes, let’s dive into automating content promotion on LinkedIn, though the principles apply to any social platform.
Setting Up Your Content Broadcast on LinkedIn
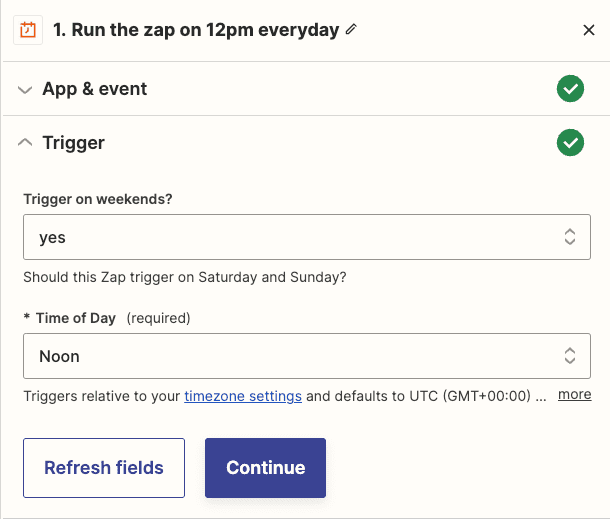
From my experience, timing plays a significant role in content marketing.
Say you publish at 10am; it’s often beneficial to stagger your promotional efforts. That’s why I suggest launching your LinkedIn promotion around 12pm, giving a two-hour window.
The gap isn’t set in stone; it merely provides breathing space and ensures the content is live and accessible.
Initiating the Automated Marketing Process:
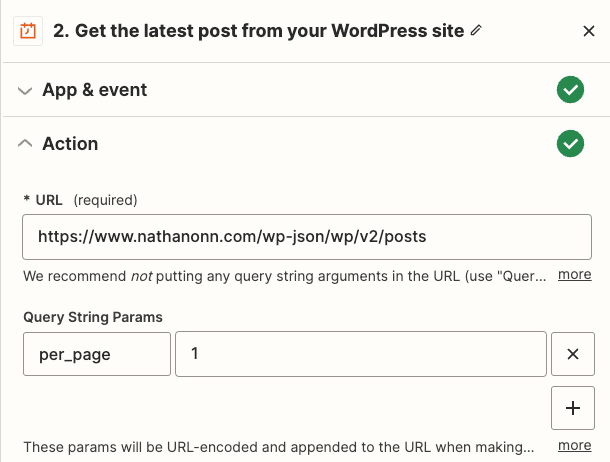
Step 1: Content Retrieval:
At 12pm, the automation tool (Zapier) gets to work, pulling the content you’ve put out two hours prior.
This ensures that it’s fetching your latest work.
Step 2: Crafting the Social Media Post:
Utilizing the content, I turn to ChatGPT to create a captivating LinkedIn post.
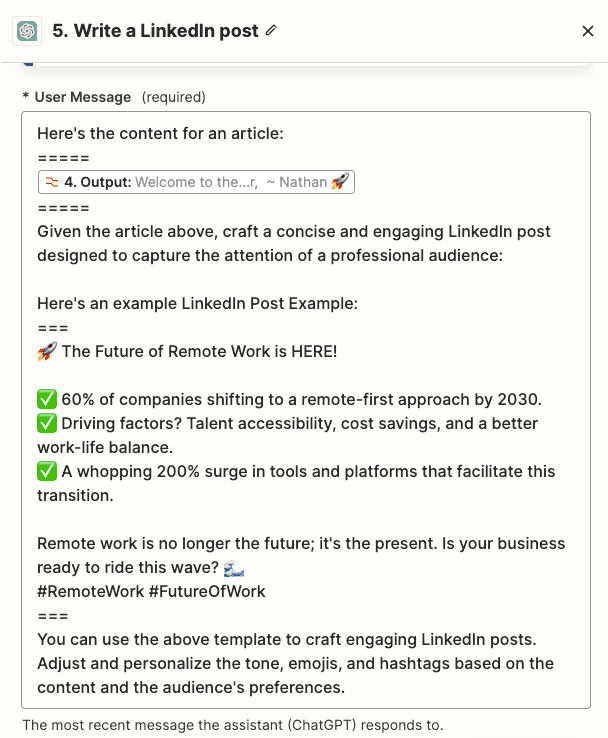
This isn’t about regurgitating the article, but more about teasing the content, making it irresistible for your LinkedIn audience.
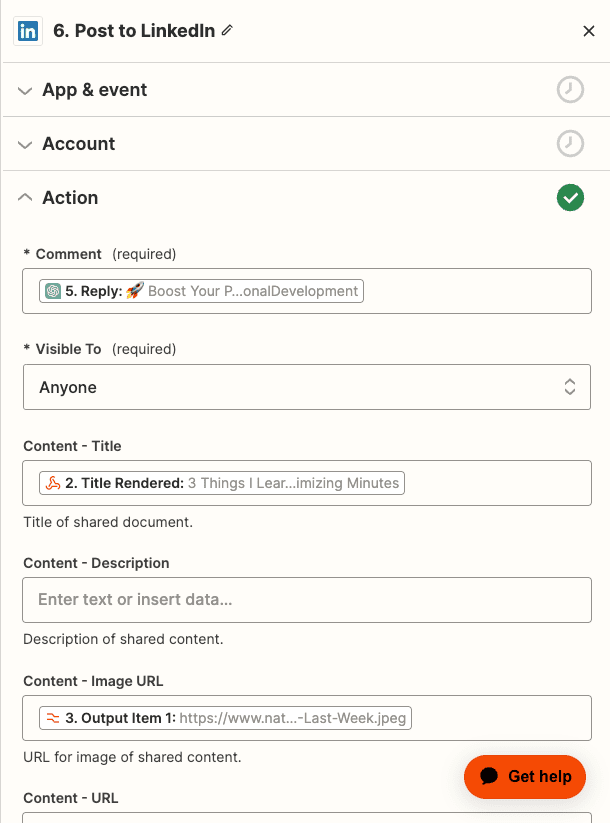
Step 3: Posting with Precision:
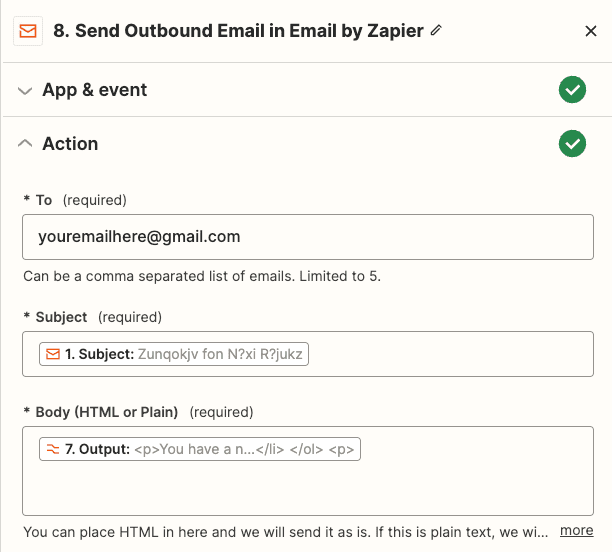
With our post crafted, it’s paired with the article’s link and any relevant imagery. This combined package is then auto-posted to LinkedIn, doing away with manual posting.
If you’re anything like me and want to amplify your content’s reach, consider setting up similar automations throughout the day.
By resharing your content at different times, you increase its visibility and potential impact.
Remember, the world of social media is vast, and to ensure you’re heard, sometimes it’s worth repeating your message.
Want to replicate this Zapier workflow? Get the full Zap template here: https://go.nathanonn.com/wp-content-marketing
Automation #3: Filter out Spammy emails from
Your WordPress Contact Form Using ChatGPT API
When we talk about managing a WordPress website, there’s one area where many people, including me, often face challenges: managing emails from the contact form.
With an influx of unsolicited and irrelevant messages, it’s easy to drown in the noise.
From my personal experience, it’s crucial to automate email classification.
Let me walk you through the reasons and the steps to set up such a system using ChatGPT API.
Why We Need Email Classification
I’ve always believed that a contact form is a double-edged sword.
On one hand, it’s a channel for genuine visitors to get in touch. On the other, it’s an open invitation for a deluge of irrelevant emails.
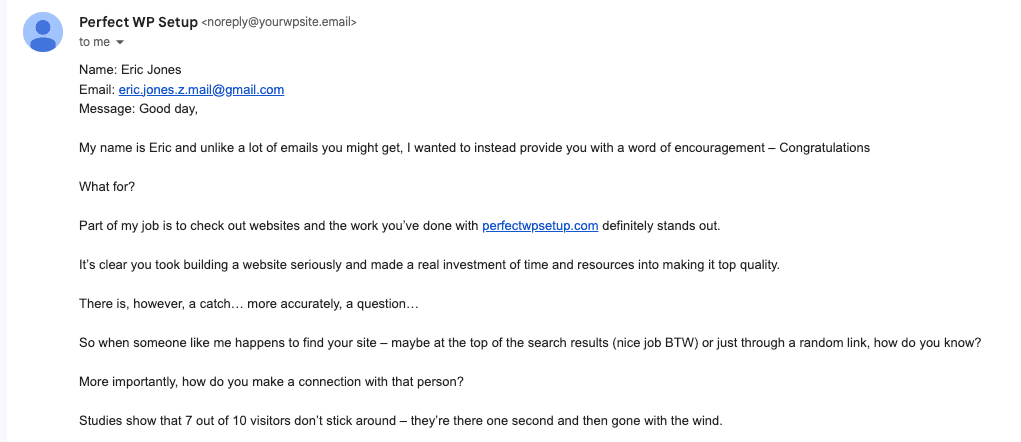
And while tools like reCAPTCHA are powerful against bots, they’re helpless against humans manually typing in their spammy pitches, like those notorious SEO or graphic design service offers.
To me, using a spam classifier isn’t just about decluttering; it’s about respect for our time, maintaining our professional image, and safeguarding our systems.
By filtering out the fluff, we ensure that we’re only giving attention to the messages that genuinely deserve our time.
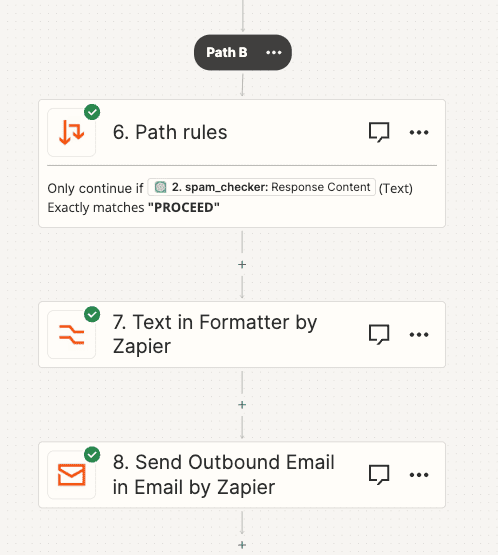
Step 1: Initializing Your Contact Form with the Spam Detector
Imagine each time someone sends a message through your form, ChatGPT acts as a diligent watchman, instantly gauging the essence of the message.

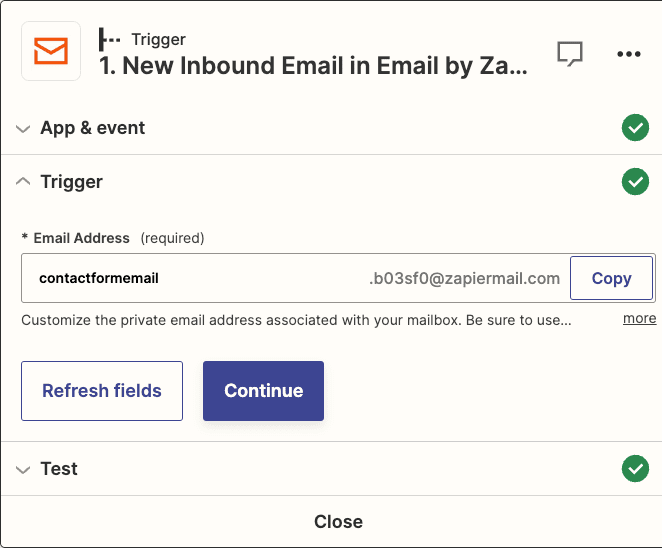
To begin, redirect all incoming emails from your contact form to a specific Zapier email. You’ll do this using the Email by Zapier trigger.
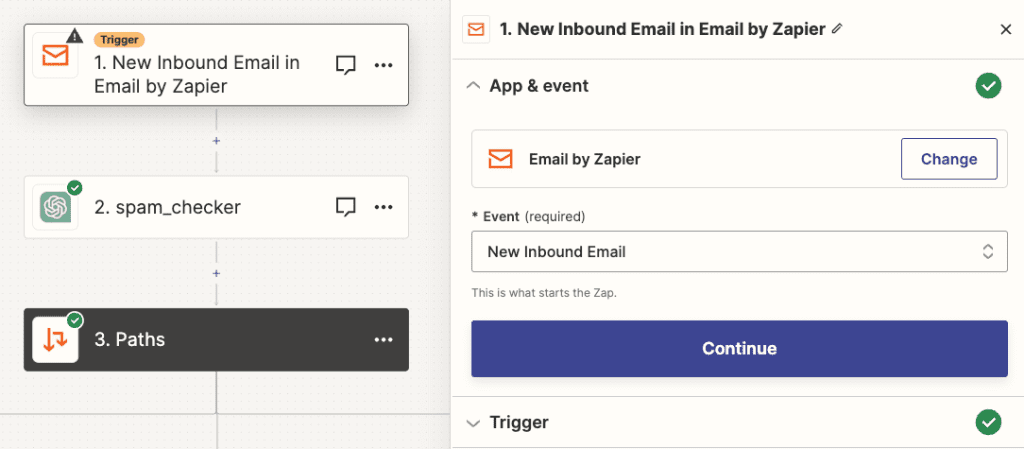
Step 2: Efficiently Processing Classified Emails
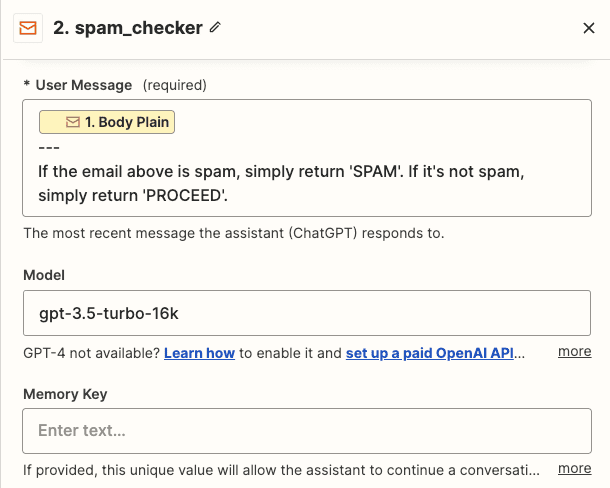
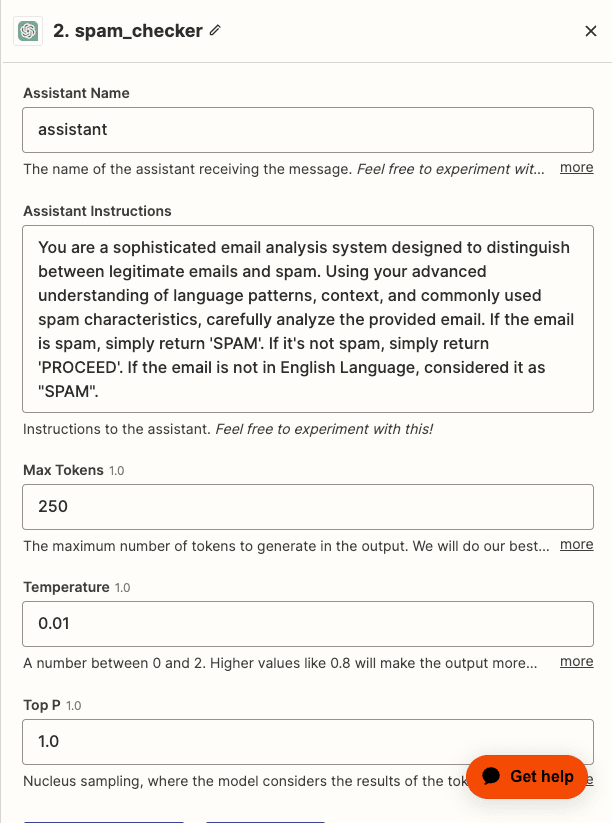
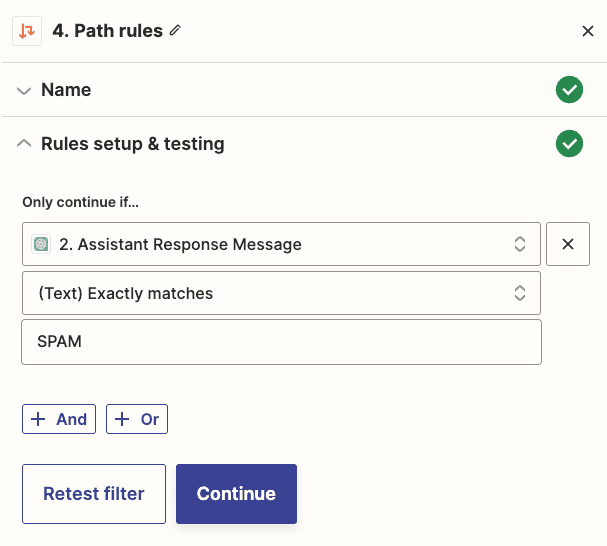
Guide ChatGPT to meticulously scan and assess each incoming email.
Upon ChatGPT’s evaluation, your next move depends on the categorization of the emails.
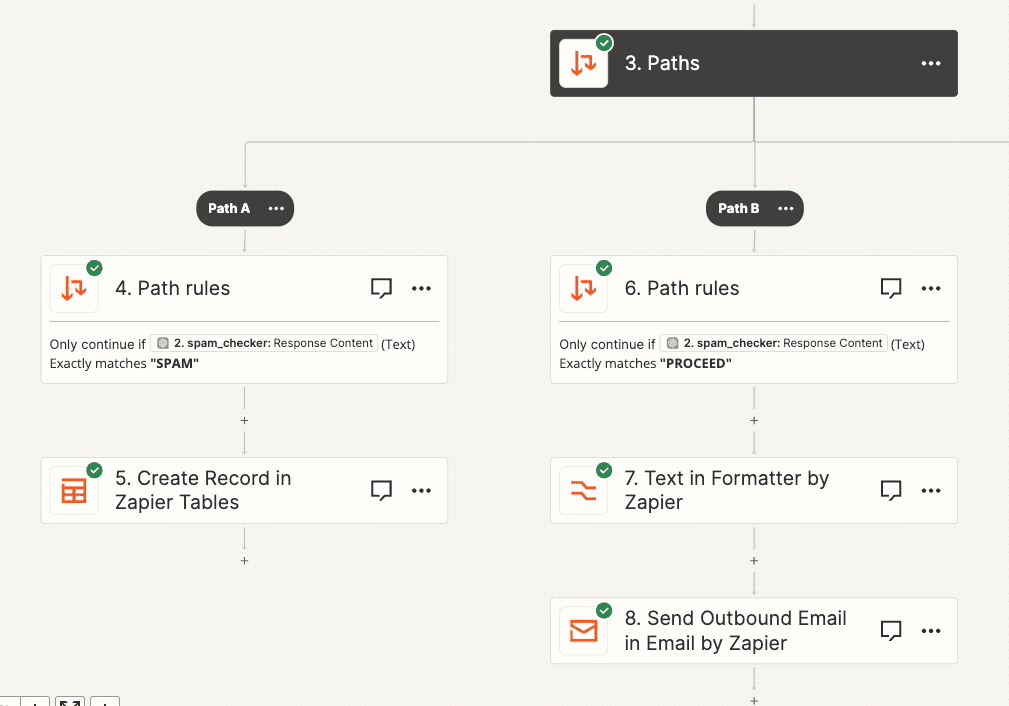
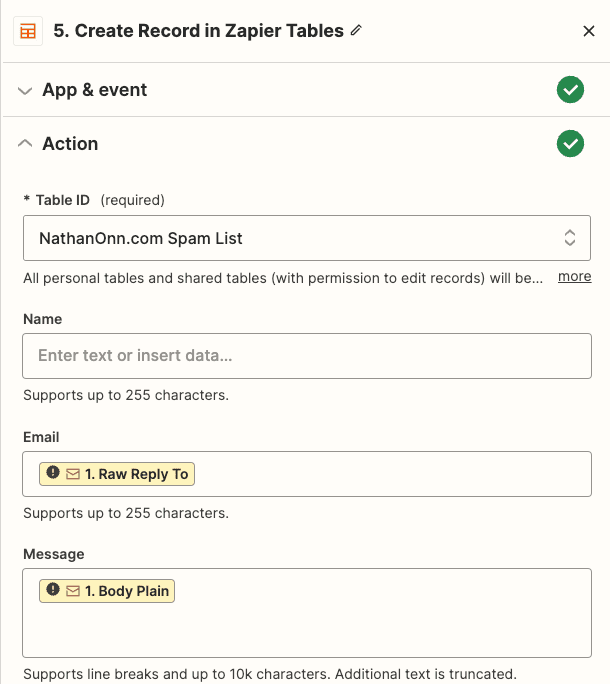
When tagged as SPAM: Swiftly divert these emails to a designated “dump list.” I recommend housing them temporarily on platforms like the zapier table, airtable, or Google sheets for convenience.
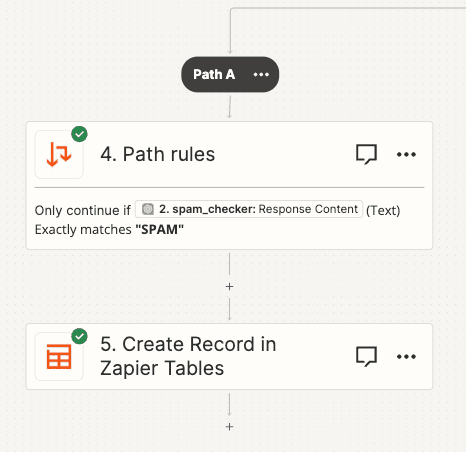
Even top-tier AI can occasionally make mistake. Therefore, by maintaining this secondary storage, you’re safeguarding against potential oversights and missed crucial communications.
Note: you can setup another zap to flush the dump list every month to make sure it isn’t overflow.
When tagged as PROCEED: These are the messages you’ve been waiting for! Make sure these invaluable communications are channeled straight to your main email account.
This system not only streamlines your primary inbox but also ensures you’re consistently exposed only to pertinent content.
In wrapping up, I feel it’s essential to state the transformative power of automating your email classification on WordPress with ChatGPT.
It doesn’t just make life easier; it adds efficiency, effectiveness, and a touch of elegance to managing your digital communications. Give it a shot and experience the difference!
Automation #4: Your Very Own WordPress Assistant Powered by ChatGPT
Have you ever fantasized about having an AI assistant handle tasks for your WordPress website?
Well, it’s not just a dream anymore. By integrating ChatGPT into your WordPress site, you can simplify tasks, save time, and enhance efficiency.
Picture this:
- Adding new user accounts, no WordPress login needed.
- Installing or updating themes and plugins—without even going to WordPress.
- Easily composing and updating blog posts.
- Tweaking settings without diving into complex dashboards.
- Executing advanced tasks with straightforward, conversational cues.
All these and more are possible with AI doing the hard work.
So, how does this magic happen?
Let me explain.
How ChatGPT Talks to WordPress
Ever wondered how you could command ChatGPT via a platform like Slack, and by doing so, direct activities on your WordPress site?
Note: This explanation will focus on Slack, but rest assured, other platforms like Discord or Telegram can also do the trick.
When you command ChatGPT via Slack, it interprets your intent. Depending on the command, it interacts with the relevant WordPress component.
For instance:
Create a new user with the details:
Email: adminemail@gmail.com
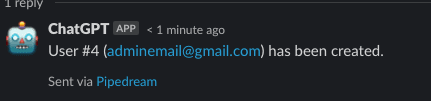
Role: adminChatGPT analyzes this, decides which WordPress segment to interact with, and processes accordingly. You’ll then receive a response:
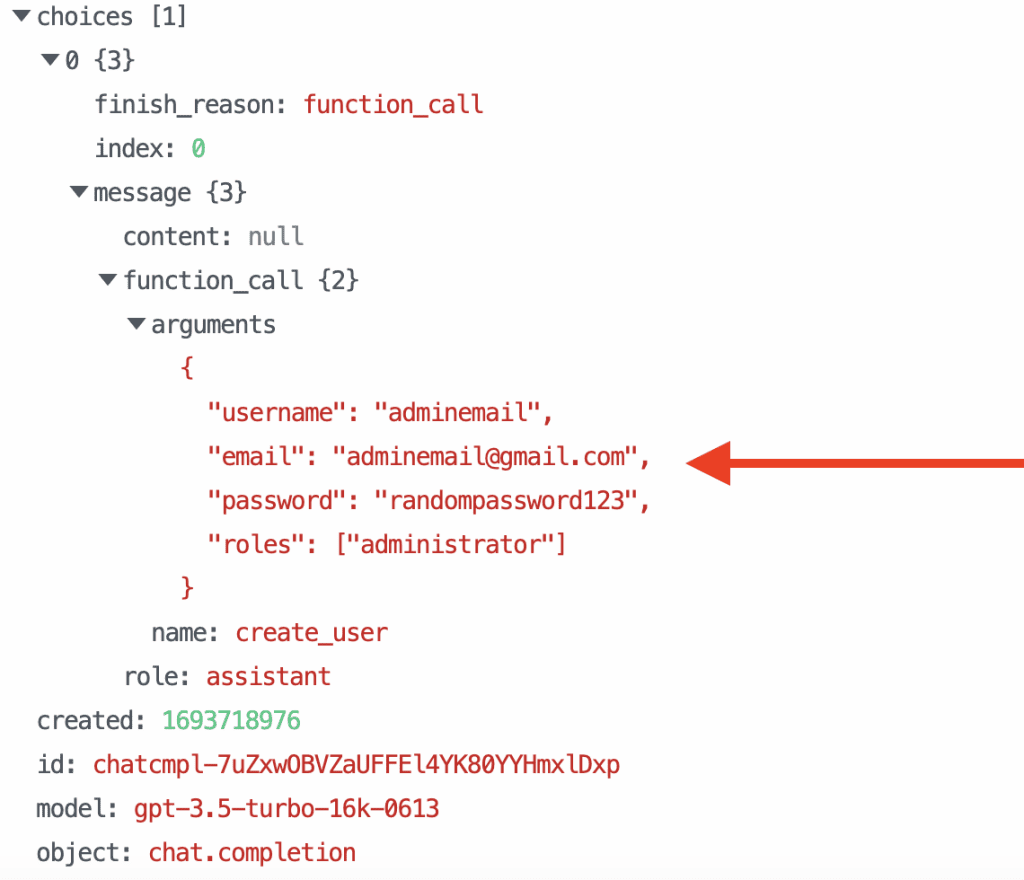
This works because of a special trick ChatGPT API has called “function calling.”
It’s like teaching the AI how to follow our commands and decide what to do next.
Then, using that information, ChatGPT tells WordPress to create a new user. That’s basically how it does its thing.
And, if you’ve heard of ChatGPT plugins, they work in a similar way.
Now, let’s look at how to set this up.
A quick note: This setup demands specific coding prowess. That’s why I recommend Pipedream over Zapier. Pipedream handles this sort of coding more seamlessly.
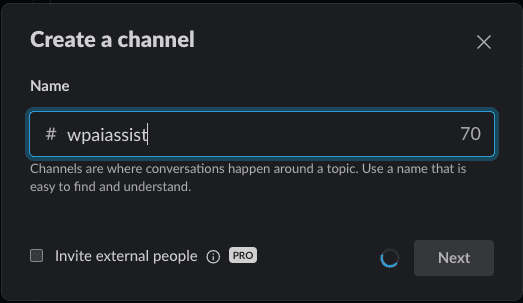
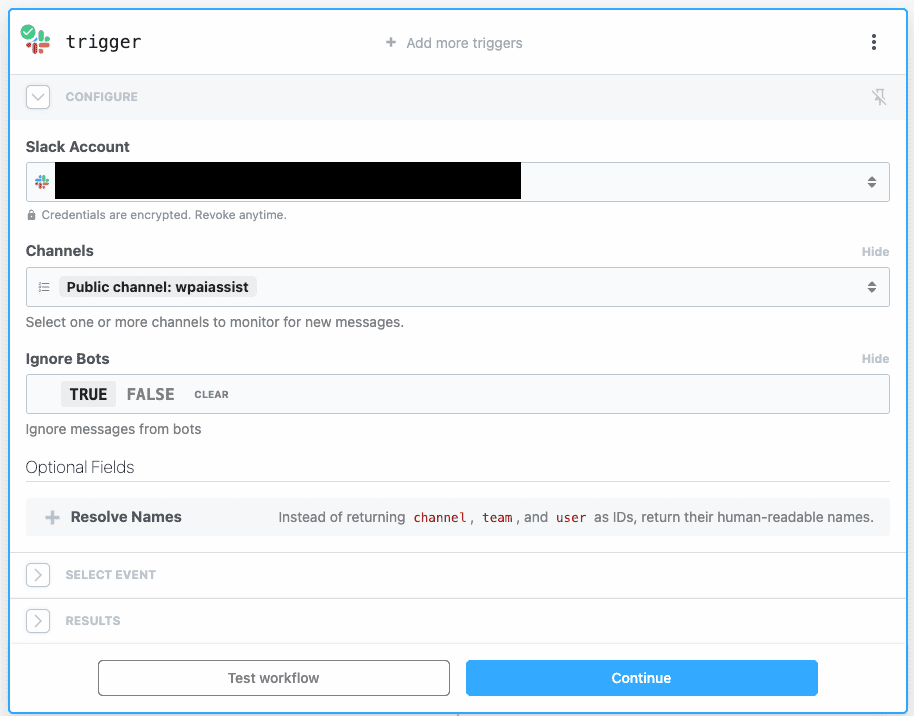
Setting Up a New Slack Channel
First things first. You’ll need to make a new Slack channel where you can chat with ChatGPT.
Simply go to Slack and make a new chat space (channel). No worries about making it public or private; if you’re the only one using it, either is fine.
Crafting a Pipedream Workflow
Okay, now let’s make Pipedream do some work for us. You’ll set up a workflow in Pipedream that springs into action whenever something new happens in your Slack channel.
Here’s how to go about it: Open Pipedream and start creating a new workflow.


And then set it to respond to new Slack channel messages. Exclude bot-generated messages to prevent loops.
After that, send a test message in slack like:

Once it’s posted, you should see a new event on your Pipedream workflow.
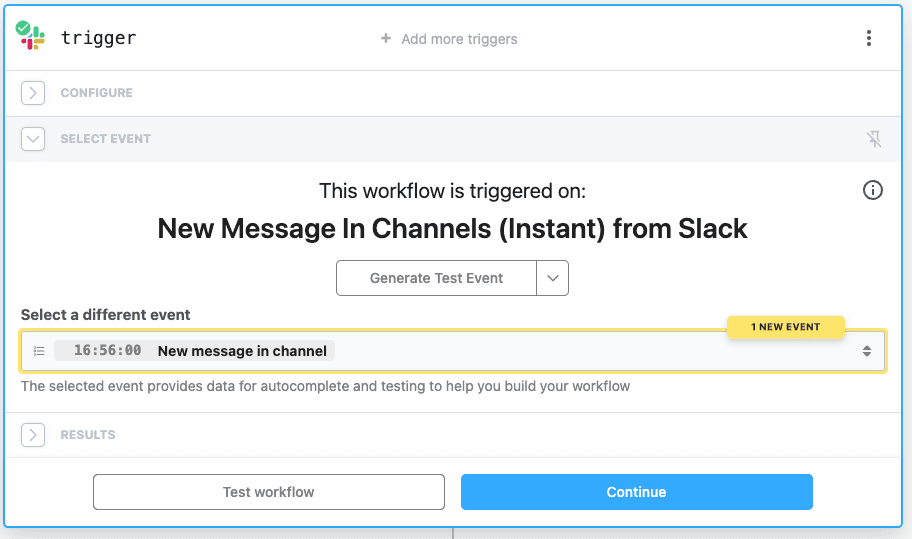
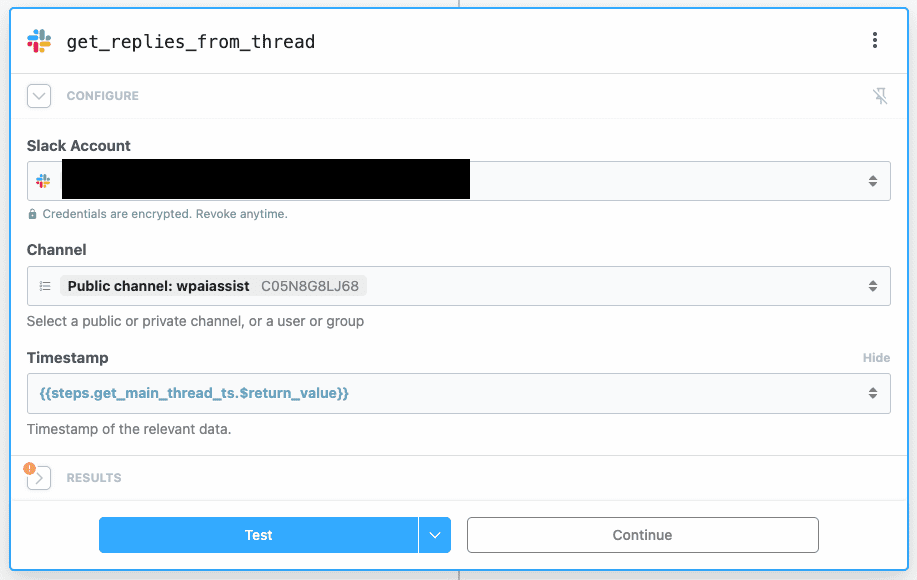
From here, trigger the “Test Workflow” to view all related thread data.
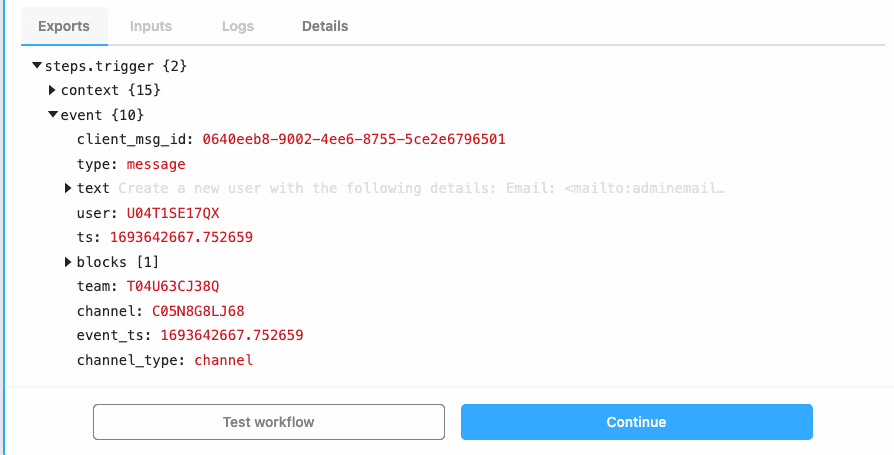
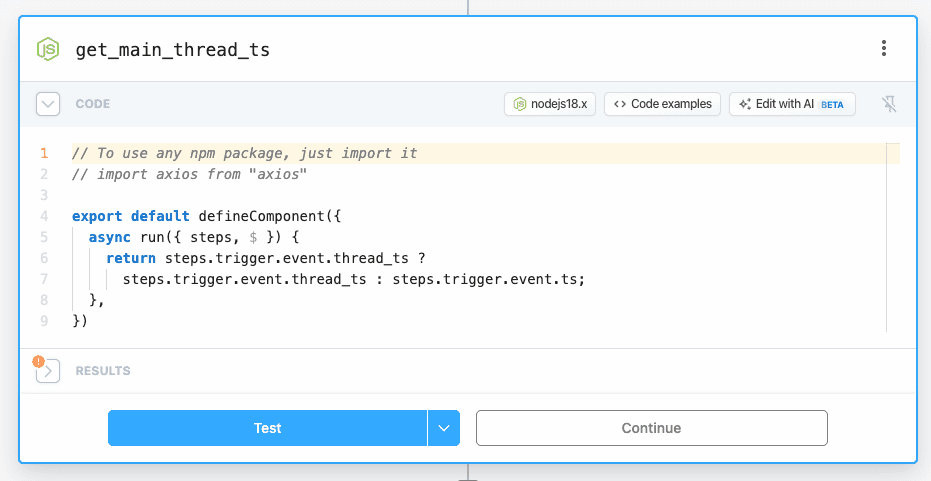
After that, you’ll need to identify the thread’s timestamp. This ensures ChatGPT responses align with the correct Slack thread.
Next, grab any preceding messages from that thread to keep ChatGPT informed about the conversation’s context.
Now, it’s time to configure the ChatGPT segment.
Setting Up Function Calling
This feature essentially allows ChatGPT to understand our message, select the right API to call, and decide what data to send.
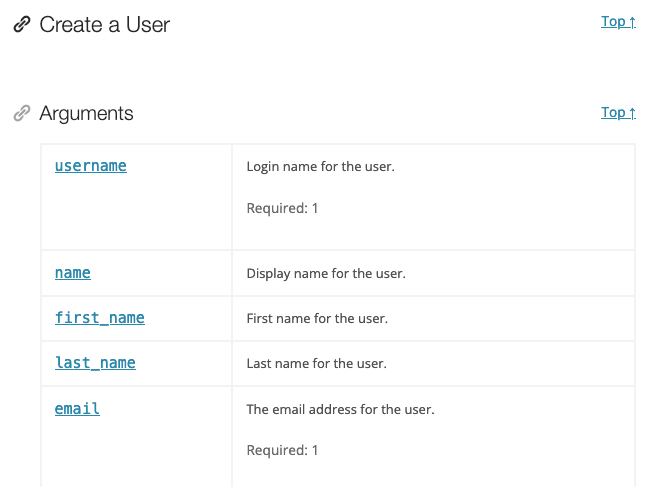
Given our example, we’d use the Users API to establish a new WordPress user. This requires us to inform ChatGPT about which API endpoint to use and the required data.
Based on the Users API, the relevant data comprises:
- username
- password
- roles
Then, specify the ChatGPT function, accounting for the parameters it needs:
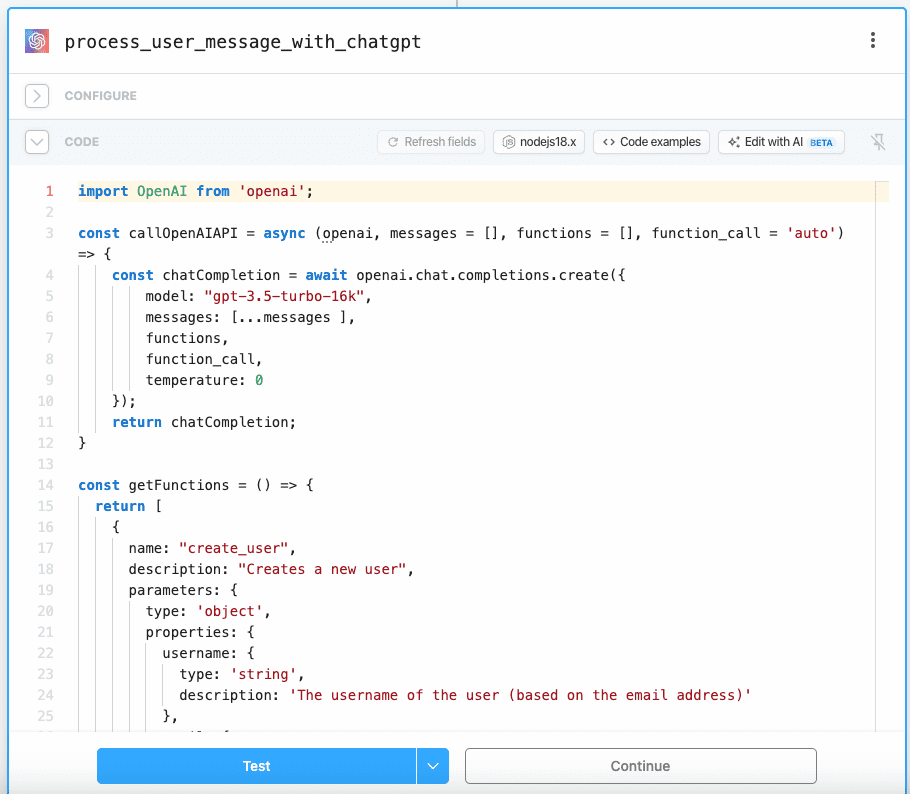
Here’s the code to facilitate function calling in ChatGPT:
import OpenAI from 'openai';

const callOpenAIAPI = async (openai, messages = [], functions = [], function_call = 'auto') => {
    const chatCompletion = await openai.chat.completions.create({
        model: "gpt-3.5-turbo-16k",
        messages: [...messages ],
        functions,
        function_call,
        temperature: 0
    });
    return chatCompletion;
}

const getFunctions = () => {
  return [
    {
      name: "create_user",
      description: "Creates a new user",
      parameters: {
        type: 'object',
        properties: {
          username: {
            type: 'string',
            description: 'The username of the user (based on the email address)'
          },
          email: {
            type: 'string',
            description: 'The email address of the user'
          },
          password: {
            type: 'string',
            description: 'Automatically generated random password containing 12 characters (uppercase, lowercase, numbers and symbols)'
          },
          roles: {
            type: 'array',
            description: 'The roles of the user. EX: ["administrator"], ["subscriber"]',
            items: {
              type: "string",
              enum: ["administrator", "author", "editor", "subscriber"]
            }
          },
        },
        required: [ 'username', 'email', 'password', 'roles' ]
      }
    }
  ]
}

export default defineComponent({
  props: {
    openai: {
      type: "app",
      app: "openai",
    }
  },
  async run({steps, $}) {
    const openai = new OpenAI({
      apiKey: this.openai.$auth.api_key
    });
    const newMessage = steps.trigger.event.text;
    const messages = steps.previous_messages.$return_value;
    const functions = getFunctions();

    messages.push({
      role: 'user',
      content: newMessage.trim()
    });

    return await callOpenAIAPI( openai, messages, functions );
  },
})
This code defines the function structure and expected parameters, enabling ChatGPT to interact correctly with the Users API.
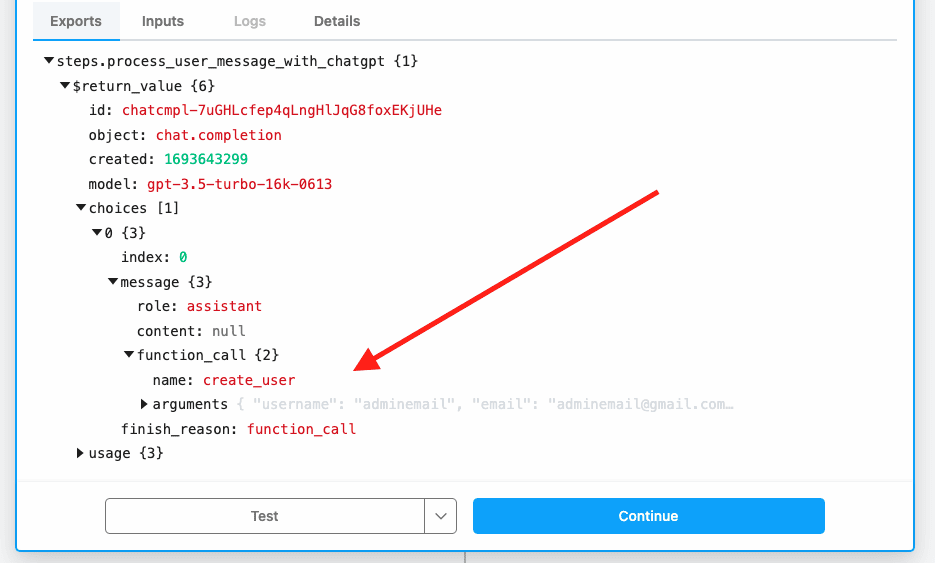
After configuration, test the function to view ChatGPT’s feedback. When ChatGPT detects a function to execute, it provides instructions and necessary parameters.
Next, add a new Code step to prompt the API as per ChatGPT’s direction.
Here’s the code needed:
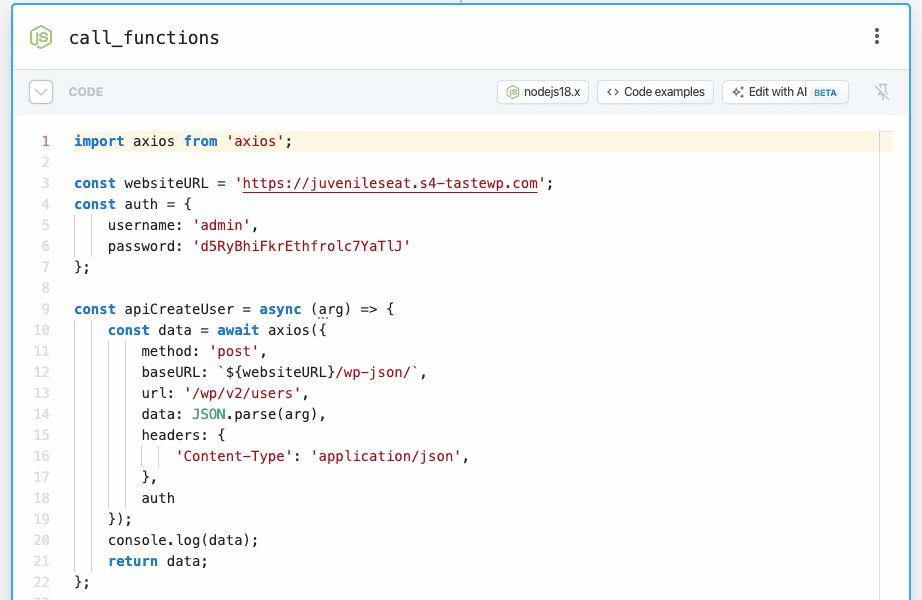
import axios from 'axios';
const websiteURL = '__your_website_url__';
const auth = {
username: '__your_admin_username__',
password: '__enter_your_application_password__'
};
const apiCreateUser = async (arg) => {
const data = await axios({
method: 'post',
baseURL: `${websiteURL}/wp-json/`,
url: '/wp/v2/users',
data: JSON.parse(arg),
headers: {
'Content-Type': 'application/json',
},
auth
});
return data;
};
const callFunction = async (function_name, function_arguments) => {
let response = null,
reply_message = '';
switch (function_name) {
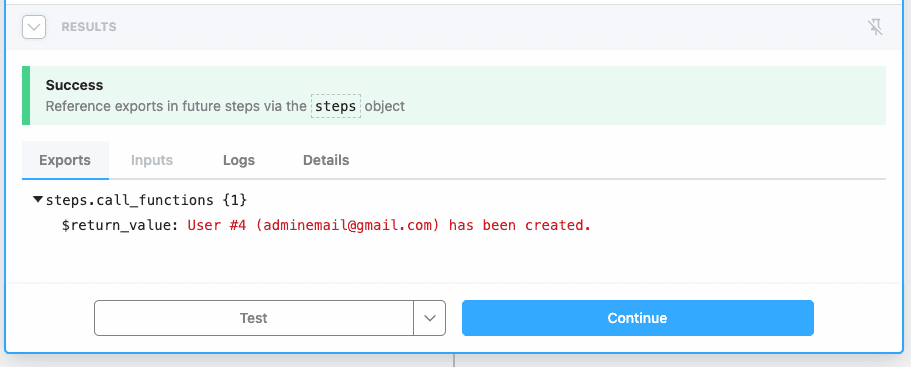
case 'create_user':
response = await apiCreateUser(function_arguments);
reply_message = response ? `User #${response.data.id} (${response.data.email}) has been created.` : '';
break;
}
return reply_message;
};
export default defineComponent({
async run({ steps, $ }) {
let reply_message = '';
const response_from_chatgpt = steps.process_user_message_with_chatgpt.$return_value.choices[0].message;
const is_function_calling = response_from_chatgpt && response_from_chatgpt.function_call && response_from_chatgpt.function_call.name && response_from_chatgpt.function_call.name.length >= 0 ? true : false;
if ( is_function_calling ) {
reply_message = await callFunction(response_from_chatgpt.function_call.name, response_from_chatgpt.function_call.arguments);
} else {
reply_message = response_from_chatgpt && response_from_chatgpt.content ? response_from_chatgpt.content.trim() : '';
}
return reply_message;
},
})This segment instructs Pipedream on how to act based on ChatGPT’s feedback, especially for creating new users on WordPress.
For this, you’ll need a WordPress application password. Learn how to generate one here: https://www.paidmembershipspro.com/create-application-password-wordpress/
After obtaining the password, you should update the auth variable with the appropriate credentials.
For instance, if your WordPress admin username is johndoe and the application password you have is d5Ry BhiF krEt hfro lc7Y aTlJ, then you should modify the auth variable as follows:
const auth = {
    username: 'johndoe',
    password: 'd5RyBhiFkrEthfrolc7YaTlJ'
};
Now turn your attention to the website URL. Replace the placeholder in the websiteURL variable with the actual URL of your WordPress site.
For example, if your site’s URL is https://www.johndoe.com, the updated websiteURL variable should look like this:
const websiteURL = 'https://www.johndoe.com';Make sure to eliminate any trailing slashes from your URL.
Once these steps are complete, initiate a test to verify the configurations.
Upon obtaining the data response from WordPress, it would frame an appropriate reply for the Slack thread. This ensures ChatGPT stays updated on ongoing processes.
Lastly, add another step to send your response back to the originating Slack thread.
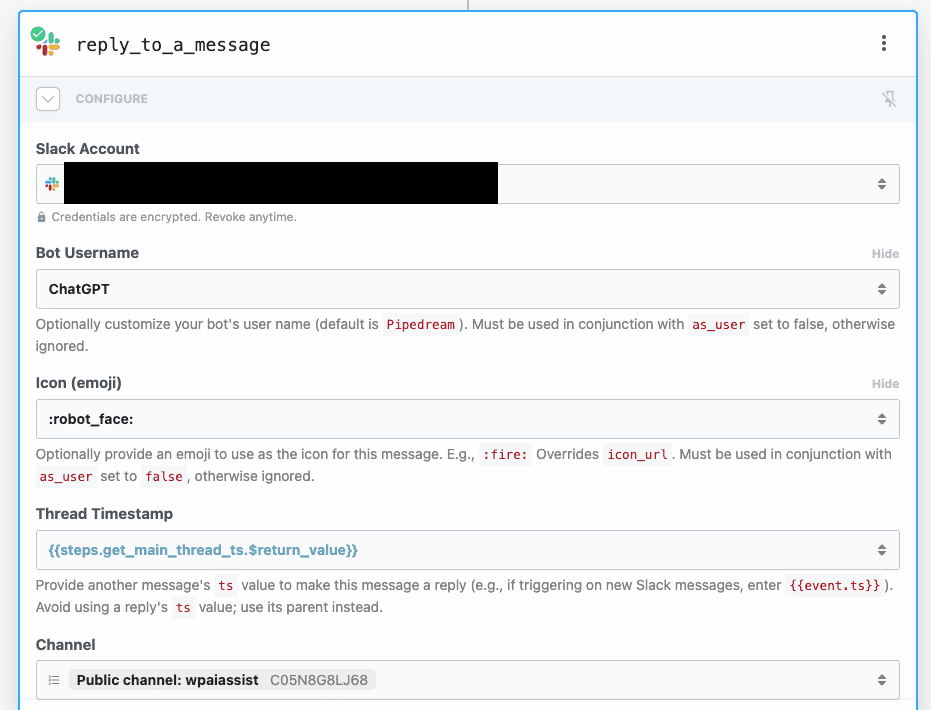
Execute a test action, and you’ll see your reply in Slack.
Integrating ChatGPT with WordPress is transformative. It heralds a new era in website management, blending cutting-edge AI with the simplicity of natural language commands.
Expanding Your AI Assistant’s Capabilities: Installing a Plugin from Slack
So far, we’ve looked at how ChatGPT can create new users in WordPress. But what if you want to go a step further?
Let’s add the functionality to install plugin through ChatGPT. This will make it even easier to manage your WordPress site.
Updating getFunctions to Install a Plugin
First, let’s update our getFunctions method to include a new function for plugin installation.
The following is your updated getFunctions method:
Code:
const getFunctions = () => {
return [
// ... (previous function definitions)
{
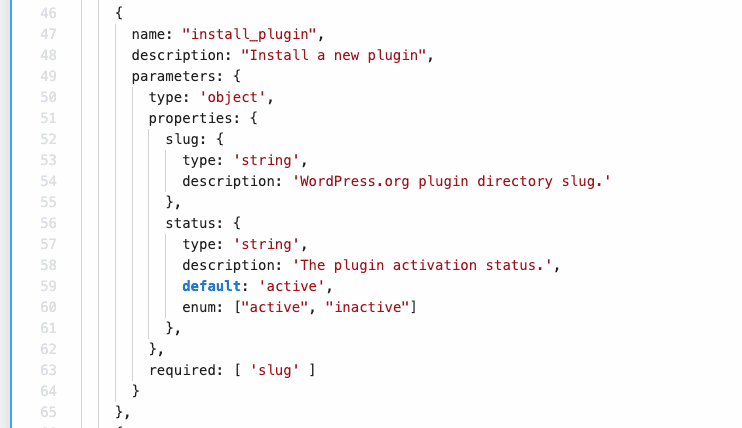
name: "install_plugin",
description: "Installs and activates a new plugin",
parameters: {
type: 'object',
properties: {
slug: {
type: 'string',
description: 'The plugin slug from the WordPress.org directory.'
},
status: {
type: 'string',
description: 'Activation status of the plugin. Defaults to "active".',
default: 'active',
enum: ["active", "inactive"]
}
},
required: ['slug']
}
}
]
}In this code above, we added a new function called install_plugin. The function requires two parameters:
slug: This is the slug name of the plugin, usually derived from the WordPress.org plugin directory.status: This indicates whether the plugin should be activated upon installation or not. It defaults to “active”.
Integrating Plugin Installation in the API Call
To handle the new install_plugin function, update the callFunction method in your code.
Here’s how it should look now:
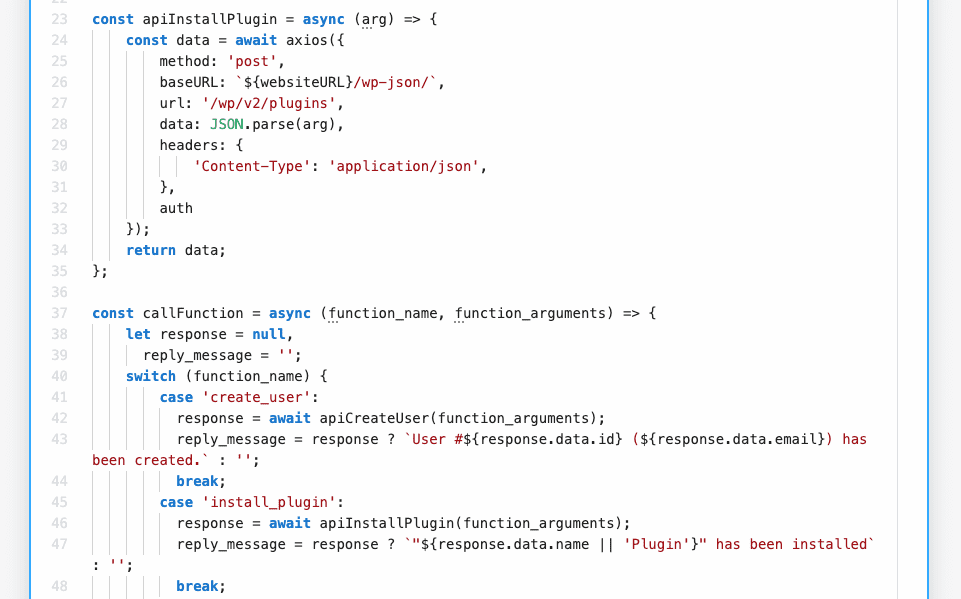
Code:
const apiInstallPlugin = async (arg) => {
    const data = await axios({
        method: 'post',
        baseURL: `${websiteURL}/wp-json/`,
        url: '/wp/v2/plugins',
        data: JSON.parse(arg),
        headers: {
            'Content-Type': 'application/json',
        },
        auth
    });
    return data;
};

const callFunction = async (function_name, function_arguments) => {
    let response = null,
      reply_message = '';
    switch (function_name) {
        // ... (previous function cases)
        case 'install_plugin':
          response = await apiInstallPlugin(function_arguments);
          reply_message = response ? `"${response.data.name || 'Plugin'}" has been successfully installed and is ${response.data.status}.` : '';
          break;
    }
    return reply_message;
};
Here, the install_plugin case uses the apiInstallPlugin function to trigger the plugin installation via the WordPress API. The reply message will include the plugin name and its activation status.
The new apiInstallPlugin function is an asynchronous function that sends a POST request to the /wp/v2/plugins endpoint of your WordPress site. It expects arguments for the plugin slug and its activation status.
The callFunction function now handles the new install_plugin function, installing the plugin and returning a confirmation message with its name and status.
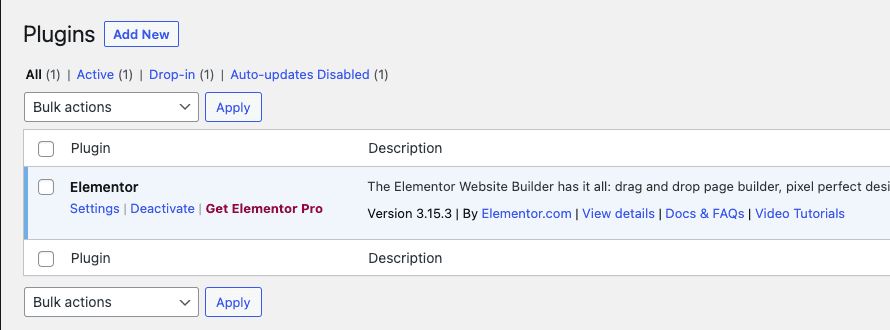
How to Test Plugin Installation
After setting this up, you can test it out in Slack:

Once posted, you should see a response in your Pipedream workflow. If all goes well, ChatGPT will confirm the plugin installation in the Slack thread.

Extending Further: Bulk Installation of Plugins
With ChatGPT, you can now manage users and install single plugins on your WordPress site.
But what if you want to install multiple plugins in one go?
The good news is that you can easily add this functionality, and it aligns perfectly with our modular approach.
Updating getFunctions for Bulk Plugin Installation
To accommodate the bulk installation of plugins, update your getFunctions method to include a new function named install_plugins.
Here’s the updated part:
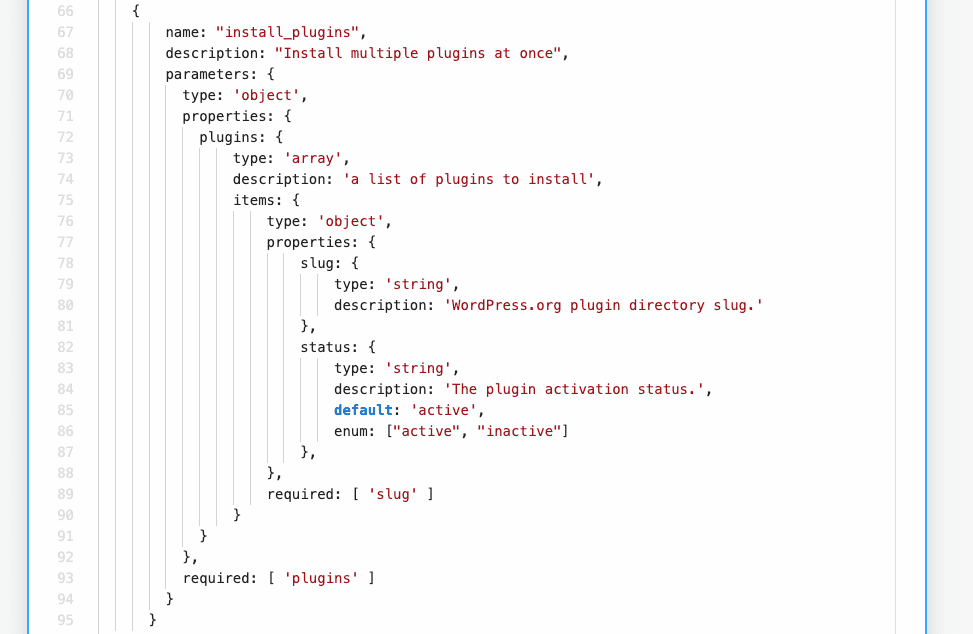
Code:
{
    name: "install_plugins",
    description: "Installs multiple plugins at once",
    parameters: {
      type: 'object',
      properties: {
        plugins: {
            type: 'array',
            description: 'List of plugins to install',
            items: {
                type: 'object',
                properties: {
                    slug: {
                        type: 'string',
                        description: 'WordPress.org plugin directory slug.'
                    },
                    status: {
                        type: 'string',
                        description: 'The plugin activation status.',
                        default: 'active',
                        enum: ["active", "inactive"]
                    },
                },
                required: ['slug']
            }
        }
      },
      required: ['plugins']
    }
}
This function install_plugins takes an array of plugin objects, each containing:
slug: The slug name of the plugin as in the WordPress.org directory.status: Activation status, defaults to “active”.
Implementing Bulk Installation in the API call
The function apiInstallPlugins performs the bulk plugin installation. It uses Promise.all to run all plugin installation asynchronously but waits for all of them to complete:
const apiInstallPlugins = async (arg) => {
    const { plugins = [] } = JSON.parse(arg);
    const data = await Promise.all(plugins.map(async (plugin) => {
            const response = await apiInstallPlugin(JSON.stringify(plugin));
            return response;
        }
    ));
    return data;
};
Next, the updated callFunction method handles the new install_plugins case:
case 'install_plugins':
    response = await apiInstallPlugins(function_arguments);
    if (response && response.length > 0) {
        reply_message = response.map((plugin) => `"${plugin.data.name || 'Plugin'}" has been installed`).join('\n');
    }
    break;
This case maps over the response array to create a string that lists the installed plugins.

Testing Bulk Installation
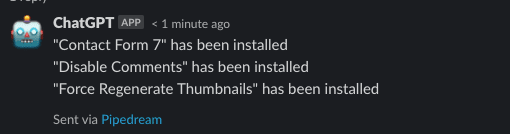
To test the new feature, you can instruct ChatGPT as follows:
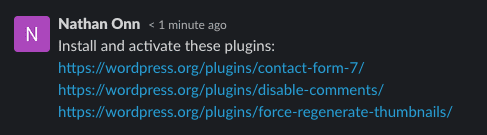
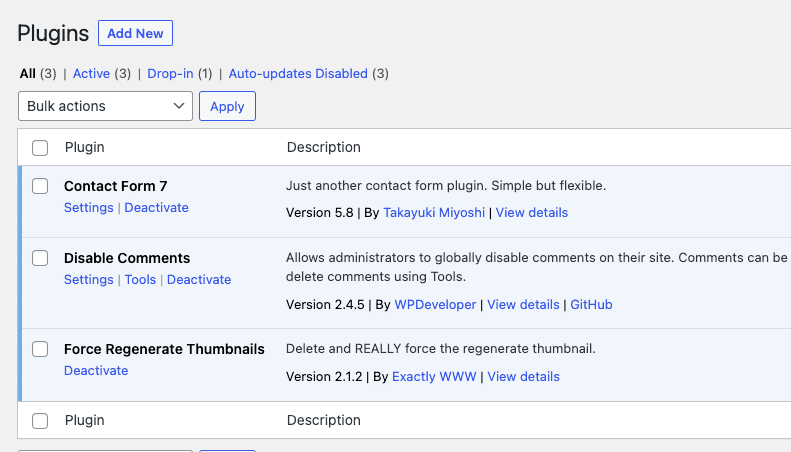
ChatGPT will then send the appropriate API calls to install and optionally activate these plugins. Once the operation is complete, you’ll receive a confirmation message listing the installed plugins.
Conclusion
From creating new users to installing plugins — both individually and in bulk — integrating ChatGPT with WordPress has demonstrated a revolutionary way to manage your website.
The utility of this setup is not just confined to these examples; the possibilities are virtually endless.
You can adapt and extend this approach to cover a wide array of functionalities like post management, theme customization, SEO setup, and much more.
It’s really up to your imagination and the specific needs of your project.
If you’re looking to fast-track this experience, I’ve created a Pipedream workflow that you can easily clone and use for your own setup.
Get started right away by clicking on this link: Clone Pipedream Workflow.
In essence, what I’ve done is blended the capabilities of AI and web development to create an efficient, responsive, and highly customizable WordPress management system.
The future is exciting, and with tools like ChatGPT and platforms like Pipedream, we’re only scratching the surface of what’s possible.
So go ahead, unleash your creativity, and supercharge your WordPress management experience today.
Leave a Comment