I thought I was being thorough.
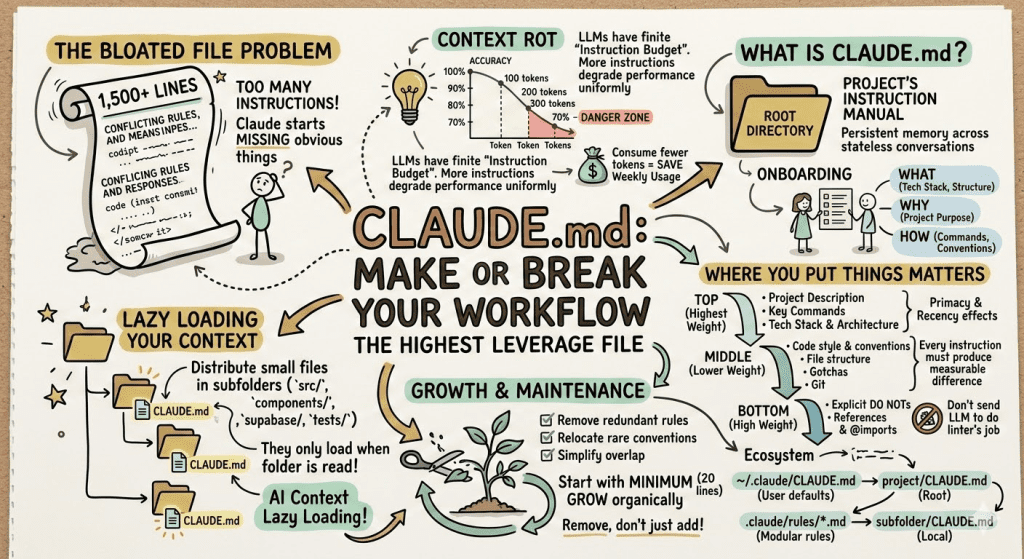
My CLAUDE.md file had grown to over 1,500 lines. Every coding convention I’d ever learned. Every edge case I’d encountered. Code snippets for common patterns. Integration examples for every third-party service we used. Database schema references. The works.
I was so proud of that file. Look at all this context I’m giving Claude! Surely this would make it understand my project perfectly.
(Narrator voice: It did not.)
Here’s what actually happened: Claude started missing obvious things. Instructions I knew were in there—ignored. Conventions I’d spelled out clearly—forgotten. The more I added to my CLAUDE.md, the worse Claude performed.
I’d accidentally discovered something that changed how I approach AI-assisted development entirely.
.
.
.
The problem wasn’t that Claude couldn’t follow instructions. The problem was that I’d given it too many to follow.
What Even Is a CLAUDE.md File? (And Why Should You Care?)
Let’s back up for a second—because if you’re new to Claude Code, you might be wondering what I’m talking about.
CLAUDE.md is a markdown file that lives at the root of your project. Claude Code reads it automatically at the start of every session. Think of it as your project’s instruction manual for the AI—persistent memory across what would otherwise be completely stateless conversations.
And here’s the thing: after your choice of model, your CLAUDE.md file is the single biggest point of leverage you have in Claude Code.
One bad line in there? It cascades into everything downstream.
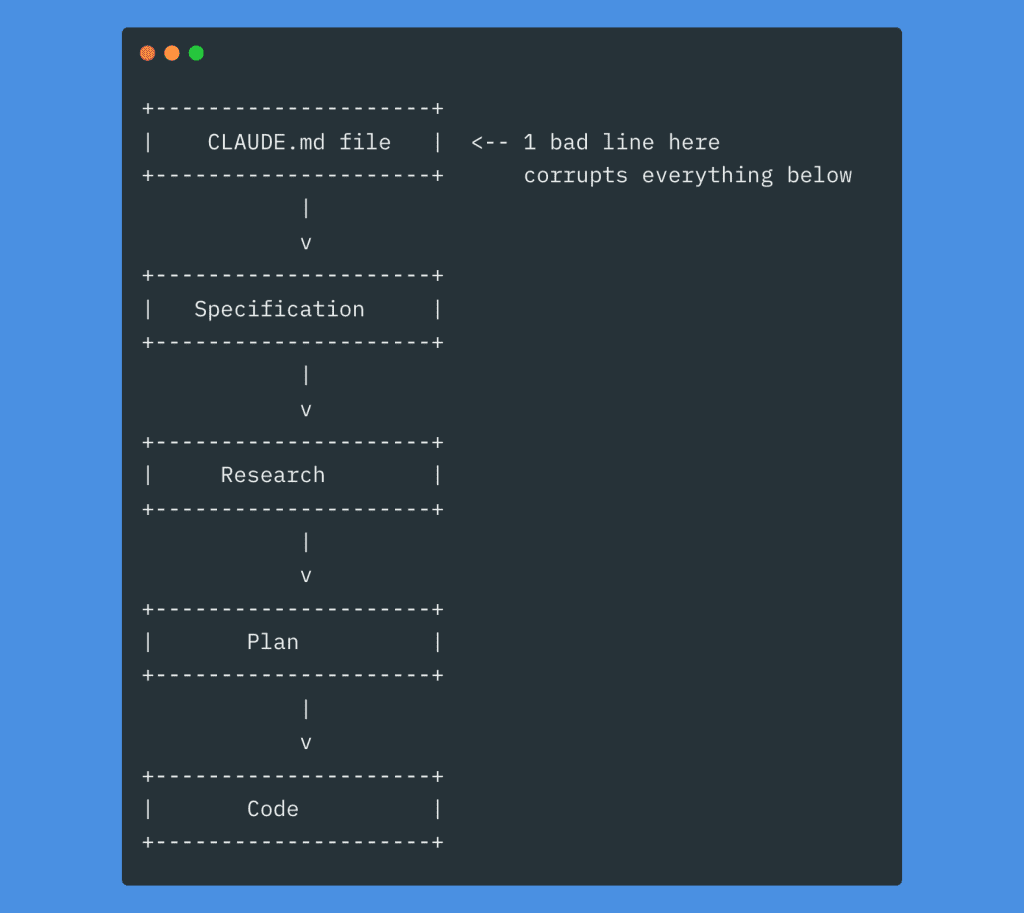
Every decision Claude makes flows from that initial context. A vague instruction becomes a vague spec, becomes vague research, becomes a vague plan, becomes… well, you know how this story ends.
.
.
.
The “Instruction Budget” I Wish Someone Had Told Me About
Here’s where I learned my lesson the hard way.
LLMs have a finite number of instructions they can reliably follow at once. This sounds obvious when I say it out loud, but I’d never really internalized it until I watched my 1,500-line CLAUDE.md file turn Claude into a confused mess.
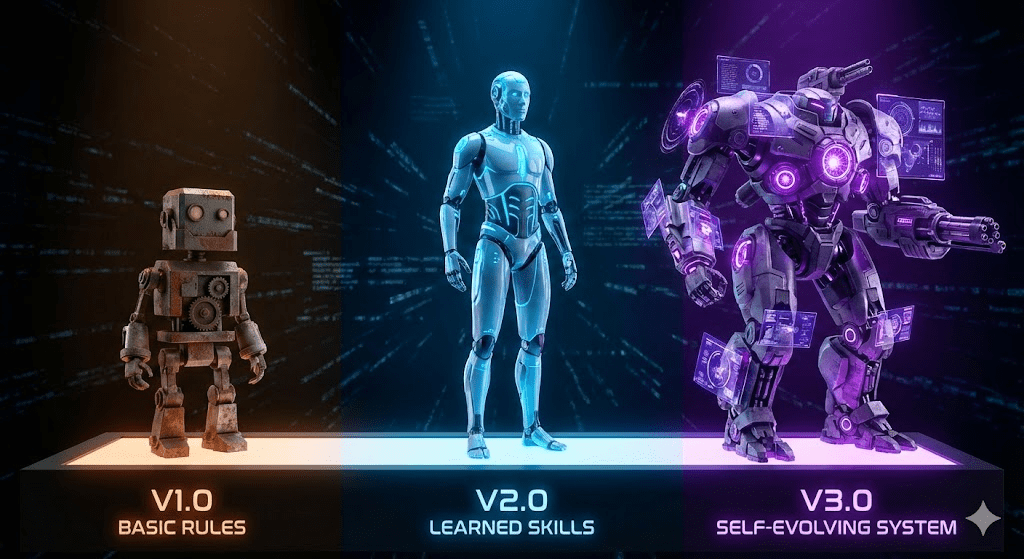
The counterintuitive part? Adding more instructions doesn’t just risk the new ones being ignored. It degrades performance uniformly across all your instructions—including the ones that worked perfectly before.
Research from Chroma on “context rot” backs this up: as the number of tokens in the context window increases, the model’s ability to accurately recall information from that context decreases. Your beautiful, comprehensive CLAUDE.md file might actually be making Claude worse at remembering what’s in it.
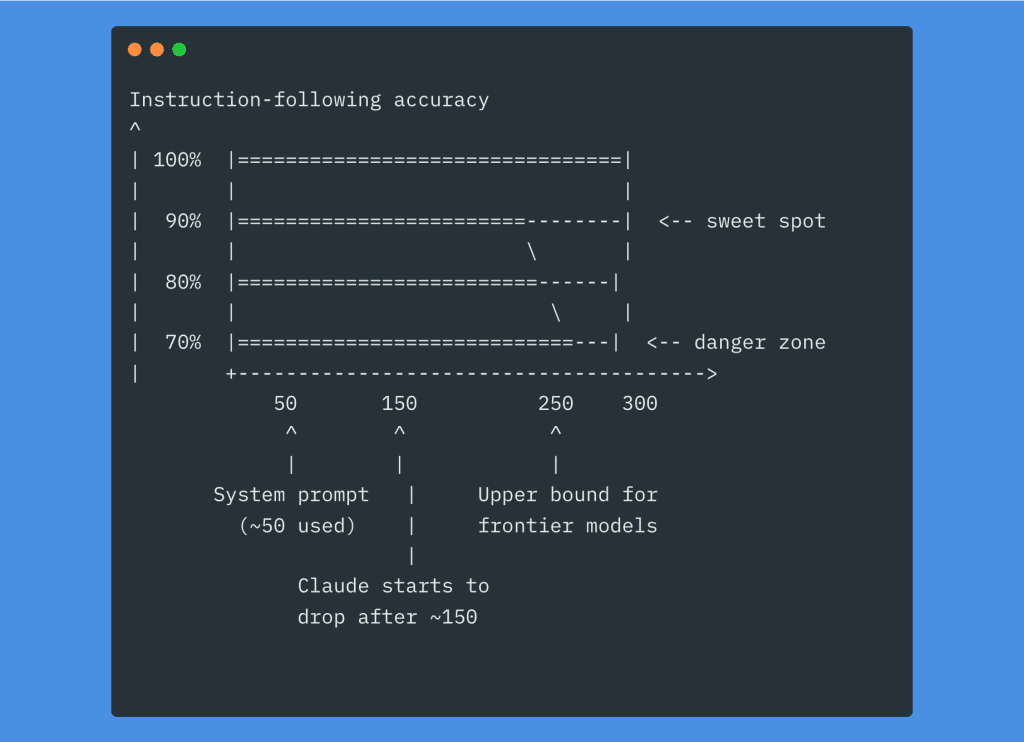
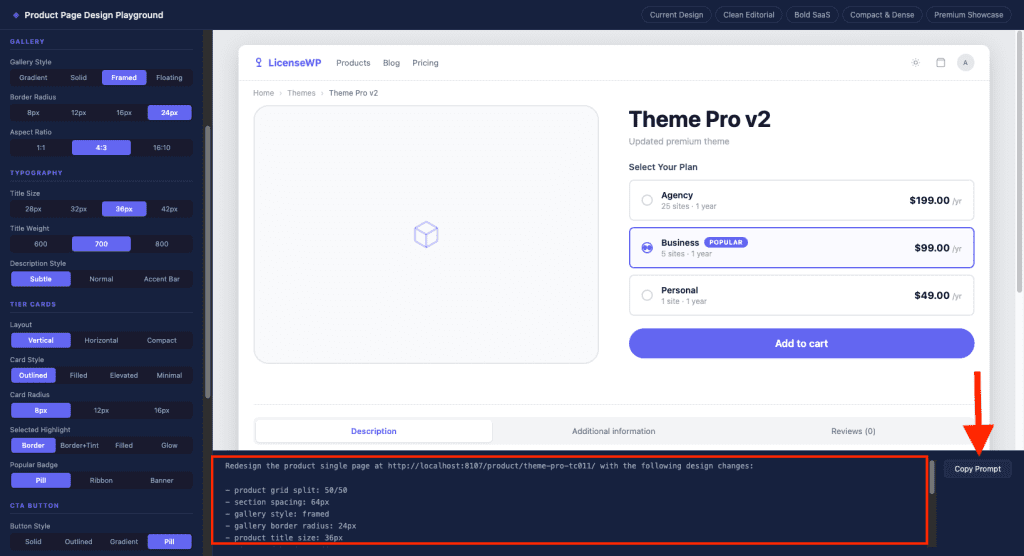
Let me do the math for you: Claude Code’s system prompt already uses around 50 instructions. If the model handles roughly 250 total, you’ve got about 200 left for your CLAUDE.md plus your plan plus your task prompt.
And here’s the part that really stung when I realized it: a bloated CLAUDE.md means you’re filling up the context window before you even send your first instruction. Every session starts with that massive file loaded. Every message you send has to fit alongside it.
If you’ve been struggling with Claude Code eating through your weekly usage too fast, the first place to cut is your CLAUDE.md file. Seriously. Smaller context = fewer tokens consumed = more runway for actual work.
I went digging through public CLAUDE.md files on GitHub recently. About 10% of them exceed 500 lines.
That’s almost certainly too large. (Ask me how I know.)
👉 Aim for under 300 lines. Ideally much shorter.
.
.
.
The Framework That Finally Made Sense
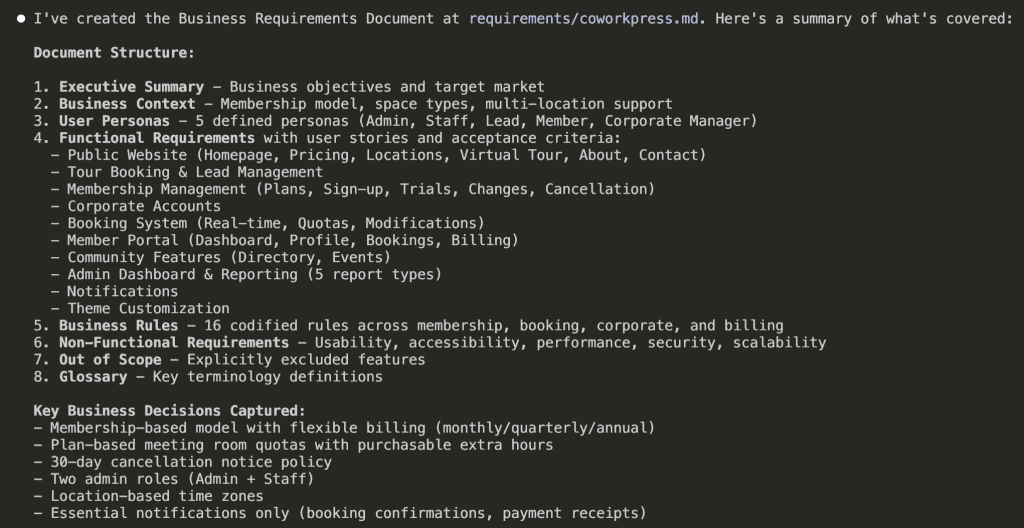
After my bloated-file disaster, I needed a new approach. I landed on something simple: think of CLAUDE.md as an onboarding document.
Imagine you’re bringing a brilliant new hire up to speed on day one. What would you tell them? Three things, really:
WHAT — The tech stack, project structure, key files. “This is a Next.js 14 app with App Router, Prisma, and Stripe.”
WHY — The purpose of the project and its parts. “We’re building an e-commerce platform for artisan sellers.”
HOW — Commands, workflows, conventions. “Use npm, not pnpm. Run tests before commit.”
Everything else? Details that can live elsewhere or get loaded on-demand. (More on that “on-demand” part in a minute—it’s a game-changer.)
.
.
.
Where You Put Things Actually Matters
Here’s something I didn’t appreciate until embarrassingly recently: models pay more attention to the top and bottom of a document than the middle. Primacy and recency effects—same cognitive biases humans have.
So structure your CLAUDE.md accordingly:
At the top (highest weight):
- Project description (1-3 lines)
- Key commands (dev, test, build, lint, deploy)
- Tech stack and architecture overview
In the middle (lower relative weight): 4. Code style and conventions 5. File/folder structure map 6. Important gotchas and warnings 7. Git and commit conventions
At the bottom (high weight again): 8. Explicit DO NOTs 9. References and @imports to deeper docs
Let me walk through the ones that matter most.
Project Description
A concise summary that orients Claude to the big picture. Every decision should tie back to purpose.
# Project: ShopFront
Next.js 14 e-commerce application with App Router,
Stripe payments, and Prisma ORM. Built for artisan
sellers to manage inventory and process orders.
Three lines. Claude now knows what you’re building, who it’s for, and the core architecture. That’s it.
Key Commands
Be explicit here. Don’t assume Claude knows your setup—it doesn’t.
## Commands
- `npm run dev`      — Start dev server (port 3000)
- `npm run test`     — Run Jest unit tests
- `npm run test:e2e` — Run Playwright E2E tests
- `npm run lint`     — ESLint check
- `npm run build`    — Production build
- `npm run db:migrate` — Run Prisma migrations
And include the non-obvious choices! “Use npm not pnpm or bun” saves you from Claude randomly picking bun because it read about it somewhere and thought it’d be helpful. (Thanks, Claude. Very helpful.)
Code Style—Where Most People Go Wrong
This is where I see CLAUDE.md files bloat into monsters. Vague rules that waste your precious instruction budget.
Don’t write this:
- “Use good coding practices”
- “Write clean code”
- “Follow best practices”
These instructions accomplish nothing. They’re the equivalent of telling a new hire “do good work.” Thanks, very actionable.
Write this instead:
- “TypeScript strict mode, no
anytypes” - “Use named exports, not default exports”
- “Prefer
constoverlet“ - “Use
import type {}for type-only imports”
Every instruction should produce a measurable difference in output.
And here’s a secret that took me way too long to figure out: don’t send an LLM to do a linter’s job. If a rule can be enforced by ESLint or Prettier, enforce it there. LLMs are slow and expensive linters. Claude learns from your existing code patterns anyway—it doesn’t need to be told every formatting convention.
One more thing: resist the urge to stuff code snippets, integration examples, and schema references into your CLAUDE.md. I know it feels helpful. I did it too. But all those “handy references” are just bloating your context window and triggering context rot. If Claude needs to see code, it can read your actual codebase.
The DO NOTs
Put these at the bottom (recency effect) and be specific:
## DO NOT
- Do not modify files in `/generated/` — they are auto-generated
- Do not use `console.log` — use the project logger
- Do not run `prisma db push` — always use migrations
Use emphasis sparingly. If everything is IMPORTANT, nothing is.
.
.
.
The Technique That Changed Everything: Lazy Loading Your Context
Okay, here’s where things get really interesting.
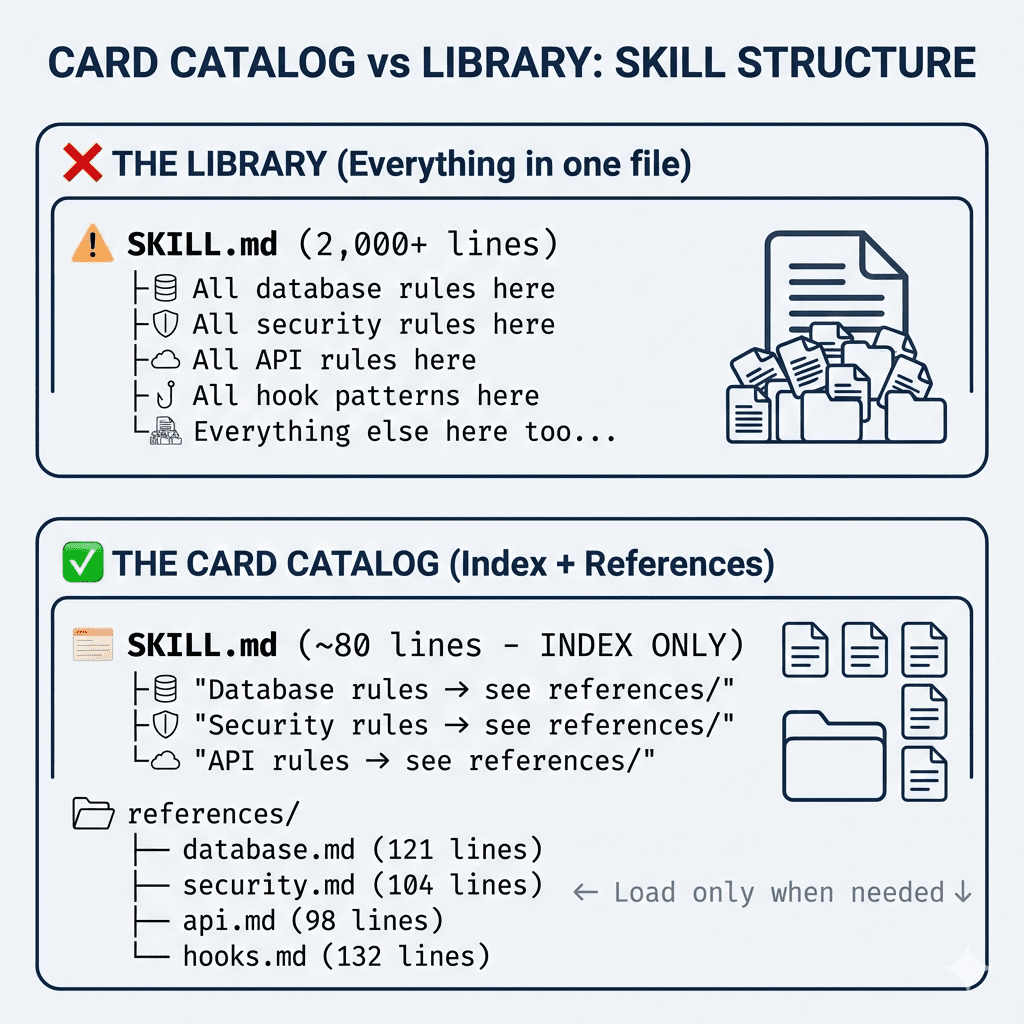
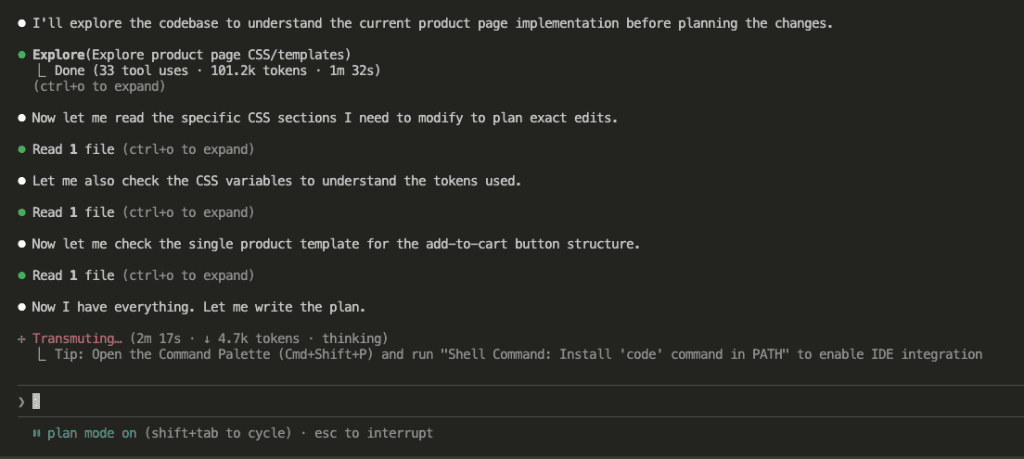
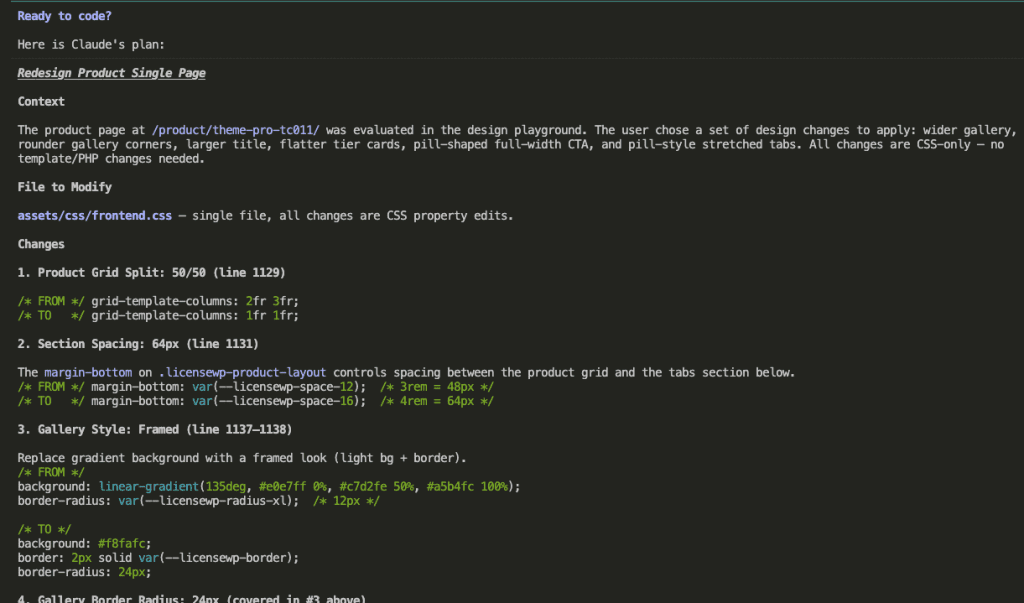
Instead of cramming everything into one giant root file, you can distribute smaller CLAUDE.md files across subfolders. The magic? They only load when Claude actually reads files in that folder.

Think about what this means: your Supabase migration instructions only consume tokens when you’re actually working on Supabase. During frontend work? Those instructions don’t exist. They’re not cluttering up Claude’s context. They’re not eating into your instruction budget.
It’s lazy loading for your AI context.
How to Split Things Up
Your root CLAUDE.md stays small—maybe 50-100 lines. Project description, global commands, universal rules. The stuff that applies everywhere.
Then each subfolder gets its own focused file:
src/CLAUDE.md— Component patterns, state management approach, import rulesapi/CLAUDE.md— Endpoint conventions, auth rules, error format, validation patternssupabase/CLAUDE.md— Migration flow, schema rules, dangerous commands to avoid
These load automatically when Claude reads files in those directories. No extra work on your part. Just organize your instructions where they logically belong.
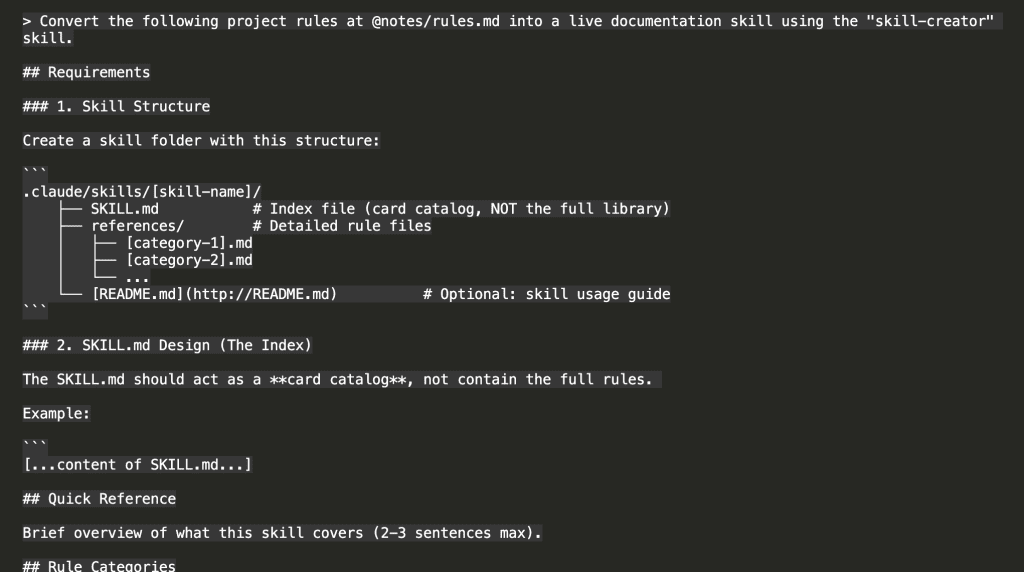
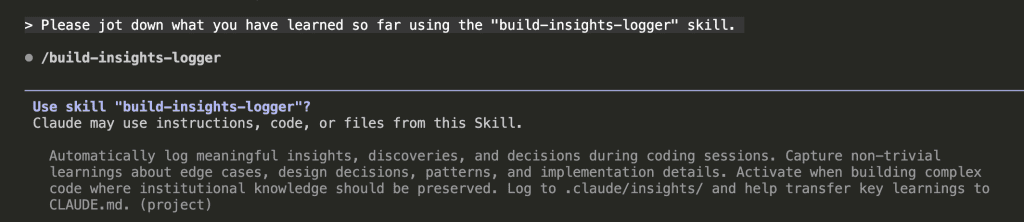
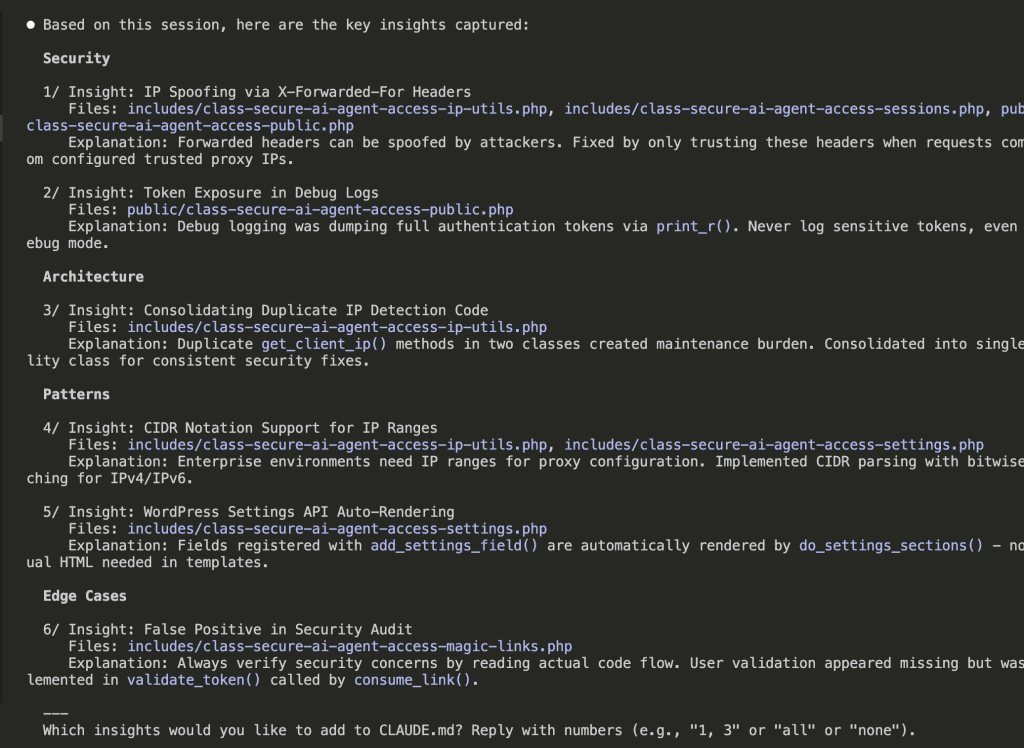
Progressive Disclosure with @imports and Rules
Here’s another trick: reference detailed docs instead of inlining everything.
## References
See @README.md for project overview
See @docs/api-patterns.md for API conventions
See @docs/auth-flow.md for authentication details
See @package.json for available scripts
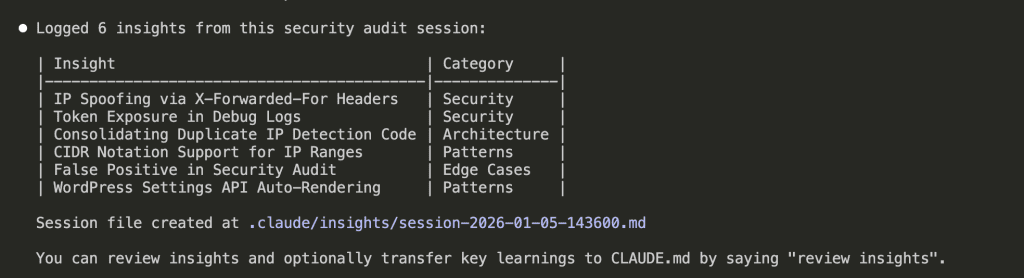
Or use the .claude/rules/ directory:
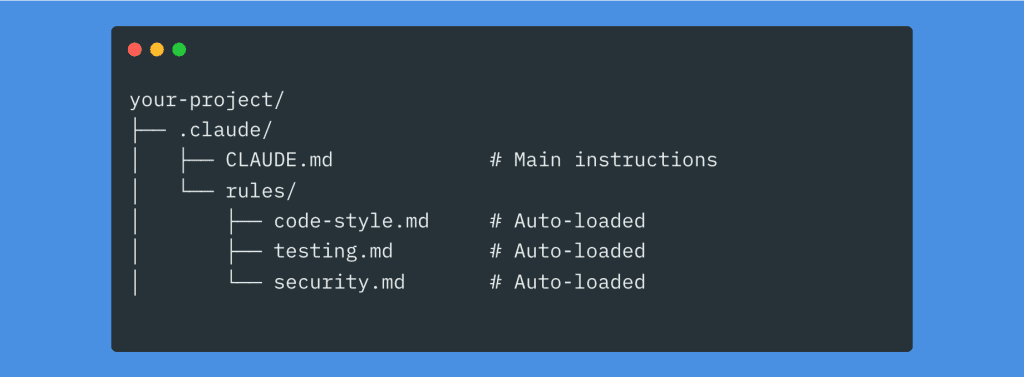
All markdown files in .claude/rules/ load automatically alongside your main CLAUDE.md. Modular. Organized. Maintainable.
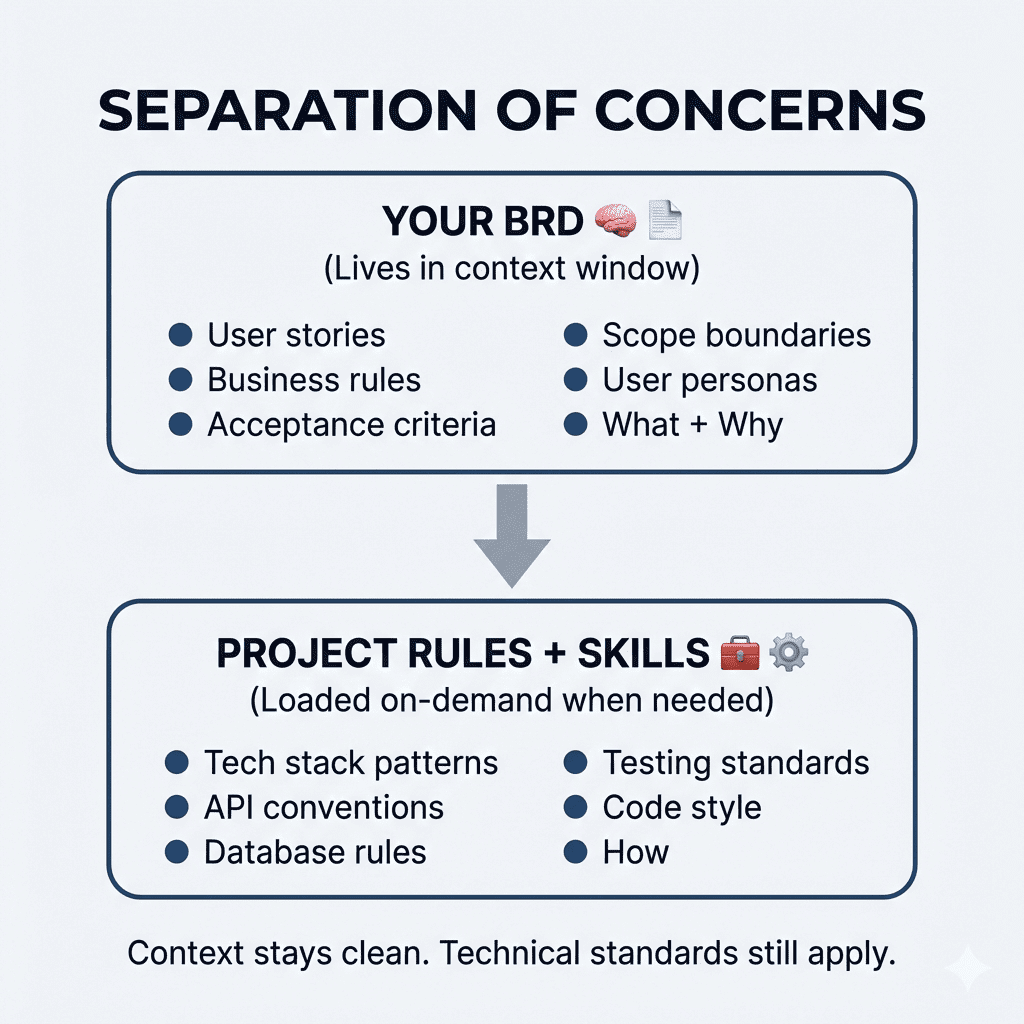
If you want to take this further—and I mean really further—I wrote a deep dive on building self-evolving Claude Code rules that keep all your guidelines, code snippets, and best practices organized in a system that actually grows smarter over time: How to Build Evolving Claude Code Rules.
It’s the natural next step once you’ve got the basics of CLAUDE.md structure down.
.
.
.
A Real Example: What This Looks Like in Practice
Here’s a complete root CLAUDE.md that actually works:
# Project: ShopFront
Next.js 14 e-commerce app with App Router, Stripe, Prisma ORM.
Built for artisan sellers to manage inventory and process orders.

## Commands
- `npm run dev`: Start dev server (port 3000)
- `npm run test`: Run Jest tests
- `npm run test:e2e`: Run Playwright E2E tests
- `npm run lint`: ESLint check
- `npm run build`: Production build
- `npm run db:migrate`: Run Prisma migrations

## Tech Stack
- TypeScript (strict mode)
- Next.js 14 (App Router)
- Prisma ORM + PostgreSQL
- Stripe for payments
- Tailwind CSS + Radix UI
- Jest + Playwright for testing

## Architecture
- `/app` — Pages, layouts, API routes
- `/components/ui` — Shared UI components
- `/lib` — Utilities, helpers, shared logic
- `/prisma` — Schema and migrations

## Code Conventions
- Named exports only (no default exports)
- Use `import type {}` for type-only imports
- No `any` types — use branded types for IDs
- Functional components with hooks
- Tailwind classes only, no custom CSS files

## Important
- NEVER commit .env files
- Stripe webhook must validate signatures
- Images stored in Cloudinary, not locally
- Do not modify files in `/generated/`
- Use project logger, not console.log

See @docs/auth-flow.md for authentication details
See @docs/api-patterns.md for API route conventions
That’s roughly 45 lines. Clean. Scannable. Universally applicable.
.
.
.
The Growth Strategy (Or: How to Not Repeat My Mistakes)
Please, I’m begging you: do not start with a giant template or auto-generated file.
Start with the absolute minimum. Project description, key commands. Maybe 20 lines.
Then use Claude Code on your project. When Claude makes a repeated mistake—and it will—add ONE targeted instruction to fix it. Commit that change to Git so you can trace it later.
Here’s the counterintuitive part: with every model release, look at what you can remove from your CLAUDE.md. Not what you can add. Remove.
Newer models have better built-in behaviors. Old workarounds can actively hinder them. Your CLAUDE.md should shrink over time, not grow.
(This was hard for me. I’m a collector by nature. But trust me—less really is more here.)
.
.
.
The Maintenance Checklist I Actually Use
Every few weeks—or after any model upgrade—I run through this:
Remove:
- Redundant rules the model handles naturally now
- Old workarounds for previous model versions
- Vague instructions that don’t change output
- Rules that should be enforced by linters instead
- Code snippets and examples that bloat context
Relocate:
- Domain-specific rules → move to subfolder CLAUDE.md files
- Detailed docs → convert to @imported files
- Rarely-used conventions → put in .claude/rules/
Simplify:
- Merge overlapping instructions
- Replace verbose paragraphs with bullet points
- Make every line earn its place
The Complete Picture
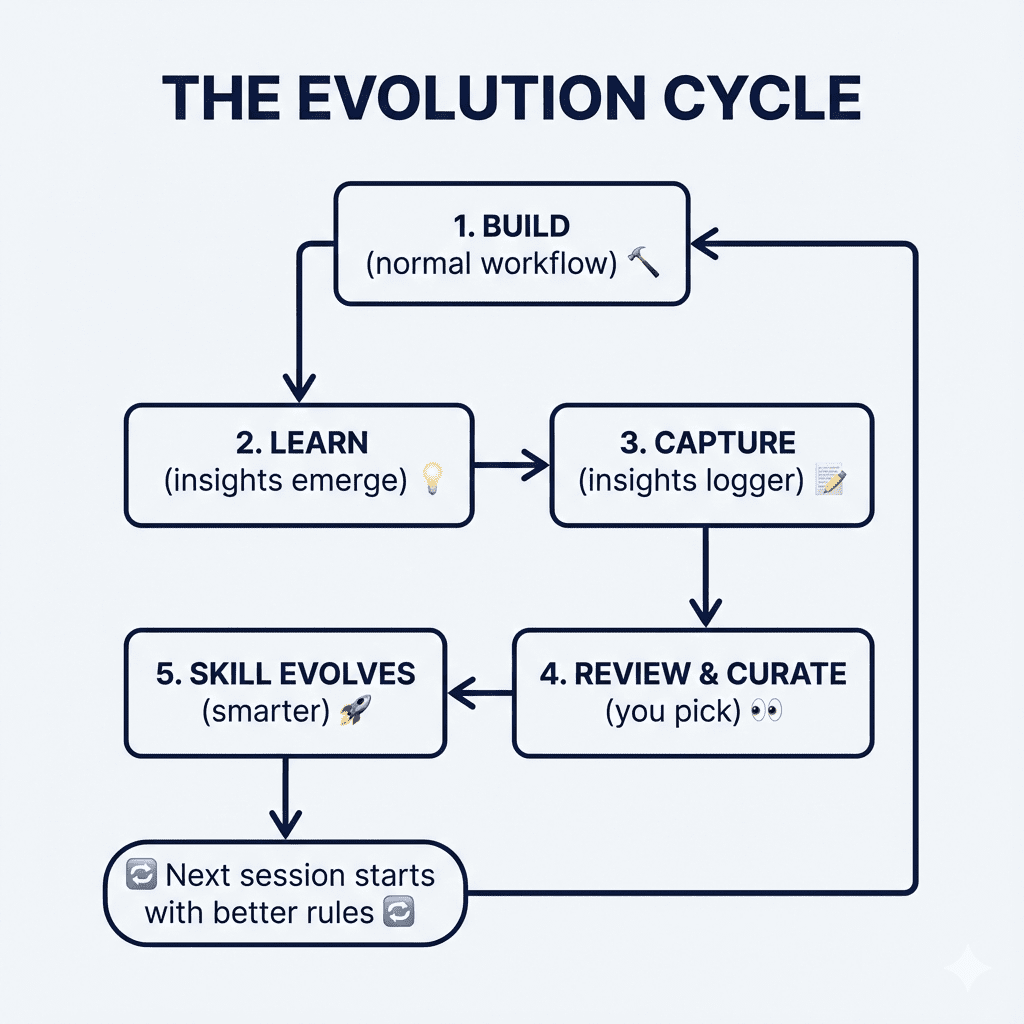
Here’s how all the pieces fit together:
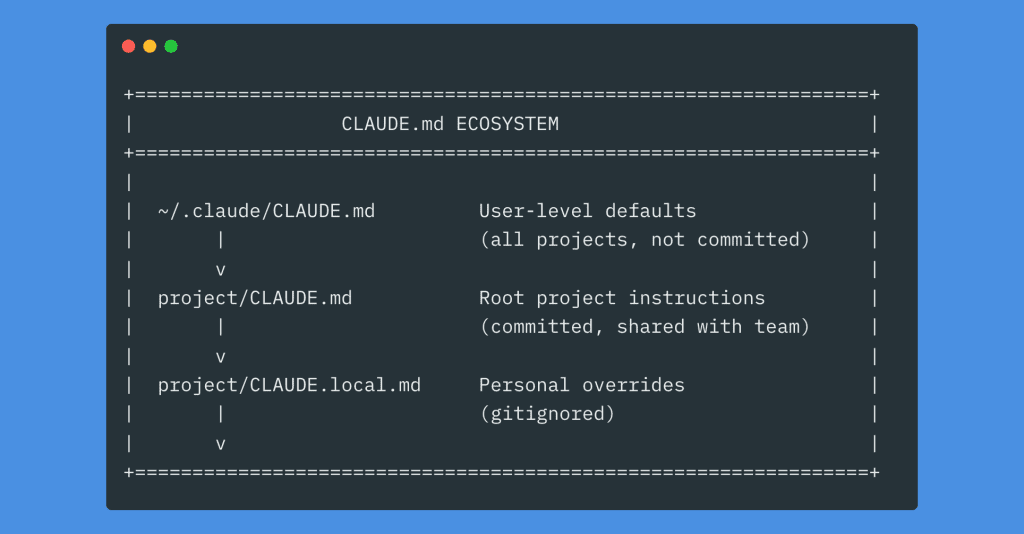
It looks like a lot. But you don’t need all of it. Start with the root file. Add lazy loading when your root gets crowded. Grow organically.
.
.
.
Your Next Step
Here’s my challenge for you:
Open your most active Claude Code project. Look at your CLAUDE.md file (or create one if it doesn’t exist). And ask yourself one question:
What instruction am I going to remove today?
Not add. Remove.
Find the vague rule that accomplishes nothing. Find the workaround for a model behavior that’s been fixed. Find the code snippet that’s just bloating your context. Find the formatting instruction that ESLint already handles.
Delete it.
Every line should earn its place.


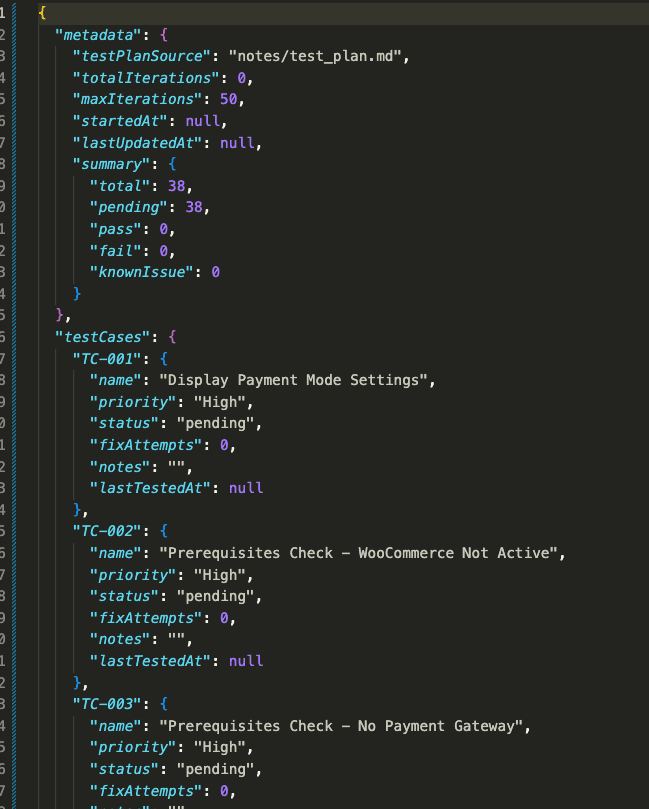

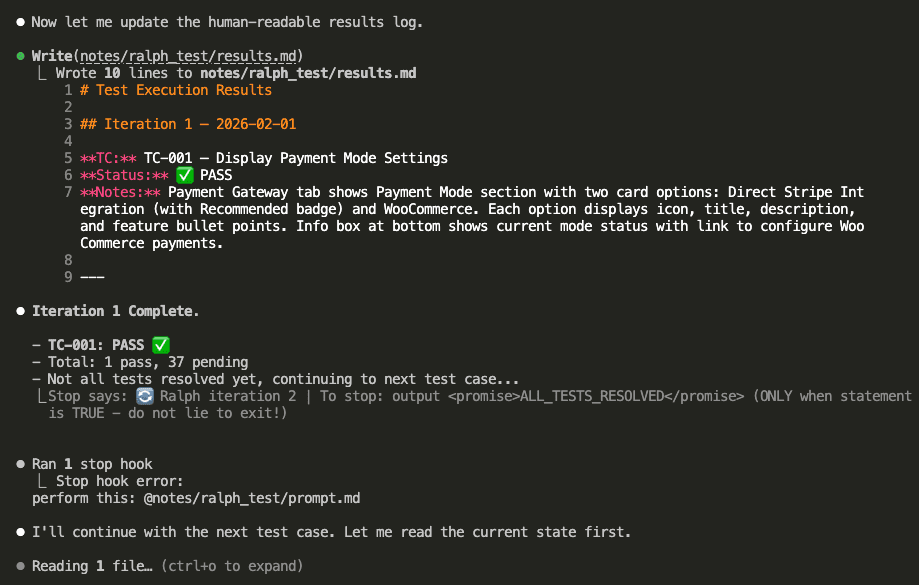

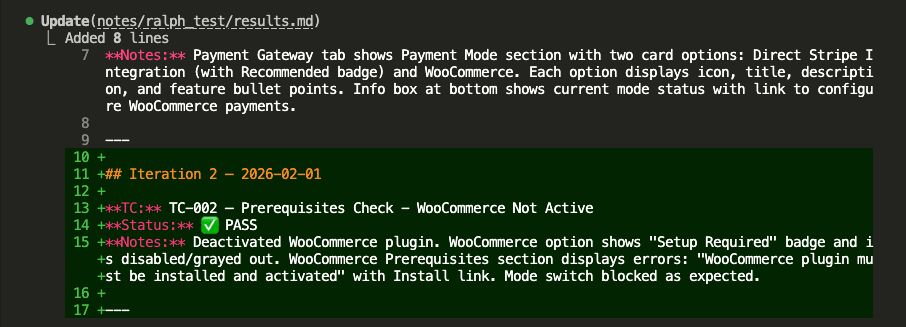
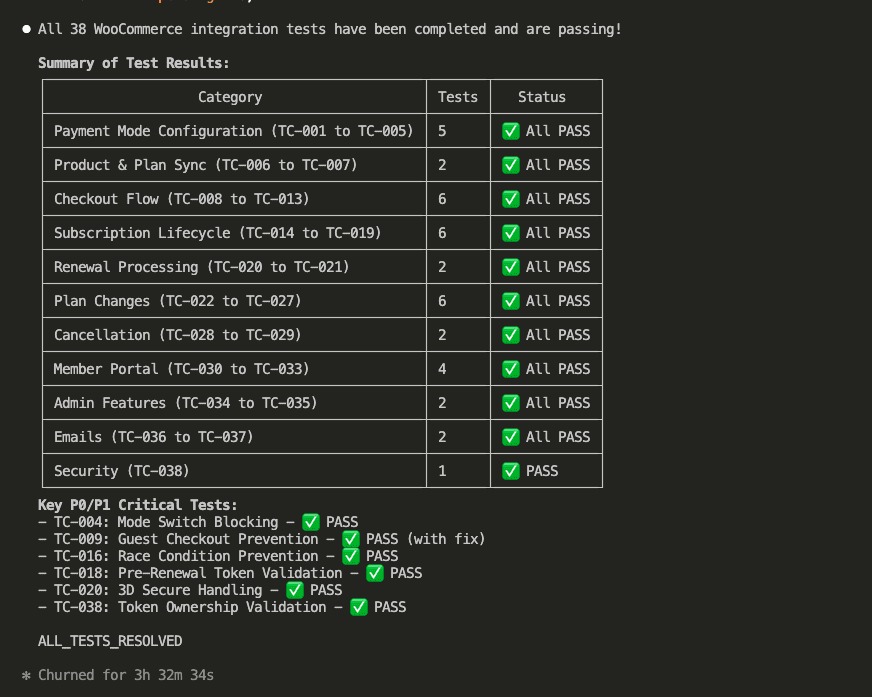

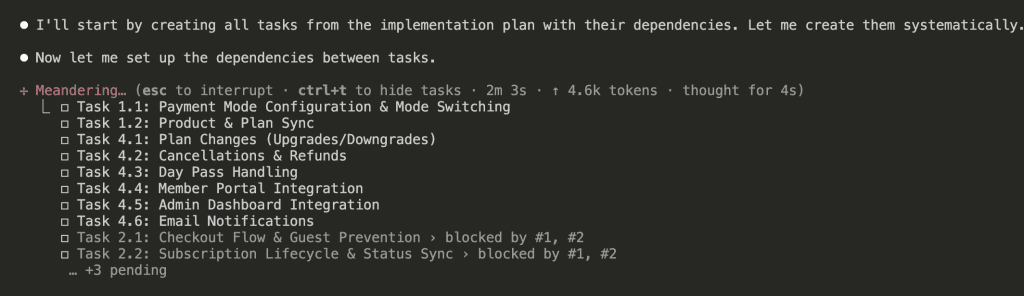

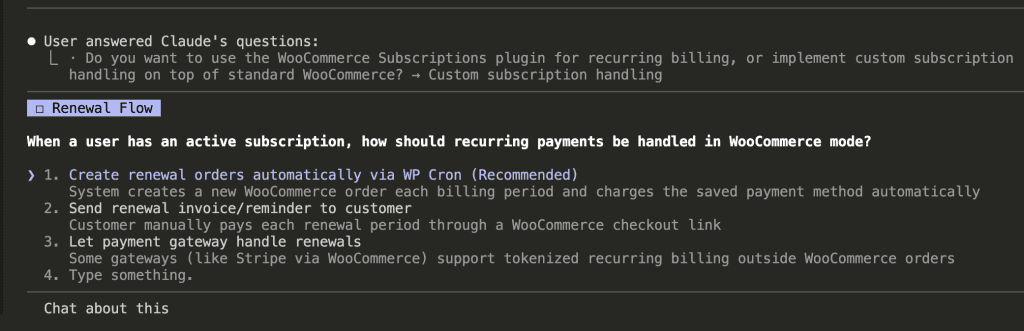

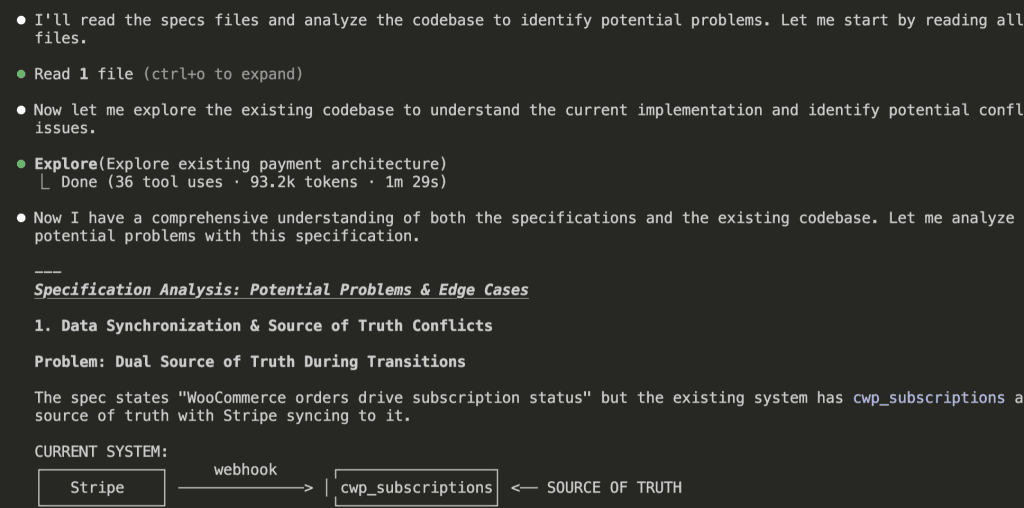


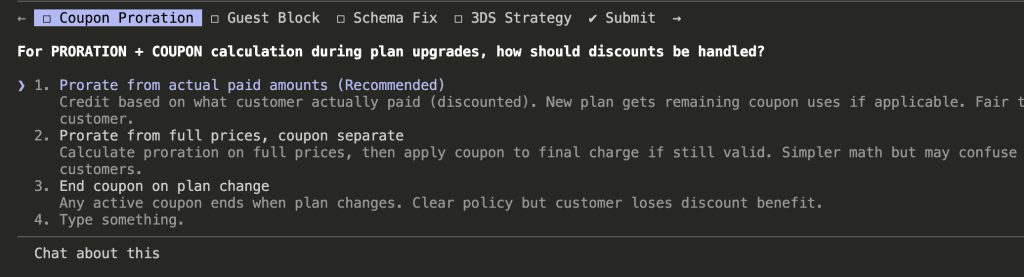
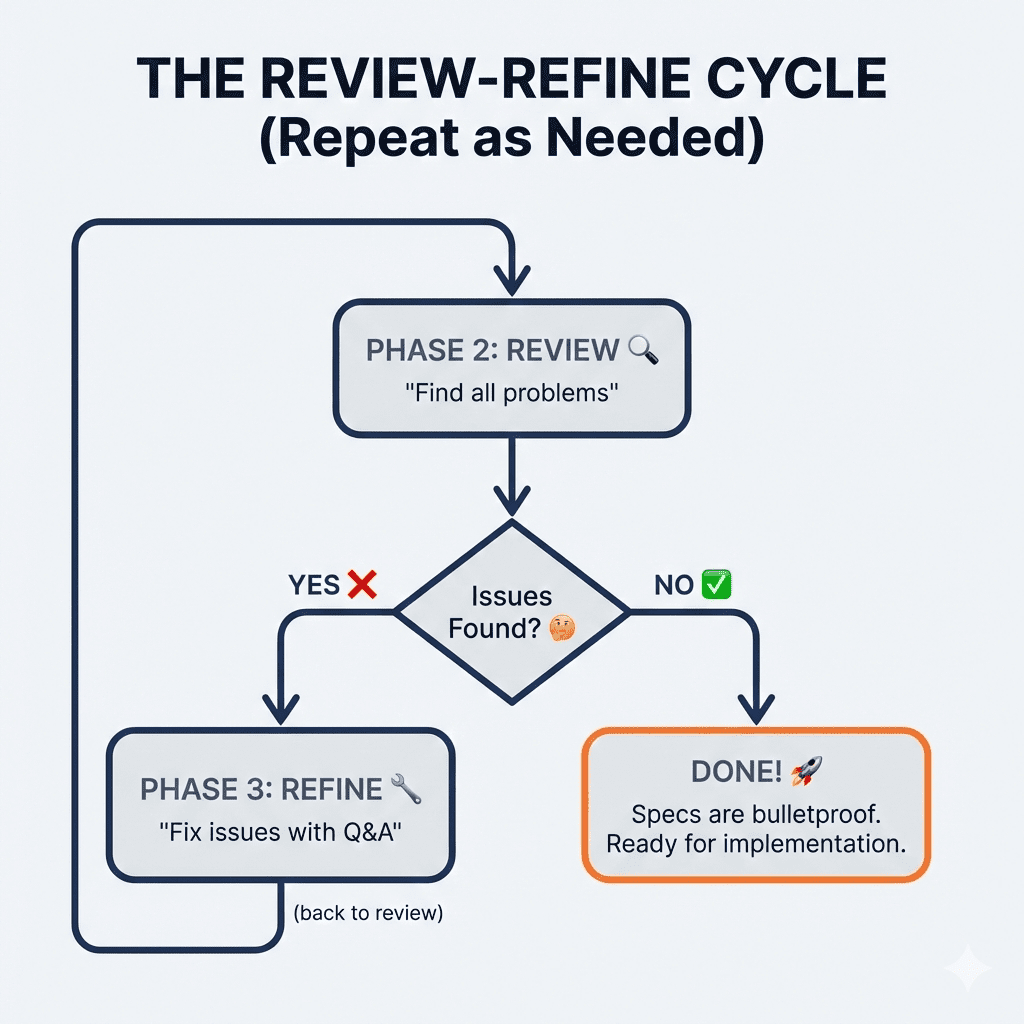


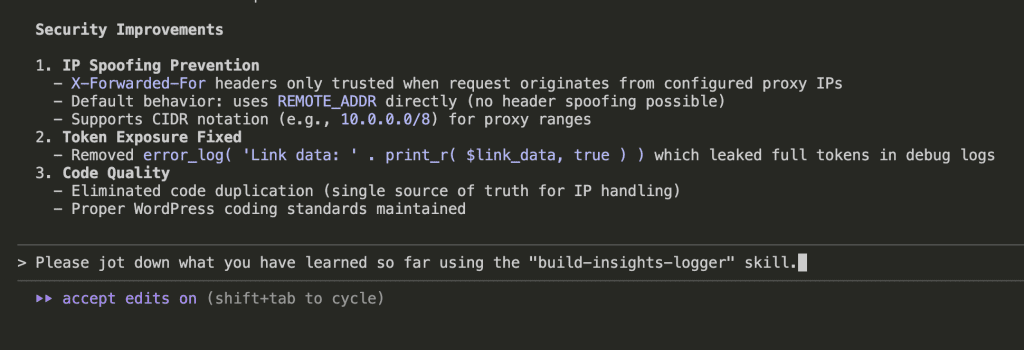
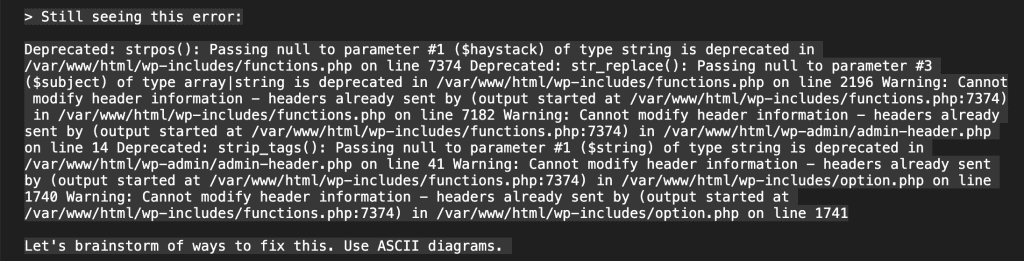
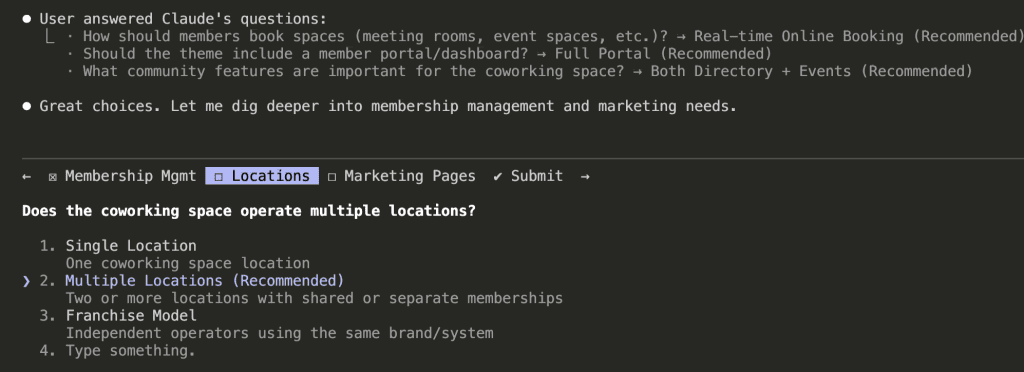
![Infographic titled "THE VISIBILITY PRINCIPLE" at the top in bold, dark blue font. The image is divided into two sections, "BEFORE" and "AFTER", separated by a horizontal line.
The "BEFORE" section, with a downward arrow, shows a flow diagram. On the left, a person icon labeled "You" has an arrow pointing right to a gray rectangular box labeled "[Fog]" with a cloud emoji. Below this fog box, a smaller gray box with an upward arrow points to it, containing the text "(Missing context, summarized errors, assumptions) ❓". An arrow from the "[Fog]" box points right to a robot icon labeled "Claude". An arrow from "Claude" points right to a red rectangular box labeled "Wrong answer" with a red 'X' mark and a sad face emoji 😞.
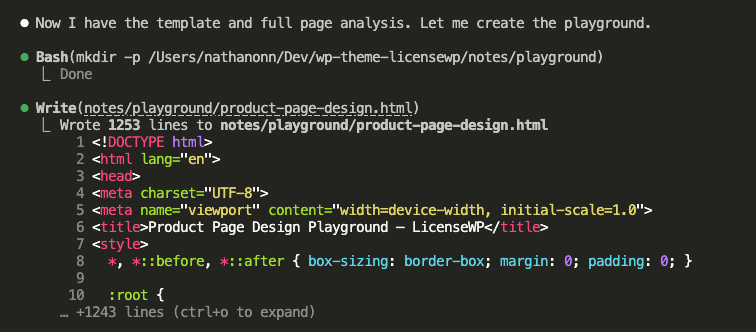
The "AFTER" section, with a downward arrow, shows a parallel flow diagram. On the left, a person icon labeled "You" has an arrow pointing right to a blue rectangular box labeled "[Clear]" with an eyes emoji 👀. Below this clear box, a smaller blue box with an upward arrow points to it, containing the text "(Raw errors, actual output, full context) 🔍". An arrow from the "[Clear]" box points right to a robot icon labeled "Claude". An arrow from "Claude" points right to a green rectangular box labeled "Right answer" with a green checkmark ✅ and a happy face emoji 😊.](https://www.nathanonn.com/wp-content/uploads/2026/01/image-15.png)

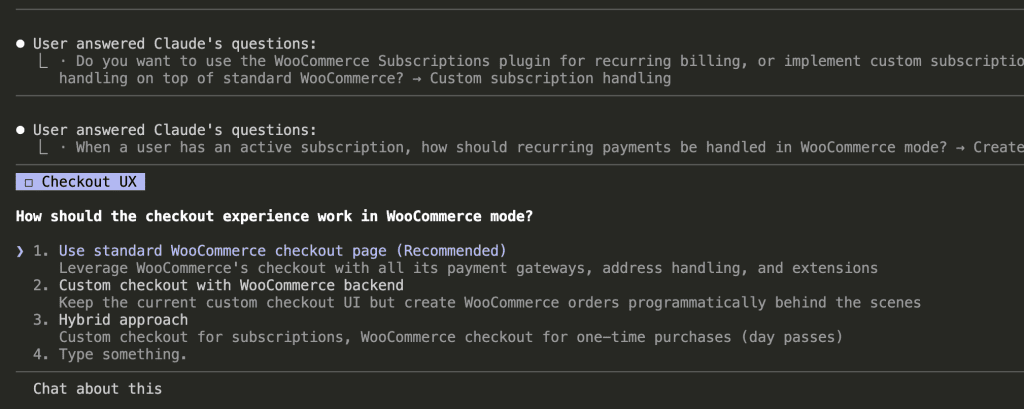
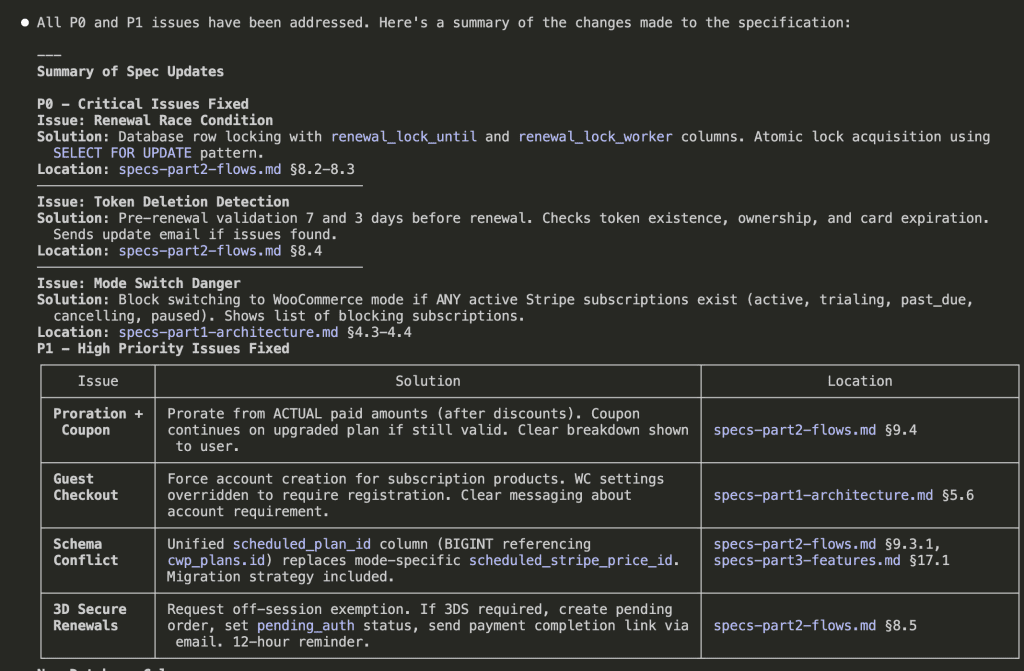
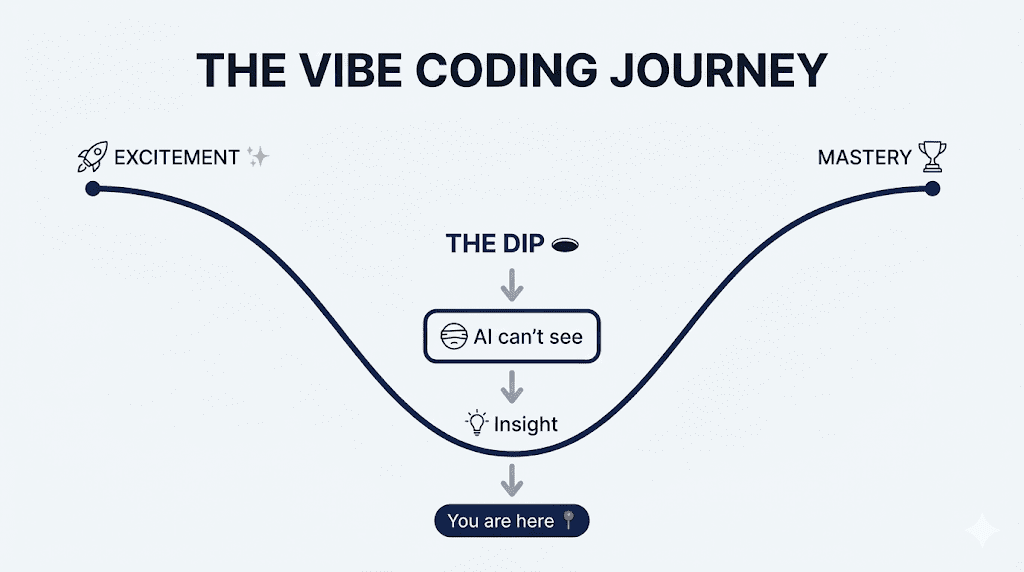
![Flowchart titled 'THE ASKUSERQUESTION FLOW' illustrating an interactive process between a user and an AI, Claude, to improve output. The flow starts with 'Your Prompt' 🗣️ leading to 'Claude Asks Questions' 🤖. This step points to 'You Answer (Options + Your Input)' ⌨️, which then leads to a decision diamond: '95% Confident?' 🤔. If 'No', an arrow loops back to '[Ask More]' 👀 and then to 'Claude Asks Questions'. If 'Yes', an arrow points to '[Generate BRD]' 📄. Finally, '[Generate BRD]' leads to the ultimate goal: 'Better Output' 💪✅. The boxes are connected by arrows on a light grey background.](https://www.nathanonn.com/wp-content/uploads/2026/01/image-10.png)


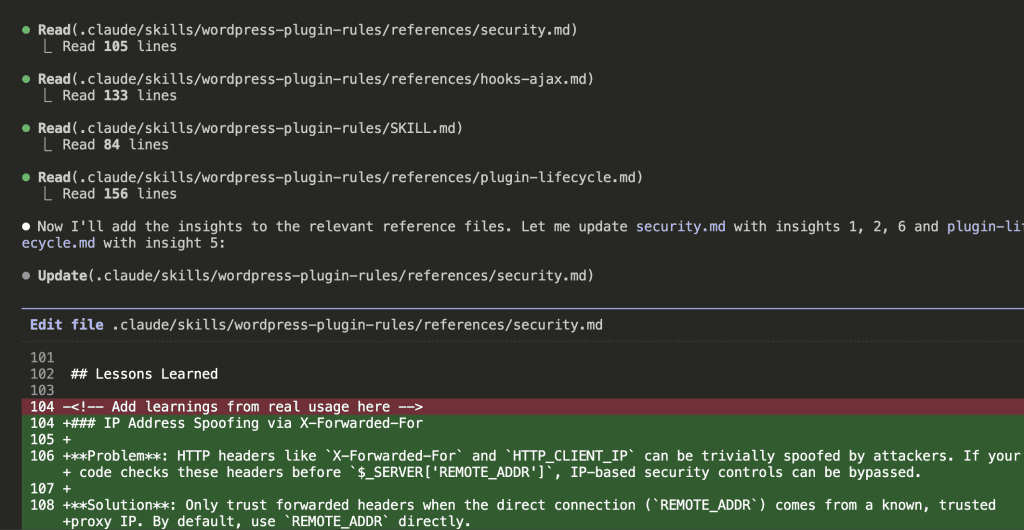
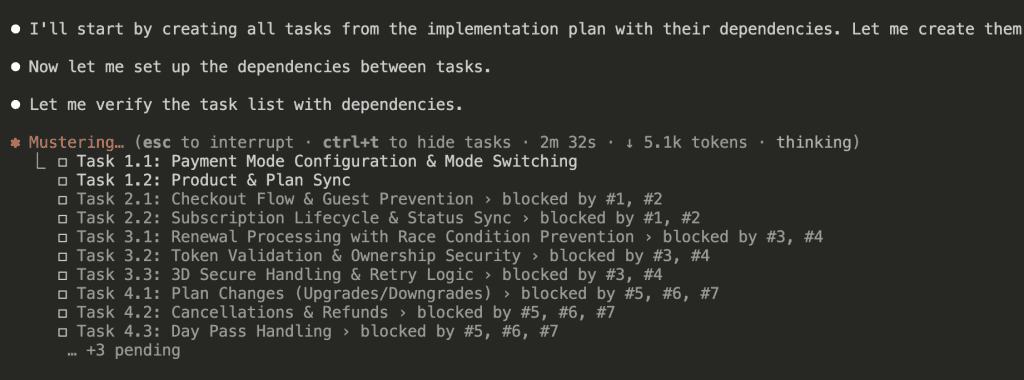
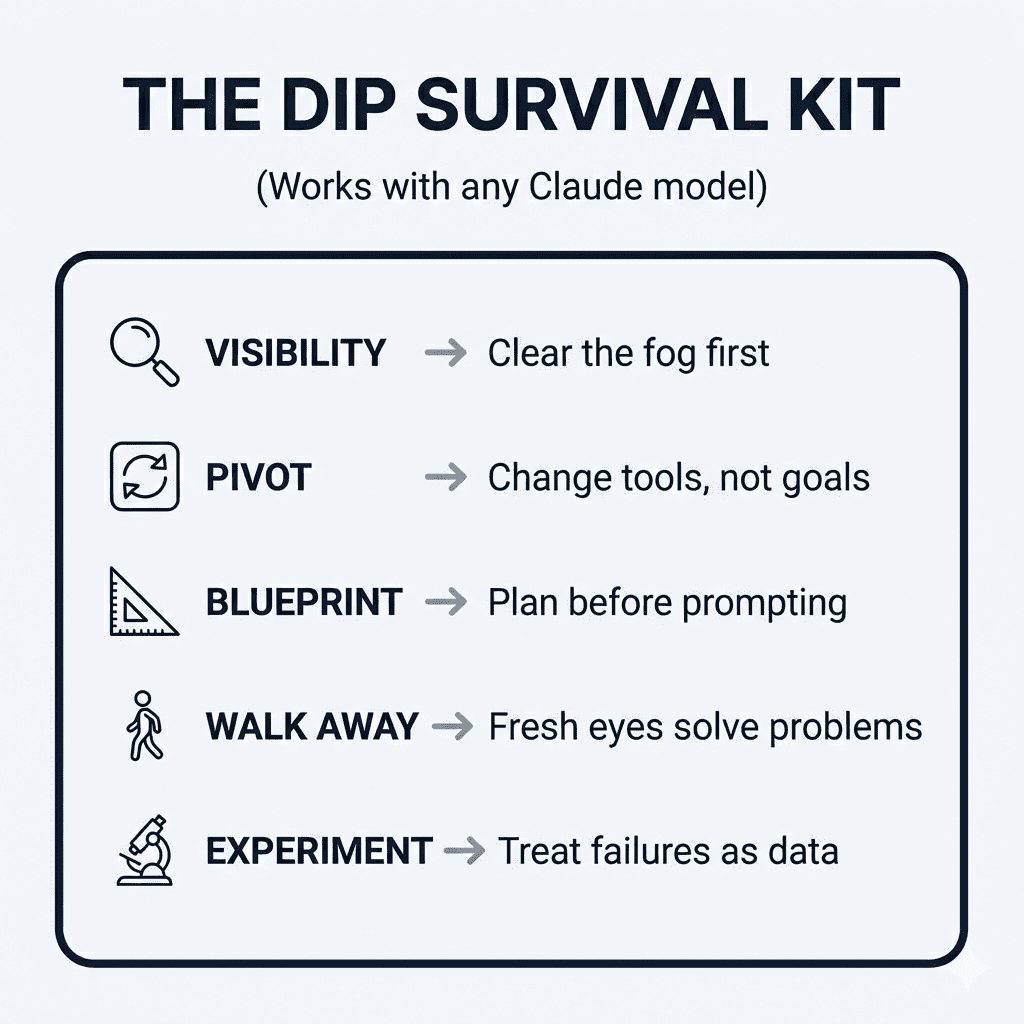
![TOKEN CONSUMPTION: BEFORE vs AFTER". The top section, "THE CLAUDE.md TRAP (Before) ❌", shows a large, full dark bar labeled "2,000 lines = ~4k tokens". Below it are labels for code modules: [security][database][api][hooks][i18n][testing][deploy][...]. Text states "Every message loads EVERYTHING" and "Simple UI task? Still paying for ALL of it. ⚠️". The bottom section, "THE INDEXED SKILL (After) ✅", shows a small dark bar for "Index/descriptions = ~500 tokens (always loaded)". Below it, a separate, segmented gray bar represents "+ security.md = ~800 tokens (only if needed)". Text states "Load index first, references only when needed" and "Simple UI task? Pay only for the index. ✅". A legend indicates that dark bars mean "Tokens consumed" and gray bars mean "Loaded on-demand". A final callout box with a lightbulb icon states, "Key Takeaway: Indexing significantly reduces token costs by loading only what's necessary!](https://www.nathanonn.com/wp-content/uploads/2026/01/image-5.png)