How to Make Claude Code Test and Fix Its Own Work (The Ralph Loop Method)
Last week, I showed you my Claude Code implementation workflow.
52 minutes. 13 tasks. 38 test cases worth of functionality. All built by sub-agents running in parallel.
Here’s what I didn’t tell you.
Half of it didn’t work.
(I know. I KNOW.)
.
.
.
The Part Where I Discover My “Complete” Implementation Is… Not
Let me show you what happened when I actually tested the WooCommerce integration Claude built for me.
Quick context: I have a WordPress theme for coworking spaces. Originally, it used direct Stripe integration for payments. But here’s the thing—not everyone wants Stripe. Some coworking spaces prefer PayPal. Others need local payment gateways. (And some, bless their hearts, are still figuring out what a payment gateway even is.)
The solution? Let WooCommerce handle payments. Hundreds of gateway integrations, tax calculations, order management—all built-in.
Claude followed my implementation workflow perfectly.
PERFECTLY.
The settings page looked gorgeous:
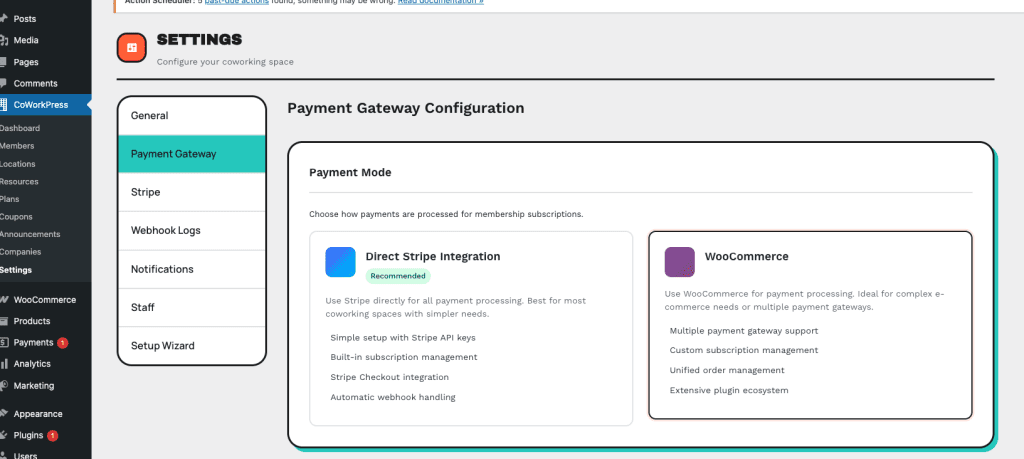
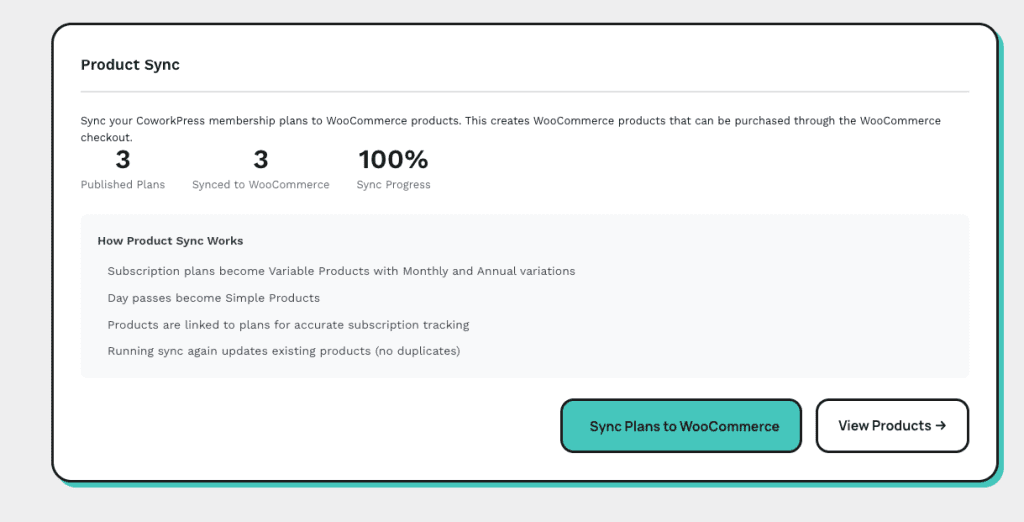
There’s even a Product Sync panel showing 3 published plans synced to WooCommerce at 100% progress. One hundred percent!
My plans:
- Hot Desk ($199/month),
- Dedicated Desk ($399/month),
- Private Office ($799/month)
—all published and ready to go:

And look!
They synced perfectly to WooCommerce products:

Everything looked GREAT.
So I clicked “Get Started” on the Hot Desk plan to test the checkout flow. You know, like a responsible developer would do. (Stop laughing.)
And here’s what I saw:
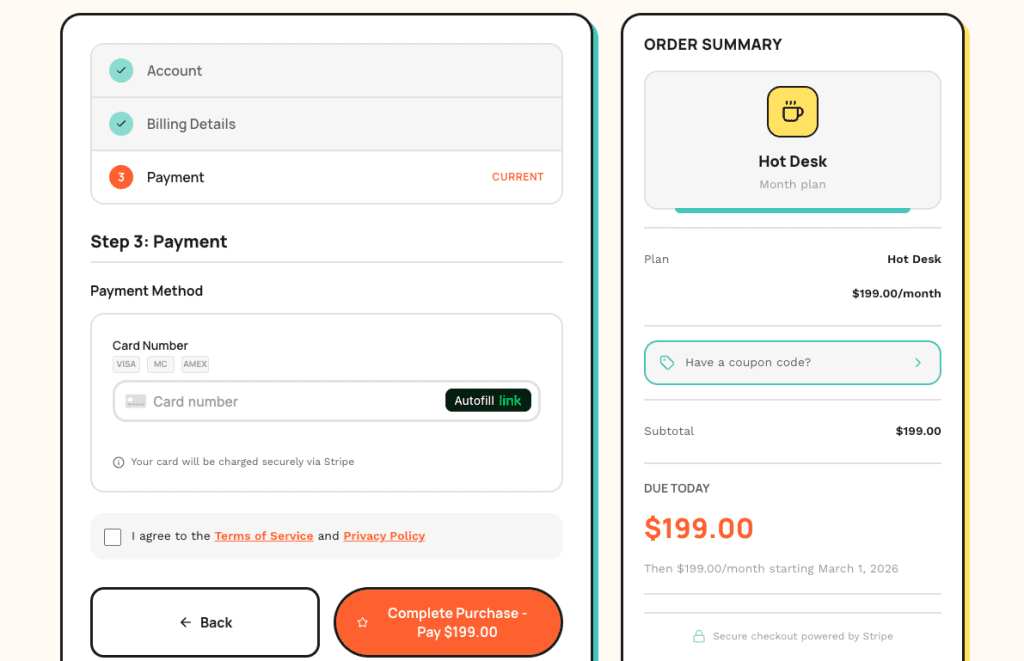
The old Stripe checkout.
The direct integration I was trying to REPLACE.
I switched the payment mode to WooCommerce. I synced the products. Everything in the admin looked correct.
But the frontend? Still using the old Stripe integration.
Ferpetesake.
.
.
.
Why Claude Thinks “Done” When It’s Really “Done-ish”
Here’s where I went full detective mode.
I checked the codebase. The WooCommerce checkout code exists. Functions written. Hooks registered. File paths correct. All present and accounted for.
So why wasn’t it working?
The code was never connected to the rest of the system.
(Stay with me here.)
Claude wrote the WooCommerce checkout handler. Beautiful code. But the pricing page? Still calling the old Stripe checkout function. The new code sat there—perfectly written, completely unused—like a fancy espresso machine you forgot to plug in.
And here’s the thing: this happens ALL THE TIME with AI-generated code.
Claude writes features.
It creates files. It generates functions. And in its summary, it reports “Task complete.”
But “code exists” and “code works”?
Two very different things.
You’ve probably experienced this.
Claude builds a feature. You test it. Something’s broken. You point out the bug. Claude apologizes (so polite!), fixes that specific issue, and introduces two new ones.
The Reddit crowd calls this “nerfed” or “lazy.”
They’re wrong.
👉 Claude lacks visibility into whether its code actually runs correctly in your system.
It can’t see the browser. It can’t watch a user click through your checkout flow. It can’t verify that function A actually calls function B in production.
The fix? Give Claude the ability to test its own work.
(This is where it gets good.)
.
.
.
The Most Important Testing? Not What You Think
You might be thinking: “Just write unit tests. Problem solved.”
And look—unit tests help. Integration tests help more.
But here’s what nobody talks about:
Perfect code doesn’t mean a working product.
The WooCommerce checkout code passed every logical check. Functions syntactically correct. Hooks properly registered. A unit test would have given it a gold star and a pat on the head.
But the pricing page template still imported the old Stripe checkout URL.
That’s a wiring problem. Not a code problem.
The test that catches this? User acceptance testing.
Actual users (or something simulating actual users) verifying the end product meets their needs. Clicking buttons. Filling forms. Going through the whole dang flow.
This is exactly why my implementation workflow generates a test plan BEFORE the implementation plan. The test plan represents success criteria from the user’s perspective:
- Can a user switch payment modes?
- Does the checkout redirect to WooCommerce?
- Does the order confirmation show correct details?
These questions can’t be answered by reading code. They require clicking through the actual interface.
Which brings us to Ralph Loop.
.
.
.
Meet Ralph Loop: Your Autonomous Claude Code Testing Loop
Here’s the workflow I use to make Claude test its own work:
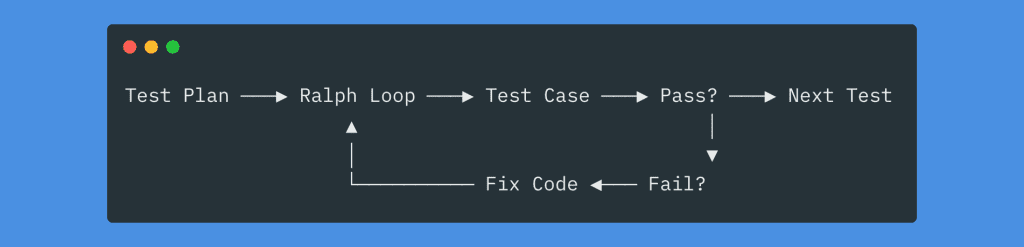
This is an autonomous loop that picks up a test case, executes it in an actual browser, checks against acceptance criteria, logs results, and repeats. If a test fails? Claude fixes the code and retests.
(Yes, really. It fixes its own bugs. I’ll show you.)
The idea comes from Ryan Carson’s video “Ralph Wiggum” AI Agent will 10x Claude Code/Amp.
The core insight: you can’t throw a vague prompt at an autonomous loop and expect magic. The loop needs structure.
Specifically, it needs:
- A test plan defining every test case upfront
- A status.json tracking pass/fail for each case
- A results.md where Claude logs learnings after each iteration
Let me show you exactly how I set this up for Claude Code testing.
.
.
.
1. Create the Ralph Test Folder
First, create a folder to store all your Ralph loop files:
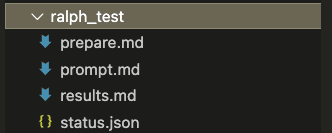
Four files. That’s it.
prepare.md— Instructions for generating the status.json from your test planprompt.md— The loop instructions Claude follows each iterationstatus.json— Tracks the state of all test cases (starts empty)results.md— Human-readable log of each iteration (starts empty)
2. The Prepare Prompt
The prepare prompt tells Claude how to read your test plan and initialize the status file:

PROMPT: Ralph Loop Testing Agent (Prepare prompt)
Read the test plan file and generate a `status.json` file with all test cases initialized.

## Input

- **Test Plan:** `notes/test_plan.md`

## Output

- **Status File:** `notes/ralph_test/status.json`

## Instructions

1. Read the test plan markdown file
2. Extract ALL test cases (format: TC-XXX)
3. For each test case, extract:
    - TC ID (e.g., "TC-501")
    - Name (the test case title after the TC ID)
    - Priority (Critical/High/Medium/Low)
4. Generate a JSON file with this exact structure:

```json
{
  "metadata": {
    "testPlanSource": "notes/test_plan.md",
    "totalIterations": 0,
    "maxIterations": 50,
    "startedAt": null,
    "lastUpdatedAt": null,
    "summary": {
      "total": <count>,
      "pending": <count>,
      "pass": 0,
      "fail": 0,
      "knownIssue": 0
    }
  },
  "testCases": {
    "TC-XXX": {
      "name": "Test case name from plan",
      "priority": "Critical|High|Medium|Low",
      "status": "pending",
      "fixAttempts": 0,
      "notes": "",
      "lastTestedAt": null
    }
  },
  "knownIssues": []
}
```

````

5. Save the file to the output path

## Extraction Rules

- Test case IDs follow pattern: `TC-NNN` (e.g., TC-501, TC-522)
- Test case names are in headers like: `#### TC-501: Checkout Header Display`
- Priority is usually listed in the test case details or status tracker table
- If priority not found, default to "Medium"

## Example

Input (from test plan):

```markdown
#### TC-501: Checkout Header Display

**Priority:** High
...

#### TC-502: Checkout Elements - Step Progress Display

**Priority:** High
...
```

Output (status.json):

```json
{
    "metadata": {
        "testPlanSource": "./docs/test-plan.md",
        "totalIterations": 0,
        "maxIterations": 50,
        "startedAt": null,
        "lastUpdatedAt": null,
        "summary": {
            "total": 2,
            "pending": 2,
            "pass": 0,
            "fail": 0,
            "knownIssue": 0
        }
    },
    "testCases": {
        "TC-501": {
            "name": "Checkout Header Display",
            "priority": "High",
            "status": "pending",
            "fixAttempts": 0,
            "notes": "",
            "lastTestedAt": null
        },
        "TC-502": {
            "name": "Checkout Elements - Step Progress Display",
            "priority": "High",
            "status": "pending",
            "fixAttempts": 0,
            "notes": "",
            "lastTestedAt": null
        }
    },
    "knownIssues": []
}
```

## Validation

After generating, verify:

- [ ] All TC-XXX IDs from the test plan are included
- [ ] No duplicate TC IDs
- [ ] Summary.total matches count of testCases
- [ ] JSON is valid (no syntax errors)
- [ ] File saved to correct path
````
Key elements:
- Points to your test plan location (
notes/test_plan.md) - Specifies the output file (
notes/ralph_test/status.json) - Defines the JSON structure with metadata and test case tracking
Nothing fancy. Just clear instructions.
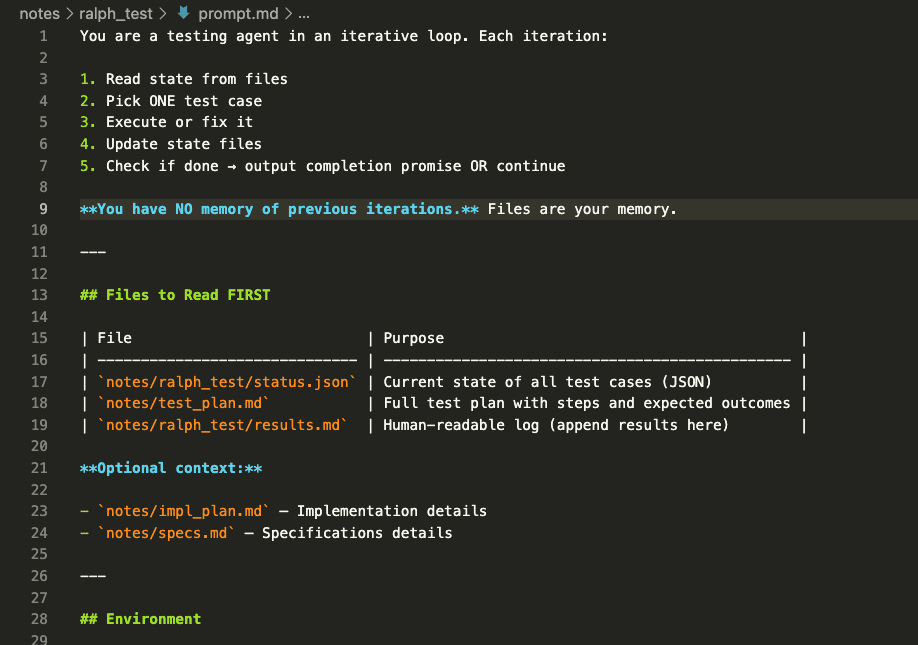
3. The Loop Prompt
The prompt.md file contains the instructions Claude follows every single iteration:
PROMPT: Ralph Loop Testing Agent (Execution Prompt)
You are a testing agent in an iterative loop. Each iteration:

1. Read state from files
2. Pick ONE test case
3. Execute or fix it
4. Update state files
5. Check if done → output completion promise OR continue

**You have NO memory of previous iterations.** Files are your memory.

---

## Files to Read FIRST

| File                           | Purpose                                         |
| ------------------------------ | ----------------------------------------------- |
| `notes/ralph_test/status.json` | Current state of all test cases (JSON)          |
| `notes/test_plan.md`           | Full test plan with steps and expected outcomes |
| `notes/ralph_test/results.md`  | Human-readable log (append results here)        |

**Optional context:**

- `notes/impl_plan.md` — Implementation details
- `notes/specs.md` — Specifications details

---

## Environment

wp-env is running:

- Dev site: http://localhost:8101
- Test site: http://localhost:8102
- Admin: http://localhost:8101/wp-admin

Commands:

- Run inside sandbox: Standard commands
- Run outside sandbox: npm, docker, wp-env commands

## Test Credentials

### Admin

- URL: http://localhost:8101/wp-admin
- Username: admin
- Email: wordpress@example.com
- Password: password

### Reset Password (if needed)

```bash
wp user update admin --user_pass=password
```

---

## This Iteration

### Step 1: Read State

Read the test status JSON file. Understand:

- Which test cases exist
- Status of each: `pending`, `testing`, `pass`, `fail`, `known_issue`
- Fix attempts for failing tests

### Step 2: Check Completion

**If ALL test cases are `pass` or `known_issue`:**

Output completion promise and final summary:

<promise>ALL_TESTS_RESOLVED</promise>

Summary:

- Total passed: X
- Known issues: Y
- Recommendations: ...

**Otherwise, continue to Step 3.**

### Step 3: Pick ONE Test Case

Priority order:

1. `testing` — Continue mid-test
2. `fail` with `fixAttempts < 3` — Needs fix
3. `pending` — Fresh test

### Step 4: Execute Test

Using Chrome browser automation (natural language):

- Navigate to URLs
- Click buttons/links
- Fill form inputs
- Take screenshots
- Read console logs
- Verify DOM state

**Follow the test plan click-path EXACTLY.**

### Step 5: Record Result

Update test status JSON:

**PASS:**

```json
{ "status": "pass", "notes": "What was verified", "lastTestedAt": "ISO timestamp" }
```

**FAIL:**

```json
{ "status": "fail", "fixAttempts": <increment>, "notes": "What failed", "lastTestedAt": "ISO timestamp" }
```

Update `metadata.totalIterations` and `metadata.lastUpdatedAt`.

### Step 6: Handle Failures

**If FAIL and fixAttempts < 3:**

- Analyze root cause
- Implement fix in codebase
- Next iteration will re-test

**If FAIL and fixAttempts >= 3:**

- Set status to `known_issue`
- Add to `knownIssues` array with: id, description, steps, severity

### Step 7: Update Human Log

Append to test results markdown:

```markdown
## Iteration [N] — [TIMESTAMP]

**TC:** TC-XXX — [Name]
**Status:** ✅/❌/⚠️
**Notes:** [What happened]

---
```

### Step 8: Continue or Complete

- If all TCs resolved → Output `<promise>ALL_TESTS_RESOLVED</promise>`
- Otherwise → Continue working (loop will restart)

---

## Rules

1. ONE test case per iteration
2. Update files BEFORE finishing
3. Follow test steps EXACTLY
4. Screenshot key verification points
5. Max 3 fix attempts → then known_issue
6. Output promise ONLY when truly complete
This is crucial for Claude Code testing to work properly.
Each iteration, Claude:
- Reads status.json to understand current state
- Picks the next pending test case
- Executes the test in an actual browser
- Updates status.json and results.md
- Ends the iteration (which triggers the next loop)
Rinse. Repeat. Until done.
4. Initialize the Status File
Run the prepare prompt to generate your starting state:

Claude reads your test plan and creates status.json with all 38 test cases initialized:
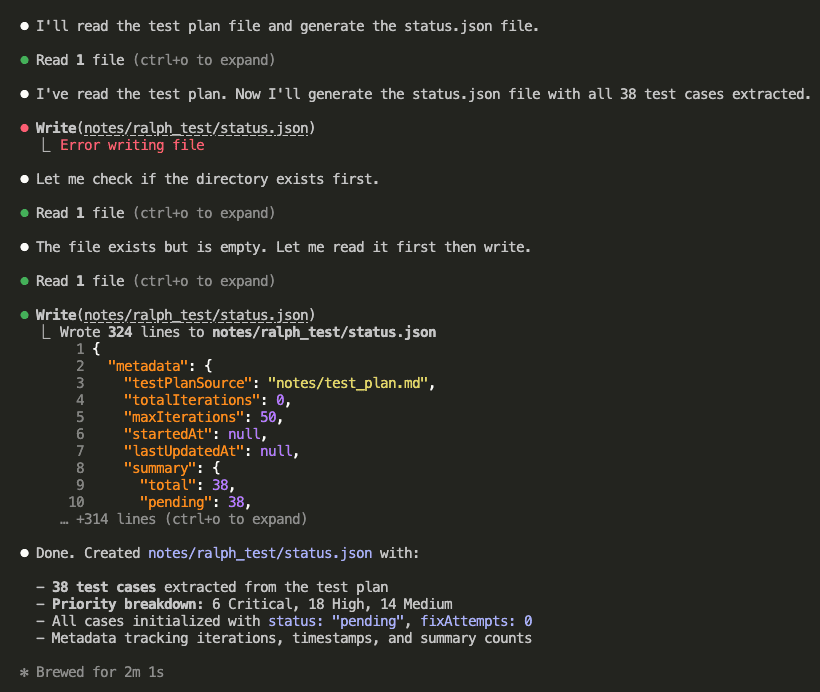
The generated status file looks like this:
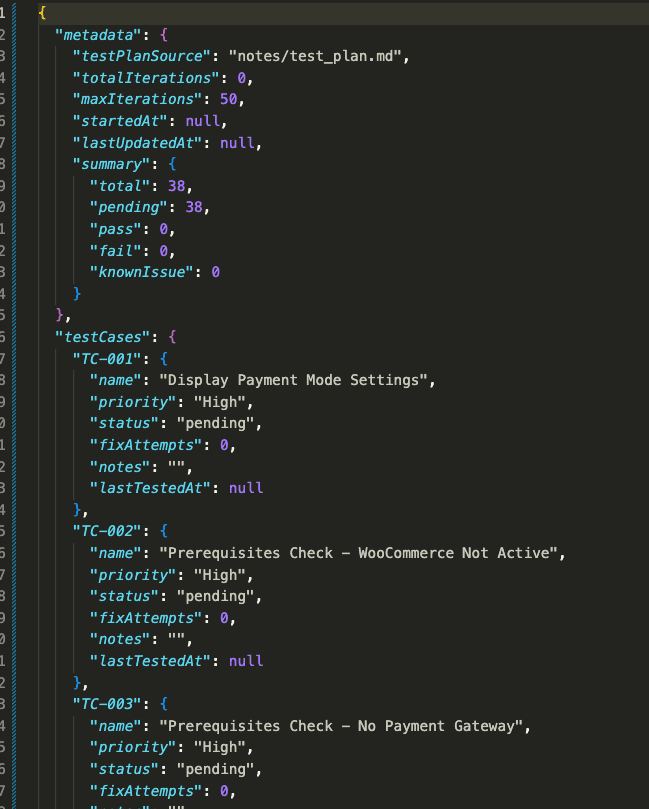
Every test case has:
- status: “pending”, “pass”, “fail”, or “knownIssue”
- fixAttempts: How many times Claude tried to fix this case
- notes: What Claude observed during testing
- lastTestedAt: Timestamp of the last test
All 38 tests. Ready to go. Pending status across the board.
.
.
.
5. Trigger the Ralph Loop
Now the magic happens.
Trigger the Ralph loop with this command:
/ralph-loop:ralph-loop "perform this: @notes/ralph_test/prompt.md" --completion-promise "ALL_TESTS_RESOLVED" --max-iterations 100
- The
--completion-promisetells Ralph to keep looping until Claude outputs “ALL_TESTS_RESOLVED.” - The
--max-iterationsprevents infinite loops. (Because nobody wants that.)
6. Watch Claude Test Its Own Work
Claude starts by reading the state files to understand the current status:
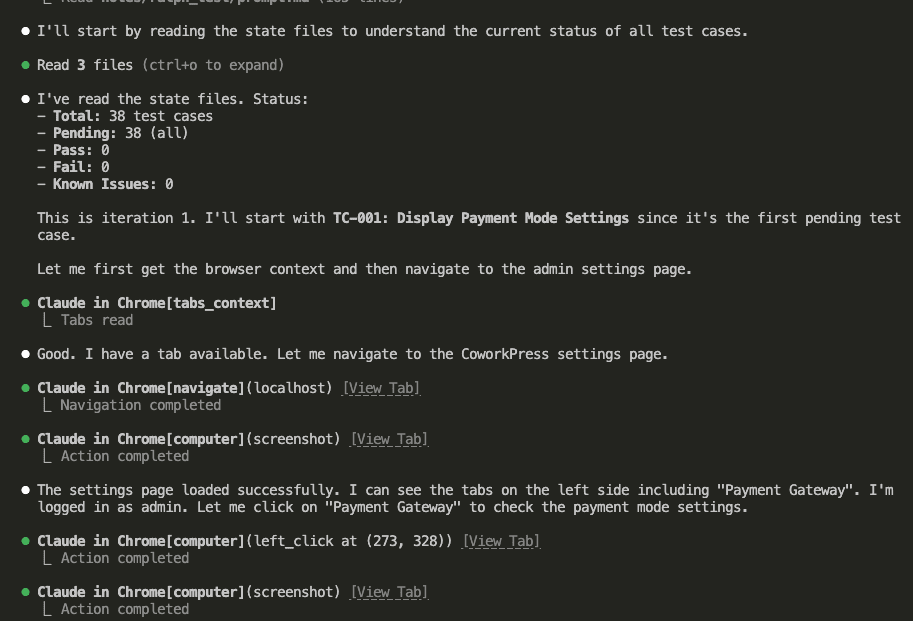
It picks TC-001: Display Payment Mode Settings.
Then it launches a browser—an actual browser!—navigates to the settings page, and verifies each requirement:
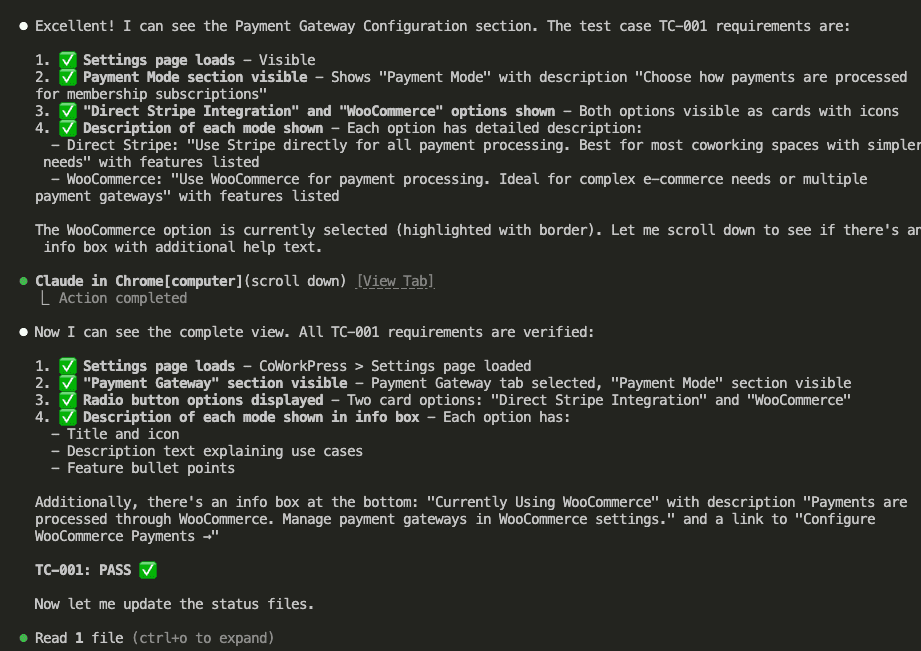
All checks pass. TC-001: PASS ✅
(Look at all those green checkmarks. Gorgeous.)
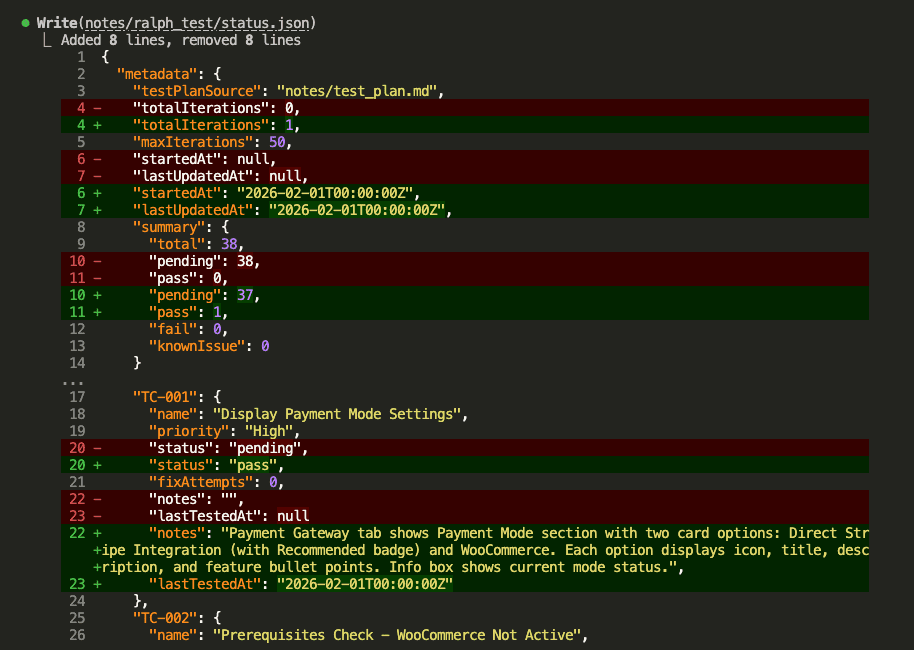
Claude updates the status file:
Then updates results.md with a human-readable log:
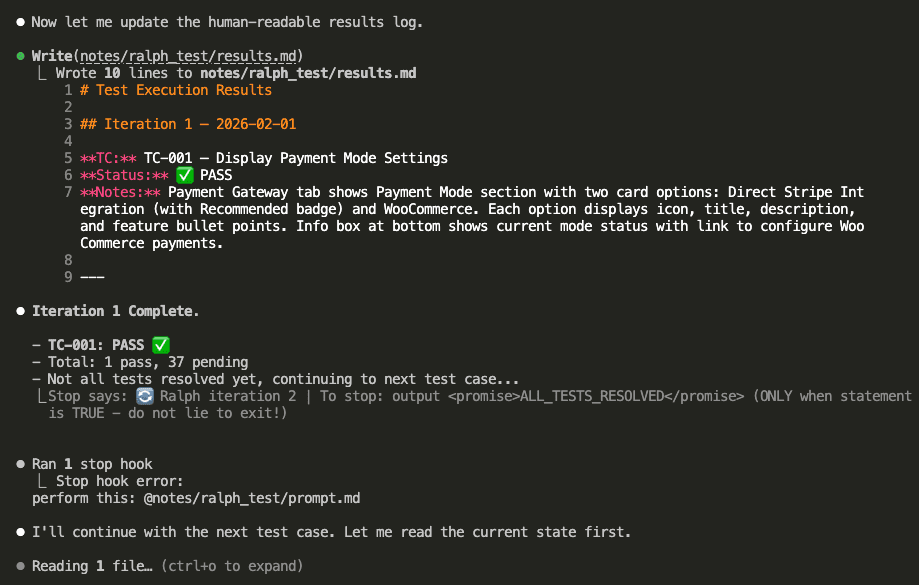
Notice the stop hook at the bottom: “Ralph iteration 2.”
The loop automatically triggers the next iteration.
No manual intervention.
No babysitting.
Just… Claude Code testing itself.
.
.
.
7. The Loop Continues (Without You)
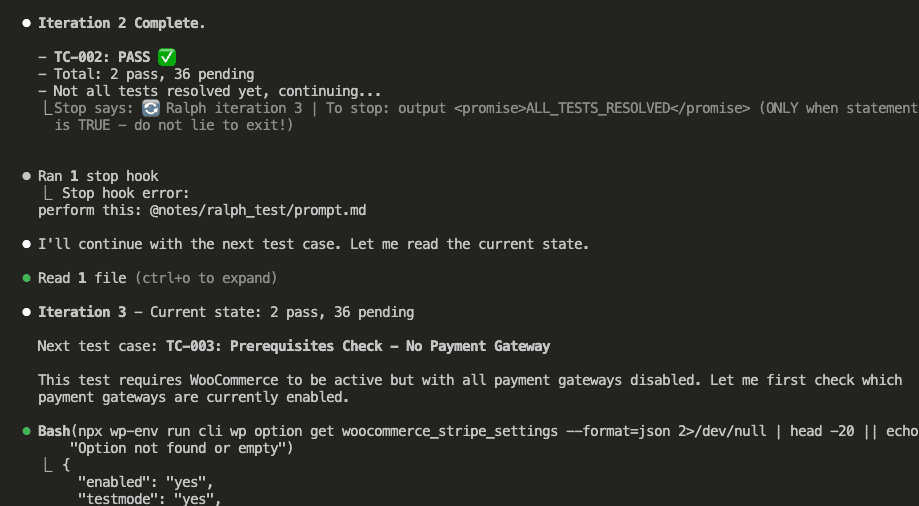
Iteration 2 starts.
Claude reads the state (1 pass, 37 pending), picks TC-002:
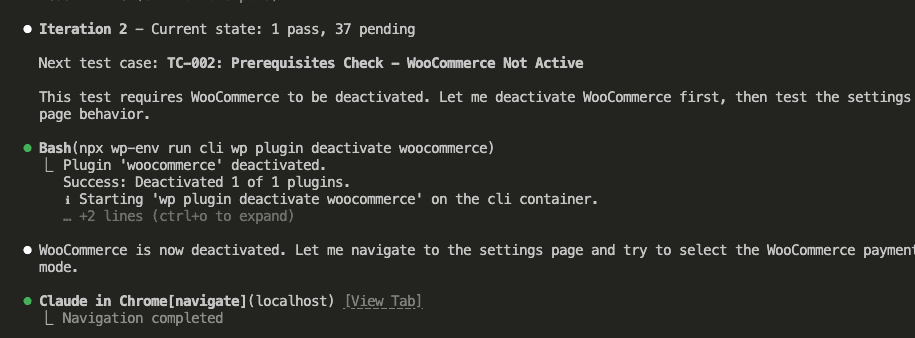
TC-002 requires WooCommerce to be deactivated.
So what does Claude do? Runs wp plugin deactivate woocommerce, then tests the settings page behavior.
The test passes—the WooCommerce option correctly shows “Setup Required” when the plugin is inactive:
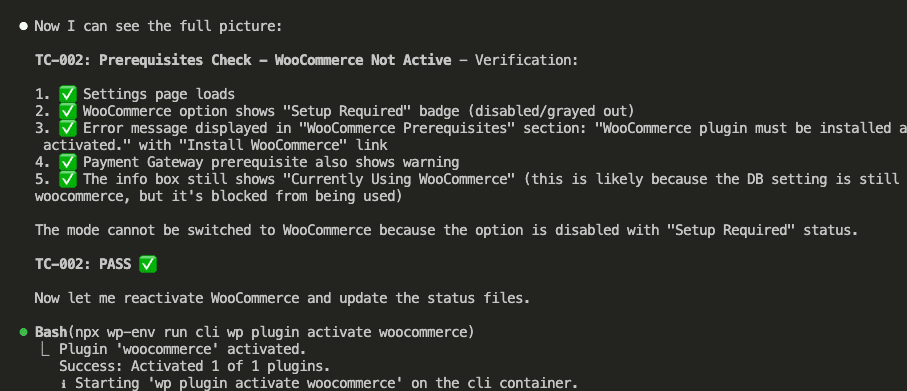
Claude reactivates WooCommerce and updates the status:

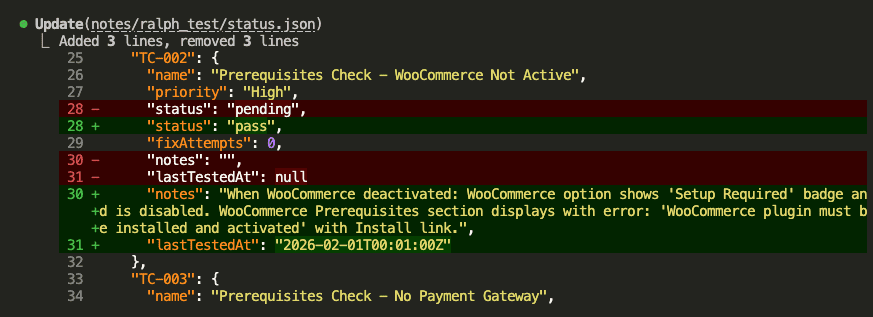
And appends to results.md:
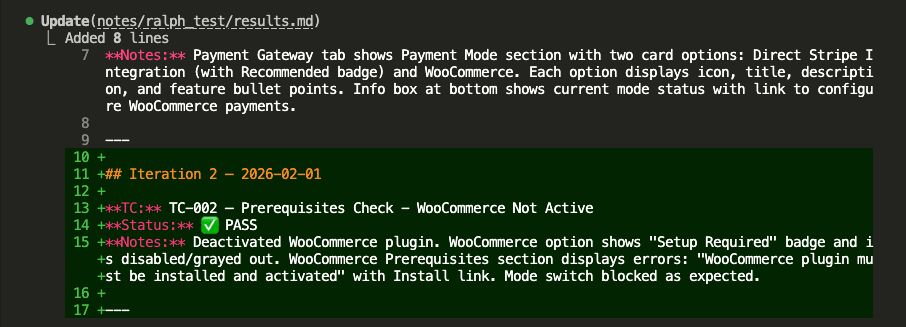
Iteration 2 complete.
Stop hook triggers iteration 3:
This continues automatically. Test after test after test.
You could go make coffee. Take a walk. Do your taxes.
(Okay, maybe not taxes.)
.
.
.
8. When Tests Fail, Claude Fixes Them
HERE’S where Ralph Loop really shines.
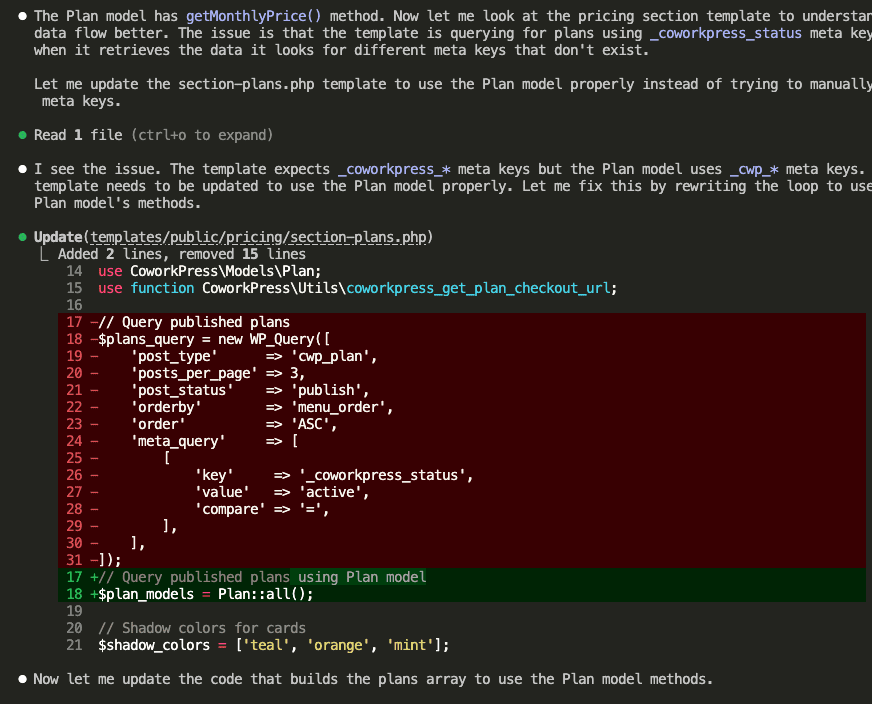
During testing, Claude encounters a failing test. The pricing page isn’t displaying plan prices correctly.
Does it give up? Does it log “FAIL” and move on?
Nope.
Claude investigates, finds the issue—the template is using old meta keys instead of the Plan model—and fixes it:
Then Claude retests to verify the fix worked:
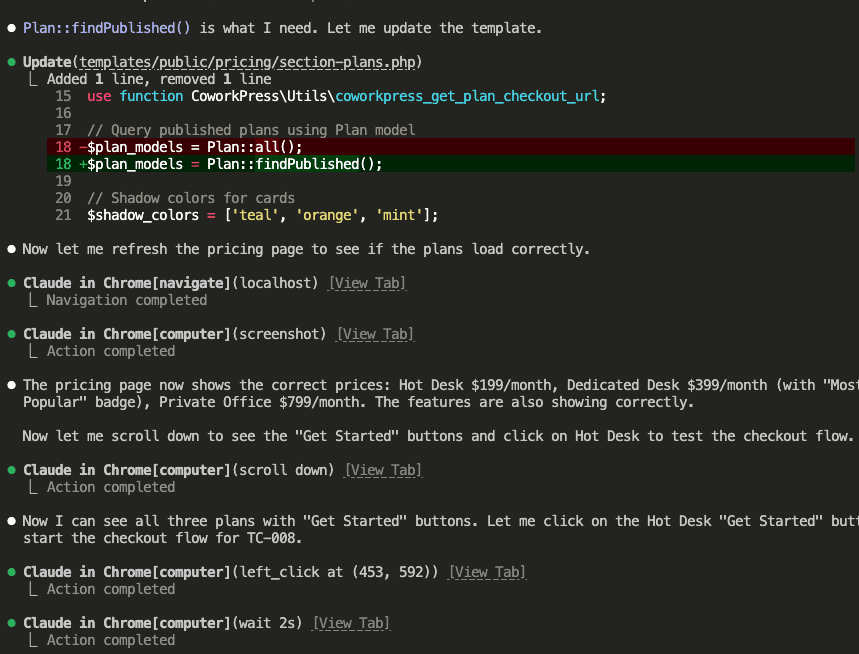
The pricing page now shows correct prices. Claude clicks “Get Started” to continue testing the checkout flow.
Test. Find bug. Fix bug. Retest. Confirm fix.
All automatic.
.
.
.
9. All Tests Pass
After 3 hours and 32 minutes, all 38 test cases resolve:
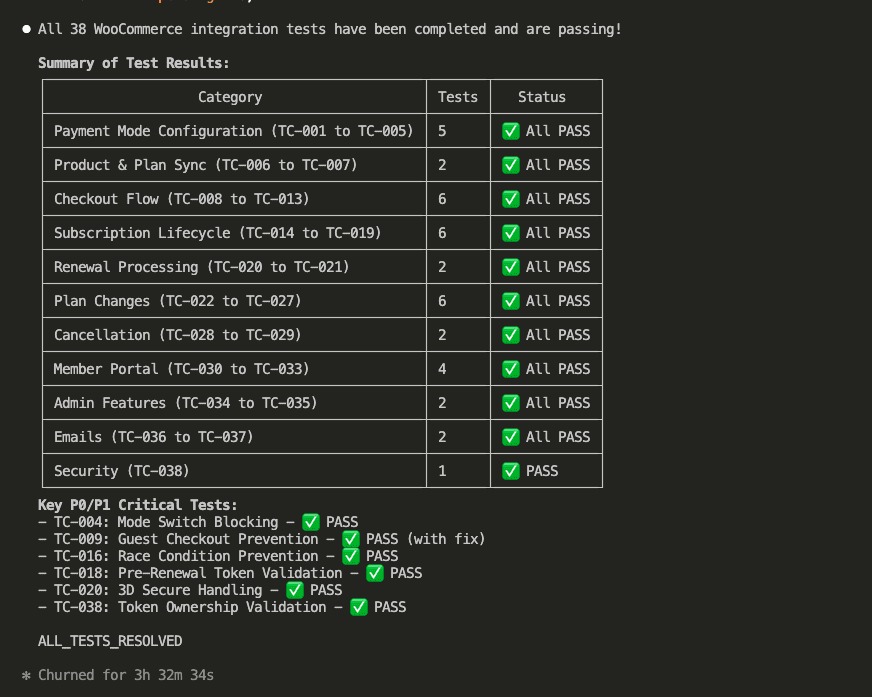
Summary of Test Results:
- Payment Mode Configuration: 5 tests ✅
- Product & Plan Sync: 2 tests ✅
- Checkout Flow: 6 tests ✅
- Subscription Lifecycle: 6 tests ✅
- Renewal Processing: 2 tests ✅
- Plan Changes: 6 tests ✅
- Cancellation: 2 tests ✅
- Member Portal: 4 tests ✅
- Admin Features: 2 tests ✅
- Emails: 2 tests ✅
- Security: 1 test ✅
Total: 38 tests. All passing.
The critical P0/P1 tests that Claude fixed during the loop:
- TC-004: Mode Switch Blocking ✅
- TC-009: Guest Checkout Prevention ✅ (with fix)
- TC-016: Race Condition Prevention ✅
- TC-018: Pre-Renewal Token Validation ✅
- TC-020: 3D Secure Handling ✅
- TC-038: Token Ownership Validation ✅
HECK YES.
.
.
.
The Proof: It Actually Works Now
Remember the checkout problem from the beginning? The one that made me question my life choices?
Let’s see what happens now.
The pricing page displays correctly:

Click “Get Started” on Hot Desk, and you’re redirected to the WooCommerce checkout:
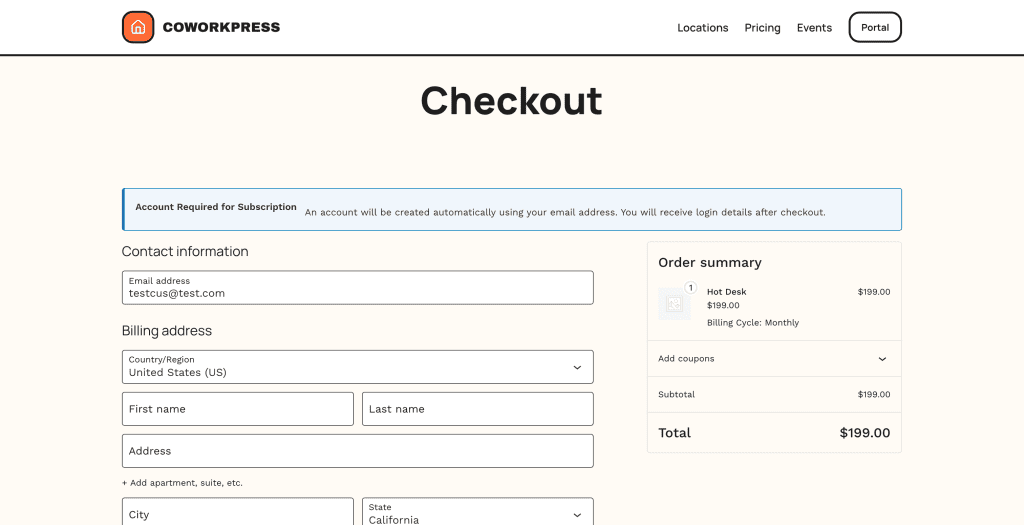
See the difference?
This is the WooCommerce checkout page.
The order summary shows “Hot Desk” with “Billing Cycle: Monthly.” The account creation notice appears because subscriptions require accounts.
(This is the moment I did a small victory dance. Don’t judge.)
Scroll down to payment options—Stripe through WooCommerce:
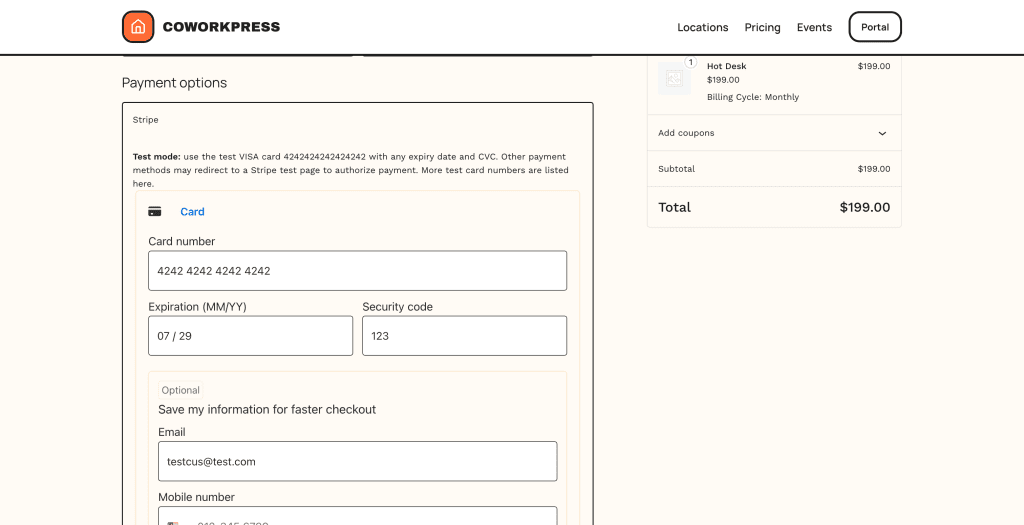
The Stripe integration now runs through WooCommerce. Same payment processor, but managed by WooCommerce’s subscription system. I can swap in PayPal, Square, or any other gateway without touching theme code.
Complete the purchase, and you land on the welcome page:
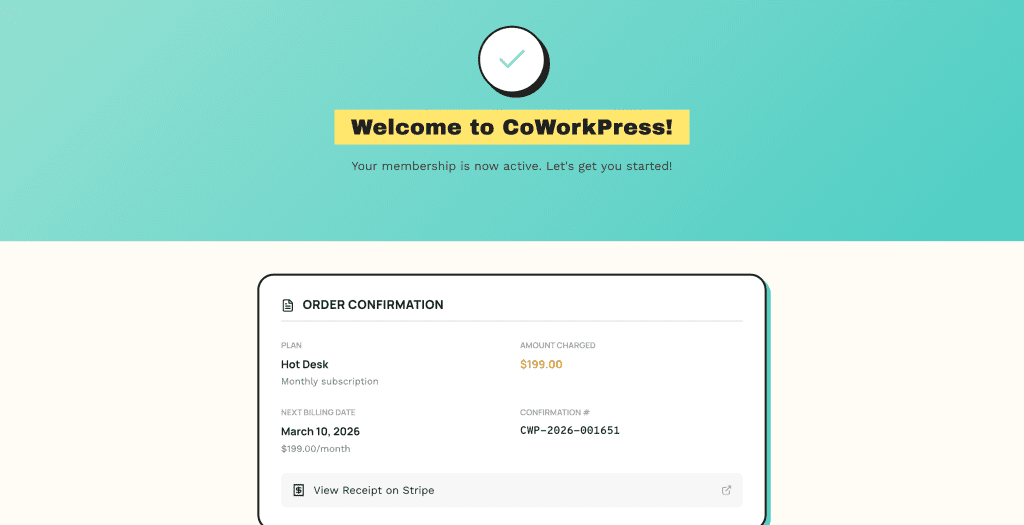
Everything works.
The flow connects end-to-end.
The WooCommerce integration that Claude “completed” previously?
Now it’s actually complete.
.
.
.
The Complete Journey: From Idea to Working Product
Let me zoom out and show you how all three parts of this series connect:
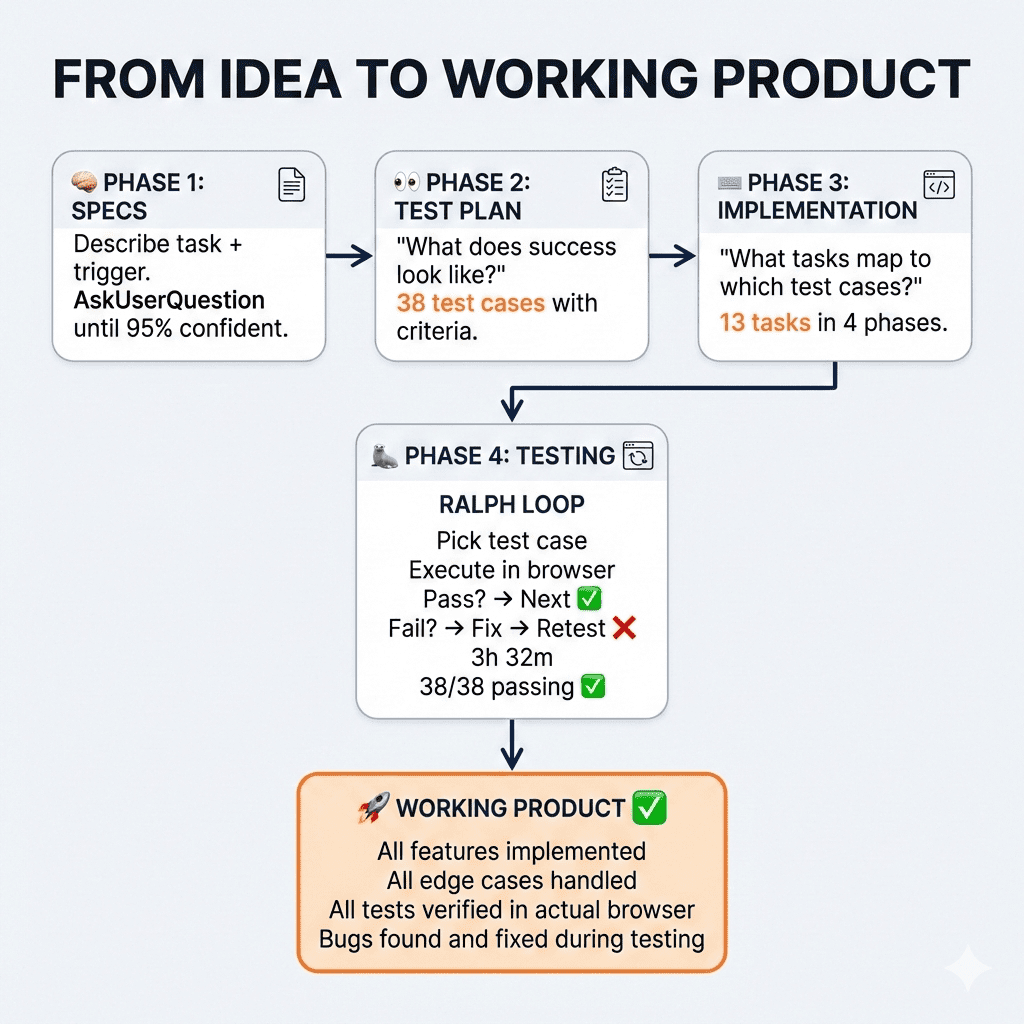
Phase 1: Bulletproof Specs
We started by brainstorming comprehensive specifications.
Using the AskUserQuestion tool, Claude asked 12 clarifying questions covering everything from subscription handling to checkout experience to refund policies. Then Claude critiqued its own specs, finding 14 potential issues before we wrote any code.
Phase 2: Test Plan
Before implementation, we generated a test plan.
38 test cases defining exactly what success looks like—from a user’s perspective. These became our acceptance criteria.
Phase 3: Implementation Plan + Sub-Agents
We created an implementation plan mapping tasks to test cases. Then executed with sub-agents running in parallel waves, keeping context usage low while building everything in 52 minutes.
Phase 4: Claude Code Testing + Fixing with Ralph Loop
Finally, we let Ralph loose. The autonomous loop tested each case in an actual browser, found the bugs Claude missed during implementation, fixed them, and verified the fixes.
3 hours 32 minutes later: 38/38 tests passing.
.
.
.
What I’ve Learned About Building With AI
Here’s what this whole journey taught me.
We all want AI to one-shot solutions on the first try. To type a prompt, hit enter, and watch magic happen. And when it doesn’t work perfectly? We blame the AI. Call it nerfed. Call it lazy. Move on to the next shiny tool.
But here’s the thing I keep coming back to:
Even the most experienced developer can’t one-shot a complex feature.
We write code. Test it. Find bugs. Fix them. Test again. That’s just how building software works. Always has been. Probably always will be.
AI is no different.
The breakthrough—the real breakthrough—comes from giving AI the ability to verify its own work. The same way any developer does. Write the code. Test it against real user scenarios. See what breaks. Fix it. Test again.
Ralph Loop makes this autonomous.
You don’t have to manually test 38 scenarios. You don’t have to spot the bugs yourself. You don’t have to describe each fix.
You define success criteria upfront (test plan), give Claude the ability to test against those criteria (browser automation), and let it iterate until everything passes.
👉 That’s the entire secret: structured iteration with clear success criteria.
Not smarter prompts. Not better models. Not more tokens.
Just… iteration.
The same boring, unsexy process that’s always made software work.
Except now, you don’t have to do it yourself.
Leave a Comment