How to Make Claude Code Actually Build What You Designed
Here’s a thing that happened to me once.
I moved apartments.
Being the organized person I am, I created the most detailed inventory list you’ve ever seen. Every box labeled. Every item cataloged. “Kitchen – Plates (12), Bowls (8), That Weird Garlic Press I Never Use But Can’t Throw Away (1).”
I handed this masterpiece to the movers and said, “Here you go!”
They looked at me like I’d handed them a grocery list in Klingon.
Because here’s what my beautiful inventory didn’t tell them: Which boxes go to which rooms. What order to load things. Which items are fragile. What depends on what. The fact that the bookshelf needs to go in before the desk, or nothing fits.
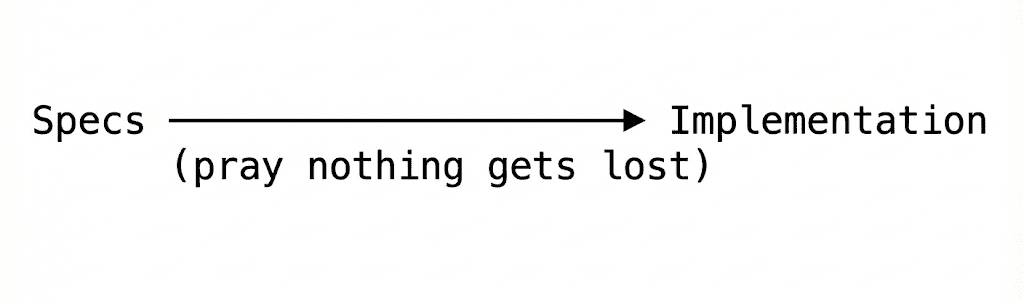
They weren’t wrong to be confused. I’d given them a comprehensive what without any how.
This is exactly what happens when you hand Claude Code your bulletproof specs and say “implement this.”
.
.
.
The Gap Nobody Warns You About
Last week, we talked about creating bulletproof specs using the 3-phase method.
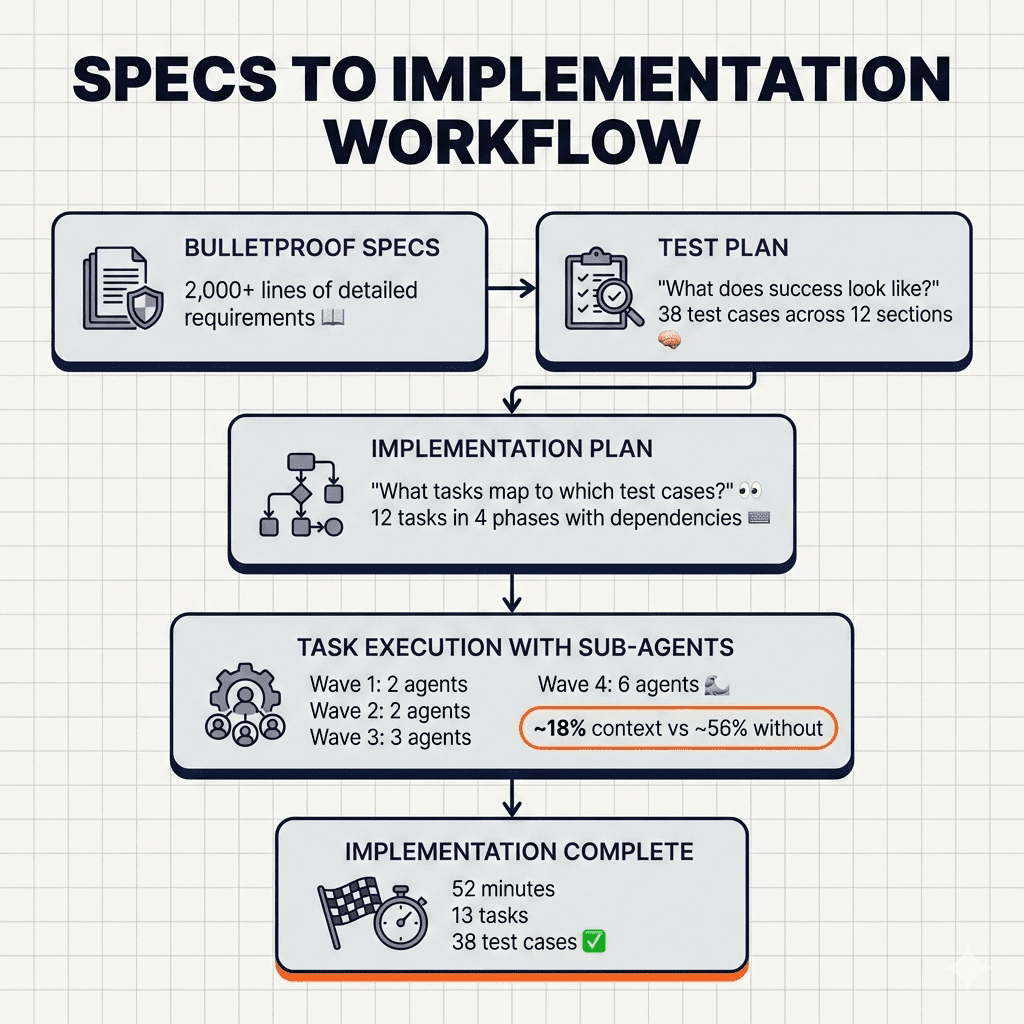
You followed the process. You answered every clarifying question. You had Claude critique its own work. Your specs are comprehensive—2,000+ lines of detailed requirements, edge cases, and architectural decisions.
Now you’re ready to build.
So you fire up Claude Code and type: “Read the specs and implement it.”
Claude starts working. Files appear. Code flows.
And thirty minutes later? Half your edge cases are missing. The checkout flow doesn’t match what you specified. That critical race condition prevention you spent three rounds of Q&A perfecting?
Nowhere to be found.
Here’s the thing: Comprehensive specs don’t automatically translate to comprehensive implementation.
Your specs might be 2,000 lines. Claude’s context window is limited. As implementation progresses, early requirements fade from memory. The AI starts making shortcuts. Details slip through the cracks like sand through fingers.
Sound familiar?
(If you’re nodding right now, stay with me.)
The issue isn’t Claude’s capability. It’s the gap between what’s documented and what gets built. Even human developers working from perfect documentation miss things. They get tired. They make assumptions. They interpret requirements their own way.
Claude faces the same challenges—plus context limits that force it to work with only a subset of information at any given moment.
👉 The solution isn’t better prompting. It’s better process.
And that process? It’s what I’ve been calling the Claude Code implementation workflow. Let me show you what I mean.
.
.
.
The Missing Middle Layer
Here’s what most people do:
I call this the “hope-based development methodology.”
(That’s a joke. Please don’t actually call it that.)
Here’s what actually works:
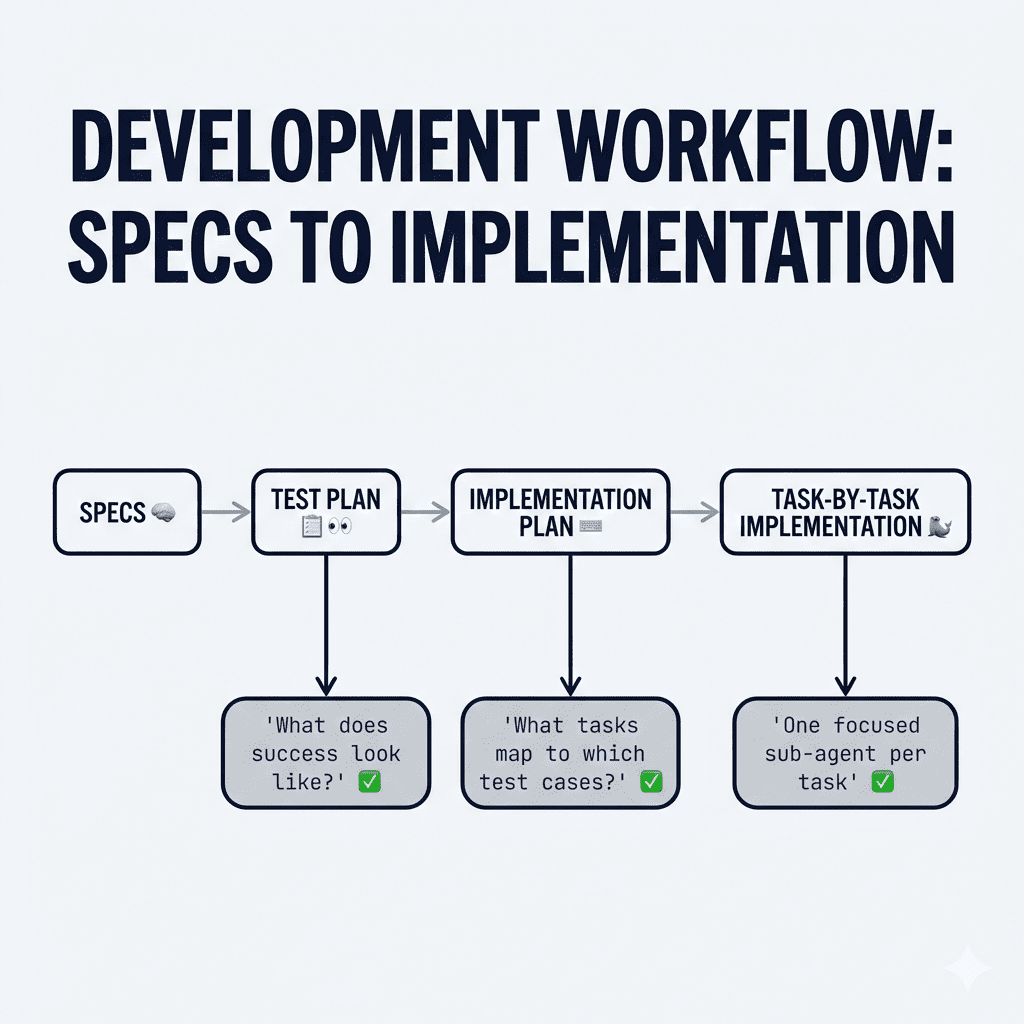
- The test plan answers: “How will we know if each requirement is implemented correctly?”
- The implementation plan answers: “What specific tasks need to happen, and in what order?”
- The task management answers: “How do we keep Claude focused and prevent context overload?”
Think of it like this: your specs are the inventory list. The test plan is the “here’s how we’ll know each box arrived safely” checklist. The implementation plan is the “which room, which order, what depends on what” instruction sheet.
The movers—er, Claude—can actually do their job now.
Let me walk you through exactly how this Claude Code implementation workflow… well, works.
.
.
.
Step 1: Create a Test Plan From Your Specs
Before writing any code, Claude needs to understand what success looks like.
Now, I know what you’re thinking: “Wait—isn’t a test plan for after implementation?”
Traditionally, yes. But for AI-driven development, creating the test plan first serves a completely different purpose.
👉 It forces Claude to deeply analyze every requirement and translate it into verifiable outcomes.
When Claude creates test cases for “handle race conditions during renewal processing,” it has to think through exactly what that means. What are the preconditions? What actions trigger the behavior? What should the expected results be?
It’s like asking someone to write the exam questions before teaching the class. Suddenly, they understand the material much more deeply.
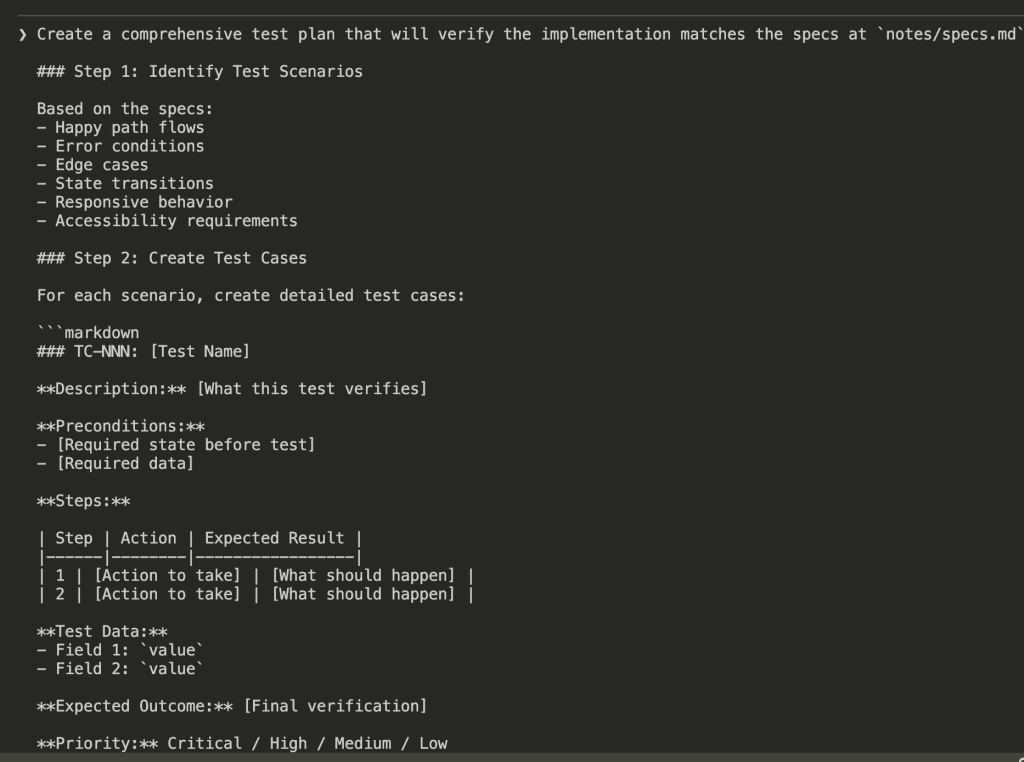
Here’s the prompt I use:
PROMPT: Create a Comprehensive Test Plan based on Specs
Create a comprehensive test plan that will verify the implementation matches the specs at `notes/specs.md`

### Step 1: Identify Test Scenarios

Based on the specs:
- Happy path flows
- Error conditions
- Edge cases
- State transitions
- Responsive behavior
- Accessibility requirements

### Step 2: Create Test Cases

For each scenario, create detailed test cases:

```markdown
### TC-NNN: [Test Name]

**Description:** [What this test verifies]

**Preconditions:**
- [Required state before test]
- [Required data]

**Steps:**

| Step | Action | Expected Result |
|------|--------|-----------------|
| 1 | [Action to take] | [What should happen] |
| 2 | [Action to take] | [What should happen] |

**Test Data:**
- Field 1: `value`
- Field 2: `value`

**Expected Outcome:** [Final verification]

**Priority:** Critical / High / Medium / Low
````

### Step 3: Organize by Category

Group test cases:

- Functional tests
- UI/UX tests
- Validation tests
- Integration tests (if applicable)
- Edge case tests

### Step 4: Create Status Tracker

```markdown
## Status Tracker

| TC     | Test Case | Priority | Status | Remarks |
| ------ | --------- | -------- | ------ | ------- |
| TC-001 | [Name]    | High     | [ ]    |         |
| TC-002 | [Name]    | Medium   | [ ]    |         |
```

### Step 5: Add Known Issues Section

```markdown
## Known Issues

| Issue | Description | TC Affected | Steps to Reproduce | Severity |
| ----- | ----------- | ----------- | ------------------ | -------- |
|       |             |             |                    |          |
```

## Output

Save the test plan to: `notes/test_plan.md`

Include:

1. Overview and objectives
2. Prerequisites
3. Reference wireframe (if applicable)
4. Test cases (10-20 typically)
5. Status tracker
6. Known issues section

## Test Case Guidelines

- Each test should be independent
- Use specific, concrete test data
- Include both positive and negative tests
- Cover all screens from wireframe (if applicable)
- Test all states from prototype
- Consider mobile/responsive

## Do NOT

- Over-test obvious functionality
- Skip error handling tests
- Forget accessibility basics
Claude reads through all the specs, identifies what needs to be tested, and generates a structured test plan.
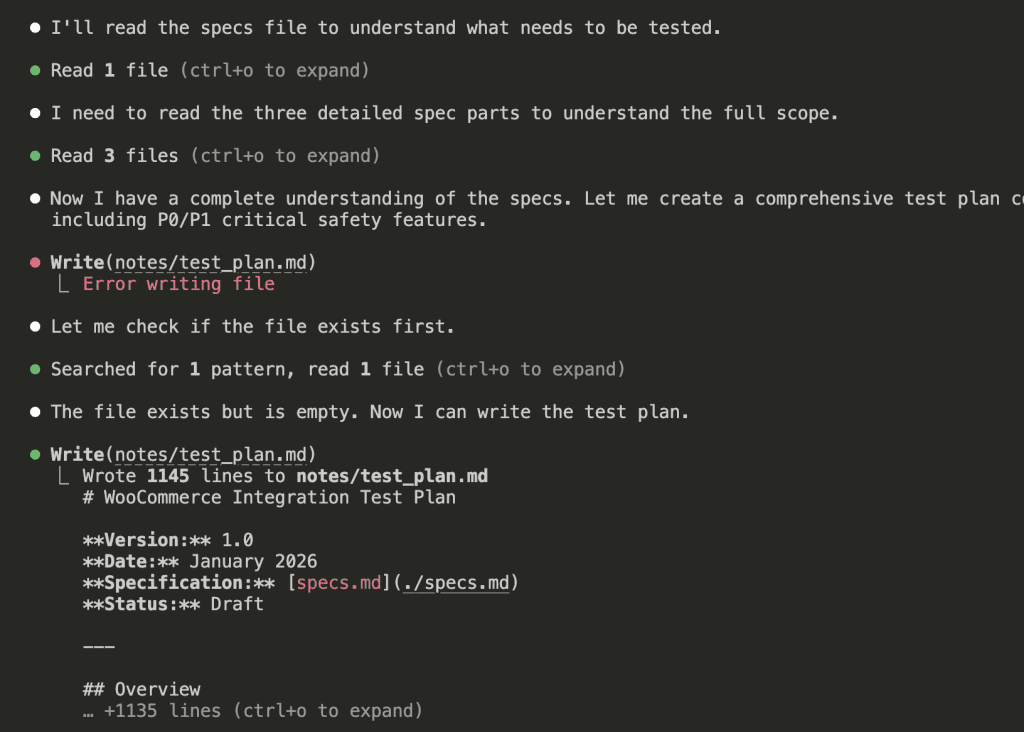
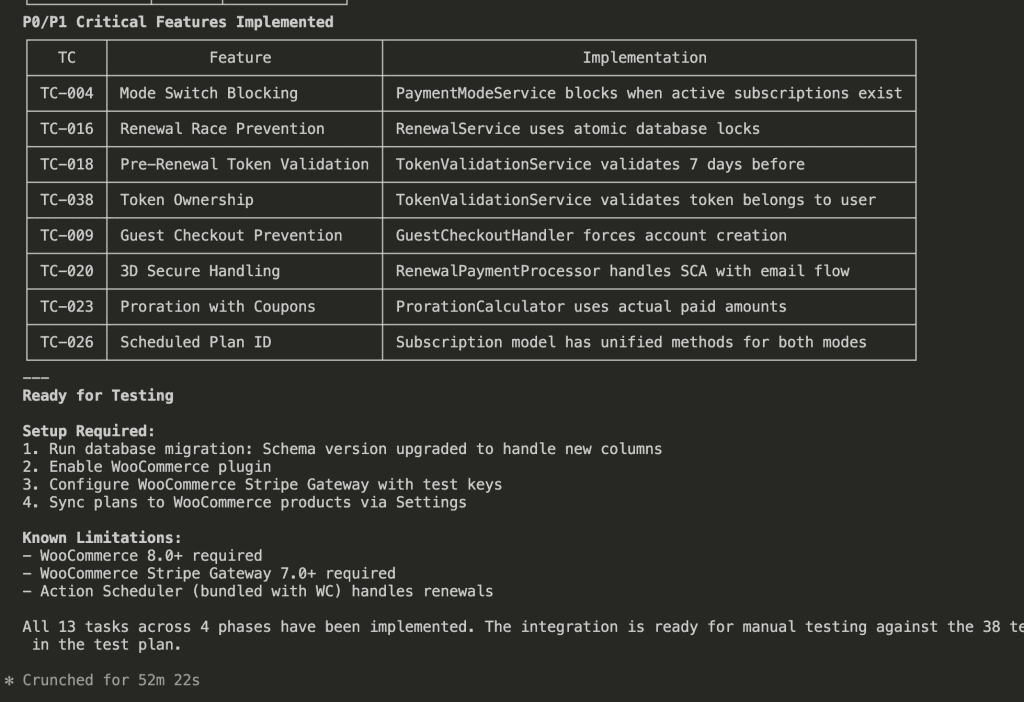
For my WooCommerce integration, Claude created 38 test cases organized into 12 sections:
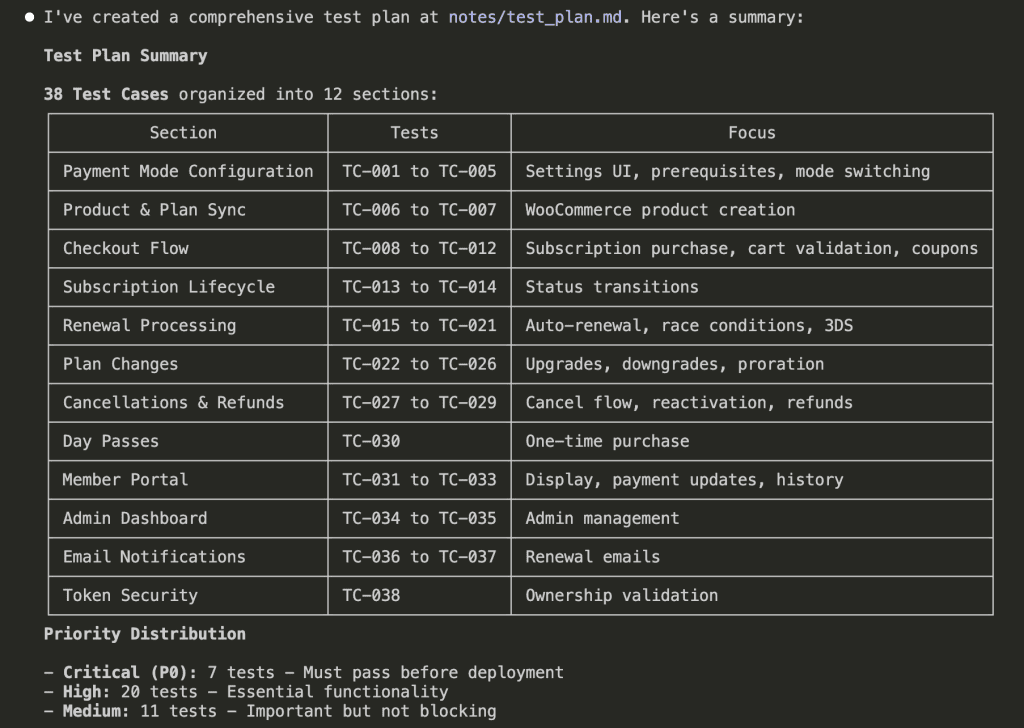
Notice the priority distribution:
- Critical (P0): 7 tests — Must pass before deployment
- High (P1): 20 tests — Essential functionality
- Medium: 11 tests — Important but not blocking
Each test case maps directly to a requirement in my specs. Nothing ambiguous. Nothing assumed. Nothing left to interpretation.
(This is the part where past-me would have skipped ahead to coding. Don’t be past-me.)
.
.
.
Step 2: Create an Implementation Plan That Maps to Test Cases
Now Claude knows what success looks like. Next question: how do we get there?
The implementation plan bridges test cases to actual tasks. Every task links back to specific test cases it will satisfy. It’s the “what depends on what” instruction sheet for our movers.
PROMPT: Create an Implementation Plan That Maps to Test Cases
Specs is approved, test plan is ready. Now we need an implementation plan.

- **Specs**: `notes/specs.md`
- **Test Plan:** `notes/test_plan.md`

## Your Task

Create a detailed implementation plan that maps to the test cases.

### Step 1: Analyze Test Cases

For each test case (TC-NNN):
- What functionality must exist?
- What files need to be created/modified?
- What dependencies are needed?

### Step 2: Create Task Breakdown

Group test cases into implementation tasks:

```markdown
## Implementation Plan: [PHRASE_NAME]

### Overview
[Brief description]

### Files to Create/Modify
[List all files]

### Implementation Tasks

#### Task 1: [Name]
**Mapped Test Cases:** TC-001, TC-002, TC-003
**Files:**
- `path/to/file1.php` - [description]
- `path/to/file2.js` - [description]

**Implementation Notes:**
- [Key detail 1]
- [Key detail 2]

**Acceptance Criteria:**
- [ ] TC-001 passes
- [ ] TC-002 passes
- [ ] TC-003 passes

#### Task 2: [Name]
...
````

### Step 3: Identify Dependencies

- What from previous phrases is needed?
- What order should tasks be implemented?
- Any external dependencies?

### Step 4: Estimate Complexity

- Simple: 1-2 tasks, straightforward
- Medium: 3-5 tasks, some complexity
- Complex: 6+ tasks, significant work

## Output

Save the implementation plan to: `notes/impl_plan.md`

Include:

1. Overview
2. Files to create/modify
3. Tasks with TC mappings
4. Dependencies
5. Complexity estimate

## Guidelines

- Every test case must map to a task
- Tasks should be completable in one session
- Include enough detail to guide implementation
- Reference design system patterns

## Do NOT

- Include actual code (next step)
- Over-engineer simple features
Specs is approved, test plan is ready. Now we need an implementation plan.
- **Specs**: `notes/specs.md`
- **Test Plan:** `notes/test_plan.md`
## Your Task
Create a detailed implementation plan that maps to the test cases.
### Step 1: Analyze Test Cases
For each test case (TC-NNN):
- What functionality must exist?
- What files need to be created/modified?
- What dependencies are needed?
### Step 2: Create Task Breakdown
Group test cases into implementation tasks:
```markdown
## Implementation Plan: [PHRASE_NAME]
### Overview
[Brief description]
### Files to Create/Modify
[List all files]
### Implementation Tasks
#### Task 1: [Name]
**Mapped Test Cases:** TC-001, TC-002, TC-003
**Files:**
- `path/to/file1.php` - [description]
- `path/to/file2.js` - [description]
**Implementation Notes:**
- [Key detail 1]
- [Key detail 2]
**Acceptance Criteria:**
- [ ] TC-001 passes
- [ ] TC-002 passes
- [ ] TC-003 passes
#### Task 2: [Name]
...
````
### Step 3: Identify Dependencies
- What from previous phrases is needed?
- What order should tasks be implemented?
- Any external dependencies?
### Step 4: Estimate Complexity
- Simple: 1-2 tasks, straightforward
- Medium: 3-5 tasks, some complexity
- Complex: 6+ tasks, significant work
## Output
Save the implementation plan to: `notes/impl_plan.md`
Include:
1. Overview
2. Files to create/modify
3. Tasks with TC mappings
4. Dependencies
5. Complexity estimate
## Guidelines
- Every test case must map to a task
- Tasks should be completable in one session
- Include enough detail to guide implementation
- Reference design system patterns
## Do NOT
- Include actual code (next step)
- Over-engineer simple features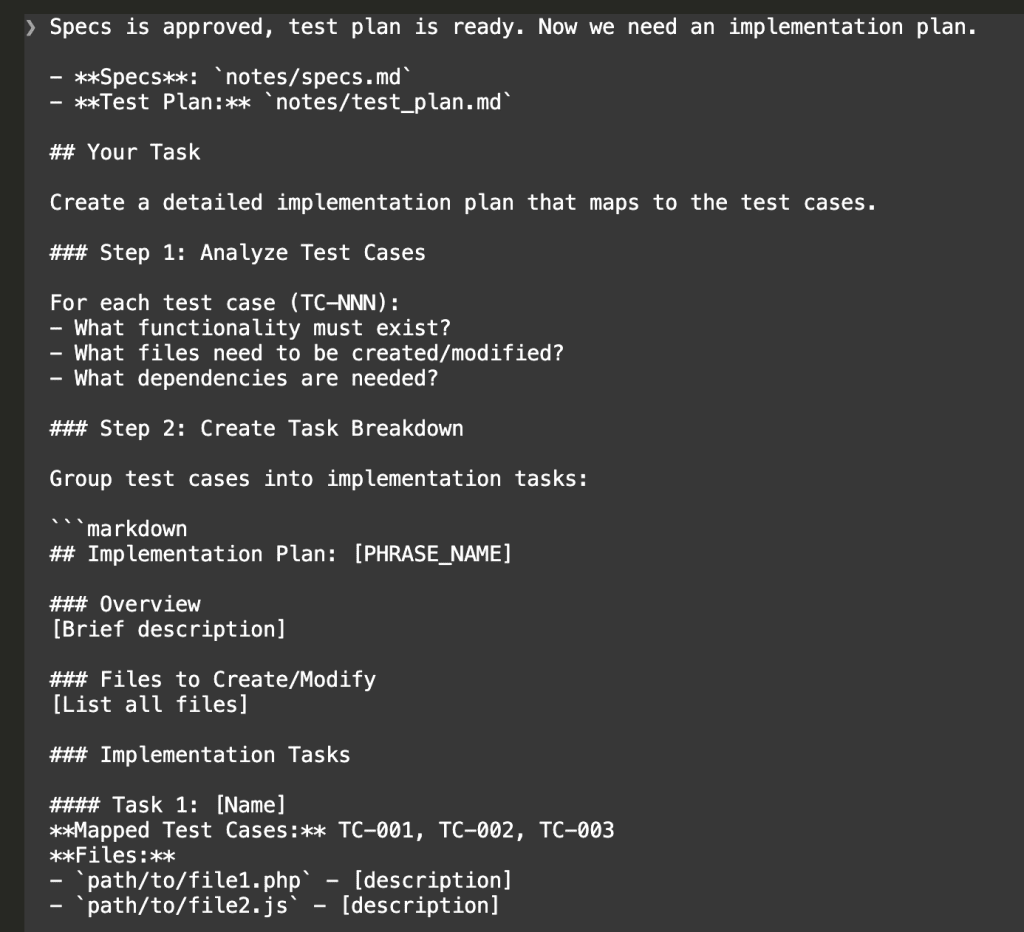
Claude analyzes both the specs and test plan, then generates a phased implementation plan:
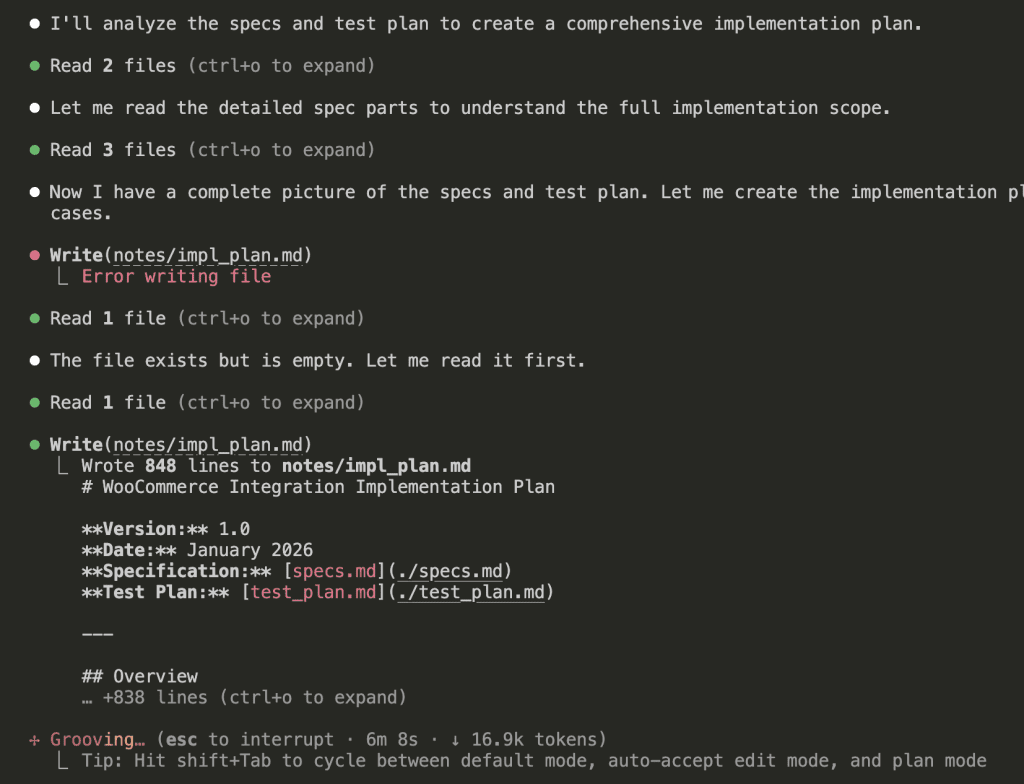
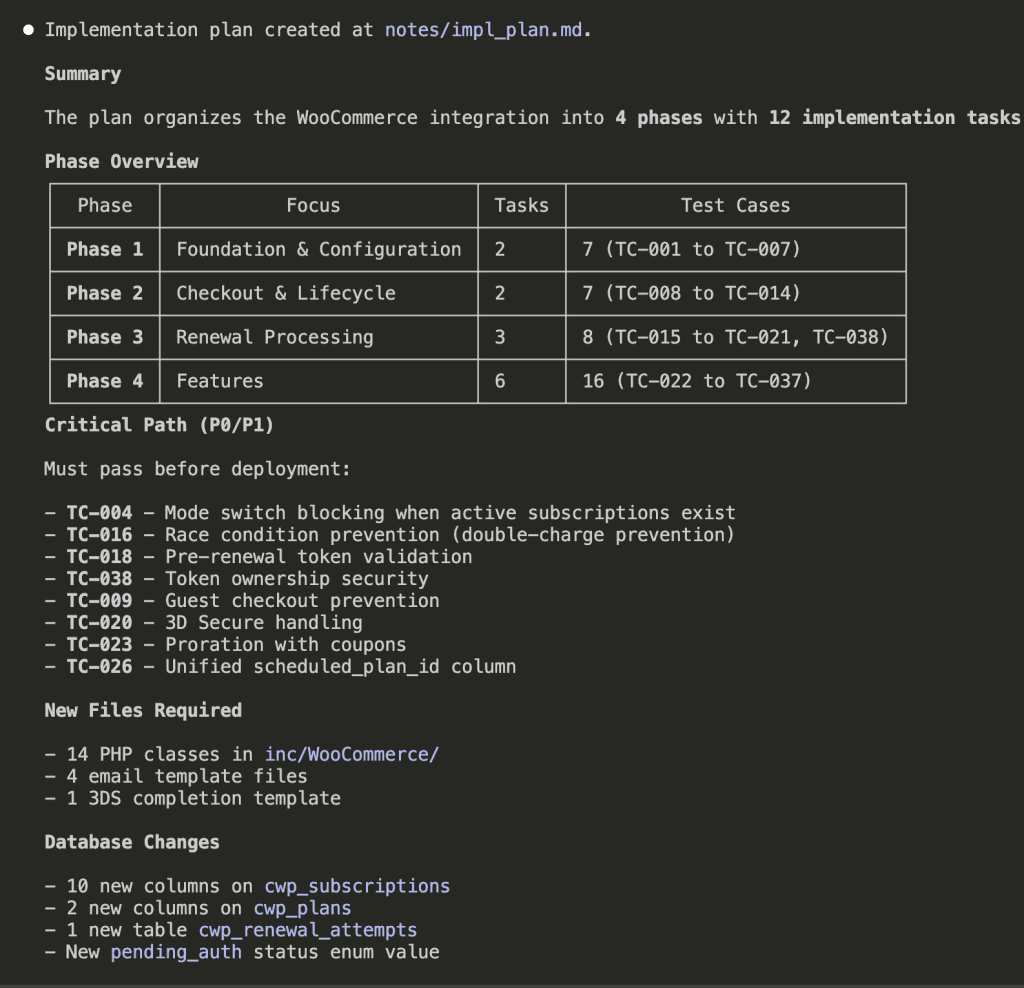
The result: 4 phases, 12 implementation tasks, each explicitly linked to the test cases that will verify them.
- Phase 1: Foundation & Configuration (2 tasks → TC-001 to TC-007)
- Phase 2: Checkout & Lifecycle (2 tasks → TC-008 to TC-014)
- Phase 3: Renewal Processing (3 tasks → TC-015 to TC-021, TC-038)
- Phase 4: Features (6 tasks → TC-022 to TC-037)
Plus a critical path of P0/P1 items that must work before deployment:
- Mode switch blocking when active subscriptions exist
- Race condition prevention (double-charge protection—ferpetesake, the payments!)
- Pre-renewal token validation
- Token ownership security
Now we have specs, a test plan, AND an implementation plan. Three documents that all reference each other. A complete picture.
But here’s where most people (including past-me, again) would stumble.
.
.
.
Step 3: Execute With Sub-Agents (This Is Where It Gets Fun)
Here’s something I learned the hard way.
There’s research showing that LLM performance degrades as context size increases. When Claude’s context fills up with implementation details from Task 1, it starts losing precision on Task 8. It’s like asking someone to remember the first item on a grocery list after they’ve been shopping for an hour.
The fix: run each task in its own sub-agent.
Each sub-agent gets fresh context. It focuses on one task, implements it, and reports back. The orchestrating agent manages dependencies and progress. No context pollution. No forgotten requirements.
It’s like having a team of movers where each person is responsible for exactly one room—and they all have fresh energy because they haven’t been carrying boxes all day.
Here’s the prompt that kicks off the Claude Code implementation workflow execution:
PROMPT: Claude Code implementation workflow execution
We are executing the implementation plan. All design and planning is complete.

## Reference Documents
- **Specs:** @notes/specs.md
- **Implementation Plan:** @notes/impl_plan.md
- **Test Plan:** @notes/test_plan.md

## Phase 1: Task Creation

### Before Creating Tasks
1. Review @notes/impl_plan.md completely
2. Understand test case expectations from @notes/test_plan.md
3. Reference wireframe/prototype for UI (if applicable)
4. Check design system for patterns (if available)

### Create Tasks from Implementation Plan
Parse the implementation plan and use `TaskCreate` to create a task for each implementation item:

1. **Extract all tasks** from @notes/impl_plan.md
2. **Identify dependencies** between tasks (what must be done before what)
3. **Create each task** with:
   - Clear description including the specific files to create/modify
   - Mapped test cases (TCs) that verify the task
   - `blocked_by`: tasks that must complete first
   - `blocks`: tasks that depend on this one

Tasks should be granular enough to run independently but logical enough to represent complete units of work.

---

## Phase 2: Task Execution

### Execution Strategy
Execute tasks using sub-agents for parallel processing:

1. **Group tasks into waves** based on dependencies
2. **Run each task in its own sub-agent** - This keeps context usage low (~18% vs ~56%)
3. **Process waves sequentially** - Wave N+1 starts only after Wave N completes

### For Each Task (Sub-Agent Instructions)
1. Use `TaskGet` to read full task details
2. Create/modify specified files
3. Implement functionality to pass mapped TCs
4. **Self-verify the implementation:**
   - Check that code compiles/runs without errors
   - Verify the functionality matches test expectations
   - Ensure design consistency with existing patterns
5. Use `TaskUpdate` to mark task complete with a brief summary of what was done
6. Note any deviations, concerns, or discovered issues

### If Issues Are Discovered
- Use `TaskCreate` to add new fix/bug tasks
- Set appropriate dependencies so fixes run in correct order
- Continue with other independent tasks

---

## Phase 3: Completion Summary

After all tasks are complete, provide:

### 1. Summary of Changes
- Files created
- Files modified
- Key functionality added

### 2. Self-Verification Results
- What works as expected
- Any concerns or edge cases noted
- Tasks that required fixes (if any)

### 3. Ready for Testing
- Confirm all tasks marked complete
- List any setup needed for testing
- Note any known limitations

---

## Important Notes

- **Do NOT run full test suite** - that's the next step
- **Use `TaskList`** periodically to check overall progress
- **Dependencies are critical** - ensure tasks don't start before their blockers complete
- **Keep sub-agent context focused** - each sub-agent only needs info for its specific task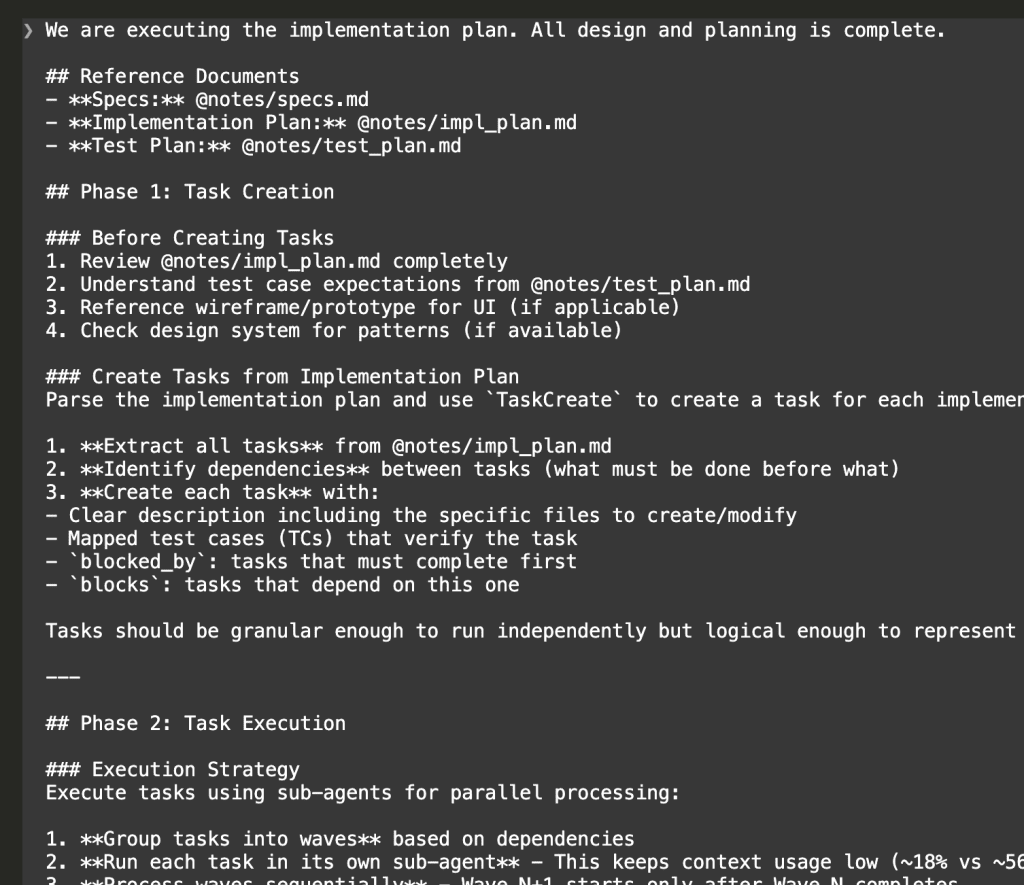
I know. That’s a lot of prompt. But here’s the thing—you set this up once, and then you watch the magic happen.
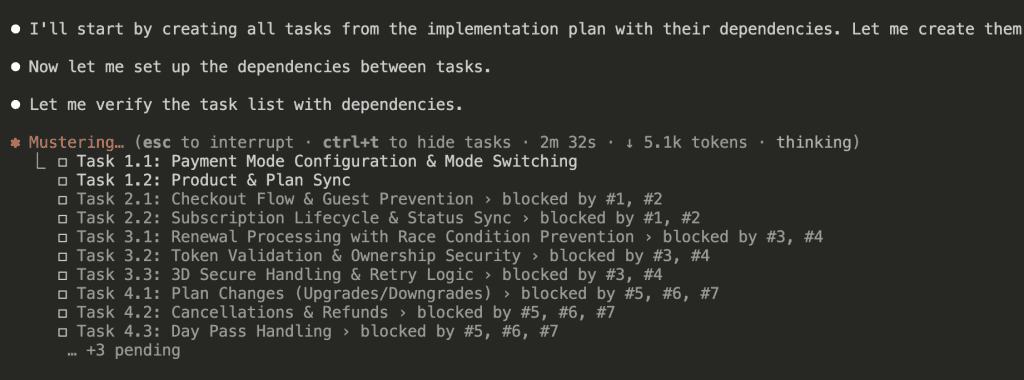
Task Creation
First, Claude creates all 13 tasks from the implementation plan:
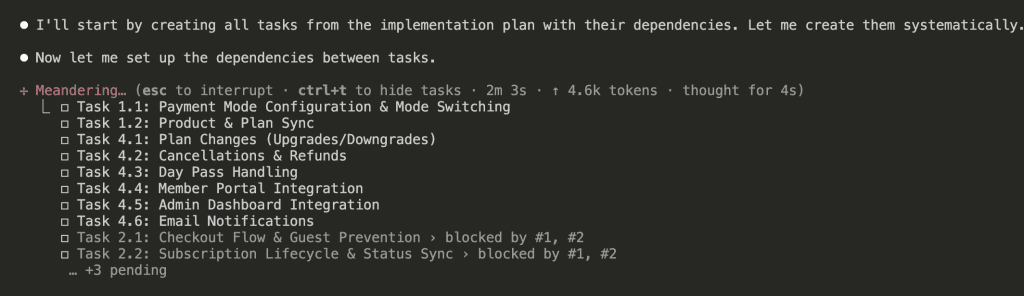
Then sets up dependencies between them. (This is the “bookshelf before desk” part.)
Wave-Based Execution
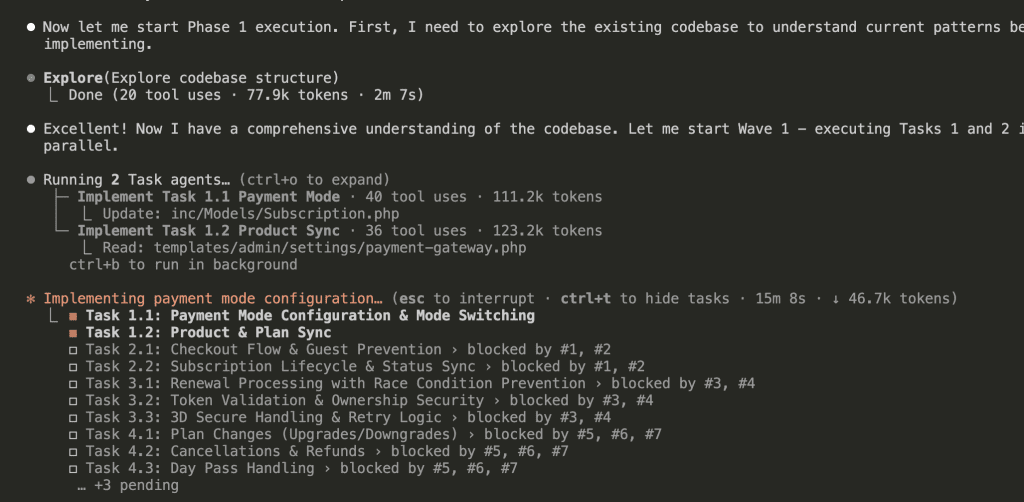
Before diving into implementation, Claude explores the existing codebase to understand patterns:
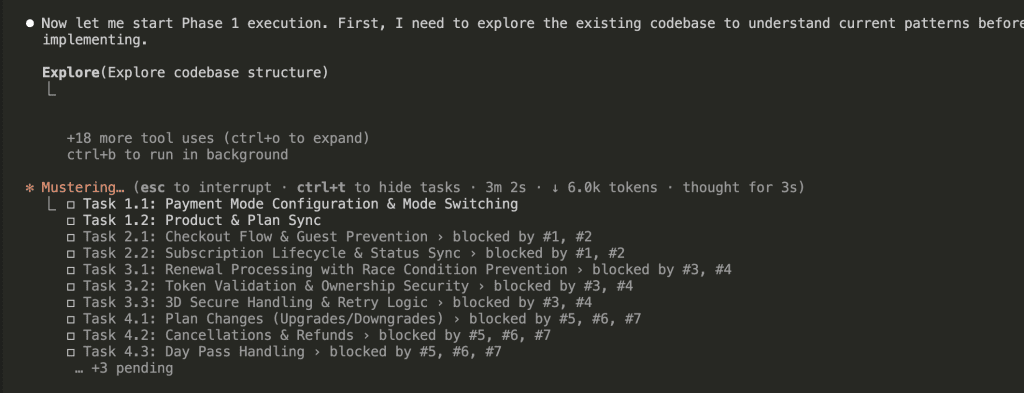
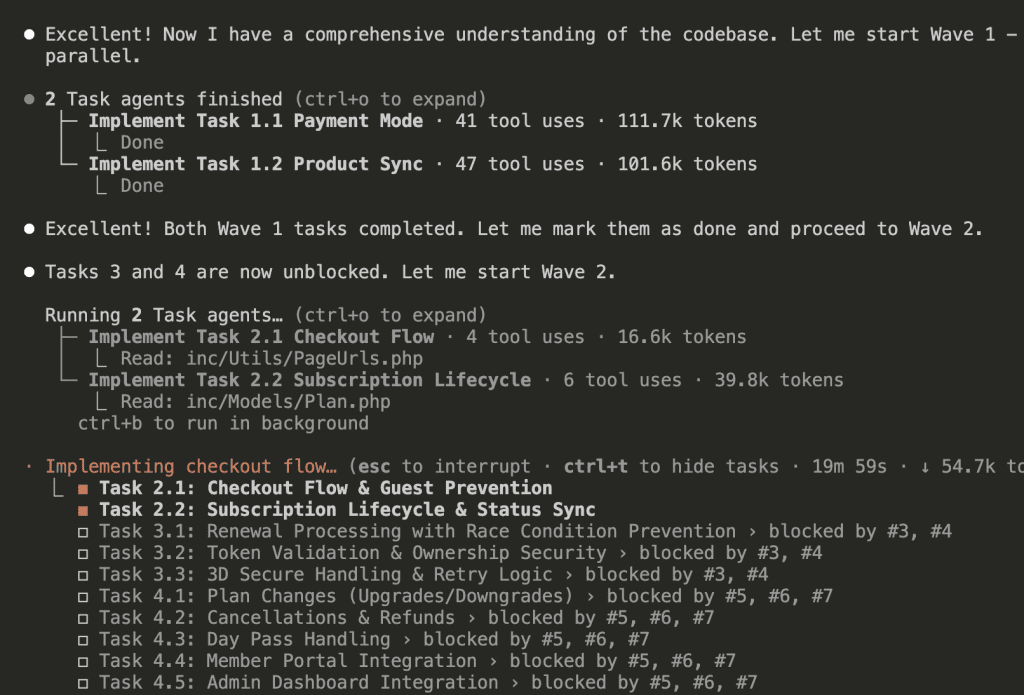
Wave 1 starts with 2 sub-agents running Tasks 1.1 and 1.2 in parallel:
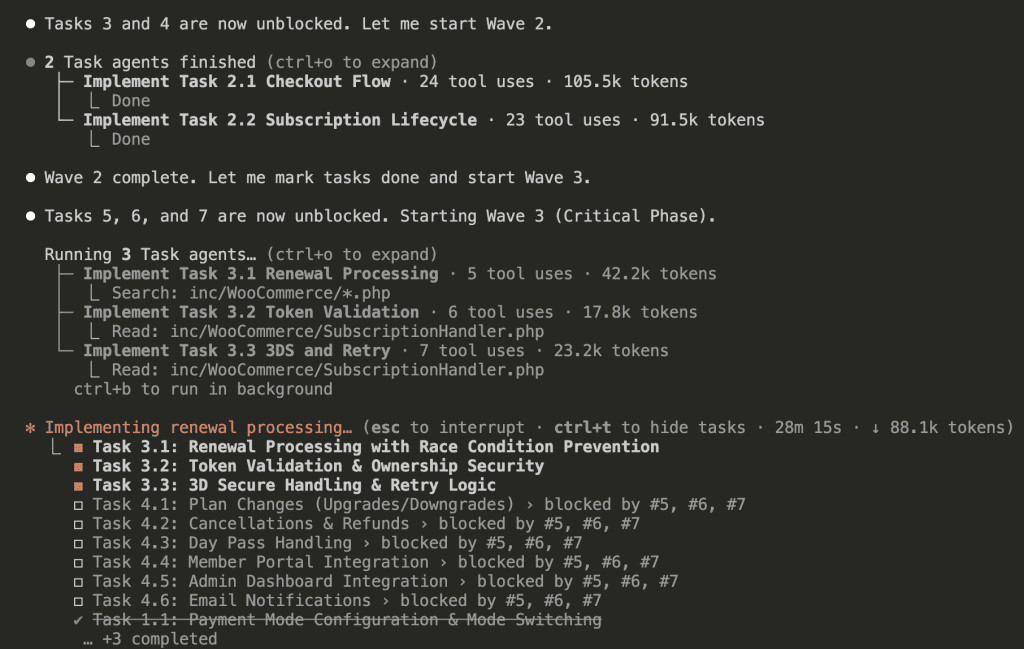
Once Wave 1 completes, Wave 2 begins:
Wave 2 completes, Wave 3 (the critical phase) starts with 3 sub-agents:
Wave 3 completes, and Wave 4 launches with 6 sub-agents in parallel:
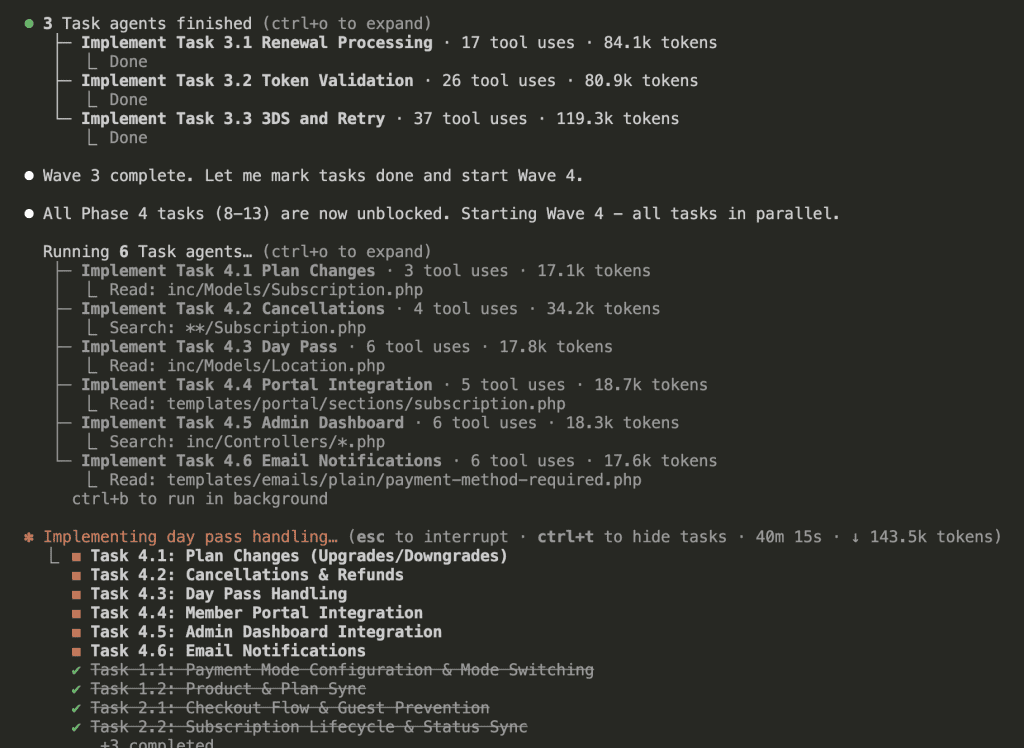
(Six sub-agents. Running in parallel. Each with fresh context. This is the future we were promised.)
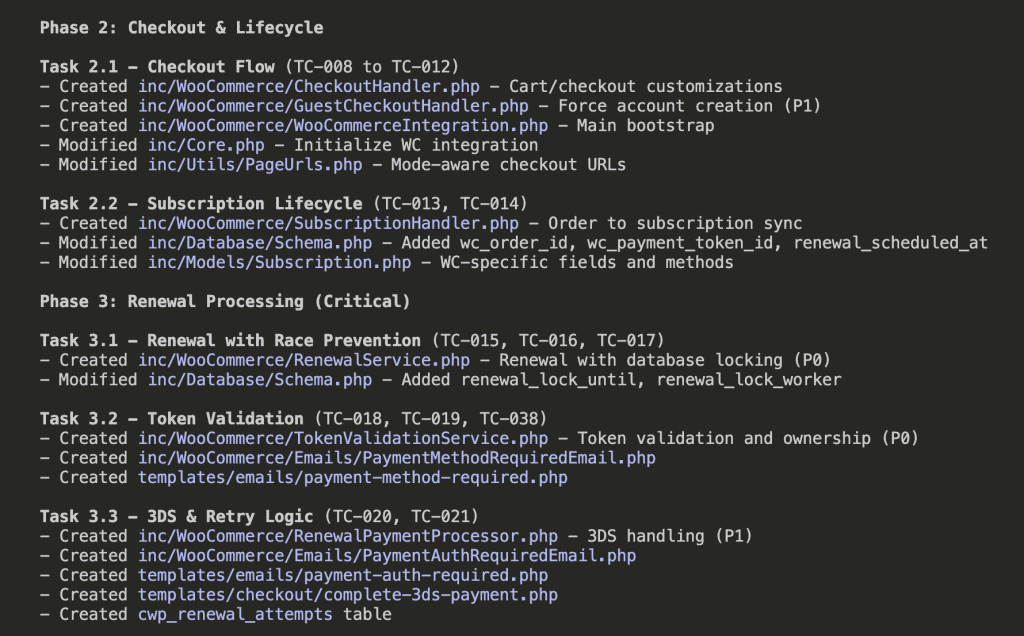
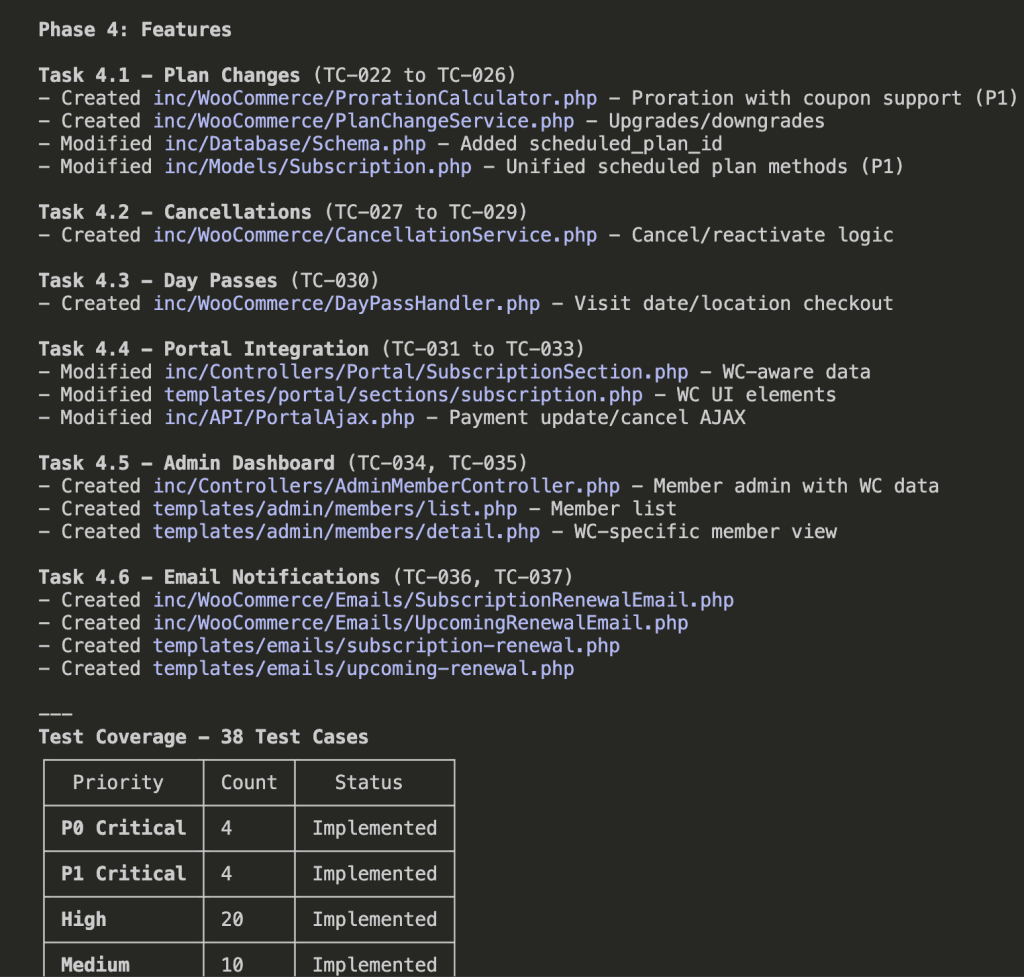
Implementation Complete
All 13 tasks across 4 waves:
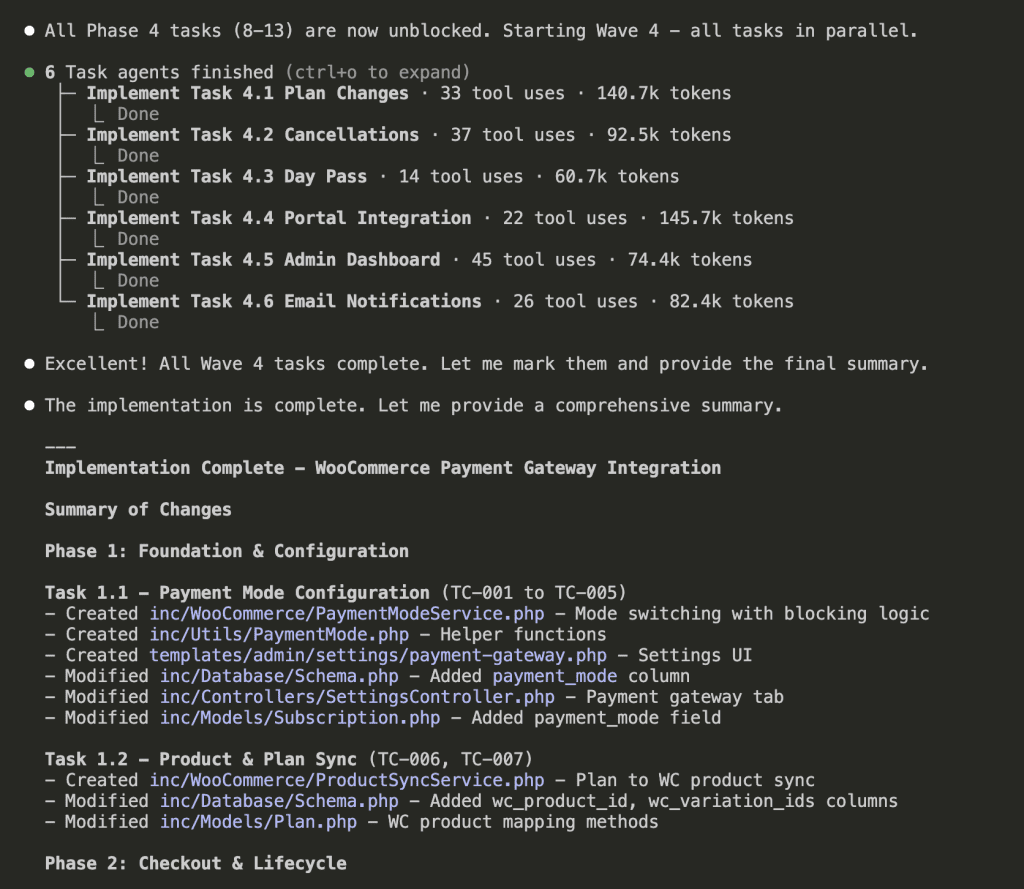
Total time: 52 minutes 22 seconds.
That’s 13 tasks. 38 test cases worth of functionality. Parallel execution keeping context usage low throughout.
Remember my WooCommerce integration specs? The 2,000+ lines that would have turned into a context-overloaded mess if I’d just said “implement this”?
Every requirement addressed. Every edge case accounted for. Every critical feature implemented.
.
.
.
The Complete Claude Code Implementation Workflow
Let me put this all together:
Step 1: Create a test plan from your specs
- Claude analyzes every requirement
- Generates verifiable test cases
- Establishes priority levels
Step 2: Create an implementation plan mapped to test cases
- Groups requirements into logical tasks
- Links each task to specific test cases
- Identifies dependencies between tasks
Step 3: Execute with sub-agents
- Create all tasks with dependency tracking
- Process in waves based on blocking relationships
- Each sub-agent gets fresh context
- Parallel execution where dependencies allow
It’s the complete Claude Code implementation workflow—from inventory list to fully unpacked apartment. (Okay, I’ll stop with the moving metaphor now.)
.
.
.
But Wait. There’s a Catch.
You followed the workflow. Claude built everything in 52 minutes. Your implementation summary shows all 38 test cases “implemented.”
Here’s the uncomfortable truth I need to share with you:
“Implemented” and “working correctly” aren’t the same thing.
Claude sometimes takes shortcuts. Features get partially built. Edge cases get acknowledged in comments but not actually handled. The sub-agent said “Done”—but did it really do what the test case required?
You need a verification step. A way to systematically check that every test case actually passes. A process for catching the gaps before you discover them in production.
That’s next week.
(Yes, another cliffhanger 😁)
Leave a Comment