The 3-Phase Method for Bulletproof Specs When You’re Not Starting From Scratch
Imagine this.
You hire a contractor to “update the bathroom.” You wave your hand vaguely at the space, mention something about “modern vibes,” and leave for work.
You come home to discover they’ve ripped out your vintage clawfoot tub—the one you specifically loved—and replaced it with a walk-in shower. They’ve chosen gray tiles. (Gray! When you’re clearly a warm terracotta person.) And oh, they’ve moved the toilet to a spot that now requires you to shimmy sideways to close the door.
“But you said you wanted it updated,” they say, genuinely confused.
Here’s the thing: they weren’t wrong. You did say that.
You just forgot to mention all the things living rent-free in your head—the constraints, the preferences, the “obviously don’t touch THAT” items you assumed were, well, obvious.
This is exactly what happens when you ask Claude Code to add a feature to your existing app.
.
.
.
The “Just Add This Feature” Trap
You’ve got a working application.
It’s not perfect, but it works. Now you want to add something—a new feature, a refactor, maybe squash a bug that’s been giving you side-eye for weeks.
So you fire up Claude Code and describe what you want in two or three sentences.
Claude gets to work. Files change. Functions appear. Code flows.
And then—record scratch—you realize it completely missed the point.
Not because Claude is bad at its job. But because you gave it the software equivalent of “update the bathroom.”
Your codebase has history.
Conventions. Edge cases you’ve already wrestled to the ground. Payment integrations that absolutely, positively cannot break (ferpetesake, the payments!). Claude needs to understand ALL of this before writing a single line of code.
This is where Claude Code spec-driven development comes in.
And honestly?
It’s transformed how I approach every feature request.
.
.
.
Why Spec-Driven Development Changes Everything
Here’s what most people do: describe the feature → let Claude code → discover problems → fix problems → discover MORE problems → question life choices.
Here’s what works: describe the feature → trigger clarifying questions → answer EVERY question → generate comprehensive specs → review specs → THEN code.
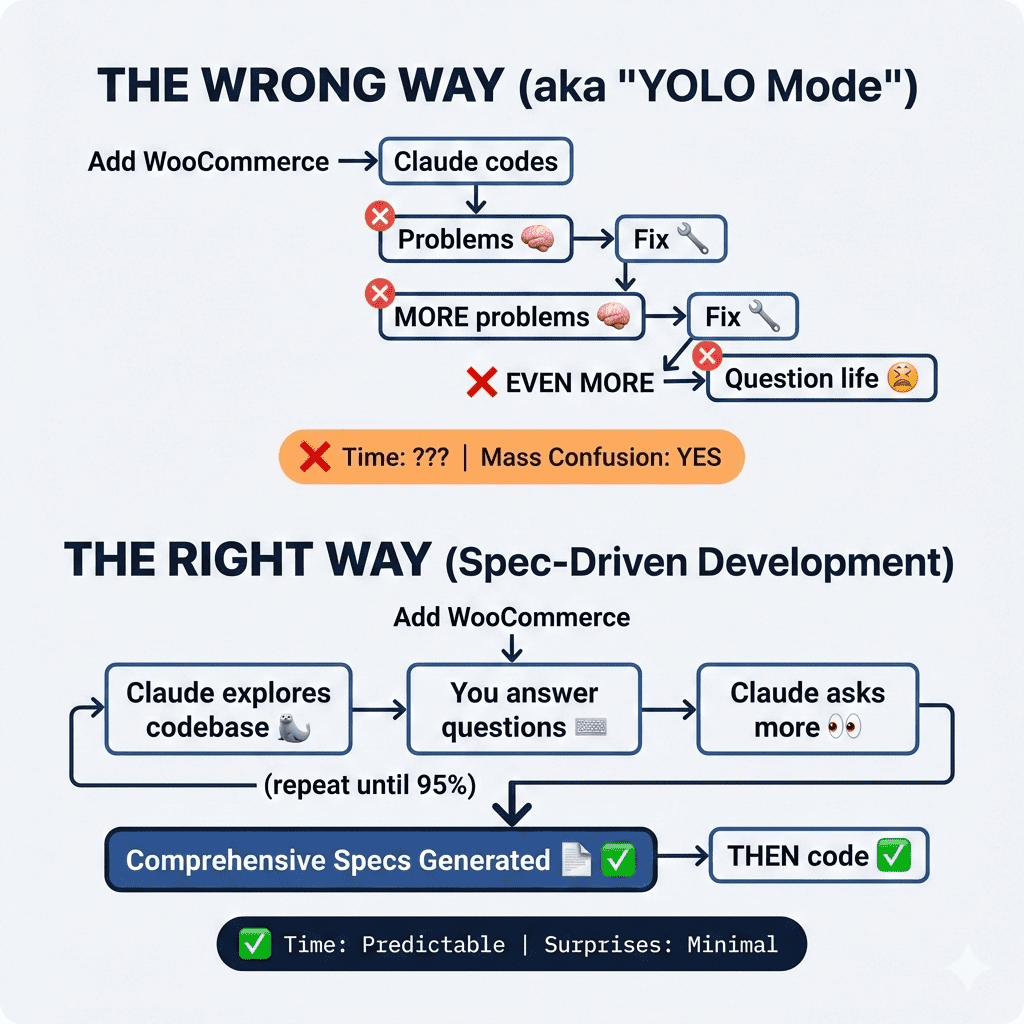
The difference isn’t just efficiency (though yes, that too).
👉 The real magic is that Claude surfaces edge cases YOU haven’t thought about.
All those assumptions living in your head? Claude will ask about them. All those “obviously we’d handle it THIS way” decisions? Claude will make you choose explicitly.
It’s like having a brilliant—if occasionally pedantic—architect who refuses to pick up a hammer until every single detail is documented.
Let me show you exactly how this works.
.
.
.
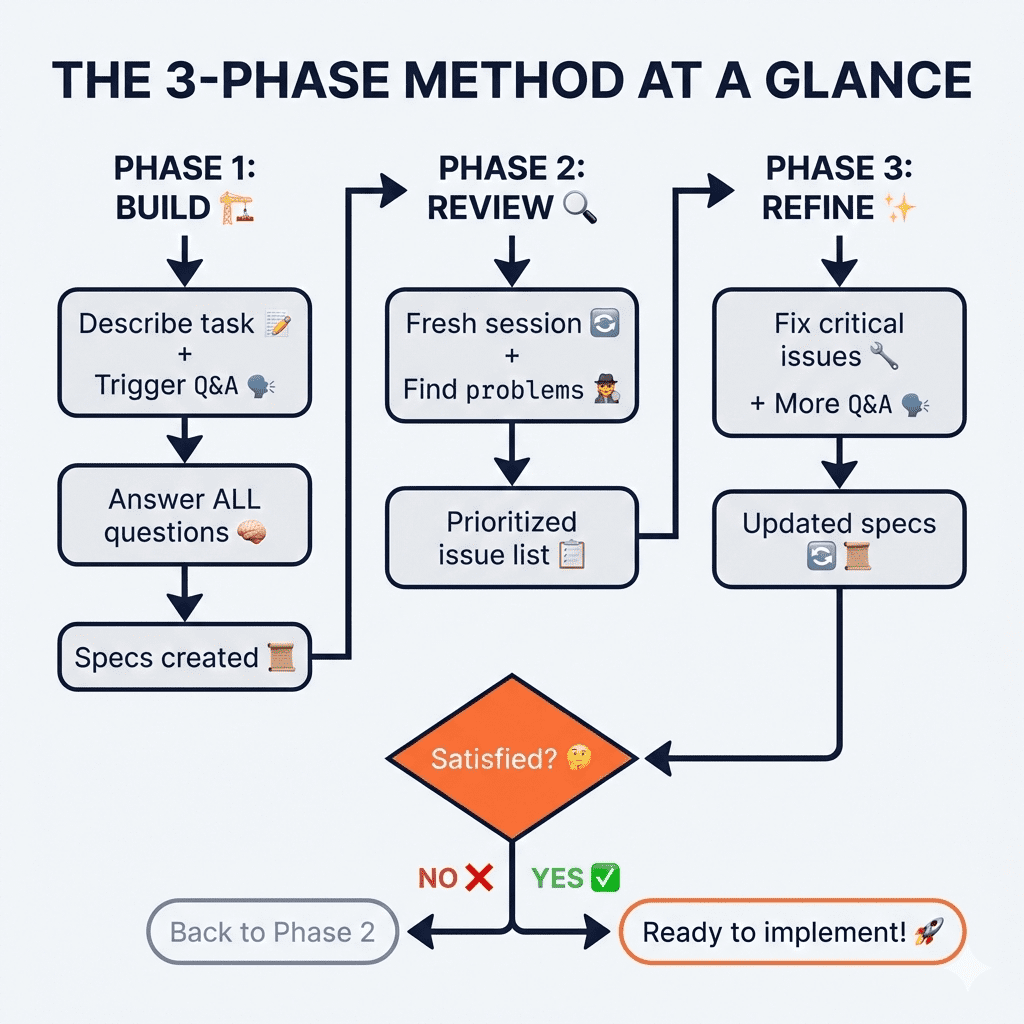
The 3-Phase Method for Claude Code Spec-Driven Development
I’ve been refining this workflow for weeks, and it breaks down into three distinct phases.
(Stay with me—I promise this is more exciting than it sounds. Okay, maybe “exciting” is strong. But genuinely useful? HECK YES.)
.
.
.
Phase 1: Build Your Specs
This is where you go from “vague idea in your head” to “comprehensive document that leaves nothing to chance.”
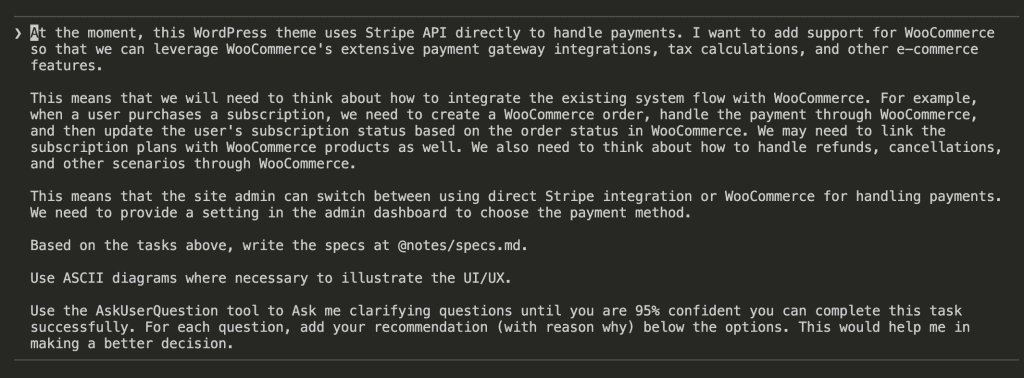
Step 1: Describe the Task + Trigger the Magic Words
Here’s the prompt structure that makes everything work:
[Describe your task/feature in detail]

Based on the tasks above, write the specs at @notes/specs.md.

Use ASCII diagrams where necessary to illustrate the UI/UX.

Use the AskUserQuestion tool to Ask me clarifying questions until you are 95% confident you can complete this task successfully. For each question, add your recommendation (with reason why) below the options. This would help me in making a better decision.
That last paragraph? That’s the secret sauce.
“Ask me clarifying questions until you are 95% confident” tells Claude not to make assumptions. Not to guess. Not to fill in blanks with whatever seems reasonable.
Instead, Claude will ASK.
Step 2: Let Claude Explore First
Here’s something beautiful: Claude doesn’t immediately pepper you with questions.
First, it explores your codebase. It reads your existing implementation. It studies your patterns, your database schema, your webhook handlers.
In my WooCommerce integration project, Claude spent about 2 minutes analyzing the existing Stripe integration—36 tool uses, 97.5k tokens of context-gathering—before asking its first question.
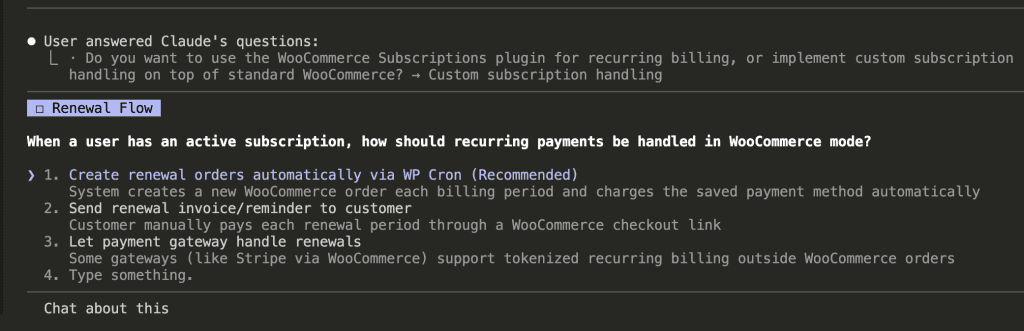
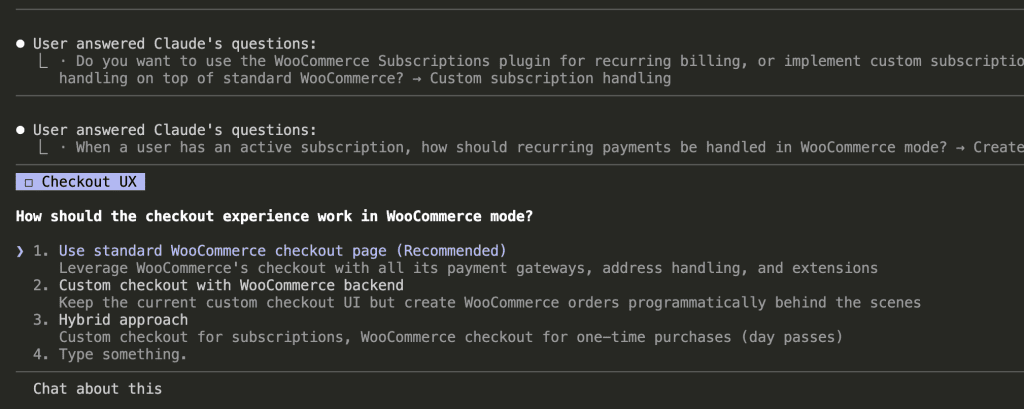
Then the questions began:

Notice what’s happening here (and this is the part that made me unreasonably happy):
- Claude presents clear options—not vague open-ended questions
- Each option includes an explanation of implications
- Claude adds its own recommendation with reasoning
- You can select an option OR type something custom
That recommendation is EVERYTHING. You’re not making decisions in a vacuum. You’re evaluating Claude’s expert analysis against your own context.
Step 3: Keep Answering Until Claude Hits 95%
After your first answer, Claude asks another question. Then another.
Each question builds on your previous answers. Claude’s understanding deepens with every response.
“But wait,” you might be thinking. “Isn’t this just Plan Mode with extra steps?”
Ah. Good question. (I asked it too.)
Plan Mode asks one batch of questions, then starts planning.
This approach keeps questioning until Claude reaches genuine confidence. If something’s unclear—or conflicts with an earlier answer—Claude asks follow-up questions. It’s more thorough. Sometimes annoyingly so. But annoyingly thorough beats catastrophically incomplete every time.
Step 4: Review the Complete Q&A
By the end of my WooCommerce project, Claude had asked 15 different questions covering:
- Subscription plugin choice
- Renewal flow mechanics
- Checkout experience
- Payment mode switching
- Migration strategy
- Product mapping
- Refund handling
- Member portal UI
- Day pass handling
- Coupon systems
- Settings location
- Email notifications
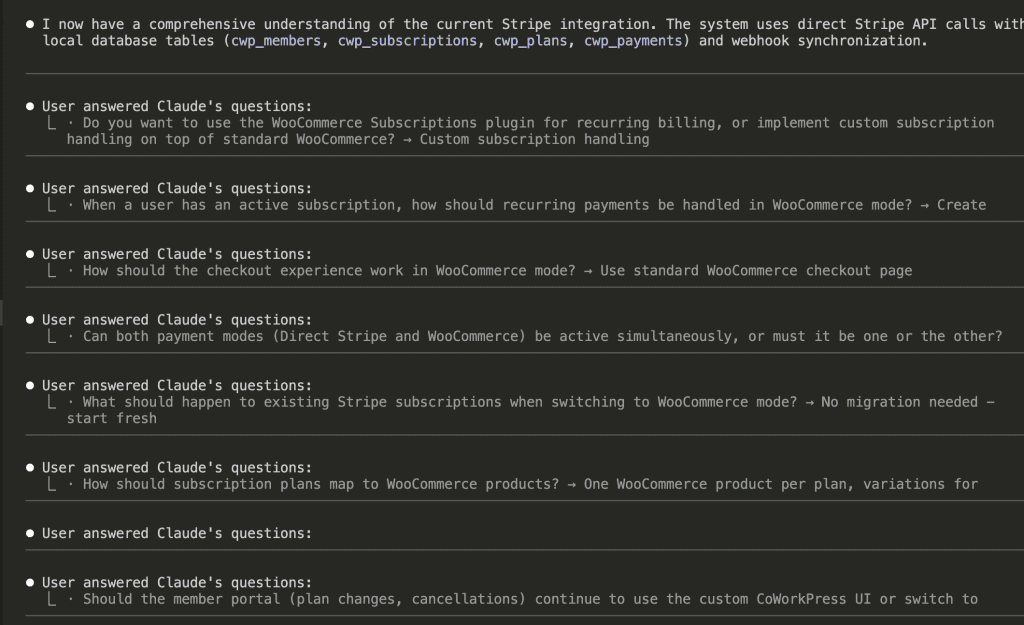
Every edge case I hadn’t considered? Surfaced as a question.
Every architectural decision that could bite me later? Addressed before a single line of code.
👉 This is the core of Claude Code spec-driven development: front-loading decisions instead of discovering them mid-implementation.
Step 5: Watch Your Specs Materialize
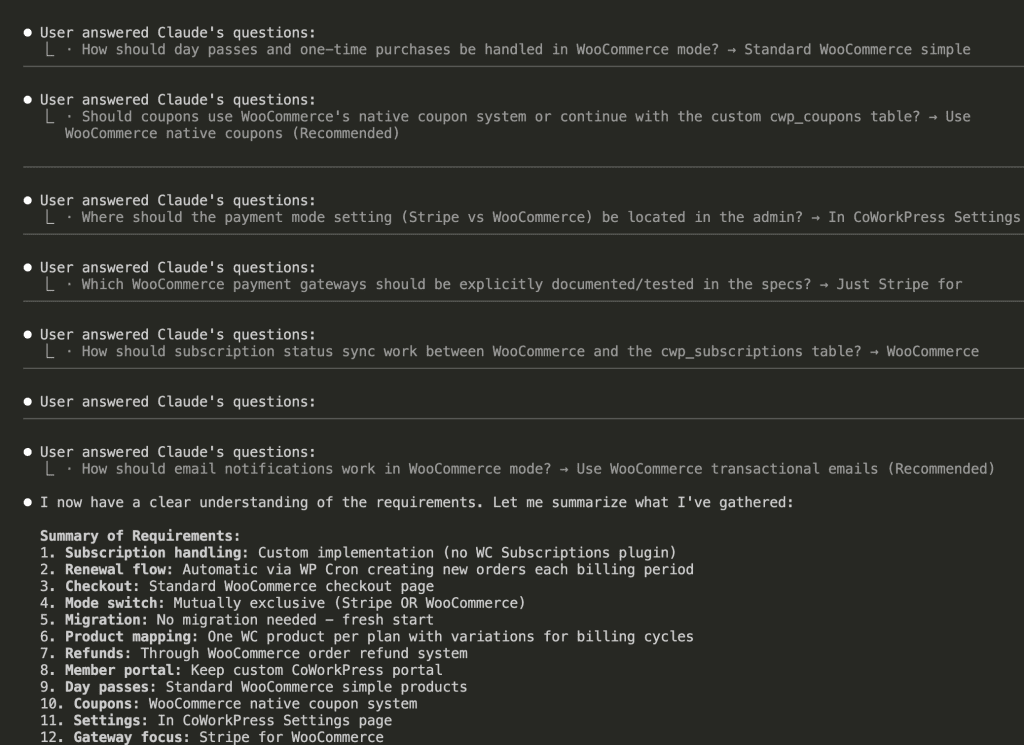
Once Claude hit 95% confidence, it summarized everything and started writing:
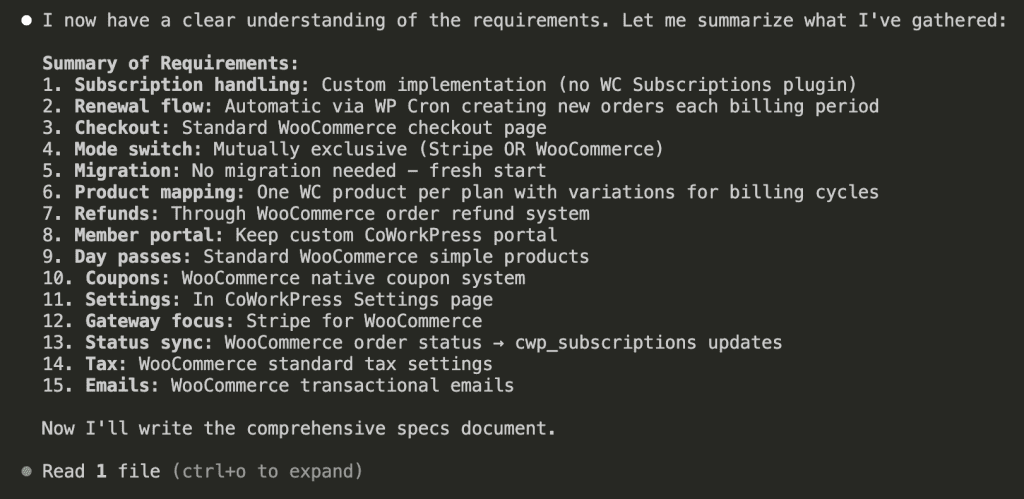
The result? A 2,068-line specification document with:
- Architecture decisions (documented!)
- Database schema changes (planned!)
- State machines for subscriptions (visualized!)
- ASCII diagrams for UI mockups (actually helpful!)
- Detailed flow documentation (comprehensive!)
- Edge case handling (the stuff that usually bites you)
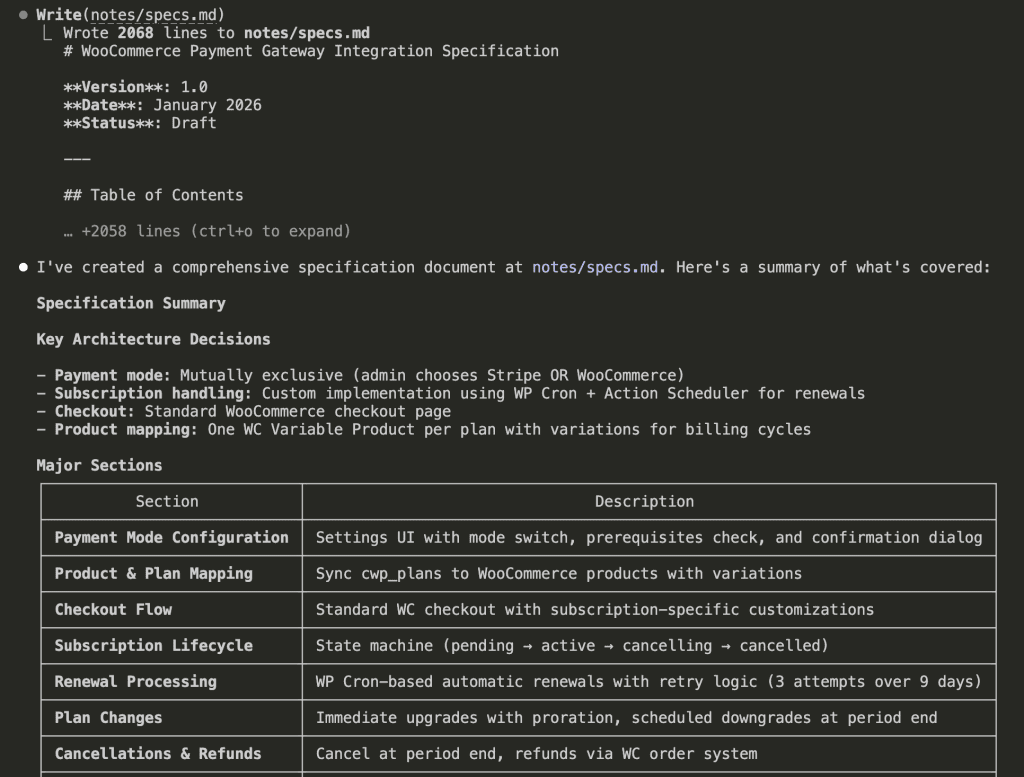
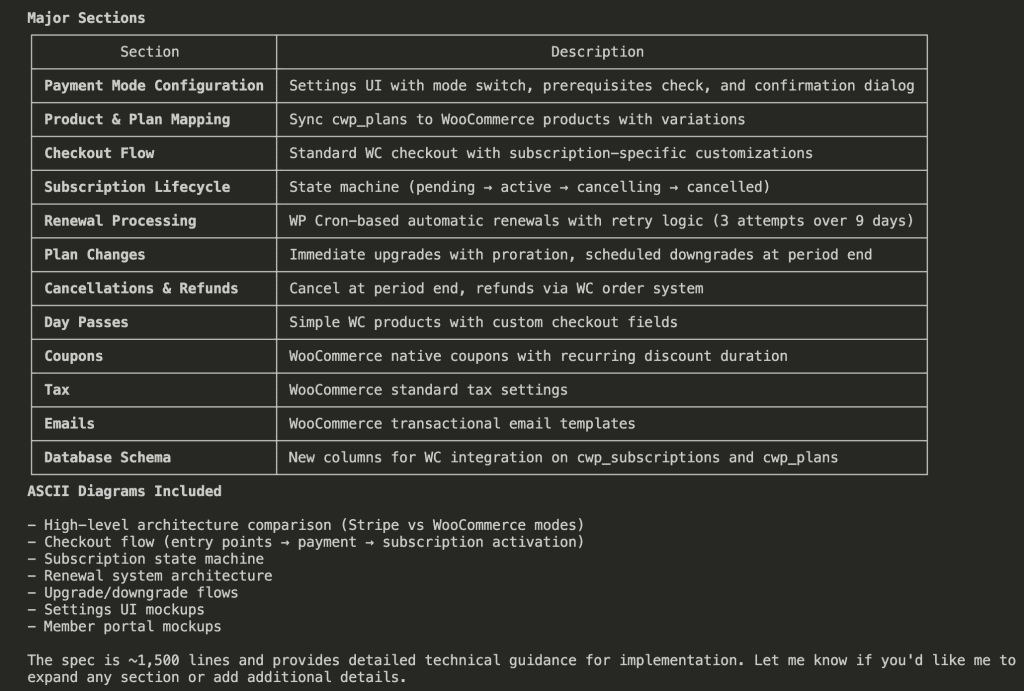
Two thousand lines might sound excessive. It’s not. It’s every decision you’d otherwise make on the fly—except now they’re documented, reviewable, and consistent.
Bonus Step: Split Large Specs
Quick practical note: if your specs exceed ~1,500 lines, split them.
Claude’s file reading has a 25k token limit. Large files cause problems during implementation. The fix is simple:
This specs file is too big. Please split it into 3 parts.
Keep the original file as the index file that links to the 3 parts.
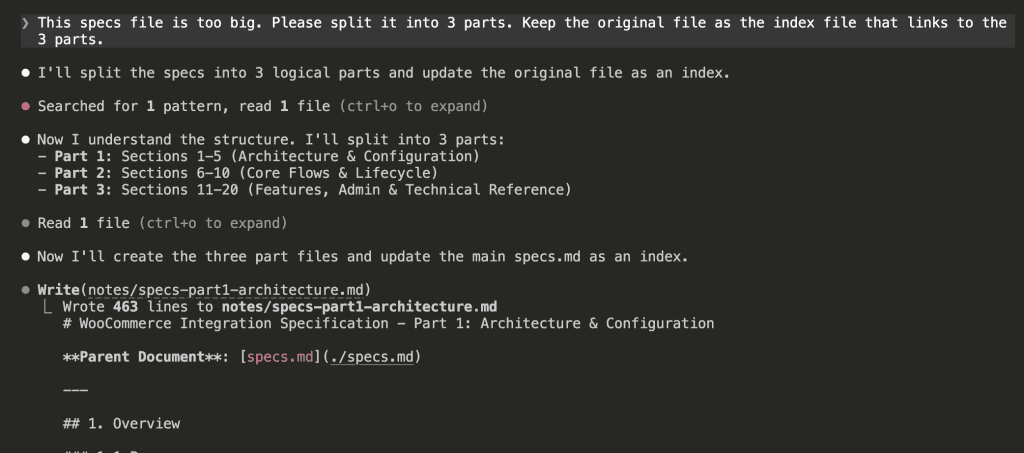
Claude reorganizes everything into digestible chunks:
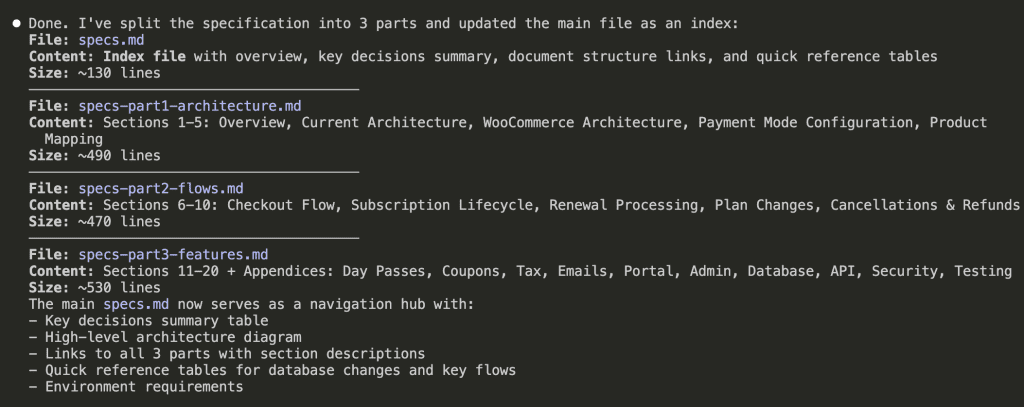
Now you have:
specs.md— Index file (~130 lines)specs-part1-architecture.md— Sections 1-5 (~490 lines)specs-part2-flows.md— Sections 6-10 (~470 lines)specs-part3-features.md— Sections 11-20 (~530 lines)
Each part fits comfortably within context limits.
Crisis averted.
.
.
.
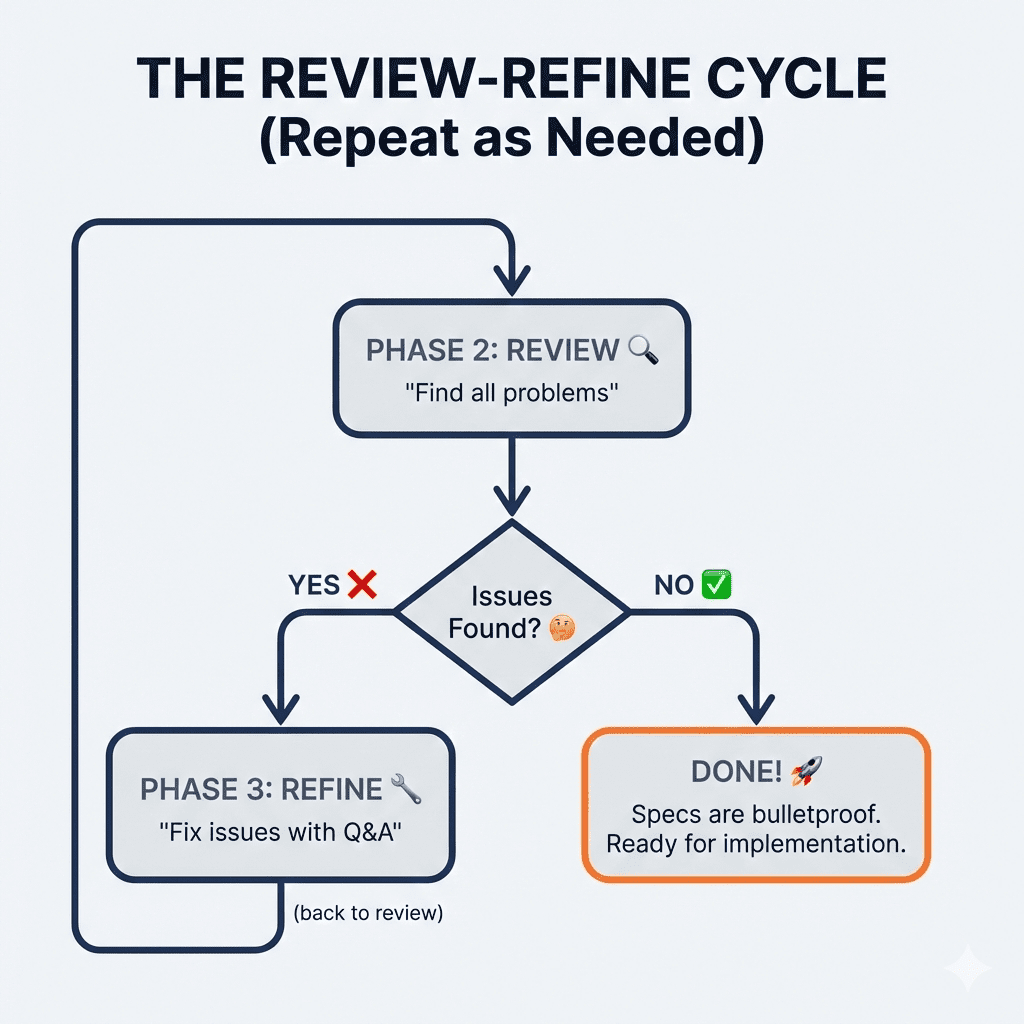
Phase 2: Review Your Specs
Here’s where most people stop.
(Don’t be most people.)
Your specs might be comprehensive, but they could still contain conflicts, gaps, or requirements that are—how do I put this diplomatically—completely impossible to implement.
Step 6: Start Fresh and Ask Claude to Critique
Start a new session. Fresh context. Then ask Claude to review its own work with skeptical eyes:
Read the `notes/specs.md`, analyze the codebase and tell me what could be
the potential problems with this specs.

Let's look at it from different angles and try to consider every edge cases.

Use ASCII diagrams to illustrate if needed. Don't edit anything yet.
Let's focus on analysis.
That last line—”Don’t edit anything yet”—is important. You want analysis first. Changes second. Mixing them leads to chaos.
Step 7: Receive Your Brutally Honest Analysis
Claude reads the specs, re-explores your codebase, and delivers feedback that might sting a little:
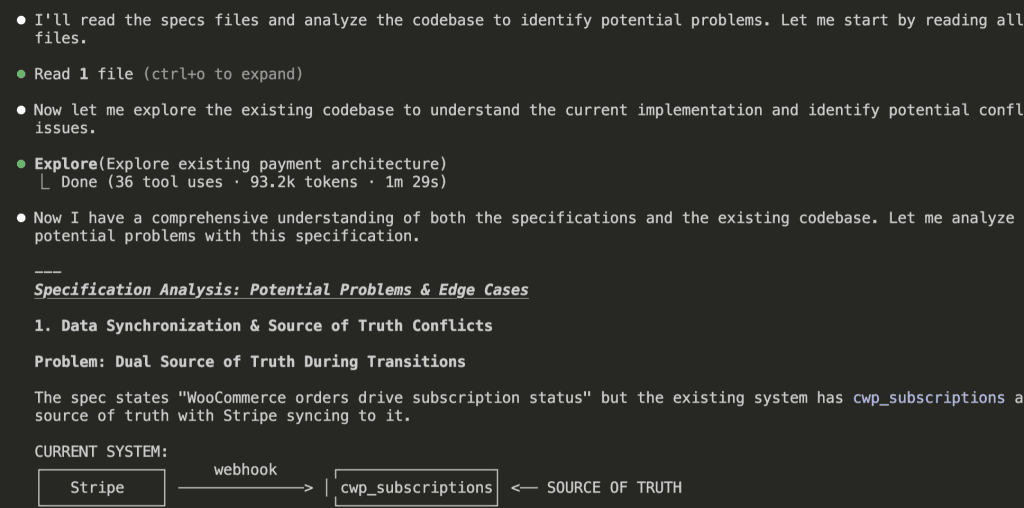
The analysis includes ASCII diagrams showing exactly where problems would occur:

In my project, Claude found 14 potential issues, organized by severity:
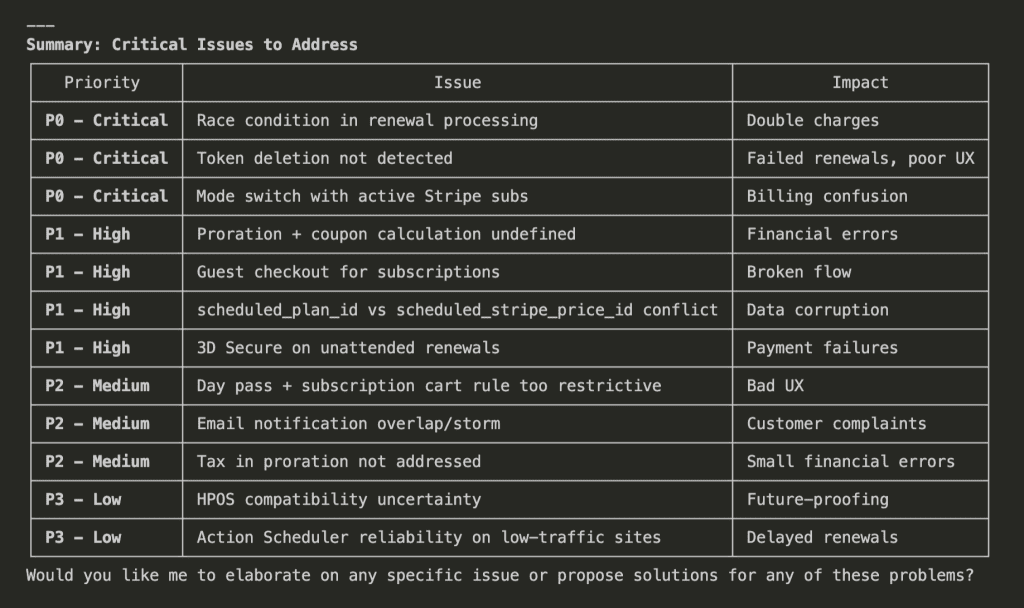
P0 – Critical (the “oh no” tier):
- Race condition in renewal processing → Double charges 😱
- Token deletion not detected → Failed renewals
- Mode switch with active Stripe subs → Billing confusion
P1 – High (the “definitely fix this” tier):
- Proration + coupon calculation undefined → Financial errors
- Guest checkout for subscriptions → Broken flow
- 3D Secure on unattended renewals → Payment failures
Would I have caught all these myself?
Honestly? Maybe half. And probably not until they caused real problems with real users and real money.
👉 Having Claude review its own specs is like getting a code review before the code exists.
.
.
.
Phase 3: Refine Your Specs
Now you have a prioritized list of issues. Time to fix them—but not by guessing.
Step 8: Address Issues With Another Round of Questions
Ask Claude to fix the critical issues, but trigger the questioning mode AGAIN:
Let's address all the P0 and P1 issues.

Update the specs file.

Use the AskUserQuestion tool to Ask me clarifying questions until you are 95% confident you can complete this task successfully. For each question, add your recommendation (with reason why) below the options.

Fixing these issues requires MORE decisions. Should you block mode switches entirely? Allow mixed modes temporarily? Auto-cancel subscriptions?
Claude asks:
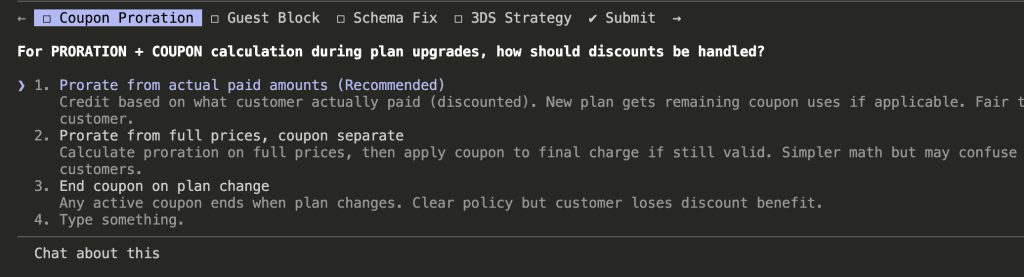
Each answer shapes the solution. After this round, Claude updates the specs with concrete, specific fixes:
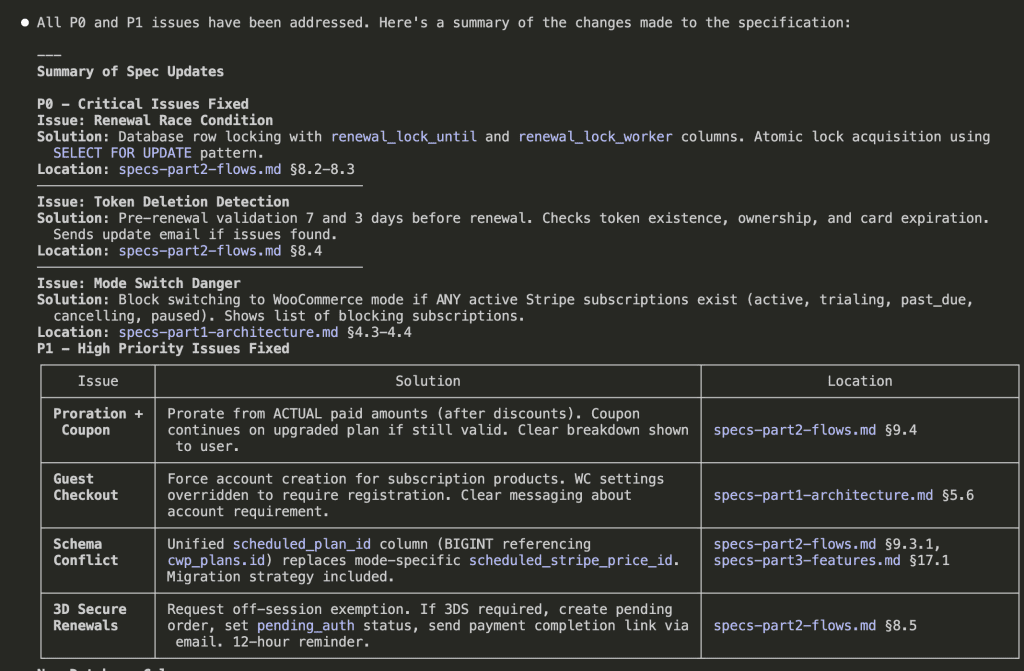
P0 Fixes:
- Renewal Race Condition → Database row locking with
SELECT FOR UPDATE - Token Deletion → Pre-renewal validation 7 and 3 days before renewal
- Mode Switch Danger → Block switching if ANY active Stripe subscriptions exist
P1 Fixes:
- Proration + Coupon → Calculate from actual paid amounts, keep coupon on upgraded plan
- Guest Checkout → Force account creation for subscription products
- 3D Secure → Request off-session exemption, fallback to email payment link
You can repeat Phase 2 and Phase 3 as many times as needed. Review, refine, review, refine—until you’re genuinely confident in your specs.
.
.
.
The Method, Summarized
Because I know you’re going to want to reference this later:
Phase 1: Build Specs
- Describe what you want + add the AskUserQuestion trigger
- Let Claude explore your codebase first
- Answer every clarifying question
- Review the generated specs
- Split large specs into parts (if needed)
Phase 2: Review Specs 6. Start a new session 7. Ask Claude to find problems (analysis only—no edits)
Phase 3: Refine Specs 8. Fix critical issues with another round of questions 9. Repeat Phases 2-3 until satisfied
YOU decide when specs are ready.
Not Claude.
You.
.
.
.
What About Implementation?
Ah. Yes.
You have these beautiful, bulletproof specs. Now what?
You could tell Claude to implement everything in one go. But for specs this comprehensive, that approach has problems:
- Claude might skip features (context limits are real)
- Long implementations drift from the plan
- Details get forgotten mid-stream
The solution?
Claude Code’s task management system—which breaks large specs into trackable tasks, maintains progress across sessions, and ensures nothing slips through the cracks.
That’s next week’s issue.
(Consider this a cliffhanger. I regret nothing.)
Leave a Comment